Table of Contents
Advertisement
Quick Links
Advertisement
Table of Contents

Related Manuals for Uniden UDR744


Summary of Contents for Uniden UDR744
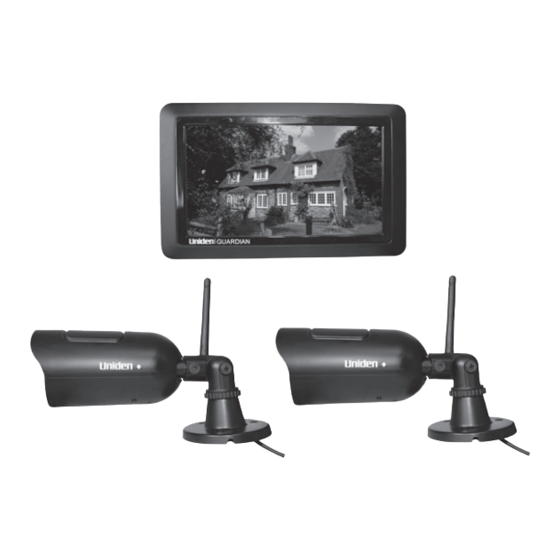
- Page 1 DIGITAL WIRELESS 7” LCD MONITORING SYSTEM WITH SD CARD RECORDING MODEL:UDR744...
-
Page 2: Feature List
Feature list: 850nm IR Led visible distance up to 10m 7” TFT Lcd Digital panel (800 RGB x 480) Two way audio Scan function PIR trigger or Video motion detect recording Manual recording Touch button operation Schedule recording separate settings from Monday to Sunday SD Card external storage, up to128GB supported One Lcd monitor can pair four cameras Individual recording files... -
Page 3: Wireless Receiver
Wireless Receiver Front View 1. LCD Screen – Displays video from the camera(s) or displays system operations. 2. Microphone Back controls... - Page 4 3. Wireless Antennas: Position the antennas as needed for best reception. 4. Power Button/ Scan Button: Press and hold to turn the receiver on / off. Press and release while the unit is powered on to turn Scan mode. 5. Speaker 6.
-
Page 5: Wireless Camera
Wireless Camera Camera Antenna – Sends & receives signals to or from the receiver. 2. IR LEDs – Infrared LEDs provide viewing in no/low light conditions 3. Camera Lens –Catches the video in front of the lens and transmits video from camera to receiver. 4. -
Page 6: Camera Installation
Camera Installation Before you install the camera, carefully plan where and how it will be positioned, and where you will route the cable that connects the camera to the power adaptor. Before starting permanent installation, verify its performance by observing the image on the receiver when camera is positioned in the same location/position where it will be permanently installed and the receiver is placed in the location where it will be used most of the time. -
Page 7: Using The System
1 Using the system By default, the camera(s) included with your system are automatically paired to the receiver.The camera(s) and receiver will communicate with each other once they are powered on. Note:It is recommended to power on the cameras before powering on the receiver. 1.1 Understanding the On-screen Display With camera 1 properly connected and powered on, the system displays a full-screen live view of the camera. - Page 8 OOUT OF RANGE Warning When the receiver can’t get signal from cameras, warning message will be displayed. Reposition the camera, or check the camera power connection. 2. SD Card Indicator – When a SD card is inserted into the SD card slot, the indicator will be shown on the LCD screen.
-
Page 9: Viewing Modes
12. New download icon- appears on the screen if new firmware is available. 13. Sequence view indicator: when “SEQ” shows on the screen, it means the monitor is auto switch mode. The monitor will change channel automatically. 14. Change Channel- Press this icon to change channel manually. When you have manually view all the channels, press this icon again, the monitor will enter auto switch mode, the “SEQ”... -
Page 10: Quad Mode
Quad mode half- Quad mode Note: When you only pair a camera or set one camera on(other three is off), there is no access to see QUAD mode. 3 SD Card Recording The system records video to the SD card (not included). You can manually record the video at your desire or the receiver records when there is motion detected by the cameras and under the A/REC function, or schedule recording based on the scheduled you set for each camera. - Page 11 or images directly on the system or by connecting the micro SD card to your computer. 4.1 Video Playback To playback recorded video on the system: 1. During live viewing, push joystick, The Recording File List opens. 2. Move the Joystick up / down to change the displayed month.
-
Page 12: Accessing Menu System
16x). •DOWN: Stop video. • To change playback volume, press Volume Controls on the side of the receiver. To exit playback: Press Menu to return to the file list. Press Menu repeatedly to return to live view. 4.3 Deleting Video Files You can delete files on the SD card directly on the system. - Page 13 Touch Menu icon on the receiver to access to Menu system. The Main Menu contains 4 submenus: Playback, Alarm, Brightness, General Settings 1. Playback –Use the menu for viewing recorded videos on the SD card. 2. Alarm– Adjust receiver beeps volume level when motion detected by camera.
- Page 14 3. Brightness- Adjust screen brightness. 4. General Settings- 6 sub-menus under “General Settings” (see below picture) 5.4.1 Camera Setup...
- Page 15 a. Pairing The system comes with camera(s) that have already been paired. These cameras will communicate with the receiver once powered on. The pairing function assigns each camera to a different channel on the wireless receiver (up to 4 cameras), and is necessary for configuring additional cameras. NOTE: It is highly recommended to pair the cameras to the receiver before permanently mounting the cameras.
-
Page 16: Camera On/ Off
successfully pair the camera. If the button on the camera is not pressed, the receiver will return to the view screen, and no pairing will take place. 5. Following the on-screen prompt, press the Pair button the front of the camera. -
Page 17: Schedule Recording
a. Duration The recording time when there is motion detected by a camera in automatic recording mode. The recording time can be set to 15s ,30s or 1 minute.(Default 15s)- Date & Time: Set the date and time on the system. b. -
Page 18: File Overwrite
Stopping Scheduled Recording When the stop time arrives, the system stops recording automatically. If necessary, you can stop schedule recording manually. To stop schedule recording: Press Manual Recording to stop schedule recording. c. File Overwrite Use the overwrite feature to have the system overwrite the oldest recorded data on the mirco SD card once the SD card is full. -
Page 19: System Setups
5.4.3 System Setups a. Date & Time Set up date and time manually. Note:You can also synchronize the system time with an Internet time server. Ensure there is a checkmark next to Synchronize with an Internet time server then push the joystick to confirm. You must keep the system connected to your wireless network using the included Ethernet cable to synchronize with the Internet time server. -
Page 20: Default Settings
c. Language There are 3 languages available in this system: English, Spanish and French d. Default Settings Restore the system to default settings (Default No). Select Yes and then press OK to confirm. The system takes a few moments to restore default settings. -
Page 21: Format Memory Card
e. Format Memory Card Select Yes to format the SD card. After formatting, all the data stored in the SD card will be deleted. (default NO) f. Information It shows the firmware information of the monitor and cameras which paired with the monitor. 5.4.4 Motion Detection Settings Separately to Set each Camera’s motion detect sensitivity and Detect Area... - Page 22 a. Sensitivity Set the motion detection sensitivity at High or Low. Or you can turn off the motion detection for the camera b. Mask Area Default setting is 80% of the screen count from central part.
-
Page 23: Network Setup
5.4.5 Network Setup a. Advanced Setup Set up Dynamic IP or Static IP address... -
Page 24: Reset Password
b. Reset Password Password will be changed to default password when confirmed Yes. c. Network Information when connect to Internet, it will show the current IP information. when you successfully set up the Network settings, system will remind if you want to reboot the monitor... -
Page 25: Firmware Upgrade
5.4.6 Firmware Upgrade There are two ways to upgrading firmware: from SD card and from Server a. From SD Card 1. Insert the SD card into the SD card reader (not included) on your PC or Mac. 2. Download the latest firmware and transfer it to the root folder on the SD card. 3. - Page 26 1. Connect the included Ethernet cable from the Ethernet port on the receiver to your router. The new download icon ( ) appears on the screen if new firmware is available. 2. Select Firmware Upgrade and select From Server, then select Yes. 3.
- Page 27 Android and iOS App Remote view 1. Download app MyCam View freely from the App Store or the Google player store on your smart phone or tablet.(Make sure your phone connect with network) 2. Connect the 7’’monitor with your home router by internet cable. 3.
- Page 28 Then press OK to confirm it. 4. The system will show in your device list at an online status as below picture. 5. Press the camera you have added on your device, now you can view live video from your camera in either portrait or landscape mode.
- Page 29 View icon : press this icon to view Snapshot photos already taken. Snapshot Icon : press this icon to take photo from camera side Mute Icon : It cut off the audio on the camera side. Press this icon to listen the audio from camera side. Talk back Icon :Press it to talk back to the camera currently being displayed on your phone.
- Page 30 Online:1,only one remote visit, system support 4 remote visit at the same time. Quality: shows the network quality. 6. Back to the add camera menu, then press the down arrow, a new interface pops out as showed .
- Page 31 Reconnect: If your remote device connected failed with the camera, press it to reconnect. Edit Device: Device setting and Advanced setting are under this menu. You can see the camera’s details under Device Setting. You can modify Password setting(default 000000) , video Quality(default Min) and Alert interval(default 3 MIN)under Advance setting.
- Page 32 FCC NOTICE: This device complies with Part 15 of the FCC Rules. Operation is subject to the following two conditions: (1) this device may not cause harmful interference, and (2) this device must accept any interference received, including interference that may cause undesired operation. This device complies with Part 15 of the FCC Rules.