Table of Contents
Advertisement
Quick Links
Advertisement
Table of Contents

Related Manuals for Crestron CNXIR-8


Summary of Contents for Crestron CNXIR-8
-
Page 3: Table Of Contents
Contents CNX Infrared & Serial Expansion Card: CNXIR-8 Description ... 1 Functional Description ... 1 Physical Description... 1 Leading Specifications ... 2 Setup... 2 Installation ... 2 Preparation for Use... 3 Programming with SIMPL Windows ... 3 How the Program Works ... 4 How to Create the Program... -
Page 5: Cnx Infrared & Serial Expansion Card: Cnxir-8
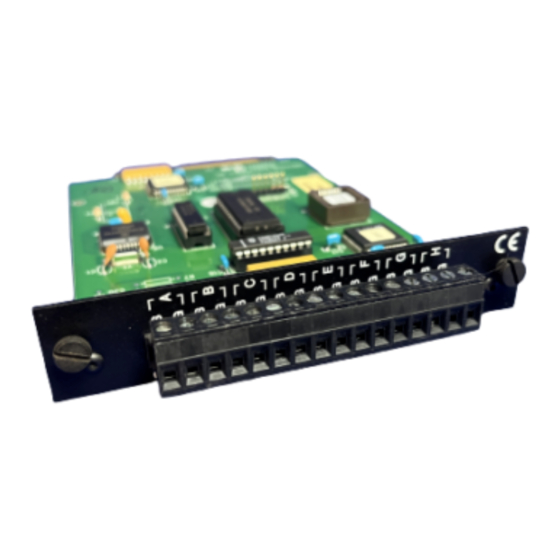
Physical Description The CNXIR-8, shown below, is a circuit board fastened to an aluminum faceplate. The card is manufactured to easily fit into an unoccupied slot in a Crestron CNX Generation Control System. CNXIR-8 Faceplate The faceplate contains one male, 16-pin connector. Silk screening is applied to the faceplate;... -
Page 6: Leading Specifications
2. Use the Phillips tip screwdriver and remove two screws and blank faceplate from the control system. 3. Align the CNXIR-8 with the card guides in the open slot and slide the expansion card into postion. 4. Firmly press both ends of the CNXIR-8 faceplate to seat the expansion card into the control system connector. -
Page 7: Preparation For Use
Crestron control system. The next two subsections describe a sample SIMPL Windows program that utilizes the CNXIR-8. The first subsection details how the sample program works with a textual description and block diagram. The second subsection provides a broad description of how to actually create the SIMPL Windows program. -
Page 8: How The Program Works
For this example, add a CNXIR-8 to slot #1 of the CNMSX-PRO. Also add a CT-3000 to the system; its NET ID must be set to 03, shown on the next page. - Page 9 Graphical System View of CNXIR-8 and CT-3000 in SIMPL Windows’ Configuration Manager Click on the CNXIR-8 in slot #1 of the CNMSX-PRO to display all the IR ports of the card in the Detail System View area of the Configuration Manager. To assign specific IR devices, select them from either the Crestron or User Database which is available from the Device Library.
- Page 10 Expand the Central Control Modules folder and the CNXIR-8 folder. Double click on the two ports of the CNXIR-8 for a detail view (alternatively CTRL+D or drag and drop into Detail View). Assign signals as shown on the next page.
- Page 11 CRESTRON Graphical Detail View of Port A on the CNXIR-8 in SIMPL Windows’ Programming Manager NOTE: If the optional [enable] line into the IR driver is not used, the driver is considered to always be enabled. Graphical Detail View of Port C on the CNXIR-8 in SIMPL Windows’ Programming...
-
Page 12: Problem Solving
Further Inquiries If after reviewing this Operations Guide for the CNXIR-8, you cannot locate specific information or have questions, please take advantage of Crestron's award winning technical support team by calling: For local support from exclusive Crestron factory-trained personnel call: CNX Infrared &... -
Page 13: Return And Warranty Policies
(3) years from the date of shipment to purchaser. Disk drives and any other moving or rotating mechanical parts are covered for a period of one (1) year. CRESTRON warrants all its other products for a period of one year from the defects mentioned above, excluding touchscreen display components which are covered for 90 days.