
Related Manuals for Viessmann GALILEI Tecto CI4


Summary of Contents for Viessmann GALILEI Tecto CI4
- Page 1 DOC. 1 di 2 USER MANUAL Read carefully and keep for future reference Tecto CI4 Cod. 80006610a - GB - VR 01.02.2021...
- Page 2 THANK YOU! Dear customer, Thank you very much for your choice! We wish you a profitable and successful use with this refrigerating cabinet. Please read this manual carefully before using the unit. These instructions will provide you with all the necessary information to guarantee a safe, effective, and long-lasting use of this unit.
-
Page 3: Table Of Contents
CONTENTS For your safety General provisions for the user General provisions for the maintenance personnel Residual hazard General data and features Description and technical features Nomenclature Cross sections Front Views Maximum load Noisiness Weight of the refrigerated cabinet The rating plate Transportation and handling Transportation and handling Reception and storage... - Page 4 Cleaning the internal bottom surface of the casing Cleaning the defrost water tank Cleaning the condenser Cleaning the condenser with the removable filter Dixell XR50CX control panel Description Switch the unit on and off Normal conditions of operation User interface Set-point (working temperature) Defrosting Lights, switching on/off...
-
Page 5: For Your Safety
1. For your safety Units running with flammable refrigerant R290 (Propane) The final user and the personnel in charge of maintenance and/or technical interventions should read and properly understand these instructions before using the unit. 1.1 General provisions for the user The units running with R290 are identified by a specific tag applied on the base sidewall. -
Page 6: Residual Hazard
1. For your safety The refrigeration circuit is hermetically sealed; therefore, repairing interventions on the circuit are not possible without breaking the vacuum. In the event that vacuum breaking is needed for carrying out maintenance operations, follow the following provi- sions: •... - Page 7 1. For your safety Risks Protruding and raised parts, edges. In maintenance and loading phases, there may be a gen- eral hazard of bruising the hands and arms, head and legs. Wear suitable workwear and PPE. Wet floor In case of severe environmental conditions, the conden- sate water re-evaporation automatic system might not be able to discharge water completely so some water might overflow.
-
Page 8: General Data And Features
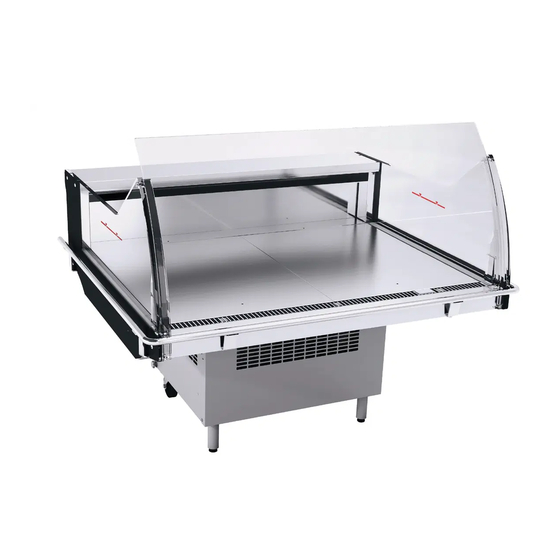
2. General data and features 2.1 Description and technical features ______________________________ Forced air circulation cabinet with built-in condensing unit, designed to be used as Service or Self service counter thanks to the convertible glass superstructure. It is suitable for the displaying and selling of meat, fish (i.e. “Fish” ver- sion), salami, milk and dairy products, deli, meat and produce. -
Page 9: Cross Sections
2. General data and features 2.3 Cross sections ____________________________________________ Tecto CI4...90 VC Tecto CI4...90 VC FISH Tecto CI4...90 VD Tecto CI4...90 VD FISH Cod. 80006640a - GB - VR 01.02.2021... -
Page 10: Front Views
2. General data and features 2.4 Front Views ______________________________________________ Tecto CI4...90 VC Tecto CI4...90 VD Cod. 80006640a - GB - VR 01.02.2021... -
Page 11: Maximum Load
2. General data and features 2.5 Maximum load ____________________________________________ Maximum load accepted for the Tecto CI4 model is 90kg/m on the display decks and 10 kg/m on the acrylic glass top canopy. The load must be distributed evenly on the display deck. 10kg/m 90kg/m 90kg/m... -
Page 12: The Rating Plate
3. Rating plate 3.1 The rating plate ____________________________________________ The rating plate is normally positioned near the electrical switchboard or in the tank for multideck or island versions. The plate displays all the information to identify the unit as well as the technical specifications to install the unit proper- Please always provide this infor- mation when a spare part is ordered. - Page 13 3. Rating plate Meaning of the rating plate fields Model and length of the refrigerated cabinet Serial number, code and/or configuration number (if any) Year of manufacture Climate class, it gives the proper environmental conditions in which the unit operates properly 3 –...
-
Page 14: Transportation And Handling
4. Transportation and handling 4.1 Transportation and handling __________________________________ In order to be transported, the cabinet is delivered on a Europallet with standard dimensions (120 x 80 cm), and fixed by means of proper fixing plates. Unloading must be carried out by means of a forklift (see chapter “2.7 weight of cabi- net”), using the designated handling points indicated in the below picture. -
Page 15: Setting Up The Unit
5. Setting up the unit 5.1 Positioning the refrigerated cabinet _____________________________ For unloading and handling the cabinet with a forklift, we recommend using the marked handling points as given in this manual. We remind you that the use of forklift is exclusively allowed to authorized and properly trained personnel. Dur- ing the unloading, positioning and installing phases, the personnel should wear suitable personal protection equipment (i.e. -
Page 16: Unpacking
5. Setting up the unit 5.2 Unpacking ______________________________________________________ The unit is delivered in a packaging made of a Europallet and a cardboard box (see Chapter 4 “Transportation and handling”). Once the cabinet is placed on the installation point, make sure that the packaging is integral and undam- aged. -
Page 17: Cleaning Before Starting
5. Setting up the unit 5.4 Cleaning before starting Before connecting the unit to the power supply, remove the protective films and clean both the internal and external surfaces of the refrigerated cabinet, in particular the display decks. It is recommended that you use lukewarm water and neutral detergents (pH 6÷8). -
Page 18: Loading And Using The Unit
6. Loading and using the unit 6.1 Preserving the displayed products _____________________________ The refrigerated cabinets are designed to guarantee the display of pre-cooled products. Products come from refrigerated places such as refrigerated warehouses or cold-rooms at a temperature as close as possible to the ideal one. -
Page 19: Temperature Setting
6. Loading and using the unit 6.3 Temperature setting ________________________________________ Setting-up working parameters: for adjusting the “set-point” temperature and the other parameters, see the in- structions of the control panel included in this manual. When setting up the set-point, make sure that the resulting tem- perature in the cabinet matches the temperature class of the cabinet and/or the displayed product. -
Page 20: Service/Self Service Conversion
6. Loading and using the unit 6.6 Service/Self service conversion ________________________________ The cabinet is equipped with supports [1] with side guides which allow to turn the refrigerated cabinet from Ser- vice (SA) to Self Service (LS) and vice versa. Caution to handle the glass parts. Use suitable PPE. •... -
Page 21: User's Maintenance
7. User’s Maintenance 7.1 General recommendations ___________________________________ This chapter is dedicated to maintenance which can be carried out by the personnel of the store where the unit is installed. Only cleaning operations as given in this chapter can be carried out by the store personnel. Warning! Technical maintenance and technical interventions on the unit must be carried out only by qualified and authorized personnel (i.e. -
Page 22: Cleaning The Front Glass
7. User’s Maintenance 7.3 Cleaning front glass ____________________________________________ Use a soft and non-abrasive cloth with neutral de- tergents (pH 6÷8) for cleaning and a soft and dry cloth for drying. Do not use abrasive products or metal scrapers that may scratch the glass. Do not use hot water on cold glass as it can break and be dangerous for the operator. -
Page 23: Cleaning The Defrost Water Tank
7. User’s Maintenance or machines for pressure cleaning (i.e. high pressure washers). • Remove the display decks [1] or the stainless steel trays by using the supplied tool [2]. • Remove the air outlet baffle [3]. • Vacuum any residue in the carcass. •... -
Page 24: Cleaning The Condenser With The Removable Filter
7. User’s Maintenance • Unscrew the side knobs [1]. • Slightly rotate the panel [2], lift it up to remove it from the slots on the upper part of the frame. Remove the panel. • Use a vacuum cleaner and a hard bristles brush to clean the dust and any other dirt residue between the aluminium fins of the condenser [3]. -
Page 25: Dixell Xr50Cx Control Panel
8. Dixell XR50CX control panel 8.1 Description _______________________________________________ Models 70-90 Models 50 The following instructions refer to a refrigerated cabinet with built-in condensing unit and DIXELL mod. XR50CX elec- tronic controller. This microprocessor based controller is equipped with an LED display designed for the management of refrigerating units, display cabinets and showcases. -
Page 26: User Interface
8. Dixell XR50CX control panel Attention: The cabinet is equipped with a digital thermometer positioned inside the display area, usually close to the front glass. The displayed temperature corresponds to the temperature in the refrigerated cabinet; there- fore refer to this value for preserving the goods properly. The temperature displayed by the controller corre- sponds to the set point value. -
Page 27: Set-Point (Working Temperature)
8. Dixell XR50CX control panel 8.5 Set-Point (working temperature) The electronic controller automatically manages the working temperature inside the cabinet, according to the set value, as well as the defrost cycles. How to display the current set point To display the current set point value, push and release the SET key. To display the sensor value again, push and release the SET key or wait 10 seconds for the automatic reset of the display. -
Page 28: Alarm Warnings
8. Dixell XR50CX control panel 8.8 Alarm warnings In case of an anomaly, the microprocessor will activate an alarm and the display will show the corresponding warning codes which identify the cause. All alarm warnings will automatically stop as soon as the normal conditions of opera- tions are restored. -
Page 29: Programming The Controller
8. Dixell XR50CX control panel 8.9 Programming the controller Attention! This section of the manual is meant for maintenance technicians only. Access to the programming menus and the modification of the parameters are exclusively reserved for installa- tion and maintenance personnel. Incorrect or improper modifications of the parameters can cause malfunctions and/or a poor performance of the unit. -
Page 30: Wurm Cra Control Panel
9. Wurm CRA control panel 9.1 Description _______________________________________________ Models 70-90-120 Models 50 The following use instructions refer to the cabinet case with built-in condensing unit which has a control panel equipped with an electronic controller WURM model CRA. This microprocessor based controller is equipped with an LED display designed for the management of refrigerating units, display cabinets and showcases. -
Page 31: User Interface
9. Wurm CRA control panel Attention: The cabinet is equipped with a digital thermometer positioned inside the display area, usually close to the front glass. The displayed temperature corresponds to the temperature in the refrigerated cabinet; there- fore refer to this value for preserving the goods properly. The temperature displayed by the controller corre- sponds to the set point value. -
Page 32: Set-Point (Working Temperature)
9. Wurm CRA control panel Energy saving mode: Display not active Note: function not active Maintenance: reserved Switching on or blinking during the maintenance operations by technicians. Unit of measure set: Celsius degrees °C Cabinet lighting (if any): activated On/Standby On: the cabinet is in stand-by mode (functions disabled) 9.5 Set-Point (operating temperature) ______________________________... -
Page 33: Alarm Warnings
9. Wurm CRA control panel 9.8 Alarm warnings _________________________________________________ In case of an anomaly, the microprocessor activates an alarm and the display shows the corresponding warning code that identifies the cause. The symbol illuminates on the display to indicate an alarm condition. Warnings “PR1”... -
Page 34: Programming Of The Controller
9. Wurm CRA control panel 9.9 Programming the controller Attention! This section of the manual is meant for maintenance technicians only. Access to the programming menus and the modification of the parameters are exclusively reserved to installation and maintenance personnel. Incorrect or improper modifications of the parameters can cause malfunctions and/or poor performances of the unit. -
Page 35: Anomalies And Remedies
10. Anomalies and Remedies 10.1 Anomalies and remedies ____________________________________ Before calling Technical Support, see the following table to check if the problem can be solved. Anomalies Causes Remedies The refrigerated cabinet plug is not connected Connect the plug to the socket properly. Check properly to the power supply socket. - Page 36 10. Anomalies and Remedies Anomalies Causes Remedies The display of the con- trollers Dixell XR50CX and XR77CX show “HA2” warning. Clean the condenser. See “7.6 and 7.7 Cleaning the condenser”. If the problem continues, switch Wurm CRA controller Obstructed or dirty condenser. off the refrigerated cabinet and call Technical Sup- display shows “COH”...
-
Page 37: Spare Parts And Warranty
11. Spare Parts, Warranty, EPREL Database 11.1 Technical Support and Spare Parts For your safety, it is recommended to replace worn or damaged parts with original spare parts only. The requests for technical support and the requests for spare parts can be sent to the following: •... -
Page 38: Dismantling And Disposal
12. Dismantling and disposal 12.1 Dismantling and disposal ___________________________________ For the preservation of the environment, all parts and materials that compose this counter have to be sorted in accordance with the waste disposal regulations in force in the country where the disposal occurs. These parts cannot be considered as ordinary household waste. - Page 39 Austria Lithuania kuehlen.viessmann.at saldymas.viessmann.lt Belgium Netherlands froid.viessmann.be koelen.viessmann.nl Denmark Norway koele.viessmann.dk kjol.viessmann.no Estonia Poland kylm.viessmann.ee chlodnicze.viessmann.pl Finland Russia kylma.viessmann.fi holod.viessmann.ru France Spain froid.viessmann.fr refrigeracion.viessmann.es Germany Sweden kuehlen.viessmann.de kyla.viessmann.se Ireland Switzerland cooling.viessmann.co.uk kuehlen.viessmann.ch Latvia United Kingdom dzesesana.viessmann.lv cooling.viessmann.co.uk Attenzione! Il contenuto di questo manuale è proprietà intellettuale di Galilei Refrigerazione s.r.l.
- Page 40 GALILEI REFRIGERAZIONE S.R.L. – VIA VENETO 29/31 – 35020 DUE CARRARE (PD) – ITALY Tel. +39 049 99 30 650 Fax +39 049 52 11 341 WWW.GALILEISPA.IT...