Chauvet COLORado 3 User Manual
Chauvet colorado colorado 3 light fixtures: user manual
Hide thumbs
Also See for COLORado 3:
- Supplementary manual (4 pages) ,
- Specifications (1 page) ,
- Features (1 page)

Related Manuals for Chauvet COLORado 3


Summary of Contents for Chauvet COLORado 3
- Page 1 COLORado™ 3 COLORADO 3 USER MANUAL CHAUVET, 3000 N 29 Ct, Hollywood, FL 33020 U.S.A (800) 762-1084 – (954) 929-1115 FAX (954) 929-5560 www.chauvetlighting.com 2007-08-01/10:31...
-
Page 2: Table Of Contents
Table of Contents 1. BEFORE YOU BEGIN... 4 ... 4 NPACKING NSTRUCTIONS ... 4 ONTACT ... 5 AFETY NSTRUCTIONS LED E ... 5 XPECTED IFESPAN 2. INTRODUCTION ... 6 ... 6 EATURES DMX C ... 6 HANNEL UMMARY ... 7 RODUCT VERVIEW 3. - Page 3 400Hz version and the older non-400Hz version. If desired, older versions of the COLORado 3 can be upgraded to the latest version of the COLORado 3. Please contact Chauvet at the location below for the cost and time required for this upgrade.
-
Page 4: Before You Begin
World Wide Web COLORado™ 3 User Manual Save the carton and all packing If you should require sending any items back to CHAUVET, call CHAUVET for a (RMA) Return Merchandise Authorization number. The factory will not allow any shipments without an RMA. -
Page 5: Safety Instructions
There are no user serviceable parts inside the unit. Do not open the housing or attempt any repairs yourself. In the unlikely event your unit may require service, please contact CHAUVET at: 954-929-1115. LED Expected Lifespan LEDs gradually decline in brightness over time. HEAT is the dominant factor that leads to the acceleration of this decline. -
Page 6: Introduction
2. Introduction Features • 12-channel DMX-512 LED bank system (with ID addressing) • Separate DMX channels for red, green, blue, cyan, magenta, yellow and white • Blackout/static/dimmer/strobe • Separate RGB control over each individual pod • RGB color mixing with or without DMX controller •... -
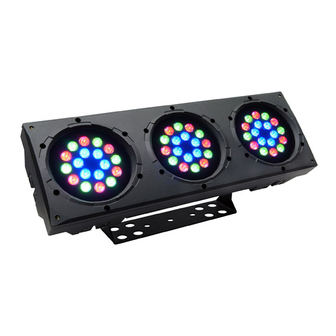
Page 7: Product Overview
Product Overview 570MM 570MM 22.44IN 22.44IN 190MM 190MM 7.48IN 7.48IN Power Link Out Power Link Out Interlocking Interlocking connectors connectors Each LED surface Each LED surface is referred to as a is referred to as a “Module” “Module” COLORado™ 3 User Manual COLORado™... -
Page 8: Setup
You must supply your own clamp and make sure the clamp is capable of supporting the weight of this fixture. You can order C-clamps from any CHAUVET dealer or distributor. Block access below the work area and use suitable and stable platform when installing or servicing fixture. -
Page 9: Stacking
Stacking The COLORado™ 3 can be stacked vertically and horizontally creating a blinder or a strip light. Stack them horizontally to increase intensity of the projection for more distant throws or to use as a blinder effect. The strip light stacking can be used for runway lighting and cycloramas. Fixture Linking You will need a serial data link to run light shows of one or more fixtures using a DMX-512 controller or to run synchronized shows on two or more fixtures set to a master/slave operating mode. -
Page 10: Data Cabling
Data Cabling To link fixtures together you must obtain data cables. You can purchase CHAUVET certified DMX cables directly from a dealer/distributor or construct your own cable. If you choose to create your own cable please use data-grade cables that can carry a high quality signal and are less prone to electromagnetic interference. -
Page 11: Setting Up Admx Serial Data Link
(male) 3 pin connector. Then, proceed to connect from the output as stated above to the input of the following fixture and so on. CHAUVET Certified DMX Data Cables Order Code Description DMX1.5 DMX Cable 1.5m/4.9ft DMX4.5... -
Page 12: Operating Instructions
4. Operating Instructions Control Options The COLORado™ 3 is addressable in the DMX range of 001 to 245 in its simplest control form, this allows for the control of 20 fixtures; however, a secondary “ID” address system exists for use in a limited DMX universe and architectural environments. -
Page 13: Dmx-512 Addressing With Id Address
DMX-512 addressing with ID address Follow instructions 1 ~ 4 for DMX512 addressing. Activate ID addressing in each fixture by setting panel function {ID ON/OFF} to ON. {MENU} {Settings) For every DMX512 starting address the user can set 66 separate ID addresses. Set ID addresses in each fixture by setting panel function {ID address} to incremental values. -
Page 14: Colorcon™ Setup
COLORcon™ setup FIXTURE CONTROL PANEL SETUP Activate ID addressing in each fixture by setting panel function {ID ON/OFF} to ON. {MENU} Set ID addresses in each fixture by setting panel function {ID address} to incremental values. (I.e. 1,2,3,4,5,6,etc…) {MENU} It is not necessary to set the DMX address. CONTROLLER SETUP When using the {Effect program} function, it is necessary to set the {Settings} setting, which is the quantity of fixtures in series. -
Page 15: Setting The Dmx Address
Setting the DMX address Each fixture requires a "start address" from 1 to 244. A fixture requiring one or more channels for control begins to read the data on the channel indicated by the start address. For example, a fixture that occupies or uses 7 channels of DMX and was addressed to start on DMX channel 100, would read data from channels: 100, 101, 102, 103, 104, 105 and 106. -
Page 16: Menu Map
Menu Map UNCTION Green Blue Yellow Static color Cyan Purple White Strobe DMX512 address Auto program ID address ID ON/OFF ADAS faders no Settings ADAS ON/OFF ADAS copy Factory settings ON/OFF Password Set Password Manual Power ON/OFF The COLORado™ can be turned on and off using the control panel. OWER CTION When {MENU} is displayed in the LCD panel, hold down the (EXIT) button for 3... -
Page 17: Dmx512 Channel Values
DMX512 Channel Values The COLORado™ has two DMX512 channel profiles (modes). Channel 9 is used to switch between profiles. DMX CONTROL MODE 1 HANNEL ALUE Channel 10 (ID address selection) All IDs ID 1 ID 2 ID 3 ID 4 ID 5 ID 6 ID 7... - Page 18 HANNEL ALUE COLORado™ 3 User Manual UNCTION Module Selection #1=ON, #2=ON, #3=ON #1=ON #2=ON #3=ON #1=ON, #2=ON #2=ON, #3=ON #1=ON, #3=ON #1=ON, #2=ON, #3=ON #1=OFF, #2=OFF, #3=OFF Speed control of Channel 9 Color-Cycle Mode 4 Effect Macro No Function Macro 01 Macro 02 Macro 03 Macro 04...
-
Page 19: Important Notes About Dmx Mode 1
Important Notes about DMX Mode 1 R e d , G r e e n a n d B l u e S e l e c t i o n • Channels 1, 2 and 3 control overall intensity of each respective color. •... -
Page 20: Dmx Control Mode 2
DMX CONTROL MODE 2 HANNEL ALUE ID Address Selection Important Notes about DMX Mode 2 M o d u l e s e l e c t i o n • Simplified control of modules using channels 1,2 & 3. S t r o b e •... -
Page 21: Colorado™ Controller
5. COLORado™ Controller Overview LCD Display Panel MODE MODE Accesses main menu or backs out of sub-menu SETUP Selects the currently displayed menu or confirms the current function value Use to navigate upwards through menu items or increment function values DOWN Use to navigate downwards through menu items or decrement function values Setup... -
Page 22: Menu Map
Menu Map ELECTION UNCTION Wash [1] Wash program Wash [8] Effect [1] Effect program Effect [8] Custom [1] Custom program Custom [8] Play Schedule schedule Time now Clock Edit time Wash [1] Wash [8] Effect [1] Schedule Effect [8] Custom [1] Custom [8] DMX address Range... -
Page 23: Custom Program
Custom Program Select from the eight existing [Custom] programs and it will instantly play. Enter the [Edit] section to create or edit program. You can create or edit up to 100 scenes. To omit a scene from execution set its [Step time] to 0. Select the ID address of the target unit. -
Page 24: Activating Password Mode
[Reset to factory settings] This function will reset all the settings to the factory defaults except for [Custom] programs. Factory Default Settings Setting [Schedule] [Wash program] [Effect program] [DMX address] [Range] [Allow edit] [Password ON/OFF] [Set password] Activating password mode Set [Password] function to [ON]. - Page 25 COLORado™ 3 User Manual Blackout Effect [7] Blackout Effect [8] Blackout Custom [1] Blackout Custom [2] Blackout Custom [3] Blackout Custom [4] Blackout Custom [5] Blackout Custom [6] Blackout Custom [7] Blackout Custom [8] Operating Instructions 8/1/2007 10:30 AM...
-
Page 26: Appendix
XLR male to female connectors. The shield connection is pin 1, while pin 2 is Data Negative (S-) and pin 3 is Data positive (S+). CHAUVET carries 3-pin XLR DMX compliant cables, DMX-10 (33’), DMX-4.5 (15’) and DMX-1.5 (5’) Returns Procedure Returned merchandise must be sent prepaid and in the original packing, call tags will not be issued. -
Page 27: Photometric
Unplug fixture from power. Clean all glass when the fixture is cold with a mild solution of glass cleaner or Isopropyl Alcohol and a soft lint free cotton cloth or lens tissue. Apply solution to the cloth or tissue and drag dirt and grime to the outside of the lens. Gently polish optical surfaces until they are free of haze and lint. -
Page 28: Technical Specifications
Appendix Technical Specifications WEIGHT & DIMENSIONS Length... 22.5 in (570 mm) Width ... 7.5 in (190 mm) Height ... 8.3 in (210 mm) Weight ... 18 lbs (8.2 kg) POWER Operating Voltage ... 90V ~ 240V 50/60 Hz AC input... IEC 60320 C14 Current draw...