Table of Contents
Advertisement
Quick Links
Advertisement
Table of Contents

Related Manuals for Korg modvawe


Summary of Contents for Korg modvawe
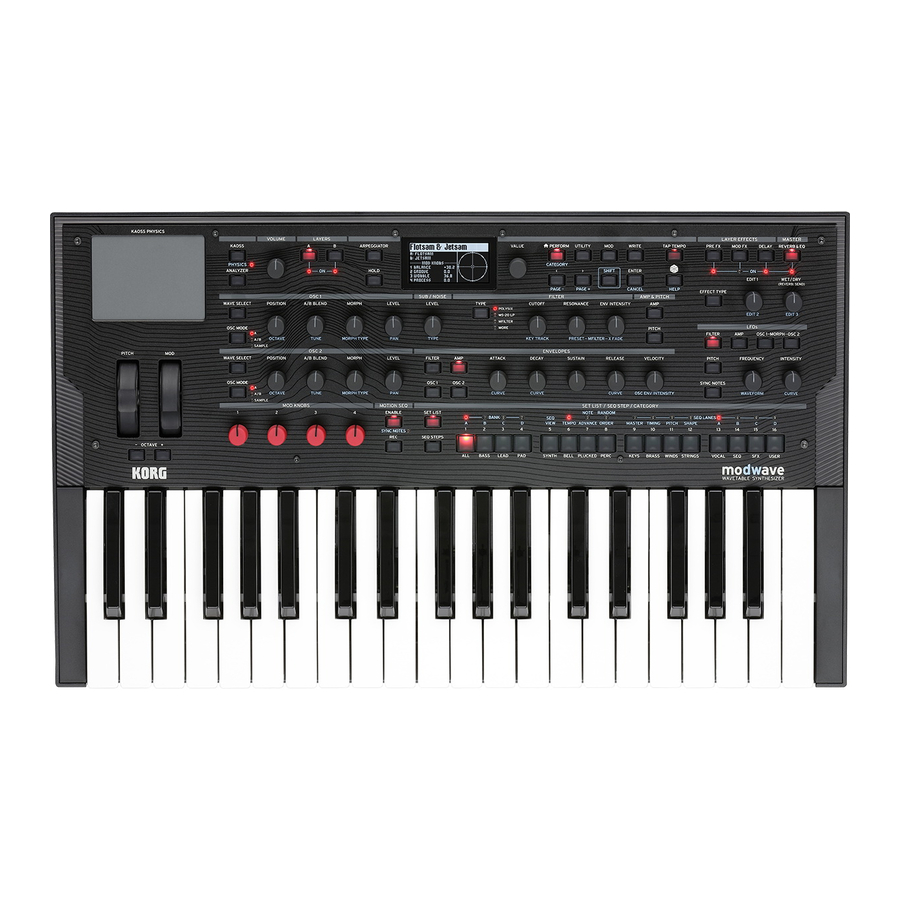
- Page 1 modwave WAVETABLE SYNTHESIZER Owner’s Manual...
-
Page 2: Table Of Contents
Contents Contents Getting Started ....................1 About the modwave manuals . - Page 3 Contents Step Probability ......................35 Timing Lane probability .
- Page 4 Contents Filter/Amp/Osc 1/Osc 2 Envelope Trigger................. 71 LFOs .
- Page 5 Contents Preferences......................95 System Stats.
-
Page 6: Getting Started
Getting Started Getting Started Thank you for purchasing the Korg modwave Wavetable Synthesizer. About the modwave manuals The documentation for the modwave consists of the following: • Precautions • Quick Start Guide • Owner’s Manual (what you’re reading now) In this manual, the following text styles indicate: •... -
Page 7: Shift
Getting Started Modwave page map LEGEND PERFORM TAP TEMPO HELP ARPEGGIATOR Button Knob OLED Display Layer Velocity Keyboard Program Performance Perform Voice Assign Layer Setup Randomize Help pages Arpeggiator Page Help Programs Zones Zones Setup Setup Help Help CUTOFF, (OSC 1/2) RESONANCE, ENV INTENSITY, (OSC 1/2) -
Page 8: Help Pages
Getting Started Help pages Hold SHIFT and press the (Randomize) button to bring up a set of pages containing shortcuts and usage tips. Structure The modwave plays one Performance at a time. A Performance has two Layers (A and B), Kaoss Physics, and a master reverb and EQ. Each Layer contains an Arpeggiator, a Program, and other settings such as MIDI channel, key and velocity zones, etc. -
Page 9: Selecting And Playing Sounds
Selecting and Playing Sounds Selecting and Playing Sounds Selecting Sounds Selecting Performances from the display Press the PERFORM button, and if necessary press it again. Wherever you are in the system, the second press will always bring up the home page, with the large Performance name selected. -
Page 10: Using Set Lists
Selecting and Playing Sounds You can also show the list of categories on the display. To do so: In the list popup, hold SHIFT and press > (for PAGE+). The Filters & Sort Order page appears. Select the Category or Collection parameter, and turn the VALUE knob or press ENTER. -
Page 11: Assigning A Performance To A Set List Slot
Selecting and Playing Sounds If you select a sound using the display, buttons 1-16 will go dark. To return to the Set List, just press one of the buttons again. You can store many different Set Lists, and switch between them as desired. To select a different Set List: Press UTILITY twice, to go to the System Setup page. -
Page 12: Basic Editing
Basic Editing Basic Editing Home Page (PERFORM) Performance Name Layer Programs Mod Knob Kaoss Physics Names & Values This is the modwave’s main page, where you can select Performances, set the Programs for the two Layers, see the Mod Knob names and values, and view the Kaoss Physics graphic. Wherever you are in the system, pressing twice in row always returns here, with the Performance name PERFORM... -
Page 13: Velocity Zones
Basic Editing Velocity Zones Fade-in/ Fade-out Shortcut: Pressing a LAYER button switches to the current parameter in the selected Layer's column. High Vel (A, B), Low Vel (A, B) [1…127] These set the highest and lowest velocities on which the Layer will sound. High Fade (A, B) [0…126] 0: The High Vel acts as a hard split, with full volume on one side and silence on the other. -
Page 14: Program Setup
Basic Editing HFade (High Fade A, B) [0…127] 0: The High key acts as a hard split, with full volume on one side and silence on the other. 1…127: This allows you to create a keyboard crossfade. As the notes approach the High key, the volume will fade out gradually. -
Page 15: Voice Assign
Basic Editing Voice Assign Mode = Poly The settings on this page are stored with the Program, if the Program is written separately. (Voice Assign) Mode [Poly, Mono] This selects the basic voice allocation mode. Depending on which one you select, various other options will appear, such as Single Trig (Poly mode only) and Unison (Mono mode only). - Page 16 Basic Editing On: The first note in a legato phrase will sound normally; subsequent notes in the phrase will sound smoother (for instance, envelopes will continue instead of restarting). Off: Legato playing will produce the same sound as detached playing. Priority [Low, High, Last] Priority is available when Voice Assign Mode is set to Mono.
-
Page 17: Layer Setup
Basic Editing Layer Setup Volume [-Inf, -84.9…+6.0 dB] This controls the volume of the Layer. Note that this is saved in the Performance, but not with the Program—so it’s a good choice when balancing levels between Layers. Octave [-3…+3] This transposes the Layer by up to 3 octaves, up or down. Tune [-100…+100 cents] This lets you detune the Layer by up to 100 cents (1/100 of a semitone), up or down. -
Page 18: Performance Setup
Basic Editing Performance Setup Volume [-Inf, -84.9…0.0 dB] This controls the Performance volume, for balancing levels with other sounds. Octave [-2…+2] This transposes the entire Performance by up to 2 octaves, up or down. Tempo (TAP TEMPO) [40…300] This sets the tempo for the Performance. Transpose [-12…+12] This transposes the entire Performance by up to 12 semitones, up or down. -
Page 19: Write
Write Write Saving Sounds The Performance, with its two Layers, contains a complete modwave sound. When selecting, editing, and saving sounds, Performance are all you need to use. While you can save Programs and presets for Motion Sequences, Motion Sequence Lanes, and Kaoss Physics, you don’t have to do so: all data is contained in the Performance. Similarly, when you load any of these other data types into a Performance, a new copy of the data is created in the Performance. -
Page 20: Editing Names
Write Editing names On the Write page, select the Name. Press ENTER, or turn the VALUE dial. The Name page appears. Use the cursor buttons to move back and forth in the text, and use VALUE to select a character from the set shown below. -
Page 21: Using Compare
Write Using Compare To use compare: Hold ENTER and press WRITE. The Compare page will appear. Hold ENTER and press WRITE, again, to toggle between the saved and edited versions of the Performance. When you change from Edited Performance to Saved Performance, the edited version is stored in a buffer, and the Performance reverts to the version saved in the database. -
Page 22: Wavetable Osc
Wavetable Osc Wavetable Osc Overview Osc 1 and Osc 2 can each play either a single Wavetable, a modulatable blend of two Wavetables, or a Multisample. The modwave ships with over 200 Wavetables, and you can also import your own via the Sound Librarian software. The sound of the Wavetables can be changed in different ways. - Page 23 Wavetable Osc MOD (Wavetable A Modifier) Each waveform in a Wavetable is stored as a single 32-bit floating-point table with 2048 samples, referred to below as the “base table.” This corresponds to a pitch of about 25 Hz. Tables for higher pitches are generated when the Wavetable is loaded.
-
Page 24: Sample Mode
Wavetable Osc Tip: Fade between modified and original versions of a Wavetable Set Mode to A/B. Select the same Wavetable for both A and B. Make sure that B Offset is set to 0.00. Set Wavetable A Modifier to None. Set Wavetable B Modifier as desired (for instance, Hard Clip). -
Page 25: Osc 1/2 Position
Wavetable Osc Osc 1/2 Position Position (POSITION) [0.00…100.00] Wavetables contain up to 64 waveforms. Position sweeps through all of the waveforms in the Wavetable. 0.00 always selects the first waveform, and 100.00 selects the last waveform. The range between these extremes is divided between the total number of waveforms in the selected Wavetable, as shown below. -
Page 26: Osc 1/2 Morph
Wavetable Osc It may be helpful to think of the Position value range 0-100 as a ribbon, with the Wavetable stretched to fit, regardless of how many waveforms it contains. Each waveform is a stripe on the ribbon. Xfade Width controls the amount of blurring between the stripes. - Page 27 Wavetable Osc Windowed Sync: Similar to Sync above, but with reduced high frequencies for lower aliasing. Stretch: The waveform is stretched in one direction and squeezed in the other, creating an effect similar to Pulse Width Modulation. When Morph Amount is set to 50, the waveform is unaltered. Flip: This inverts the polarity of a section of the waveform, with the “flip”...
-
Page 28: Osc 1/2 Details
Wavetable Osc Osc 1/2 Details Envelope (OSC ENV INTENSITY) [-100.00…+100.00] This sets the amount of Position modulation from the Osc 1 Envelope (for Osc 1) or the Osc 2 Envelope (for Osc 2). Vel->Env (VELOCITY) [-100.00…+100.00] This lets you use velocity to scale the amount of Position modulation from the Osc 1 Envelope (for Osc 1) or the Osc 2 Envelope (for Osc 2). -
Page 29: Mixer & Sub Osc
Wavetable Osc Mixer & Sub Osc Osc 1 Level (LEVEL) [0%…100%] This controls Oscillator 1’s volume. (SHIFT-LEVEL) [L100…L1, C0, R1…R100] This controls Oscillator 1’s stereo position. Osc 2 Level (LEVEL) [0%…100%] (SHIFT-LEVEL) [L100…L1, C0, R1…R100] See the descriptions for Osc 1, above. Sub/Noise This section can be either a sub oscillator or a noise generator, depending on the selected Sub/Noise Type. - Page 30 Wavetable Osc Speckled Noise: This is noise with both roll-off and clipping, producing a very aggressive timbre. With additional lowpass filtering, it can produce sounds reminiscent of thunder and explosions. Saturated Noise: This uses moderate filtering and saturation to produce a thicker-sounding noise signal. [–2, –1, 0] This applies only when Sub/Noise Type (on the Mixer &...
-
Page 31: Analyzer
Analyzer Analyzer The Analyzer shows a real-time oscilloscope view of the full, polyphonic modwave audio output, including effects. Press to go to this page. ANALYZER... -
Page 32: Motion Sequencing 2.0
Motion Sequencing 2.0 Motion Sequencing 2.0 What is Motion Sequencing 2.0? Motion Sequencing 2.0 is evolved from the wavestate’s Wave Sequencing 2.0. Sequences run individually for each voice. Timing, Pitch, Shape, and four sets of Step Sequence values (Seq A-D) are separated into “lanes.” Each lane can have a different number of Steps, its own Loop Start and Loop End, and its own loop direction or step order randomization. -
Page 33: Motion Seq Overview
Motion Sequencing 2.0 Motion Seq Overview This shows all of the Motion Sequence Lanes for the Layer’s oldest sounding voice. It displays up to 16 steps at once, matching the 16 front-panel buttons, for each Layer. The bank, A/B/C/D, is shown to the left of the steps. For each lane, the display automatically shifts to show the bank containing the active step. -
Page 34: Motion Sequence Recording
Motion Sequencing 2.0 Motion Sequence Recording Step recording Pitch To record a sequence of notes into the Pitch lane: Press REC. and buttons (PITCH) and 13-16 (SEQ A-D) will blink. Press button (PITCH) to select the Pitch Lane. Alternatively, press REC again to cancel. The Pitch Recording Setup page appears. - Page 35 Motion Sequencing 2.0 Press REC. and buttons (PITCH) and 13-16 (SEQ A-D) will blink. Press one of buttons 13-16 (SEQ A-D) to select a target Seq Lane. Alternatively, press REC again to cancel. If there’s already data in the selected Lane, you’ll be prompted to clear the data. If prompted, select an option for Clear, and then press ENTER to continue.
-
Page 36: Motion Sequence Editing
Motion Sequencing 2.0 • One value is recorded per step; for finer resolution in time, use a faster timing lane. • For playback closest to the original knob movements, leave the Lane’s Transition set to Linear (the default). Motion Sequence editing Editing Lanes The Lane controls which of its Steps are played, and how they loop. -
Page 37: Motion Sequencer
Motion Sequencing 2.0 Motion Sequencer This page lets you choose a Motion Sequence for the Program. Press SEQ STEPS to go to this page. Preset (SEQ STEPS) [List of Presets] This list includes all of the Motion Sequence Presets stored in the database. Enable (ENABLE) [Off, On]... -
Page 38: Master Lane
Motion Sequencing 2.0 Sync Notes Sounding Note Timing Lane A10 A11 A12 Pitch Lane … Seq Lane D New Note Timing Lane A10 A11 A12 Pitch Lane … Seq Lane D Use Master [Off, On] This enables the Master Lane; for more information, see “Master Lane” on page 33. TEMPO (SHIFT-6) [Off, On]... -
Page 39: Standard Lane Controls
Motion Sequencing 2.0 Use Master [Off, On] Off: The Master Lane is disabled. On: The Master Lane is enabled, and restarts other Lanes as described above. Loop Duration [TEMPO Off: 0.0013…120.0000 seconds] [TEMPO On: 32nd-note triplet…2x breve] If Timing Lane Tempo is Off, you can set the length of the Master Lane loop in seconds. If Timing Lane Tempo is On, this sets the basic length of the Master Lane, relative to the system tempo. -
Page 40: Step Probability
Motion Sequencing 2.0 Step Probability Each individual Step has a Probability setting, from 0% to 100%. This controls how likely the Step is to play. As with most Step parameters, Probability can be modulated; for instance, moving a Mod Knob might make some Steps more likely to occur, and other steps less likely to occur. - Page 41 Motion Sequencing 2.0 TEMPO (SHIFT-6) [Off, On] Off: Step Durations are specified in seconds. On: Step Durations are specified in rhythmic values. Speed [TEMPO Off: 0.01…1.00…100.00] [TEMPO On: 1/4…Normal…4x] This modifies the speed of the entire Timing Lane. When TEMPO is Off, you can vary this continually from 0.01 (1/ 100 of the original speed) to 100.00 (100 times the original speed).
-
Page 42: Timing Lane Step
Motion Sequencing 2.0 Timing Lane Step Tempo On Tempo Off Step [A1…D16] This is the current Step. You can edit this parameter on-screen, or use the buttons to select Steps directly. SEQ STEP Type [Note, Rest, Gate] Note: The step will play normally. Rest: The step will be silent. -
Page 43: Pitch
Motion Sequencing 2.0 Pitch This Lane sets the pitch of each Step. Pitch Lane Press SHIFT-11 (PITCH) to go to this page. Preset, Loop (Start), to (Loop End), Mode, Repeats, NoteAdv See “Standard Lane Controls” on page 34. Use Shape [Off, On] When this is On, non-zero pitch values will be scaled by the Shape Lane. - Page 44 Motion Sequencing 2.0 (Scale Type) [Major, Minor, Hrmnic Maj, Hrmnic Min, Melodic Min, Dorian, Phrygian, Lydian, Mixolydian, Locrian, Penta Maj, Penta Min, Diminished, Half Dim, Augmented, Whole Tone, Tritone, Blues, Bebop Dom, Flamenco, Romani, Hungarian, Persian, Harmonics, Acoustic, Enigmatic] This selects the scale to which the generated notes will be confined. It only applies if Fit To Scale is On. Notes generated by Pitch Lane (if Scale Key = C) Scale Major...
-
Page 45: Pitch Lane Step
Motion Sequencing 2.0 Pitch Lane Step Step See “Step” on page 37. Transpose [-24…+24 semitones] This offsets the played note by up to two octaves, up or down. If the Oscillator is playing a Multisample, this also affects the index into the Multisample map (unlike Tune below), potentially changing the sample selection, similar to transposing the entire keyboard. -
Page 46: Shape
Motion Sequencing 2.0 Shape The Shape Lane creates a contour over the duration of the step. It can affect the Pitch Lane and/or any of the Seq Lanes (when the respective Lane’s Use Shape is On). Shape Lane Press SHIFT-12 (SHAPE) to go to this page. -
Page 47: Seq A/B/C/D
Motion Sequencing 2.0 Phase ° [-180…+180 This controls the start point of the shape. For example, to start in the middle of the shape, set the Phase to +180°. Prob (Probability) See “Step Probability” on page 35. Seq A/B/C/D The four Seq Lanes generate modulation sources to control other synthesis parameters, just like envelopes, LFOs, etc. Seq Lane Press to go to this page. -
Page 48: Seq Lane Step
Motion Sequencing 2.0 Seq Lane Step Step [A1…D16] See “Step” on page 37. Type [Value + Continuous Mod, Value * Random +/-, Value * Random +, Value + S & H Mod] Value + Continuous Mod: The Step uses the programmed value, and modulation continuously affects the value. For instance, if an LFO is modulating Value, you’ll hear the LFO’s shape during the step. -
Page 49: Motion Sequence Utility
Motion Sequencing 2.0 Motion Sequence Utility Cut Steps, Copy Steps, Paste Steps, Insert Steps To cut, copy, paste, or insert Steps to either a single Lane or all Lanes: From a Motion Sequence Lane page, use PAGE+ to go to the Lane Utility page. Select an Action such as Cut Steps or Insert Steps. -
Page 50: Kaoss Physics
Kaoss Physics Kaoss Physics Overview Kaoss Physics models a ball rolling on a surface. You can start the ball by flicking a finger on the x-y pad, or launch the ball automatically using a trigger source such as Gate + Damper. You can also directly control the ball by holding your finger on the pad. -
Page 51: Kaoss Physics
Kaoss Physics Kaoss Physics Physics (SHIFT- KAOSS) [Off, On] Off: The physics model is disabled, and the pad works as a simple x-y pad. On: The physics model is enabled. P (Kaoss Physics Preset) [List of Presets] Select the parameter and then either turn the VALUE knob or press ENTER... -
Page 52: Kaoss Physics Details
Kaoss Physics Kaoss Physics Details Bump Height [-100…+100] Positive for convex (a “hill”), negative for concave (a “hole”). Position X [0…50…100] Sets the center point of the bump on the X axis. 50 is the center; 0 is the left side, and 100 is the right. (Position) Y [0…50…100] Sets the center point of the bump on the Y axis. -
Page 53: Kaoss Launch
Kaoss Physics Kaoss Launch This page lets you launch the ball automatically using a trigger source. For instance, triggering via Gate + Damper will launch the ball whenever you play a new phrase on the keyboard; triggering via the Kaoss Button will launch the ball when you press the front-panel KAOSS button. -
Page 54: Arpeggiator
Arpeggiator Arpeggiator Arpeggiator The Arpeggiator is particularly effective in conjunction with Motion Sequence Lane Note Advance, so that each generated note starts on a new step in the Lane. Try this with a single Timing step set to Gate. Arpeggiator (ARPEGGIATOR) [Off, On] Turn the arpeggiator on and off via the... - Page 55 Arpeggiator On: The Arpeggiator will synchronize to any sounding tempo Motion Sequences. Latch [Off, On] Off: The Arpeggiator will only play as long as notes are being held on the keyboard (or via the damper pedal). On: The Arpeggiator will continue to play after notes are released.
-
Page 56: Filter
Filter Filter Filter Type (FILTER TYPE) [Polysix, MS-20 LP, MS-20 HP, 2-pole LP, 2-pole HP, 2-pole BP, 2-pole BR, 4-pole LP, 4-pole HP, 4-pole BP, 4-pole BR, Multi Filter] Pressing the front panel FILTER TYPE button selects and edits the Type parameter. Three useful settings are available directly: the Polysix LP, the MS-20 LP, and the Multi Filter. - Page 57 MS-20 LP and HP: These 12dB/octave, self-resonating filters lovingly recreate the distinctive timbral signature of the classic Korg MS-20. Raising Resonance will cause increasing amounts of saturation and overdrive, creating a more aggressive tone. Input volume can have a strong effect on this character; for more information, see “Gain” on page 53.
-
Page 58: 2-Pole Lp/Hp/Bp/Br
Filter 2-Pole LP/HP/BP/BR (Resonance) Bass [Full, Tight] This is available only when Type is one of the 2-pole Resonant or 4-pole Resonant settings, or Multi Filter. Resonance Bass controls the character of the filter resonance at low cutoff frequencies. Its effect is most noticeable with high Resonance settings. -
Page 59: Multi Filter
Filter Normal, 2-osc input: This is the lowest input gain. It will produce the classic resonant sounds of these filters even with two oscillators playing at full volume. If you’re using the Sub Oscillator as well, and want to retain the full volume of the resonance effect, you may wish to use Trim to further reduce the input gain. -
Page 60: What's A Multi Filter
Filter What’s a Multi Filter? Standard multimode filters generate low-pass, high-pass, and band-pass filters simultaneously—but only let you use one of them at a time. The Multi Filter gives you access to all three filter modes simultaneously, in any combination, along with the dry input signal. - Page 61 Filter Envelope (ENV INTENSITY) [-142.00…+142.00] This sets the amount of modulation from the Filter Envelope, in semitones. Vel->Env (VELOCITY) [-142.00…+142.00] This lets you use velocity to scale the amount of the Filter Envelope applied to Filter Freq, in semitones. Key Track (SHIFT-CUTOFF) [-142.00…+142.00] This controls how much the Key Track will affect the Cutoff frequency.
-
Page 62: Filter Key Track
Filter Filter Key Track Most acoustic instruments get brighter as you play higher pitches. At its most basic, keyboard tracking re-creates this effect by increasing the cutoff frequency of a lowpass filter as you play higher on the keyboard. Usually, some amount of key tracking is necessary in order to make the timbre consistent across the entire range. - Page 63 Filter Slope value Modulation change no change +1.00 0 to maximum in 5 octaves +5.00 0 to maximum in 1 octave +10.00 0 to maximum in 6 semitones +Inf 0 to maximum in 1 half-step The final effect of Key Track is a combination of the Key Track shape and the modulation intensity. With greater Slope values, the Key Track shape can max out fairly quickly.
-
Page 64: Pitch
Pitch Pitch Osc Pitch Osc 1 Osc 1 Octave (SHIFT-POSITION) [–2…0…+2] This sets Oscillator 1’s basic pitch, in octaves. The default is 0. Tune (SHIFT-A/B BLEND) [–12.00…+12.00] This adjusts Oscillator 1’s pitch in increments of 1/100 of a semitone, over a range of ±1 octave. Osc 1 Transpose [–12…+12] This adjusts Oscillator 1’s pitch in semitones, over a range of ±1 octave. -
Page 65: Common Pitch
Pitch Common Pitch These settings apply to the entire Program, including Osc 1/2 and the Sub Oscillator. Press PITCH to go to this page. Octave [–2…0…+2] This sets the basic pitch, in octaves. The default is 0. Transpose [–12…+12] This adjusts the pitch in semitones, over a range of ±1 octave. If Oscillators are set to Sample mode, this also affects the index into the Multisample map, potentially changing the sample selection—similar to transposing the entire keyboard. -
Page 66: Pitch Mod
Pitch Constant Time: Portamento will always take the same amount of time to glide from one note to another, regardless of the difference in pitch. This is especially useful when playing chords, since it ensures that each note in the chord will end its glide at the same time. -
Page 67: Amp
Press to go to this page. Notes on Amp Modulation Amp modulation scales the Amp Level and Amp Envelope. The final volume is determined by multiplying these by any additional modulation sources, with an upper limit of 2x the original level. If the original level is low, the maximum modulated volume will also be low. -
Page 68: Amp Key Track
Key Track [–100%…+100%] This adjusts the intensity of Key Track’s effect on the level. [L100…L1, C0, R1…R100] This sets the left-right pan. Note that this can be modulated per voice! Random Pan [Off, On] Off: The normal pan controls, above, apply. On: Each voice will be randomly panned across the stereo field. -
Page 69: Modulation
Modulation Modulation Using Modulation Modulation Overview Most front-panel controls and on-screen parameters can be modulated. You can also create multiple modulation routings to the same destination. Each modulation routing includes a primary modulation source, an intensity, and a secondary modulation source; the three are multiplied together to create the modulation amount. Once a modulation routing is created, you can change either of the sources, but you cannot change the destination. -
Page 70: Viewing And Editing Modulations
Modulation Filter and Osc 1/2 Env Velocity Intensity Filter and Osc 1/2 Envelope Velocity Intensity cannot themselves be modulated. Viewing and Editing Modulations All user-created modulation routings can be viewed and edited on the Mods page. Note: Built-in modulation routings, such as Filter Envelope modulation of Filter Cutoff or Osc 1 LFO modulation of Osc 1 Morph, are not shown here. - Page 71 Modulation Filtering the modulation list The list of modulations can be long. To view only the modulation routings related to a specific controller or section of the synth, use the Show parameter on the Modulation List Info page. As a shortcut to open this parameter's popup from anywhere in the UI, hold and press <, as described below: Hold...
-
Page 72: Mod Knobs
Modulation Mod Knobs You can use the Mod Knobs in real-time performance, and also save the results as new sounds. The names and values are shown on the main PERFORM screen. The values are stored, and can themselves be modulated by the wheels, Kaoss Physics, and MIDI CCs. - Page 73 Modulation Kaoss Bttn CC 12 This is the front-panel KAOSS button (unipolar MIDI CC#12). Damper CC 64 This is the damper or sustain pedal (unipolar MIDI CC#64). Pitch Bend This is the Pitch Bend wheel (MIDI Pitch Bend). Velocity This is the note-on velocity, representing how hard the note is played on the keyboard. Exponential Velocity This is MIDI note-on velocity through an exponential curve.
-
Page 74: Mod Knobs
Modulation Kaoss Distance Kaoss Distance is the distance from the center, which is always positive. Kaoss Angle Kaoss Angle is the current angle of the ball’s trajectory. This is most interesting when the ball is on a curved path such as an orbit, since the angle will be constantly changing. -
Page 75: Envelopes
Envelopes Envelopes Filter/Amp/Osc 1/Osc 2 Envelope A (Attack Time) (ATTACK) [0.0000…90.0000 seconds] This sets how long the envelope takes to rise to the peak level. D (Decay Time) (DECAY) [0.0000…90.0000 seconds] This sets how long it takes to settle from the peak to the Sustain level. S (Sustain Level) (SUSTAIN) [–100…+100 (Filter, Osc 1/2) or 0…+100 (Amp)]... -
Page 76: Filter/Amp/Osc 1/Osc 2 Envelope Trigger
Envelopes When you change the curvature, the envelope times remain the same. However, greater curvatures will tend to sound faster, because the value changes more quickly at the beginning. Different Curve settings for up and down Generally, upwards segments use different Curve settings than downward segments. For instance, a Curve of 3 often works well for upward segments, such as Attack. - Page 77 Envelopes When the threshold is positive (or 0), the envelope resets when passing through the threshold moving upwards. In other words, if the value has been below the Threshold, and then changes so that it is equal to or greater than the Threshold, the envelope resets.
-
Page 78: Lfos
LFOs LFOs Filter/Amp/Pitch/Osc 1/Osc 2 LFO The five LFOs—Filter, Amp, Pitch, Osc 1, and Osc 2—all work identically. Tempo [Off, On] On: The LFO synchronizes to the system tempo, with its speed controlled by Base Note and Multiply. Off: The LFO speed is controlled by the Frequency parameter, in Hz. Base Note (FREQUENCY) [List of rhythmic values]... - Page 79 LFOs LFO Waveforms TRIANGLE STEP TRI 4 RND 1 RND 4 EXP TRI STEP TRI 6 RND 2 RND 5 RND 3 RND 6 SQUARE EXP SAW DN STEP SAW 4 SINE EXP SAW UP STEP SAW 6 Start Phase [-180…+180] This controls the phase of the waveform at the start of the note.
- Page 80 LFOs LFO Curve +100 –100 Curve = 0 (original waveform) Curve = +100 Curve = -100 Note: Curve does not affect the Square and Random 3 waveforms, since their values are always either +100 or -100. Fade [0.0000…5.0000 sec] The LFO can fade in gradually, instead of starting immediately at full strength. This sets the time from note-on until the LFO reaches maximum amplitude.
-
Page 81: Modulation Processors
Modulation Processors Modulation Processors Overview Modulation Processors transform a modulation signal to make it into something new. The original modulation signal also remains available. There are two Modulation Processors per Program. The Modulation Processor outputs appear in the list of modulation sources, just like the LFOs and Envelopes. Type [Gate, Offset, Quantize, Scale, Curve, Smooth, Sum ] This controls the type of processing performed by the Mod Processor. -
Page 82: Offset
Modulation Processors Below (Below Threshold) [Fixed Val, Source] This sets the output of the Gate when the Control Source is less than the Threshold. When this is set to Fixed Val, you can set a value between -100% and +100%. When it is set to Source, you can select any modulation source. Above (At &... -
Page 83: Quantize
Modulation Processors Quantize This changes a continuous signal into a series of discrete Unipolar Bipolar steps. Use this to change the shape of LFOs or envelopes, or (e.g. Mod Wheel) (e.g. LFO) to force a controller to land on a few specific values. +100 Original Input... -
Page 84: Scale
Modulation Processors Scale This processor uses a modulation source to scale the input. For instance, you can control the amount of an LFO with an Envelope, or control the amount of an Envelope with a MIDI controller. Input [List of Modulation Sources] This selects the main input for the Mod Processor. - Page 85 Modulation Processors Input [List of Modulation Sources] This selects the input for the Mod Processor. Mode [Symmetric, Asymmetric] Asymmetric produces a single curve, extending from –100 to +100. Symmetric produces two matching curves extending outwards from 0 to –100 and +100, respectively. Curve and Mode Bipolar Triangle Wave Unipolar Triangle Wave...
-
Page 86: Smooth
Modulation Processors Smooth This creates more gentle transitions between values, smoothing out abrupt changes such as a quick move on a wheel or a sharp edge on an LFO. You have separate control of the amount of smoothing during the attack (when the signal is increasing) and decay (when it’s decreasing). - Page 87 Modulation Processors Input [List of Modulation Sources] This selects the main input for the Mod Processor. Input = LFO Main Input Amount [–100.00%…+100.00%] This controls the gain and polarity of the Input. Sum Source = Env Sum Source [List of Modulation Sources] This selects the modulation source to merge into the Input.
-
Page 88: Effects
Effects Effects Overview Each Layer has its own FX, and DELAY. Additionally, the Performance has a master REVERB parametric EQ. See “Structure” on page 3. SHIFT-press or double-press the effects buttons to turn them on and off. Main page Type (EFFECT TYPE) [List of Effects]... -
Page 89: Level Controls
Effects Level controls Additional level-related parameters may be available on-screen, depending on the effect Type. Input Trim [-Inf, -84.9…0.0 dB] This controls the volume level into the effect. Use this to alter the response of effects such as the Waveshaper, or to compensate for gain increases in effects such as the Talking Modulator. -
Page 90: Pre Fx
Effects Pre FX Decimator This stereo effect models vintage digital gear, lowering the sampling frequency and reducing bit depth. Graphic EQ This is a stereo graphic EQ with macro controls. Guitar Amp This mono effect models a selection of guitar amps and speaker cabinets, for everything from subtle saturation to roaring distortion. -
Page 91: Mod Fx
Polysix Ensemble This models the mono-in, stereo-out ensemble effect built into the classic Korg Polysix synthesizer. Small Phase This models a classic mono phaser made in New York City during the 70s, with its warm, rich tone and liquid transparency. -
Page 92: Vintage Flanger
Effects Vintage Flanger A model of a truly classic mono analogue flanger. This amazing stompbox’s bucket-brigade technology provides a sweeping, whooshing sound, perfect for chords. Vintage/Custom Wah This stereo effect models the tonal character of a vintage wah pedal. Vox Wah This effect is modeled on the unique “throaty”... -
Page 93: Early Reflections
Effects Early Reflections This provides different early reflection patterns, useful for small ambiences, gated reverbs, and reverse effects. Overb The Overb features a high-quality, diffusion-based reverb core, including randomization for richer and smoother reverb timbres. Master EQ Performances include a dedicated four-band parametric EQ. To edit the EQ: Press REVERB. -
Page 94: Randomize
Randomize Randomize Randomize uses a combination of preset selection and select value randomization, rather than direct randomization of all parameters. Using Randomize To randomize the entire Performance: Press the (Randomize) button. The Randomize page will appear, with Scope set to Performance by default. If Scope has been previously changed to another setting, hold and press PERFORM. -
Page 95: Utility
Utility Utility System Setup Set List [List of Set Lists] This selects the current Set List, which maps Performances to the SET LIST buttons. You can store many Set Lists, and change between them as you like. Octave (OCTAVE -/+) [-4…+4] This shifts the keyboard up or down by up to four octaves. -
Page 96: Midi & Usb
Utility MIDI & USB Global Channel [1…16] This is the basic MIDI channel for the modwave. It applies to: • MIDI sent from the built-in keyboard and controllers (except for Program Mod Knobs) • MIDI received by any Layer with Use Global MIDI Channel enabled •... -
Page 97: Controllers
Utility Controllers Velocity Curve [1 (Heavy), 2, 3, 4 (Normal), 5, 6, 7, 8 (Light), 9 (Wide)] This controls how the volume and/or tone responds to variations in keyboard playing dynamics (velocity). Choose the curve that is most appropriate for your playing strength and style. Velocity Curves always work the same way between the built-in keyboard and the synth engine. - Page 98 Utility Convert Position = Pre-MIDI MIDI In Velocity Velocity Curve Curve = 4 Tone Scale Transpose Transpose generator Note Number changes modwave built-in keyboard MIDI Out Transmitted Received Post-MIDI: Transpose and Velocity Curve affect MIDI input. Use this to adjust response to an external MIDI controller.
-
Page 99: Midi Cc Assign
Utility MIDI CC Assign You can control Scale Select and each Mod Knob directly from MIDI CCs. These CCs edit the assigned parameters, just like moving the front-panel knobs. To modulate a parameter with variable intensity, and without causing edits to the sound, use modulation instead. -
Page 100: Preferences
Utility Pelog: This Indonesian gamelan scale uses seven notes per octave. When Key is set to C, use the white keys. The black keys will play the equal tempered pitches. Pure Major, Pure Minor: These are Just Intonations optimized for major and minor keys, respectively. Unlike the other scales, they maintain the A4 tuning (e.g. -
Page 101: System Stats
Utility When the power turns off, any un-saved edits or settings will be lost. Make sure that you save important settings before this occurs. Display Brightness [0…100] This controls the brightness of the OLED display. SST Hold Time [0 ms…60 sec] This controls the duration of Smooth Sound Transitions. -
Page 102: Usb
The modwave is a class-compliant USB MIDI device, and requires no driver for MIDI functionality. Editor Librarian The modwave Editor Librarian supports MacOS and Windows, and is available as a download from www.korg.com. For more information, please see the documentation included with the download. -
Page 103: Specifications
Specifications Specifications System Keyboard: 37 keys (velocity and release-velocity sensitive) Maximum Polyphony: 32 stereo voices Sound generating system: modwave synthesis engine Modulation Controllers: Mod Wheel, Pitch Wheel, Kaoss Physics, 4x Mod Knobs Other Sources: 4x Envelopes, 5x LFOs, 2x Mod Processors, 2x Key Track, Seq Lanes A-D, Step Pulse, Tempo, Program/Performance Note Count, Program/Performance Voice Count, Poly Legato, Velocity, Exponential Velocity, Release Velocity, Gate, Gate+Damper, Note-On Trigger, Note-On Trigger+Damper, Note Number, Aftertouch and Poly Aftertouch (external MIDI only), MIDI CCs +/-, MIDI CCs +... -
Page 104: Midi Implementation Chart
Mode 1: Omni On, Poly Mode 2: Omni On, Mono O: Yes X: No Mode 3: Omni Off, Poly Mode 4: Omni Off, Mono Consult your local Korg distributor for more information on the MIDI implementation. - Page 105 © 2021 KORG INC. www.korg.com Published 06/2021...