Table of Contents
Advertisement
EN
USER INSTRUCTIONS AND SAFETY
Congratulations on your purchase of an N-Com product.
N-Com B902 was made using the most advanced technology and top-quality materials.
Long-running tests and thorough system development have made it possible to achieve
the highest audio quality.
For additional information on the B902, to download the instructions in PDF format and
install the latest available Firmware version, please visit the website www.n-com.it.
Firmware version: 1.0
REFERENCE STANDARDS
The products of the N-Com line comply with standards as per the table below:
B902
Battery
charger
Battery
The Declarations of Compliance can be downloaded from the website www.n-com.it (Download
section).
Model: B902 X
PMN: N-Com B902 X
The Bluetooth® word mark and logos are registered trademarks owned by Bluetooth SIG, Inc.; any
use of such marks by N-Com is under license. Other trademarks and trade names are those of their
respective owners.
The Bluetooth system complies with the main safety requirements and
other applicable provisions of Directive RED 2014/53/EU, 2011/65/CE
Directive 2014/35/EU LVD, 2014/30/EU EMC, 2009/125/CE ErP,
2011/65/EU RoHS
Directive 2001/95/CE – GPSD, 2013/56/UE - BAT, 1907/2006 – REACH,
2014/30/UE – EMC, 2011/65/EU - RoHS
FCC ID:
Y6MNCOM22
IC: 9455A-NCOM22
R-NZ
Fw 1.0 - 22/12/2020
Advertisement
Table of Contents

Related Manuals for N-Com B902 X Series


Summary of Contents for N-Com B902 X Series
- Page 1 R-NZ The Bluetooth® word mark and logos are registered trademarks owned by Bluetooth SIG, Inc.; any use of such marks by N-Com is under license. Other trademarks and trade names are those of their respective owners. Fw 1.0 - 22/12/2020...
-
Page 2: Table Of Contents
AUDIO MULTITASKING................................21 16.1.Enabling / disabling the Audio Multitasking function ......................... 21 16.2.Adjusting the volumes ..................................... 22 INTERCOM ....................................22 17.1.N-Com “600”/“900” Series Intercom pairing up ............................ 22 17.2.Pairing up other N-Com ....................................23 17.3.Intercom function (one-to-one connection) ............................23 Smart Conference 17.4. -
Page 3: Warnings And Safety
• When using the N-Com system, comply with all limitations and instructions related to the use of cell phones. • Do not turn on your cell phone or the N-Com system whenever their use is forbidden or when these devices can cause interference or dangerous situations. -
Page 4: Qualified Personnel
1.7. Disposal Refer to this user manual and to manuals related to other parts of the N-Com system in order to disassemble the system from the helmet. Once the system has been disassembled, dispose of it according to the following instructions: •... -
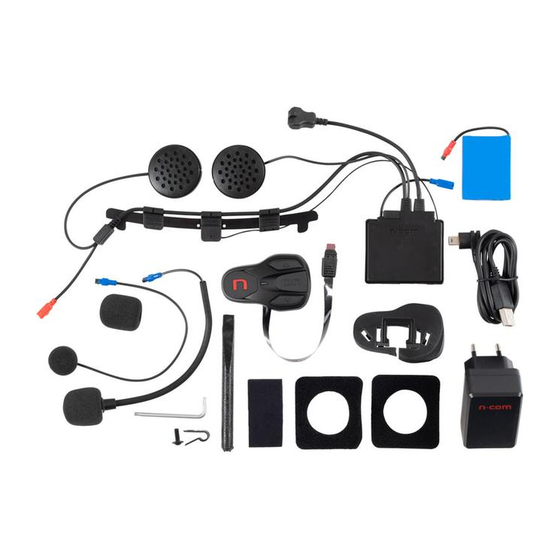
Page 5: Content Of The Packaging
CONTENT OF THE PACKAGING The N-Com B902 package contains: e-box with wiring Rechargeable battery Battery charger Adhesive Keypad Microphone Microphone for X-903 helmet Mini USB jack wire Flat head tool Microphone foam Key, Screw, Microphone Microphone securing Adhesive strips securing clip... -
Page 6: Installation On The X-1005 And X-903 Helmet
• On the left side of the helmet, open the cheek pad lining door (Fig. 1). Remove the filling material. Keep it in case you want to use your helmet without the N-Com system installed in the future. • Remove the small N-Com cap positioned on the left side of the helmet. To make the operation easier, we recommend pushing the cap from inside the helmet (Fig. - Page 7 • Connect the battery to the wiring system (Fig. 8). • Switch on the N-Com system (press “ON” for about 2 seconds) to verity its proper operation. N.B. If the system does not work, remove the flex and repeat the previous operation, making sure that the “n”...
-
Page 8: Microphone Positioning
3.3. Microphone positioning ONLY FOR X-1005 HELMETS • With the help of the flat head tool supplied as standard equipment, open the microphone-holder clip located on the right side of the helmet (Fig. 14-15). • Position the microphone at the desired length, sliding the excess portion inside the cheek pad lining (Fig. -
Page 9: Repositioning The Padding
• Hook up the microphone to the connector coming out of the e-Box (Fig. 20). • Position the wiring and the connectors behind the cheek pad lining, lifting it with the help of a flat head tool (Fig. 21). Fig. 20 Fig. -
Page 10: Installation On The X-Lite Helmets
INSTALLATION ON THE X-LITE HELMETS This procedure must be followed for the installation of N-Com systems on X-lite helmets other than model X-1005 and X-903. Important: Prior to installing the N-Com system, it is recommended to write down the identification code affixed to the product (see chapter 22.4). - Page 11 Fig. 31 Fig. 32 • Remove the small N-Com cap positioned on the left side of the helmet. To make the operation easier, we recommend pushing the cap from inside the helmet (Fig. 33). • Thoroughly clean the outside surface of the shell to make sure that the adhesive keypad sticks properly.
-
Page 12: Microphone Positioning
• Gently position the connector in its seat until it is all the way in (Fig. 38). • Switch on the N-Com system (press “ON” for about 2 seconds) to verity its proper operation. N.B. If the system does not work, remove the flex and repeat the previous operation, making sure that the “n”... -
Page 13: Repositioning The Padding
N.B.: On certain helmets, the housing for the microphone rod must be created by cutting out the helmet border gasket along the pre-cut area. FULL-FACE HELMETS • Take the polystyrene check pad (left side) and position the microphone in the special housing, as illustrated in Fig. -
Page 14: Removing The System
BASIC FUNCTIONS N.B.: Before using the N-Com device for the first time, recharge the battery completely for at least 10 hours. To obtain best performances from the battery, it is recommended to completely recharge the battery the first few times. -
Page 15: Multi-Language Voice Messages
Click on "DOWNLOAD" and save the file in the computer. • Click on "UPDATE" and wait for the firmware update to end. The release notes of the last Firmware version can be found on the website www.n-com.it – in the “Support”/”Download”/”Software” section. -
Page 16: Pairing Up Menu
PAIRING UP MENU All the Bluetooth pairing up operations are carried out in this mode. In order to access the Pairing up Menu starting with the N-Com system switched off, press the “ON” key and keep it pressed for 4 seconds. -
Page 17: Mobile Phone / Mp3 Player Pair Up
• Activate the search of Bluetooth devices on the mobile phone. • Select the N-Com system from the list. If a password is requested, enter the code 0000 (four zeros). • After a few seconds, the connection between the two devices is activated. -
Page 18: Mobile Phone
Saving the Speed Dial numbers To assign one or more speed dialling numbers: • To access the Configuration Menu starting with the N-Com switched on, press the keys “” and “” for 4 seconds. • Press the key “” or “” until you hear the voice command “... -
Page 19: Conference Call Function
Turning off the phone conference During the phone call, briefly press “n”. call function N.B.: “Telephone Conference” function can only be used with the N-Com series “600”/“900”. 11.3. Smart Navi System The “SMART NAVI SYSTEM” function allows you to listen to navigator directions coming from the smartphone even during an intercom call or while listening to the FM Radio. -
Page 20: Sharing Music Via Bluetooth (A2Dp Sharing)
• Activate the search of Bluetooth devices on the navigator. • Select the N-Com system from the list. If a password is requested, enter the code 0000 (four zeros). • After a few seconds, the connection between the two devices is activated. -
Page 21: Fm Radio
It can be enabled / disabled through the Configuration Menu (chapter 8), the N-Com EASYSET program or the N-Com EASYSET APP. Once the function has been enabled / disabled, the N-Com system needs to be switched off and then switched on in order to store the selection. -
Page 22: Adjusting The Volumes
The volume of the foreground audio can be adjusted through the N-Com system (chapter 6.1). The volume of the background audio can be adjusted through the N-Com EASYSET APP (with the Audio Multitasking function enabled). The background volume is pre-set at level 5. -
Page 23: Pairing Up Other N-Com
Pairing up Menu you hear the voice announcement “ ”. • Put the N-Com system in “Setting” mode: press the “ON” key and keep it pressed for 4 seconds, until the blue LED starts to flash quickly. • Pairing up other N-Com On B902 system, press the key “”... -
Page 24: Smart Conference (Group Intercom)
The temporary disabling of the VOX function is then removed the first time the N-Com device is turned off; so, if the VOX Intercom is enabled (from PC or APP), it will be restored the next time the device is switched on. -
Page 25: Universal Intercom" Intercom
UNIVERSAL INTERCOM function 18.1. Pairing up the UNIVERSAL INTERCOM The N-Com system can be paired up to the other intercom (from now on referred to as Intercom B) as if it was a mobile phone. • Make sure the B902 is turned off. -
Page 26: Universal Intercom Function
N.B.: In case there are already other intercom systems stored in the memory of the B902 system, check on the EASYSET N-Com App which channels are still available. If a channel that is already used is selected during pair up, the new intercom system will overwrite the one previously stored on that channel. -
Page 27: Remote Control
▼ SENA RC4 CENTRAL KEY MULTI-FUNCTION KEY Proceed as follows to pair up the N-Com system to the RC4 Remote Control: • Make sure the RC4 is switched off. • Put the RC4 in pair up mode: press the “+”key and keep it pressed for about 8 seconds. -
Page 28: Battery And Recharge
When the battery is charged, the blue LED goes back to its standard flashing. N.B.: In case you are not planning on using the N-Com system for a long time, you need to fully recharge the device before storing it away. -
Page 29: Summary Table Of Controls
Turning off the Radio Automatic search for new station 2 sec Change station 2 sec (pre-set stations) Pre-set station 4 sec *Press any key on the N-Com keypad. **Press the keys at the same time. ***Starting with the system switched off. -
Page 30: Warranty
• Neglect and normal wear and tear of internal and external parts. • Any damage resulting from an accident. • Any modification or tampering made to the helmet or to the N-Com system by the user or third parties. • Use of incompatible accessories not approved by Nolangroup for the purchased N-Com device model. -
Page 31: Product Identification
22.4. Product identification N-Com products are identified by means of a code that allows their traceability and identification. The identification code can be found on the adhesive label affixed to the... -
Page 32: Validity Of N-Com Warranty
22.5. Validity of N-Com warranty VALIDITY VALIDITY VALIDITY VALIDITY NATION NATION 2 YEARS 1 YEAR 2 YEARS 1 YEAR ALBANIA LEBANON ALGERIA MACEDONIA SAUDI ARABIA MALAYSIA ARGENTINA MALTA AUSTRALIA MOROCCO AUSTRIA MAURITIUS BAHRAIN MEXICO BELGIUM BRP MONTENEGRO BERMUDA NORWAY BOLIVIA...