Table of Contents
Advertisement
USER'S INFORMATION MANUAL
Hx 3 TOUCH SCREEN THERMOSTAT
MODEL: S1-THXU430W
72
PRODUCT DESCRIPTION . . . . . . . . . 2
Content . . . . . . . . . . . . . . . . . . . . . . . . . 2
Features . . . . . . . . . . . . . . . . . . . . . . . . 4
THERMOSTAT CONTROLS . . . . . . . . 5
Home Screen . . . . . . . . . . . . . . . . . . . . 7
Secondary Home Screen . . . . . . . . . . . 8
Modes of Operation . . . . . . . . . . . . . . . 9
SETTINGS . . . . . . . . . . . . . . . . . . . . . 11
Away Mode . . . . . . . . . . . . . . . . . . . . 12
Humidity Settings . . . . . . . . . . . . . . . . 13
Fan Settings . . . . . . . . . . . . . . . . . . . . 14
Lockout Settings . . . . . . . . . . . . . . . . 15
Banner Information . . . . . . . . . . . . . . 16
ADVANCED SETTINGS . . . . . . . . . . 17
Schedule . . . . . . . . . . . . . . . . . . . . . . 18
Wi-Fi Network Status . . . . . . . . . . . . . 24
Johnson Controls Ducted Systems
11/07/18 11:14AM
11/07/18 11:14AM
º
COOL TO
.
Table of Contents
Hx THERMOSTAT APP . . . . . . . . . . . 25
Registration and Login . . . . . . . . . . . . 25
Wi-Fi Connectivity . . . . . . . . . . . . . . . . 26
App Home Screen . . . . . . . . . . . . . . . 29
SCHEDULES . . . . . . . . . . . . . . . . . . . 31
SETTINGS . . . . . . . . . . . . . . . . . . . . . 33
MANAGING DEALER ACCESS . . . . 35
Granting Dealer Access . . . . . . . . . . . 35
Using the Access Types Screen . . . . . 36
Revoking Dealer Access . . . . . . . . . . . 36
GEO-FENCING . . . . . . . . . . . . . . . . . 37
AMAZON ALEXA SETUP . . . . . . . . . 38
Using Alexa in Celsius . . . . . . . . . . . . 38
Alexa Skill Voice Commands . . . . . . . 39
APPLE WATCH SETUP . . . . . . . . . . 41
62
Settings
Auto
85
5407935-UUM-E-1020
Advertisement
Table of Contents

Related Manuals for York Hx 3 S1-THXU280


Summary of Contents for York Hx 3 S1-THXU280
-
Page 1: Table Of Contents
USER’S INFORMATION MANUAL Hx 3 TOUCH SCREEN THERMOSTAT MODEL: S1-THXU430W 11/07/18 11:14AM 11/07/18 11:14AM º Settings Auto COOL TO Table of Contents PRODUCT DESCRIPTION ..2 Hx THERMOSTAT APP ... 25 Content . -
Page 2: Product Description
5407935-UUM-E-1020 Read all sections of this manual and keep the man- ual for future reference. WARNING Cancer and Reproductive Harm – www.P65Warnings.ca.gov PRODUCT DESCRIPTION Content The following figure shows the items in the Hx™3 Touch Screen Ther- mostat box: Thermostat User and Installer Manual Thermostat... - Page 3 5407935-UUM-E-1020 Figure 2 shows the tools required for installing the Hx 3 Touch Screen Thermostat. It is best practice that a qualified technician performs the installation. Pencil Screwdriver Level Wire Strippers Drill Hammer 3/16 in. Drill Bit (Drywall) 7/32 in. Drill Bit (Plaster) A0976-002 Figure 2: Tools for Installation Johnson Controls Ducted Systems...
-
Page 4: Features
5407935-UUM-E-1020 Features The following table describes the main features of the Hx 3 Touch Screen Thermostat. Feature Description Control of heating Uses RS485 modbus and cooling outputs Indoor temperature > 0.5°F accuracy from 60°F to 90°F sensing Connects to a standard 10k NTC thermistor Remote sensor (P/N: S1-02542683000) Operates cool-to-dehumidify functionality and... -
Page 5: Thermostat Controls
5407935-UUM-E-1020 THERMOSTAT CONTROLS IMPORTANT: Never use sharp instruments, such as a pencil or pen, to tap touch screen controls or keys. To prevent damage to the ther- mostat, always tap keys with your fingertip. To familiarize yourself with the thermostat controls, see Figures 3 and 4. Emergency Advanced Adv. - Page 6 5407935-UUM-E-1020 PIN Disable Settings Settings Settings PIN Edit General General PIN Enable Software Software Status Reset Reset Status Save System Save System Schedule Time Schedule Time Schedule Toggle Cancel Cancel Hold Fwd/Back Hold Schedule Edit Edit Schedule Settings Settings Service Service A1190-001 Figure 4: Thermostat controls...
-
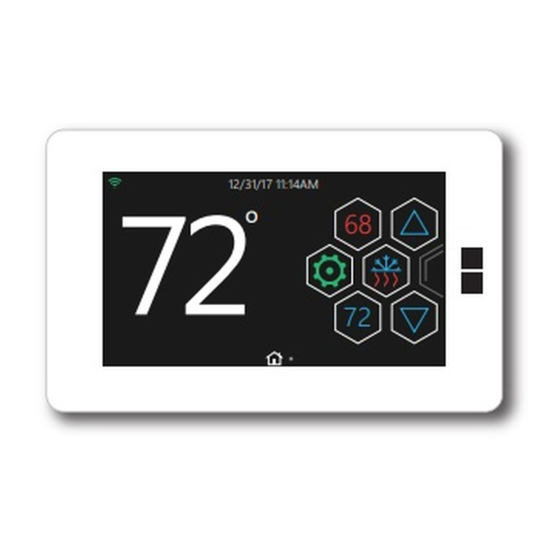
Page 7: Home Screen
5407935-UUM-E-1020 Home Screen For a quick reference guide to the Home screen, see Figure 5. Banner Wi-Fi Signal Settings Heat Set Point Information Up/Down Arrows Mode Status Settings Auto Cool To Cool Set Point Page Room Home Indicator Temperature Swipe to reach the Secondary Home Screen A1191-001 Figure 5: Home screen... -
Page 8: Secondary Home Screen
5407935-UUM-E-1020 Secondary Home Screen On the Home screen, swipe left to reach the Secondary Home screen. The Secondary Home screen allows you to do the following: • Access the Settings screen. • Activate Max Heat mode or Max Cool mode. •... -
Page 9: Modes Of Operation
5407935-UUM-E-1020 Modes of Operation Home Icons Auto Heat Cool Heat Cool Settings Mode Mode Status Icons Mode Heat Cool Auto E-Heat Heat Cool Auto Emergency Heat Cancel Hold Schedule Cancel Hold A1193-001 Figure 7: Home and mode status icons On the Home screen, different modes of operation are available: •... - Page 10 5407935-UUM-E-1020 Activating Auto Mode You can activate Auto mode on the Home screen. See Figure 5. For automatic heating, on the Home screen, tap the Heat setpoint (red) and use the Up/Down arrows to select the required setpoint. For automatic cooling, on the Home screen, tap the Cool setpoint (blue) and use the Up/Down arrows to select the required setpoint.
-
Page 11: Settings
5407935-UUM-E-1020 SETTINGS Use the Settings screen to configure the thermostat settings. For an overview of the settings icons, see Figure 10. SETTINGS Comfort Service General Schedule System Away A1196-001 Figure 10: Settings icons Tap the Comfort, General, or System icons to access the secondary settings screens (see below for the options available on each screen). -
Page 12: Away Mode
5407935-UUM-E-1020 Away Mode AWAY SETPOINTS Reset Reset Heat Cool Save Cancel A1244-001 Figure 11: Away mode Use Away mode to select setpoints outside the schedule. This is useful if you want to adjust heating and cooling for periods when you are not at home. -
Page 13: Humidity Settings
5407935-UUM-E-1020 Humidity Settings Auto & Manual Mode Humidity HUMIDITY AUTO AUTO Dehum DEHUM AUTO A1197-001 Figure 12: Humidity settings To move between automatic and manual mode, tap Auto or Man. See Figure 12. • In manual mode, you can change setpoints by tapping the Up/Down arrows. -
Page 14: Fan Settings
5407935-UUM-E-1020 Fan Settings To view or change the fan settings: 1. On the Secondary Home screen, tap the Fan icon. 2. Tap the Up/Down arrows to view or select fan settings as shown in Figure 13. For the different fan options, see Figure 14. Up/Down Arrows Settings A1199-001... -
Page 15: Lockout Settings
5407935-UUM-E-1020 Lockout Settings You can lock your thermostat by setting a PIN. You can do this to prevent someone from tampering with your thermostat, for example. To activate the Lockout setting and set a PIN: 1. On the Home screen, tap the Settings icon. 2. -
Page 16: Banner Information
5407935-UUM-E-1020 Banner Information Banner Information Scroll Bar DATE & TIME STATUS OUTDOOR HUMIDITY TEMP A1202-001 Figure 18: Banner information DELAY ACTIVE A1203-001 Figure 19: Banner information To specify the information shown in the banner of the thermostat: 1. On the Settings screen, tap the General icon, then tap the Banner icon. -
Page 17: Advanced Settings
5407935-UUM-E-1020 ADVANCED SETTINGS To configure the thermostat, go to the Advanced Settings screen. See Figure 20. When you select an entry from the list of advanced settings, a selection screen similar to the one shown in Figure 21 displays. A1204-001 Figure 20: Advanced settings Cancel Save... -
Page 18: Schedule
5407935-UUM-E-1020 The following advanced settings are available: • Synch Time to Server: If the thermostat is connected to a Wi-Fi router, both the date and time are synced with the server based on the timezone of the smart device used to connect the thermostat to the router. - Page 19 5407935-UUM-E-1020 Understanding Schedule Settings On the Schedule Settings screen, tap the buttons to enable the required schedule settings. When a setting is enabled, a check mark is displayed. Use the scroll bar to view all options. As shown in Figure 22, you can choose one of the following modes: •...
- Page 20 5407935-UUM-E-1020 Override settings are also available on the Schedule Settings screen. See Figures 23 and 24. These are only applicable in Programmable mode. If you want to suspend the set schedule, you can choose one of the following options: • Until Cancelled: Overrides the schedule until you tap the Cancel Hold icon •...
- Page 21 5407935-UUM-E-1020 When you select an override setting, if you tap the Up/Down arrows on the Home screen, the schedule Cancel Hold icon Cancel appears. Tap the Cancel Hold icon to revert the system to the Hold set schedule. The Cancel Hold icon disappears. Editing the Schedule Day Part Selection Area Example MONDAY...
- Page 22 5407935-UUM-E-1020 To edit the schedule: 1. On the Schedule screen, swipe left or right to navigate to the day of the week that you want to edit, for example, Monday. 2. Tap the day part you want to edit, for example, Monday Awake. See the example outlined in green in Figure 25.
- Page 23 5407935-UUM-E-1020 EVENTS - MONDAY Save Part Cancel A1212-001 Figure 28: Events screen MONDAY Copy º º Events 06:00am 08:00am Awake Leave Default º º A1213-001 Figure 29: Schedule screen - two day part Johnson Controls Ducted Systems...
-
Page 24: Wi-Fi Network Status
5407935-UUM-E-1020 Wi-Fi Network Status Connectivity Information WIRELESS STATUS Wi-Fi Signal SSID myhome_wifi-2.4 98f175bc97f AC000W000221268 DISCONNECT Green = Connected Red = Not Connected A1231-001 Figure 30: Wireless status screen To connect the Hx 3 Touch Screen Thermostat to a Wi-Fi network, you must perform wireless setup using the Wireless Status screen and the Hx™... -
Page 25: Hx Thermostat App
5407935-UUM-E-1020 Hx THERMOSTAT APP The Hx Thermostat app is available for Apple iOS at the App Store or Android devices at Google Play. Search for Hx Thermostat. Registration and Login Sarah Smith A1412-001 Figure 31: Sign up Figure 32: Check your email Part 1: Register for a Hx Thermostat App account 1. -
Page 26: Wi-Fi Connectivity
5407935-UUM-E-1020 NOTICE Only one email account can be registered to a Hx 3 Touch Screen Thermostat. If more than one user needs to use the app, use the same email address when logging in on additional phones or tablets. Do not create additional accounts for your thermostat. Creating an additional account will unpair your device from the first account. - Page 27 5407935-UUM-E-1020 A1413-001 Figure 33: Connect your thermostat A1414-001 A1415-001 Figure 34: Scan QR code Figure 35: Enter SSID Johnson Controls Ducted Systems...
- Page 28 5407935-UUM-E-1020 Part 2: Complete wireless setup NOTICE You must connect the thermostat to the 2.4 GHz frequency on dual band routers. A1416-001 Figure 36: Wireless location 1. Select the network Wi-Fi. 2. Enter the password. 3. Enter the location name, for example, Home. The location name is a name for the thermostat.
-
Page 29: App Home Screen
5407935-UUM-E-1020 NOTICE The smart device might be connected to the RIPL network. In this case, go to the smart device settings and, under Wi-Fi, choose the option to forget the RIPL network. App Home Screen Both the app and the thermostat update with changes you make to either. Room name pull-down Temperature... - Page 30 5407935-UUM-E-1020 Select mode • Tap the mode button for mode options (set to Auto in Figure 37). The Select mode screen will appear with equipment-specific modes: Auto, Heat, Cool, and Off. See Figure 38. • Tap Advanced modes to select Max Heat, Max Cool and Emer- gency heat.
-
Page 31: Schedules
5407935-UUM-E-1020 SCHEDULES A1420-001 A1421-001 Figure 40: Schedules screen Figure 41: Edit Schedule You can use the Schedule and Schedule Hold Length settings to man- age the thermostat schedule. To adjust the schedule: 1. From the App Home Screen bottom bar, select Schedules. 2. - Page 32 5407935-UUM-E-1020 5. Repeat step 2 to step 4 to edit the day parts in each day as required. The following options are available on the Schedules screen: • Default: Allows you to reset the schedule to the default schedule. • Events: For a two day part schedule, tap the Leave event, then, at the bottom of the screen, tap Delete Leave &...
-
Page 33: Settings
5407935-UUM-E-1020 SETTINGS To access the app settings, tap the Settings icon on the app bottom bar. The settings are explained below. About Hx Software version, Help, Terms & Privacy Rate Do you like or dislike what you see? Feel free to use this function to rate this app. - Page 34 5407935-UUM-E-1020 Vacation (Zoning only) Enable or disable vacation mode and set temperature range. Humidity Adjust humidify and dehumidify setpoints manually or set to Auto mode. System info View thermostat software and System logs. Under System logs, you can email system logs to the dealer. Delete thermostat Delete a thermostat from the app.
-
Page 35: Managing Dealer Access
5407935-UUM-E-1020 MANAGING DEALER ACCESS You can allow dealers to access your system, for example, to enable them to view the system and diagnose issues. You do this through the Grant dealer access screen, which is accessible if you receive an email from the dealer requesting access. -
Page 36: Using The Access Types Screen
5407935-UUM-E-1020 You can not review the dealer access options if you open the link using your PC, laptop, or Mac. When you select the link, the Grant dealer access screen appears. On this screen, you can change the role type, duration, and locations as needed, and grant access to the dealer. -
Page 37: Geo-Fencing
5407935-UUM-E-1020 GEO-FENCING Use the toggle button to enable or disable the Geo-fencing feature. Zoom in and out of the map to specify a region boundary within 1 mile to 25 miles of your home (the scale adjusts accordingly). When enabled, the Geo-fencing feature triggers specific actions when your smart device enters or exits the specified region. -
Page 38: Amazon Alexa Setup
5407935-UUM-E-1020 AMAZON ALEXA SETUP You can use Alexa with the Hx 3 Touch Screen Thermostat. Ensure that Alexa is installed, enabled, and connected to your home Wi-Fi network, and that the Alexa app is installed on a smart device. From the Settings screen, tap Connect Alexa and follow the in-app instructions. -
Page 39: Alexa Skill Voice Commands
5407935-UUM-E-1020 Alexa Skill Voice Commands The following table provides examples of Alexa skill voice commands. Command Utterances “Alexa, set {Room Name} to {number} degrees" "Alexa, set {Room Name} to {number}" "Alexa, set the {Room Name} temperature to {number} degrees" Set device temperature "Alexa, change the {Room Name} to {number} degrees"... - Page 40 5407935-UUM-E-1020 Command Utterances Turn device "Alexa, turn off {Room Name fan}" fan off Turn device "Alexa, turn on {room Name fan}" fan on "Alexa, turn {Room Name} to Cool" "Alexa, turn {Room Name} to Heat" Change mode "Alexa, turn {Room Name} to Auto" "Alexa, turn {Room Name} Off"...
-
Page 41: Apple Watch Setup
5407935-UUM-E-1020 APPLE WATCH SETUP To use the Hx Thermostat app on the Apple Watch: 1. Pair the Apple Watch to an iPhone. 2. Download the Hx Thermostat app to the iPhone. 3. Log in to the Hx Thermostat app. Note that the interface on the Apple Watch is similar to the interface on the iPhone. - Page 42 5407935-UUM-E-1020 NOTES Johnson Controls Ducted Systems...
- Page 43 If a Dealer response is not received within a reasonable amount of time, notify Company at: Johnson Controls Unitary Products, Consumer Relations, 5005 York Drive, Norman, OK 73069 or by telephone at (877) 874-7378. All warranty service or repair will be performed during regular business hours, Monday through Friday 9:00 AM - 5:00 PM.
- Page 44 You may also have other rights which vary from state to state. Subject to change without notice. Published in U.S.A. 5407935-UUM-E-1020 Copyright © 2020 by Johnson Controls. All rights reserved. Supersedes: 5407935-UUM-D-1119 York International Corp. 5005 York Drive Norman, OK 73069...