Table of Contents
Advertisement
Available languages
Available languages
Quick Links
Advertisement
Chapters
Table of Contents

Related Manuals for Motorola XT220


Summary of Contents for Motorola XT220
- Page 1 Two-Way Radios User Guide XT220 Non Display Model T220 N...
-
Page 3: Table Of Contents
Power Supply and Charger ..12 CONTENTS Holster ......12 Charging with the Drop-in Tray Single Unit Contents. - Page 4 CTCSS and DPL Codes ....39 Motorola Solutions Limited Warranty ..42 Accessories ......44 Battery .
-
Page 5: Computer Software Copyrights
Solutions products shall not be deemed to COPYRIGHTS grant either directly or by implication, estoppel, or otherwise, any license under the copyrights, The Motorola Solutions products described in patents or patent applications of Motorola this manual may include copyrighted Motorola Solutions, except for the normal non-exclusive... -
Page 6: Safety
For a list of Motorola Solutions-approved SAFETY antennas, batteries and other accessories, visit the following website which lists approved PRODUCT SAFETY AND RF accessories: EXPOSURE COMPLIANCE www.motorolasolutions.com/XTSeries Before using this product, read the operating instructions and RF energy awareness information... -
Page 7: Batteries And Chargers Safety Information
Use of accessories not recommended by To reduce risk of electric shock, unplug the Motorola Solutions may result in risk of fire, charger from the AC outlet before attempting electric shock, or injury. -
Page 8: Operational Safety Guidelines
OPERATIONAL SAFETY exceed the ratings stated on the product label located at the bottom of the charger. GUIDELINES • Make sure that the cord is located where it will • Turn the radio OFF when charging battery. not be stepped on, tripped over, or subjected to •... -
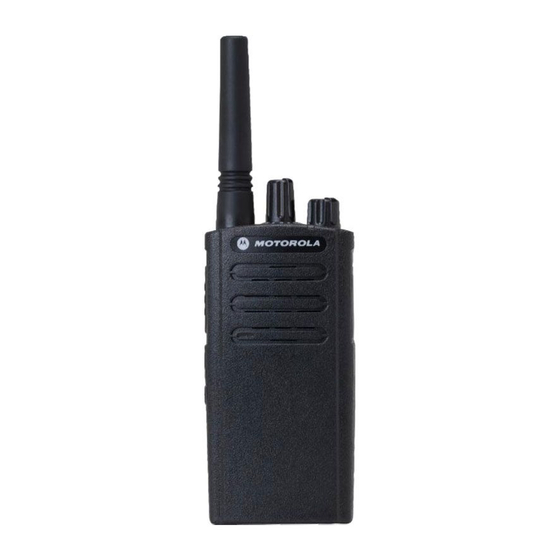
Page 9: Radio Overview
RADIO OVERVIEW PARTS OF THE RADIO Channel Selector Knob Antenna On/Off/Volume Knob Microphone Audio Accessory 2 Pin Connector Indicator PTT (Push-To- Talk) Button Battery SB1 - CTCSS/ DPL Defeat / Model Label Monitor SB2 - Scan/ XT220 Nuisance Channel Delete English... -
Page 10: On/Off/Volume Knob
On/Off/Volume Knob Side Buttons Used to turn the radio ON or OFF and to adjust Push-to-Talk (PTT) Button the radio’s volume. • Press and hold down this button to talk, release it to listen. Channel Selector Knob Side Button 1 (SB1) Used to switch the radio to different channels. - Page 11 This User Guide covers model XT220. The model number of the radio is shown at the bottom of the radio, underneath the speaker and provides the following information: Table 1: XT220 Radio Specifications Transmit Number of Frequency Model Power Antenna...
-
Page 12: Batteries And Chargers
Motorola Solutions batteries are designed BATTERY FEATURES AND CHARGING specifically to be used with a Motorola OPTIONS Solutions charger and vice versa. Charging in About the Li-Ion Battery non-Motorola Solutions equipment may lead to The XT Series radio comes equipped with a battery damage and void the battery warranty. -
Page 13: Installing The Li-Ion Battery
18 Hours Tabs Slots Turn OFF the radio. With the Motorola Solutions logo side up on the battery pack, fit the tabs at the bottom of the battery into the slots at the bottom of the radio body. Press the top part of the battery towards the radio until a click is heard. -
Page 14: Power Supply And Charger
To remove, detach the top clip of the holster from the top latch of the battery. Slide the radio up from the holster. Note: To charge the battery (with the radio attached), place it in a Motorola Solutions approved Charger or Multi Unit Charger. English... -
Page 15: Charging With The Drop-In Tray Single Unit Charger
Charging with the Drop-in Tray Single Unit Charging A Stand-Alone Battery Charger Charger Charger Port Power Supply (Transformer) Place the Charger on a flat surface. Insert the connector of the Power Supply into To charge only the battery - at step 4 on the port on the side of the Charger. -
Page 16: Charger Led Indicators
Charger LED Indicators Table 2: Charger LED Indicator Status LED Status Comments Power On Green for approx. 1 sec Charging Steady red Charge Complete Steady green Red fast flash Battery Fault (*) Amber slow flash Waiting to charge (**) Flash red 1 time Battery low Flash amber 2 times Battery Level Status... -
Page 17: Estimated Charging Time
Estimated Charging Time The following table provides the estimated charging time of the battery. For more information, see “Battery” on page 44. Table 3: Battery Estimated Charging Time Estimated Charging Time Charging Solutions Standard Battery Standard ~4 Hours English... - Page 18 Charging a Radio and Battery using Place the MUC on a flat surface. a Multi Unit-Charger - MUC (Optional Insert the power cord plug into the MUC’s jack. Accessory) Plug the power cord into an AC outlet. Turn the radio OFF. Insert the radio or battery into the charging pocket with the radio or battery facing front.
-
Page 19: Multi Unit Charger Led Indicators
Multi Unit Charger LED Indicators Table 4: Charger LED Indicator Status LED Status Comments Power On Green for approx. 1 sec Charging Steady red Charge Complete Steady green Red fast flash Battery Fault (*) Amber slow flash Waiting to charge (**) Flash red 1 time Battery low Flash amber 2 times... -
Page 20: Getting Started
SELECTING A CHANNEL GETTING STARTED To select a channel, rotate the Channel Selector Knob and select the desired channel For the following explanations, refer to “Parts number. Of The Radio” on page 7. Each channel has its own Frequency and TURNING RADIO ON/OFF Interference Eliminator Code. -
Page 21: Receiving A Call
TALK RANGE Notes: XT Series radios have been designed to • To listen to all activity on a current channel, short maximize performance and improve press the SB1 to set the CTCSS/DPL code to 0. transmission range in the field. It is This feature is called ‘CTCSS/DPL Defeat’. - Page 22 Channel: Current channel that the radio is using, depending upon radio model. Frequency: The frequency the radio uses to transmit/receive. Interference Eliminator Code: These codes help minimize interference by providing a choice of code combinations. For details of how to set up frequencies and CTCSS/DPL codes in the channels, refer to “Programmable Features”...
-
Page 23: Radio Led Indicators
RADIO LED INDICATORS RADIO STATUS LED INDICATION Channel Busy Solid Orange Cloning Mode Two Orange Heartbeats Cloning In Progress Solid Orange Error (at Power Up or during One Green Blink, One Orange Blink, One Green Blink, then repeat for 4 Cloning) seconds Low Battery... -
Page 24: Hands-Free Use/Vox
To transmit, speak into accessory microphone Accessory Port/ and to receive, stop talking. Connector Note: To order accessories, contact your Motorola Motorola Solutions XT Series radios can Solutions point of purchase. operate hands-free (VOX) when used with Hands Free without Accessories (iVOX) compatible VOX accessories. -
Page 25: Reset To Factory Defaults
environments. VOX / iVOX sensitivity can be programmed via the CPS. Default value is OFF (Level 0). If you want to use the VOX feature, VOX level should be set at a different level from 0. • 1 = Low sensitivity •... -
Page 26: Programmable Features
(*) CPS Programming Cable P/N HKKN4027_ is an accessory sold Figure 1: Setting up the radio to the CPS separately. Please contact your Motorola Solutions point of purchase for more The easiest way to program or change features information. in your radio is by using the Computer... -
Page 27: Frequencies Selection
Frequencies Selection You can respond to the caller on that channel without having to switch channels by pressing The Select Frequencies feature allows you to the PTT button. choose frequencies from a pre-defined list. • To stop scanning, short press the SBx button CTCSS/DPL Codes again. -
Page 28: Time-Out Timer
To delete a channel from the Scan List: HELP file in the CPS. • Some of the features available with the CPS • To start scanning, press the Scan button. software may vary depending on the radio model. • Wait until radio pauses on the channel you wish to eliminate. -
Page 29: Cloning Radios
CLONING RADIOS To clone radios using the MUC, there must be at least two radios: You can clone XT 220 radio profiles from one Source radio to a Target radio by using any one • a Source radio (radio which profiles will be cloned of these 3 methods: or copied from) and •... - Page 30 • MUC pockets numbers should be read from left to shows solid orange, then back to two orange right with the Motorola Solutions logo facing front. heartbeats when cloning is completed. Radio LED Indicator shows a sequence of one green blink, one orange blink, one green blink repeatedly if cloning failed.
-
Page 31: Cps And Cloning Cables
CPS cable is made to program XT Series radio. Make sure the switch is in “Flash” position. • Cloning cable allows you to clone: –XT series of the same model (E.g.: XT220 with XT220). Make sure the switch is in “Cloning” position. Cloning Cable... -
Page 32: Cloning Radio Using The Radio To Radio
Cloning Radio using the Radio to Radio Plug one side of the cloning cable mini USB (R2R) Cloning Cable (Optional Accessory) connector to the first SUC and the other end to the second SUC. Note: During the cloning process, no power is being applied to the SUC. - Page 33 Note: This cloning cable is designed to operate repeatedly if cloning failed. In the event that the only with compatible Motorola Solutions cloning fails, perform each of the following SUC. steps before attempting to start cloning process...
-
Page 34: Cloning Using The Computer Programming Software (Cps)
Cloning using the Computer Programming Software (CPS) When cloning using this method, you need the Radio to be CPS software, a Charger and the CPS programmed Programming Cable. To order the CPS Programming Cable, please refer to P/N# HKKN4027_. Information on how to clone using the CPS is USB Ports available either in: CPS Programming Cable... -
Page 35: Troubleshooting
TROUBLESHOOTING Symptom Try This... Recharge or replace the Li-Ion battery. No Power Extreme operating temperatures may affect battery life. Refer to “About the Li-Ion Battery” on page 10 Confirm Interference Eliminator Code is set. Frequency or Interference Eliminator Code may be in use. Hearing other noises or Change settings: either change frequencies or codes on all radios. - Page 36 Symptom Try This... Check for clear line of sight to improve transmission. Wearing radio close to body such as in a pocket or on a belt decreases range. Limited talk range Change location of radio. Refer to “Talking and Monitoring” on page 18 Make sure the PTT button is completely pressed when transmitting.
- Page 37 Symptom Try This... Radios are too close; they must be at least five feet apart. Heavy static or interference Radios are too far apart or obstacles are interfering with transmission. Refer to “Talking and Monitoring” on page 18. Recharge or replace Li-Ion battery. Low batteries Extreme operating temperatures affect battery life.
- Page 38 Symptom Try This... VOX feature might be set to OFF. Use the CPS to ensure that the VOX Sensitivity level is not set to ‘0’. Cannot activate VOX Accessory not working or not compatible. Refer to “Hands-Free Use/VOX” on page 22. Check Charger is properly connected and correspond to a compatible power supply.
-
Page 39: Use And Care
USE AND CARE Use a soft damp cloth to Do not immerse in water Do not use alcohol or clean the exterior cleaning solutions If the radio is submerged in water... Turn radio OFF and Dry with soft cloth Do not use radio until remove batteries completely dry English... -
Page 40: Frequency And Code Charts
FREQUENCY AND CODE CHARTS The charts in this section provide Frequency and Code information. These charts are useful when using the Motorola Solutions XT220 two-way radios with other business radios. Default Channel Frequency and Interference Eliminator Code Frequency Frequency Frequency #... -
Page 41: Ctcss And Dpl Codes
CTCSS AND DPL CODES CTCSS Codes CTCSS CTCSS CTCSS 67.0 107.2 167.9 71.9 110.9 173.8 74.4 114.8 179.9 77.0 118.8 186.2 79.7 192.8 82.5 127.3 203.5 85.4 131.8 210.7 88.5 136.5 218.1 91.5 141.3 225.7 94.8 146.2 233.6 97.4 151.4 241.8 100.0 156.7... - Page 42 DPL Codes Code Code Code English...
- Page 43 DPL Codes (Continued) Code Code Code English...
-
Page 44: Motorola Solutions Limited Warranty
Defects of damage from improper testing, to your dealer or retailer to claim your warranty operation, maintenance, adjustment or any service. Do not return your radio to Motorola alteration or modification of any kind. Solutions. To be eligible to receive warranty service, you must present your receipt of purchase •... - Page 45 • Products rented on a temporary basis. • Periodic maintenance and repair or replacement of parts due to normal usage, wear and tear. English...
-
Page 46: Accessories
CHARGERS ACCESSORIES Part No. Description BATTERY Standard Multi Unit Charger Int. Part No. Description PMLN6385_ EU/UK PMMN4434_R Standard Li-Ion Battery Standard Single Unit Charger PMLN6393_ UK/EU Kit SOFTWARE APPLICATION CARRY ACCESSORY Part No. Description Part No. Description Computer Programming 82012693001 Software (CPS) HKLN4510_ XT Swivel Holster... - Page 47 MOTOROLA, MOTO, MOTOROLA SOLUTIONS and the Stylized M logo are trademarks or registered trademarks of Motorola Trademark Holdings, LLC and are used under license. All other trademarks are the property of their respective owners.
- Page 48 Notes English...
- Page 49 Caractéristiques et options de SOMMAIRE charge des batteries....10 À propos de la batterie lithium-ion ..10 Sommaire ......1 Installation de la batterie Droits d'auteur relatifs aux au lithium-ion (Li-Ion) .
- Page 50 Codes CTCSS et DPL ....39 Configuration de la sensibilité VOX ..23 Garantie limitée Motorola solutions ..42 Rétablir aux paramètres par défaut ..23 Accessoires .
-
Page 51: Droits D'auteur Relatifs Aux
écrite des DROITS D'AUTEUR propriétaires des droits. RELATIFS AUX LOGICIELS En outre, l'acquisition de ces produits Motorola INFORMATIQUES Solutions ne saurait en aucun cas conférer, directement, indirectement ou de toute autre Les produits Motorola Solutions décrits dans ce manière, aucune licence, aucun droit d'auteur,... -
Page 52: Sécurité
Pour obtenir la liste des antennes, batteries et SÉCURITÉ autres accessoires approuvés par Motorola Solutions, visitez le site Web suivant : SÉCURITÉ DU PRODUIT ET www.motorolasolutions.com/XTSeries EXPOSITION AUX FRÉQUENCES RADIO Avant d'utiliser ce produit, veuillez lire les instructions d'utilisation et les informations... -
Page 53: Consignes De Sécurité Relatives Aux Batter
L'utilisation d'accessoires non agréés par CONSIGNES DE SÉCURITÉ Motorola Solutions peut présenter un risque RELATIVES AUX d'incendie, de décharge électrique ou de BATTERIES ET blessure. CHARGEURS Lorsque vous déconnectez le chargeur, tirez sur la prise et non sur le câble d'alimentation afin Ce document contient des instructions d'utilisation d'éviter de les endommager. -
Page 54: Consignes De Sécurité Lors Du Fonctionnement
Ne démontez pas le chargeur ; il ne peut pas • Déconnectez le chargeur de la ligne sous tension être réparé et des pièces de rechange ne sont en retirant la fiche d'alimentation secteur. pas disponibles. Le démontage du chargeur •... -
Page 55: Présentation De La Radio
PARTIES DE LA RADIO Bouton du sélecteur de canal Antenne Bouton Marche/ Arrêt/Volume Microphone Connecteur 2 broches Voyant pour accessoire audio Bouton PTT (Push-To-Talk) Batterie SB1 - Ignorer CTCSS/DPL/ Étiquette du modèle Contrôle SB2 - XT220 Balayage/ suppression de canal nuisible Français... -
Page 56: Bouton Marche/Arrêt/Volume
Bouton Marche/Arrêt/Volume Voyant LED Utilisé pour allumer/éteindre la radio et pour Utilisé pour indiquer l'état de la batterie, l'état régler le volume de la radio. de mise sous tension, les informations d'appel radio et l'état du balayage. Bouton du sélecteur de canal Boutons latéraux Utilisé... -
Page 57: Batterie Li-Ion (Lithium-Ion)
Batterie Li-Ion (Lithium-Ion) Ce Guide de l'utilisateur traite du modèle XT220. Le numéro de modèle de la La radio de série XT est fournie avec une radio est indiqué en bas de la radio, sous le batterie au lithium-ion de capacité standard. -
Page 58: Batteries Et Chargeurs
25 % lithium-ion, fournies avec différentes capacités dure encore plus longtemps. qui définissent la durée de vie de la batterie. Les batteries Motorola Solutions sont conçues CARACTÉRISTIQUES ET OPTIONS DE spécifiquement pour être utilisées avec un CHARGE DES BATTERIES chargeur Motorola Solutions et inversement. -
Page 59: Installation De La Batterie Au Lithium-Ion (Li-Ion)
Standard 14 heures 18 heures Éteignez la radio. Avec le logo Motorola Solutions de la batterie orienté vers le haut, placez les languettes situées en bas de la batterie dans les encoches situées en bas de la radio. Appuyez sur la partie supérieure de la batterie vers la radio jusqu'à... -
Page 60: Alimentation Et Chargeur
Pour la retirer, retirez le clip de l'étui de la languette supérieure de la batterie. Faites glisser la radio pour la sortir de l'étui. Remarque : pour charger la batterie (fixée à la radio), placez-la dans un chargeur ou un chargeur multi-unités agréé par Motorola Solutions. Français... -
Page 61: Chargement Avec Le Chargeur À Support Pour Unité Unique (Suc)
Chargement avec le chargeur à support Charger une batterie autonome pour unité unique (SUC) Chargeur Port de chargeur Alimentation (Transformateur) Placez le chargeur sur une surface plane. Insérez le connecteur de l'alimentation dans le port situé sur le côté du chargeur. Pour recharger uniquement la batterie : à... -
Page 62: Voyants Led Du Chargeur
Voyants LED du chargeur Tableau 2 : Voyant LED du chargeur État État du voyant LED Commentaires Mise sous tension Vert pendant environ 1 s Chargement Rouge fixe Charge terminée Vert fixe Clignotement rouge rapide Problème de batterie (*) En attente de charge (**) Clignotement orange lent Clignotement rouge 1 fois Niveau de charge de la batterie faible État de niveau de... -
Page 63: Durée De Charge Estimée
Durée de charge estimée Le tableau suivant fournit la durée de charge estimée de la batterie. Pour de plus amples informations, consultez la section « Batterie » à la page 44. Tableau 3 : Durée de charge estimée de la batterie Durée de charge estimée Solutions de charge Batterie standard... - Page 64 Charge de la radio et de batterie grâce à un Placez le MUC sur une surface plane. chargeur multi-unités - MUC (accessoire en Branchez le cordon d'alimentation sur la prise option) du MUC. Branchez le cordon d'alimentation sur une prise CA. Éteignez la radio.
-
Page 65: Voyants Led Du Chargeur Multi-Unités
Voyants LED du chargeur multi-unités Tableau 4 : Voyant LED du chargeur État État du voyant LED Commentaires Mise sous tension Vert pendant environ 1 s Chargement Rouge fixe Charge terminée Vert fixe Clignotement rouge rapide Problème de batterie (*) En attente de charge (**) Clignotement orange lent Clignotement rouge 1 fois Niveau de charge de la batterie faible... -
Page 66: Mise En Route
Remarque : ne placez pas la radio trop proche de MISE EN ROUTE l'oreille lorsque le volume est élevé ou lorsque vous réglez le volume. Pour les explications ci-après, reportez-vous à la section « Parties de la radio » à la page 7. SÉLECTION D'UN CANAL Pour sélectionner un canal, tournez le bouton MISE SOUS TENSION/HORS TENSION DE... -
Page 67: Réception D'un Appel
Remarques : Remarque : le voyant LED reste allumé en rouge fixe lorsque la radio reçoit ou transmet. • Pour écouter toutes les activités d'un canal, appuyez brièvement sur le bouton SB1 pour PORTÉE DE COMMUNICATION définir le code CTCSS/DPL sur 0. Cette Les radios de série XT ont été... - Page 68 La portée optimale est obtenue dans les Pour plus de détails sur la configuration des espaces ouverts et plats, avec une couverture fréquences et des codes CTCSS/DPL sur les allant jusqu'à 9 kilomètres. Si des bâtiments ou canaux, consultez la section « Fonctionnalités des arbres font obstacle, vous obtiendrez une programmables »...
-
Page 69: Voyants Led De La Radio
VOYANTS LED DE LA RADIO STATUT RADIO Canal occupé Orange continu Mode Clonage Deux pulsations orange Clonage en cours Orange continu Erreur (lors de la mise sous Un clignotement vert, un clignotement orange, un clignotement vert, puis tension ou pendant le clonage) répétition pendant 4 secondes Batterie faible Clignotement orange... -
Page 70: Utilisation Mains Libres/Vox
Port/connecteur l'accessoire. Pour recevoir, arrêtez de parler. d'accessoire Remarque : pour commander des accessoires, Les radios de série Motorola Solutions XT contactez votre point de vente Motorola peuvent fonctionner en mains libres (VOX) Solutions. lorsqu'elles sont utilisées avec des accessoires Mains libres sans accessoires (iVOX) VOX compatibles. -
Page 71: Configuration De La Sensibilité Vox
Configuration de la sensibilité VOX La sensibilité de l'accessoire ou du microphone de la radio peut être ajustée pendant l'utilisation VOX pour s'adapter à différents environnements de fonctionnement. La sensibilité VOX/iVOX peut être programmée via CPS. La valeur par défaut est Désactivé (niveau 0). Si vous souhaitez utiliser la fonctionnalité... -
Page 72: Fonctionnalités Programmables
Le moyen le plus simple pour programmer ou FONCTIONNALITÉS modifier des fonctionnalités de votre radio est PROGRAMMABLES d'utiliser le logiciel Computer Programming Software (CPS) et le câble de programmation COMPUTER PROGRAMMING SOFTWARE CPS(*). Le logiciel CPS peut être téléchargé à (CPS) l'adresse suivante : www.motorolasolutions.com/XTSeries... -
Page 73: Sélection Des Fréquences
Le balayage vous permet de surveiller d'autres séparément. Veuillez contacter votre canaux pour détecter des conversations. point de vente Motorola Solutions pour Lorsque la radio détecte une transmission, elle obtenir plus d'informations. cesse son balayage et reste sur le canal actif. -
Page 74: Suppression D'un Canal Nuisible
• Si un code de réduction des interférences est • Attendez que la radio s'arrête sur le canal que défini pour le canal, la radio doit détecter le vous voulez éliminer. Appuyez sur le bouton même code avant de s'y arrêter. Suppression d'un canal nuisible pour supprimer temporairement ce dernier de la •... -
Page 75: Verrouillage De Canal Occupé
Remarques : • via un chargeur à unité unique (SUC) et un câble de clonage radio à radio (accessoire en option) ; • Les fonctionnalités décrites dans les pages précédentes ne sont que quelques-unes des • via le CPS (téléchargement du logiciel gratuit). fonctions du CPS. - Page 76 La radio source doit être dans le Compartiment Placez la radio source dans le compartiment de de charge 1 ou 4 et la radio cible dans le charge source couplé au compartiment cible Compartiment de charge 2 ou 5, en couplant que vous avez choisi lors de l'étape 1.
-
Page 77: Câbles De Clonage Et Cps
« Flash ». • Le câble de clonage vous permet de cloner : – les radios de série XT du même modèle (par exemple : XT220 avec XT220). Assurez-vous que le commutateur est en position « Clonage ». Français... -
Page 78: Clonage Radio Via Le Câble De Clonage Radio À Radio (R2R) (Accessoire En Option)
Clonage radio via le câble de clonage radio Branchez une extrémité du connecteur mini-USB à radio (R2R) (accessoire en option) du câble de clonage au premier SUC et l'autre, au deuxième. Remarque : pendant le processus de clonage, les chargeurs à unité unique ne sont pas mis sous tension. - Page 79 Remarque : ce câble de clonage est conçu pour le clonage a échoué. Dans le cas où le clonage fonctionner exclusivement avec un chargeur à unité unique (SUC) Motorola échouerait, réalisez chacune des étapes Solutions compatible. ci-dessous avant d'essayer de redémarrer le processus de clonage : Lorsque vous commandez le câble de clonage,...
-
Page 80: Clonage Via Le Logiciel Computer
Clonage via le logiciel Computer Programming Software (CPS) Lors du clonage via cette méthode, vous avez besoin du logiciel CPS, d'un chargeur et du Radio à programmer câble de programmation CPS. Pour commander le câble de programmation CPS, indiquez la référence HKKN4027_. Des informations sur le clonage à... -
Page 81: Dépannage
DÉPANNAGE Symptôme Essayez ceci... Rechargez ou remplacez la batterie au lithium-ion. Des températures de fonctionnement extrêmes peuvent affecter son Pas d'alimentation autonomie. Reportez-vous à la section « À propos de la batterie lithium-ion » à la page 10. Vérifiez que le code de réduction des interférences est défini. La fréquence ou le code de réduction des interférences est peut-être en cours d'utilisation. - Page 82 Symptôme Essayez ceci... Recherchez une bonne visibilité directe pour améliorer la transmission. Portée de communication Porter une radio près du corps, comme dans une poche ou à la ceinture, réduit limitée la portée. Modifiez l'emplacement de la radio. Reportez-vous à la section « Communication et surveillance » à la page 18. Assurez-vous que le bouton PTT est complètement enfoncé...
- Page 83 Symptôme Essayez ceci... Les radios sont trop proches ; elles doivent être éloignées d'au moins 1,5 m. Bruits statiques ou Les radios sont trop éloignées ou des obstacles interfèrent avec la interférences excessifs transmission. Reportez-vous à la section « Communication et surveillance » à la page 18. Rechargez ou remplacez la batterie au lithium-ion.
- Page 84 Symptôme Essayez ceci... La fonction VOX est peut-être désactivée. Utilisez CPS pour vérifier que le niveau de sensibilité VOX n'est pas défini sur Impossible d'activer la « 0 ». fonction VOX L'accessoire ne fonctionne pas ou n'est pas compatible. Reportez-vous à la section « Utilisation mains libres/VOX » à la page 22. Vérifiez que le chargeur est correctement branché...
-
Page 85: Utilisation Et Entretien
UTILISATION ET ENTRETIEN Utilisez un chiffon doux pour N'immergez pas l'appareil N'utilisez pas d'alcool ou nettoyer l'extérieur. dans l'eau. de détergents. Si la radio est immergée dans l'eau... Éteignez la radio et Séchez avec un chiffon doux. N'utilisez pas la radio jusqu'à ce retirez les batteries. -
Page 86: Graphiques Des Fréquences Et Codes
GRAPHIQUES DES FRÉQUENCES ET CODES Les graphiques de cette section offrent des informations sur les fréquences et codes. Ils sont utiles lors de l'utilisation de radios professionnelles Motorola Solutions XT220 avec d'autres radios professionnelles. Fréquence de canal par défaut et code de réduction des interférences N°... -
Page 87: Codes Ctcss Et Dpl
CODES CTCSS ET DPL Codes CTCSS CTCSS CTCSS CTCSS 67,0 107,2 167,9 71,9 110,9 173,8 74,4 114,8 179,9 77,0 118,8 186,2 79,7 192,8 82,5 127,3 203,5 85,4 131,8 210,7 88,5 136,5 218,1 91,5 141,3 225,7 94,8 146,2 233,6 97,4 151,4 241,8 100,0 156,7... - Page 88 Codes DPL Code Code Code Français...
- Page 89 Codes DPL (suite) Code Code Code Français...
-
Page 90: Garantie Limitée Motorola Solutions
Tout défaut ou dommage lié à un test, une revendeur ou détaillant pour bénéficier du service utilisation, une intervention de maintenance de garantie. Ne retournez pas la radio à Motorola ou un réglage inapproprié ou à toute Solutions. Pour pouvoir bénéficier du service de modification de quelque sorte que ce soit. - Page 91 • Tout défaut ou dommage lié à l'humidité, à l'exposition à du liquide ou à une chute. • Toute surface en plastique et toute autre partie externe rayée ou endommagée suite à l'utilisation normale de la radio. • Les produits loués de manière temporaire. •...
-
Page 92: Accessoires
CHARGEURS ACCESSOIRES Référence Description BATTERIE Chargeur multi-unités standard Référence Description PMLN6385_ int. Union européenne / Royaume-Uni PMMN4434_R Batterie Li-Ion standard Kit UE/RU chargeur à unité PMLN6393_ unique standard APPLICATION LOGICIELLE Référence Description ACCESSOIRE DE TRANSPORT Référence Description Computer Programming 82012693001 Software (CPS) HKLN4510_ Étui pivotant XT... - Page 93 MOTOROLA, MOTO, MOTOROLA SOLUTIONS et le logo stylisé M sont des marques de commerce ou des marques déposées de Motorola Trademark Holdings, LLC et sont utilisés sous licence. Toutes les autres marques appartiennent à leurs propriétaires respectifs.
- Page 94 Remarque Français...
-
Page 95: İçi̇ndeki̇ler
Lityum-İyon (Li-Ion) Bataryayı Çıkarma . 11 İÇİNDEKİLER Güç Kaynağı ve Şarj Cihazı..12 Tutucu ......12 İçİndekİler. - Page 96 CTCSS ve DPL Kodları ....39 Motorola Solutions Sınırlı Garantİsİ ..42 Aksesuarlar ......44 Batarya .
-
Page 97: Bi̇lgi̇sayar Yazılımı Teli̇f Hakları
üzerinde belli münhasır haklar sağlamaktadır. Buna göre, bu kullanıcı kılavuzunda açıklanan Motorola Solutions ürünlerinde yer alan ve telif haklarıyla korunan hiçbir Motorola Solutions bilgisayar programı, Motorola Solutions'nın açık yazılı izni alınmadığı sürece hiçbir şekilde kopyalanamaz, çoğaltılamaz, değiştirilemez,... -
Page 98: Güvenli̇k
Motorola Solutions tarafından onaylanan GÜVENLİK antenlerin, bataryaların ve diğer aksesuarların listesi için, onaylı aksesuarları listeleyen ÜRÜN GÜVENLİĞİ VE RF aşağıdaki web sitesini ziyaret edin: ENERJİSİNE MARUZ KALMA www.motorolasolutions.com/XTSeries UYUMLULUĞU Bu ürünü kullanmadan önce, telsizinizle gelen Ürün Güvenliği ve RF Enerjisine Maruz Kalma kitapçığındaki... -
Page 99: Batarya Ve Şarj Ci̇hazlari Güvenli̇k
şarj cihazı, azaltmak için bozuk ya da herhangi bir şekilde • batarya ve zarar görmüş şarj cihazını çalıştırmayın. Şarj cihazını yetkin bir Motorola Solutions servis • bataryayla çalışan telsiz. temsilcisine götürün. Yaralanma riskini azaltmak için sadece Şarj cihazını parçalarına ayırmayın; şarj cihazı... -
Page 100: Güvenli̇ Çalıştırma Yönergeleri̇
GÜVENLİ ÇALIŞTIRMA • Güç kaynağı ünitesinden gelen çıkış gücü, şarj cihazının alt kısmında bulunan ürün etiketinde YÖNERGELERİ belirtilen derecelendirme değerlerini aşmamalıdır. • Bataryayı şarj ederken telsizi KAPATIN. • Kablonun kimsenin üzerine basmayacağı, • Bu cihaz dış alanda kullanım için uygun değildir. takılmayacağı... -
Page 101: Telsi̇ze Genel Bakış
TELSİZE GENEL BAKIŞ TELSİZ PARÇALARI Kanal Seçim Düğmesi Anten Açma/Kapatma Ses Düğmesi Mikrofon Ses Aksesuarı Göstergesi 2 Pimli Konektör PTT (Bas Konuş) Batarya Düğmesi SB1 - CTCSS/ DPL Erteleme / Model Etiketi İzleme SB2 - Tarama/ XT220 İstenmeyen Kanal Silme Türkçe... -
Page 102: Açma/Kapatma Ses Düğmesi
Açma/Kapatma Ses Düğmesi Yan Düğmeler Telsizi AÇMAK ya da KAPATMAK ve telsiz Bas Konuş (PTT) Düğmesi sesini ayarlamak için kullanılır. • Konuşmak için bu düğmeyi basılı tutun, dinlemek için serbest bırakın. Kanal Seçim Düğmesi Yan Düğme 1 (SB1) Telsizde farklı kanallara geçmek için kullanılır. •... - Page 103 Bu Kullanım Kılavuzu, XT220 modelini içermektedir. Telsizin model numarası alt kısmında, hoparlörün altında gösterilir ve şu bilgileri sağlar: Tablo 1: XT220 Telsiz Özellikleri Frekans Yayın Gücü Model Kanal Sayısı Anten Bandı (Watt) XT220 PMR446 Çıkarılamaz Türkçe...
-
Page 104: Bataryalar Ve Şarj Ci̇hazları
BATARYALAR VE edilen ve ortalama olarak sadece %25 boşalan ŞARJ CİHAZLARI bir batarya daha da uzun dayanır. Motorola Solutions bataryalar özel olarak bir XT Serisi telsizler, batarya ömrünü belirleyen Motorola Solutions şarj cihazıyla kullanılmak farklı kapasitelere sahip Lityum-İyon üzere tasarlanmıştır (tersi de geçerlidir). -
Page 105: Lityum-İyon (Li-Ion) Bataryayı Takma
KAPALI AÇIK Tırnaklar Yuvalar Standart 14 Saat 18 Saat Telsizi KAPATIN. Batarya paketi üzerindeki Motorola Solutions logosu yukarıda olacak şekilde bataryanın altındaki tırnakları telsiz gövdesinin altındaki yuvalara geçirin. Bataryanın üst kısmını bir klik sesi duyana kadar telsize doğru bastırın. Türkçe... -
Page 106: Güç Kaynağı Ve Şarj Cihazı
Çıkarmak için, tutucunun üst klipsini bataryanın üst mandalından sökün. Telsizi tutucudan yukarı doğru kaydırın. Not: Bataryayı şarj etmek için (telsize takılı olarak), Motorola Solutions onaylı bir Şarj Cihazına veya Çok Üniteli Şarj Cihazına yerleştirin. Türkçe... -
Page 107: Tek Üniteli Şarj Tepsisi İle Şarj Etme
Tek Üniteli Şarj Tepsisi İle Şarj Etme Bataryayı Tek Başına Şarj Etme Şarj Cihazı Şarj Cihazı Bağlantı Noktası Güç Kaynağı (Dönüştürücü) Şarj Cihazını yüzeye yerleştirin. Güç Kaynağının konektörünü Şarj Cihazının kenarındaki bağlantı noktasına takın. adım 4, sayfa 13 bölümünde olduğu gibi AC Adaptörünü... -
Page 108: Şarj Cihazı Led Göstergeleri
Şarj Cihazı LED Göstergeleri Tablo 2: Şarj Cihazı LED Göstergesi Durum LED Durumu Açıklamalar Gücü Açma Yaklaşık 1 sn Şarj Oluyor Sabit kırmızı Şarj Tamamlandı Sabit yeşil Kırmızı hızlı yanıp sönme Batarya Arızası (*) Sarı yavaş yanıp sönme Şarj olmayı bekliyor (**) 1 defa kırmızı... -
Page 109: Tahmini Şarj Süresi
Tahmini Şarj Süresi Aşağıdaki tabloda bataryanın tahmini şarj süresi verilmektedir. Daha fazla bilgi için bkz. "Batarya", sayfa 44. Tablo 3: Bataryanın Tahmini Şarj Süresi Tahmini Şarj Süresi Şarj Etme Çözümleri Standart Batarya Standart ~4 Saat Türkçe... - Page 110 Çok Üniteli Şarj Cihazı - MUC (İsteğe Bağlı MUC'yi düz bir yüzeye koyun. Aksesuar) Kullanarak Telsizi ve Bataryayı Güç kablosunun fişini MUC’nin jakına takın. Şarj Etme Güç kablosunu AC prizine takın. Telsizi KAPATIN. Telsizi veya bataryayı, ön yüzleri size bakacak şekilde şarj etme yuvasına takın.
-
Page 111: Çok Üniteli Şarj Cihazı Led Göstergeleri17
Çok Üniteli Şarj Cihazı LED Göstergeleri Tablo 4: Şarj Cihazı LED Göstergesi Durum LED Durumu Açıklamalar Gücü Açma Yaklaşık 1 sn Şarj Oluyor Sabit kırmızı Şarj Tamamlandı Sabit yeşil Kırmızı hızlı yanıp sönme Batarya Arızası (*) Sarı yavaş yanıp sönme Şarj olmayı... -
Page 112: Başlarken
KANAL SEÇME BAŞLARKEN Kanal Seçim Düğmesini döndürerek bir kanal seçin ve istediğiniz kanal numarasını belirleyin. Aşağıdaki açıklamalar için "Telsİz Parçaları", sayfa 7 bölümüne bakın. Her kanalın kendi Frekansı ve Parazit Devre Dışı Bırakma Kodu bulunur. TELSİZİ AÇMA/KAPATMA Telsizi AÇMAK için Açma/Kapatma/Ses KONUŞMA VE İZLEME Düğmesini saat yönünde döndürün. -
Page 113: Çağrı Alma
KONUŞMA MESAFESİ Notlar: XT Serisi telsizler performansı en üst seviyeye • Geçerli bir kanaldaki tüm etkinliği dinlemek için çıkaracak ve sahadaki yayın mesafesini SB1'e kısa basarak CTCSS/DPL kodunu 0'a geliştirecek şekilde tasarlanmıştır. Paraziti ayarlayın. Bu özelliğe "CTCSS/DPL Erteleme" önlemek için 1,5 metreden daha yakın adı... - Page 114 Kanal: Telsizin kullandığı mevcut kanaldır, telsiz modeline bağlıdır. Frekans: Telsizin yayın yapmak/almak için kullandığı frekanstır. Paraziti Devre Dışı Bırakma Kodu: Bu kodlar, kod kombinasyonları seçimi sağlayarak parazitin en aza indirilmesini sağlamanıza yardım eder. Frekansların ve kanallardaki CTCSS/DPL kodlarının nasıl ayarlanacağı hakkında daha fazla bilgi için bkz.
-
Page 115: Telsi̇z Led Göstergeleri̇
TELSİZ LED GÖSTERGELERİ TELSİZ DURUMU LED GÖSTERGESİ Kanal Meşgul Devamlı Turuncu Kopyalama Kipi İki Turuncu Sinyal Kopyalama Devam Ediyor Devamlı Turuncu Hata (Çalıştırma ya da Kopyalama Bir Yeşil Yanıp Sönme, bir Turuncu Yanıp Sönme, bir Yeşil Yanıp İşlemi sırasında) Sönme, ardından 4 saniyelik tekrar Zayıf Batarya Turuncu Yanıp Sönme Zayıf Batarya Kapanması... -
Page 116: Ahi̇zesi̇z Kullanım/Vox
Aksesuar Bağlantı konuşun ve yayını almak için konuşmayı kesin. Noktası/ Not: Aksesuar sipariş etmek için, Motorola Motorola Solutions XT Serisi telsizler uyumlu Solutions Satış Merkeziniz ile iletişim kurun. VOX aksesuarlarıyla birlikte ahizesiz (VOX) Aksesuarlar olmadan Ahizesiz (iVOX) olarak da kullanılabilir. -
Page 117: Vox Hassasiyetini Ayarlama
VOX Hassasiyetini Ayarlama Telsiz aksesuarının veya mikrofonunun hassasiyeti VOX kullanımı sırasında farklı çalışma ortamlarına göre ayarlanabilir. VOX / iVOX hassasiyeti CPS aracılığıyla programlanabilir. Varsayılan değer KAPALI (Düzey 0) seçeneğidir. VOX özelliğini kullanmak istiyorsanız, VOX düzeyi 0'dan farklı bir düzeye ayarlanmalıdır. •... -
Page 118: Programlanabi̇li̇r Özelli̇kler
(*) CPS Programlama Kablosu P/N Şekil 1: Telsizi CPS'ye ayarlama HKKN4027_ ayrı satılan bir aksesuardır. Daha fazla bilgi için lütfen Motorola Telsizinizdeki özellikleri programlamanın ya da Solutions satış merkeziniz ile iletişime geçin. değiştirmenin en kolay yolu Bilgisayar Programlama Yazılımı (CPS) ve CPS... -
Page 119: Frekans Seçimi
Frekans Seçimi • Taramayı başlatmak için SBx (x = 1 veya 2) düğmesine basın. Telsiz bir kanal aktivitesi Frekans Seç özelliği frekansları önceden algıladığında, aktivite sona erene kadar bu tanımlanmış bir listeden seçebilmenizi sağlar. kanalda duraklar. PTT düğmesine basıp kanal CTCSS/DPL Kodları... -
Page 120: İstenmeyen Kanal Silme
İstenmeyen Kanal Silme Tersine İletim İstenmeyen Kanal Silme özelliği kanalları Tersine İletim, operatörün algılanamadığı Tarama Listesinden geçici olarak sırada istenmeyen gürültüyü (susturucu kaldırabilmenizi sağlar. Bu özellik "istenmeyen" kuyruğunu) ortadan kaldırır. 120, 180 veya bir kanaldaki alakasız görüşmeler yüzünden 240 değerini seçebilirsiniz. telsizin tarama özelliği kesilip duruyorsa Notlar: kullanışlıdır. -
Page 121: Telsi̇zleri̇ Kopyalama
TELSİZLERİ KOPYALAMA MUC'yi kullanarak telsizleri kopyalamak için en az iki telsiz bulunmalıdır: Aşağıdaki 3 yöntemden birini kullanarak XT 220 telsiz profillerini bir Kaynak telsizden bir • bir Kaynak telsiz (profillerin kopyalanacağı telsiz) Hedef telsize kopyalayabilirsiniz: • bir Hedef telsiz (kaynak telsizdeki profilin •... - Page 122 Kaynak telsizdeki SB1 düğmesine kısa basın. ve Kaynak telsizler aynı bant tipinde olmalıdır. Kopyalama işlemi devam ederken telsizin LED • MUC yuva numaraları, Motorola Solutions logosu Göstergesi devamlı turuncu sinyal gösterir ve ön yüzde olacak şekilde soldan sağa doğru tamamlandığında da tekrar iki turuncu sinyal okunmalıdır.
-
Page 123: Cps Ve Kopyalama Kabloları (İsteğe Bağlı Aksesuar)
CPS kablosu, XT Serisi telsizi programlamak için üretilmiştir. Anahtarın, "Yanıp Sönme" konumunda olduğundan emin olun. • Kopyalama kablosu ile şunları kopyalayabilirsiniz: Cloning Cable – XT serisinde birbiriyle aynı modeller (örn. XT220 ile XT220). Anahtarın, "Kopyalama" konumunda olduğundan emin olun. Türkçe... -
Page 124: Telsizden Telsize (R2R) Kopyalama Kablosunu (İsteğe Bağlı Aksesuar) Kullanarak Telsizi Kopyalama
Telsizden Telsize (R2R) Kopyalama SUC'deki tüm kabloları (güç kaynağı veya USB Kablosunu (İsteğe Bağlı Aksesuar) kabloları) çıkarın. Kullanarak Telsizi Kopyalama Kopyalama kablosunun mini USB konektörünü ilk SUC'ye ve diğer ucunu da ikinci SUC'ye takın. Not: Kopyalama işlemi sırasında SUC'ye güç sağlanmaz. - Page 125 Göstergesi birbirinin ardı sıra bir yeşil yanıp Not: Bu kopyalama kablosu sadece uyumlu sönme, bir turuncu yanıp sönme ve bir yeşil Motorola Solutions SUC ile çalışacak şekilde tasarlanmıştır. yanıp sönme gösterir. Kopyalamanın başarısız olması halinde işlemi tekrar başlatmayı Kopyalama Kablosu sipariş ederken lütfen P/ denemeden önce aşağıdaki adımları...
-
Page 126: Bilgisayar Programlama Yazılımını (Cps) Kullanarak Kopyalama
Bilgisayar Programlama Yazılımını (CPS) kullanarak kopyalama Bu yöntemi kullanarak kopyalama yaparken Programlanacak telsiz CPS yazılımına, bir Şarj Cihazına ve CPS Programlama Kablosuna ihtiyaç duyacaksınız. CPS Programlama Kablosunu sipariş etmek için lütfen P/N# HKKN4027_ kodunu referans alın. USB Bağlantı Noktaları CPS'yi kullanarak kopyalama ile ilgili bilgi için: CPS Programlama Kablosu •... -
Page 127: Sorun Gi̇derme
SORUN GİDERME Belirti Bunu Deneyin... Li-Ion bataryayı tekrar şarj edin veya değiştirin. Güç Yok Aşırı yüksek çalışma sıcaklıkları batarya ömrünü etkileyebilir. Bkz. "Li-Ion Batarya Hakkında", sayfa 10. Parazit Devre Dışı Bırakma Kodunun ayarlanmış olduğunu doğrulayın. Frekans veya Parazit Devre Dışı Bırakma Kodu kullanımda olabilir. Bir kanalda başka gürültüler Ayarları... - Page 128 Belirti Bunu Deneyin... Yayını iyileştirmek için görüş alanının açık olup olmadığını kontrol edin. Telsizin cepte veya kemer üzerinde taşınması bu mesafeyi düşürür. Telsizin Sınırlı konuşma mesafesi yerini değiştirin. Bkz. "Konuşma ve İzleme", sayfa 18 Yayın yaparken PTT düğmesine tam basıldığından emin olun. Telsizlerde aynı...
- Page 129 Belirti Bunu Deneyin... Telsizler birbirine çok yakın; birbirinden en az beş fit uzaklıkta olmaları gerekir. Yoğun statik veya parazit Telsizler birbirinden çok uzakta veya engeller nedeniyle yayın kesiliyor. Bkz. "Konuşma ve İzleme", sayfa 18. Li-Ion bataryayı şarj edin veya değiştirin. Batarya seviyesi düşük Aşırı...
- Page 130 Belirti Bunu Deneyin... VOX özelliği KAPALI olarak ayarlanmış olabilir. VOX Hassasiyet düzeyinin "0" olarak ayarlanmadığından emin olmak için CPS VOX etkinleştirilemiyor kullanın. Aksesuar çalışmıyor veya uyumlu değil. Bkz. "Ahİzesİz Kullanım/VOX", sayfa 22. Şarj cihazının doğru bağlanmış olup olmadığını ve uyumlu bir güç kaynağına karşılık gelip gelmediğini kontrol edin.
-
Page 131: Kullanım Ve Bakım
KULLANIM VE BAKIM Dış yüzeyini temizlemek için Suya batırmayın Alkol ya da temizleme solüsyonları yumuşak nemli bir bez kullanın. kullanmayın Telsiz suya batırılırsa... Telsizi KAPATIN ve Yumuşak bir bezle kurulayın Tamamen kuruyana kadar bataryaları çıkarın telsizi kullanmayın Türkçe... -
Page 132: Frekans Ve Kod Çi̇zelgeleri̇
FREKANS VE KOD ÇİZELGELERİ Bu bölümdeki çizelgeler, Frekans ve Kod bilgilerini sağlamaktadır. Bu grafikler, Motorola Solutions XT220 çift yönlü telsizler diğer iş telsizleriyle birlikte kullanıldığında faydalıdır. Varsayılan Kanal Frekansı ve Parazit Devre Dışı Bırakma Kodu Frekans Bant Frekans Bant Frekans #... -
Page 133: Ctcss Ve Dpl Kodları
CTCSS VE DPL KODLARI CTCSS Kodları CTCSS CTCSS CTCSS 67,0 107,2 167,9 71,9 110,9 173,8 74,4 114,8 179,9 77,0 118,8 186,2 79,7 192,8 82,5 127,3 203,5 85,4 131,8 210,7 88,5 136,5 218,1 91,5 141,3 225,7 94,8 146,2 233,6 97,4 151,4 241,8 100,0 156,7... - Page 134 DPL Kodları Türkçe...
- Page 135 DPL Kodları (Devamı) Türkçe...
-
Page 136: Motorola Solutions Sınırlı Garanti̇si̇
SINIRLI GARANTİSİ kullanılmasından veya bu kullanım kılavuzundaki talimatlara uyulmamasından GARANTİ BİLGİSİ kaynaklanan arızalar veya hasarlar. Motorola Solutions çift yönlü telsizinizi ve/veya • Kötüye kullanım, kaza veya ihmalden orijinal aksesuarlarınızı satın aldığınız yetkili kaynaklanan arızalar veya hasarlar. Motorola Solutions bayisi veya satıcısı garanti taleplerini karşılar ve/veya garanti hizmeti sağlar. - Page 137 • Normal kullanımdan dolayı çizilen veya hasar gören tüm plastik yüzeyler ve dış etkilere maruz kalan tüm parçalar. • Geçici olarak kiralanan ürünler. • Parçaların normal kullanım, aşınma ve yıpranmasından kaynaklanan periyodik bakımı ve onarımı veya değişimi. Türkçe...
-
Page 138: Aksesuarlar
ŞARJ CİHAZLARI AKSESUARLAR Parça No. Açıklama BATARYA Standart Çok Üniteli Şarj Cihazı Parça No. Açıklama PMLN6385_ AB/İngiltere PMMN4434_R Standart Li-Ion Batarya Standart Tek Üniteli Şarj Cihazı PMLN6393_ İngiltere/AB Kiti YAZILIM UYGULAMASI TAŞIMA AKSESUARI Parça No. Açıklama Parça No. Açıklama Bilgisayar Programlama 82012693001 Yazılımı... - Page 139 MOTOROLA, MOTO, MOTOROLA SOLUTIONS ve stil verilmiş M Logosu, Motorola Trademark Holdings, LLC'nin ticari markaları veya tescilli ticari markalarıdır ve lisans kapsamında kullanılmaktadır. Diğer tüm ticari markalar, ilgili sahiplerinin malıdır. © 2013 ve 2019 Motorola Solutions, Inc.
- Page 140 Motorola Solutions, Inc. 1303 E. Algonquin Rd. Schaumburg, IL 60196-1078, U.S.A. http://www.motorolasolutions.com *68012010002* 68012010002-BA...