Advertisement
Quick Links
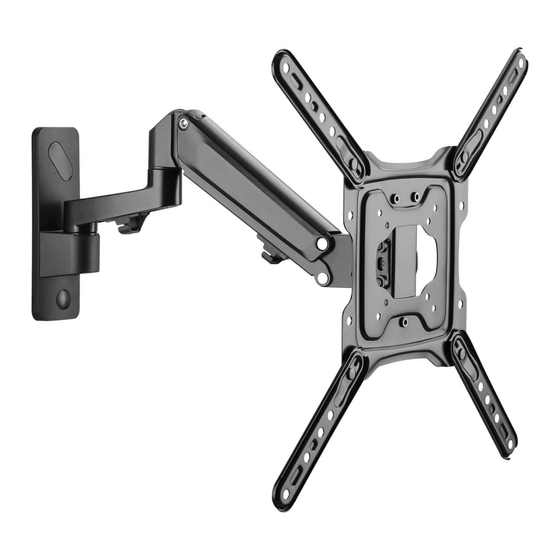
Full-Motion Flat-Screen
WARNING! Always use an assistant or mechanical lifting equipment to safely lift and position equipment.
75x75/100x100
200x100/200x200
300x300/400x200
400x300/400x400
Este manual esta disponible en español en la página de Tripp Lite: tripplite.com
Ce manuel est disponible en français sur le site Web de Tripp Lite : tripplite.com
Русскоязычная версия настоящего руководства представлена на веб-сайте компании
Dieses Handbuch ist in deutscher Sprache auf der Tripp Lite-Website verfügbar: tripplite.com
Register your product today and be automatically entered to win an ISOBAR
Owner's Manual
Wall Mount
Model: DWM2355S
Tripp Lite по адресу: tripplite.com
WARRANTY REGISTRATION
tripplite.com/warranty
1111 W. 35th Street, Chicago, IL 60609 USA • tripplite.com/support
Copyright © 2020 Tripp Lite. All rights reserved.
55"
MAX
surge protector in our monthly drawing!
®
1
11-50.6 lbs
11-50.6 lbs
(5-23 kg)
(5-23 kg)
Rated
Rated
Advertisement

Related Manuals for Tripp Lite DWM2355S


Summary of Contents for Tripp Lite DWM2355S
- Page 1 Rated Este manual esta disponible en español en la página de Tripp Lite: tripplite.com Ce manuel est disponible en français sur le site Web de Tripp Lite : tripplite.com Русскоязычная версия настоящего руководства представлена на веб-сайте компании Tripp Lite по адресу: tripplite.com Dieses Handbuch ist in deutscher Sprache auf der Tripp Lite-Website verfügbar: tripplite.com...
-
Page 2: Important Safety Instructions
• Check that the bracket is secure and safe to use at regular intervals (at least every three months) Parts List IMPORTANT: Before beginning installation, be sure you have received all the parts listed below. If any parts are missing or faulty, contact Tripp Lite for replacements. Components Wall Plate Wall Plate... -
Page 3: Required For Installation
Parts List Package M M5x14 (x4) M6x14 (x4) M6x30 (x4) M8x30 (x4) M8x50 (x4) D6 Washer (x4) D8 Washer (x4) Smaller Spacer (x8) Large Spacer (x8) Package W Concrete Anchor (x3) Washer (x3) Anchor Bolt (x3) Required for Installation Stud finder Pencil Level Drill with... - Page 4 1a. Mount on Wood Stud Wall 60mm 55mm (2.2") 2.4” 4.5mm Ø 3/16") Ø Find and mark the exact location of mounting holes Drill pilot holes Ensure holes are level Screw mount into wall WARNING • Make sure the mounting screws are anchored into the center of the studs. Use of a stud finder is highly recommended.
- Page 5 1b. Mount on Solid Brick or Concrete Block 65mm 60mm (2.4") 2.6" 10mm Ø 3/8") Ø Find and mark the exact location of mounting holes Drill pilot holes Ensure holes are level Screw mount into wall WARNING • When installing wall mount onto a concrete masonry unit (also known as a CMU or cinder block), verify the actual concrete thickness is at least 1-3/8”...
- Page 6 2. Install Articulating Arm 3. Prepare VESA Plate...
- Page 7 4. Attach VESA Adapter Brackets...
- Page 8 5. Mount Brackets to Display Note: Choose appropriate screws, washers and spacers (if necessary) according to the type of screen. • Position the adapter brackets as close as possible to the center of the display. • Firmly secure the adapter brackets onto the display using the screws and any other necessary hardware components included with the unit. DO NOT OVERTIGHTEN SCREWS!
- Page 9 6. Hang Flat Screen onto Articulating Arm 7. Level and Tighten Screen...
- Page 10 8. Adjust Articulating Arm...
- Page 11 9. Route Cables 10. Adjust Viewing Angle...
-
Page 12: Warranty And Product Registration
* No purchase necessary. Void where prohibited. Some restrictions apply. See website for details. Tripp Lite has a policy of continuous improvement. Specifications are subject to change without notice. Images may differ slightly from actual products. 1111 W. 35th Street, Chicago, IL 60609 USA • tripplite.com/support...