Table of Contents
Advertisement
Quick Links
Advertisement
Table of Contents

Related Manuals for Sekonic SPECTROMASTER C-7000


Summary of Contents for Sekonic SPECTROMASTER C-7000
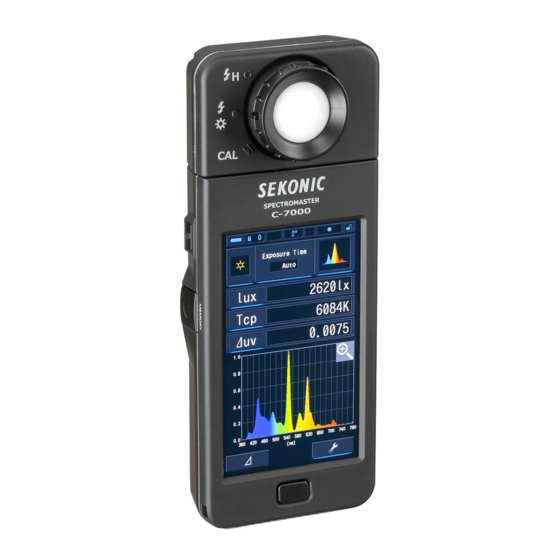
- Page 1 Spectrometer SPECTROMASTER C-7000 Operating Manual Please read the operating manual carefully to fully understand the features of this product before use and keep it for future use. Keep the operating manual in a safe place. Please see the Startup Guide for information about the basic operations.
- Page 2 LCD, conveniently displays correlated color temperature, color rendering index (CRI), chromaticity diagrams and color spectrum of various light sources. The Sekonic C-7000 illuminance measurement complies with JIS Class A and DIN 5032 Part 7 Class C standard making it a reliable illuminometer. Its capabilities...
-
Page 3: Safety Precautions
■ Safety Precautions Before using this product, please read this "Safety Precautions" for proper operation. WARNING The WARNING symbol indicates the possibility of death or serious injury if the product is not used properly. CAUTION The CAUTION symbol indicates the possibility of minor to moderate personal injury or product damage if the product is not used properly. -
Page 4: Caution
CAUTION ● Do not handle this product with wet hands, or leave it in the rain or in a location where it may be splashed with water, submerged, or come into contact with moisture. There is a danger of electric shock if the "Flash Light Cord (PC) Mode" is used. This may also result in damage to the product. - Page 5 NOTICE ● A protective sheet is attached to the LCD. Peel it off before use. ● Although the LCD monitor is manufactured to very high standards, it is possible to observe a few dead pixels on the screen. This is normal and not a malfunction of the meter.
-
Page 6: Intended Usage
■ Intended Usage The meter is designed for: ● Measuring correlated color temperature, deviation, color rendering properties (CRI, TM-30, SSI, TLCI/TLMF), illuminance, tristimulus value, chromaticity coordinates, dominant wavelength and excitation purity of various lighting sources such as LEDs, organic EL's and projectors. Measuring automotive LED headlights and other types of lamps. -
Page 7: Intended Users
We recommend that you download the latest operating manual from our website and use this product. URL: www.sekonic.com/support/instructionmanualuserguidedownload.aspx ● The safety-related precautions such as «Safety Guide and Maintenance» and «Safety Precautions» conform to the legal and industry standards that were applicable at the time this operating manual was created. -
Page 8: Accompanying Accessories
■ Accompanying Accessories The following items are included with the meter in the package. Please be sure to check that all noted items are included. * If any items are missing, please contact the distributor or the reseller you purchased the meter from. -
Page 9: Table Of Contents
Table of Contents ■ Terminology and trademarks ■ Safety Precautions ............................ WARNING ............................CAUTION ............................■ CA Prop 65 .............................. ■ Intended Usage ............................ ■ Intended Users ............................. ■ Restrictions .............................. ■ Accompanying Accessories ... - Page 10 4-3 Customizing Measuring Displays .................. 4-4 Selecting the Display Mode .................... 4-4-1 Displaying in Text [Text] Mode .................. 4-4-2 Displaying in Spectrum Graph [Spectrum] Mode ............ 4-4-3 Displaying in Color Rendering Index [CRI] Mode ............ 4-4-4 ...
- Page 11 6-3 Selecting Exposure Time [Exposure Time] Screen 1 26 ............ 6-4 Setting the Shutter Speed [Shutter Speed] Screen 1 28 ........... 6-5 Selecting Measuring Method [Measuring Method] Screen 1 30 ........ 7. Meter Settings [Setting] Screen 1 33 ...
- Page 12 8. Hardware Setting Screen 1 92 ...................... 8-1 Adjust Touch Panel 1 94 ...................... 8-2 Edit User Information 1 97 ...................... 8-3 Field of View 1 99 .......................... 8-4 Factory Setting 2 01 ........................ 9. Appendix 2 04 ...
-
Page 13: Parts Designations And Functions
1. Parts Designations and Functions Parts Designations and Functions 1-1 Parts Designations Front View Rear View Light Receptor Light Selection Ring Power Button Display Panel Measuring Button Tripod Socket Memory Button Battery Cover Latch Battery Cover Menu Button Bottom View Battery Compartment Section Strap Eyelet Sync Terminal... -
Page 14: Parts Functions
1. Parts Designations and Functions 1-2 Parts Functions The following table lists the functions of each part. Part Name Functions Point light receptor directly at light source during reading. Head Light Receptor rotates 270 degrees to aid reading. Light Selection Rotate to select dark calibration, normal measuring range or high Ring range for flash light. -
Page 15: Before Use
2. Before Use Before Use 2-1 Attaching the Strap Pass the strap (included) through the outer hole of the Strap Eyelet c. Pass the opposite end of the strap through the loop at the end of the strap. Strap Eyelet WARNING Infants or toddlers may accidentally wrap the strap around their neck, so please place it in a location out of their reach. -
Page 16: Installing The Batteries
2. Before Use 2-2 Installing the Batteries Prepare two AA batteries. Slide the Battery Cover Latch in the direction of the arrow and remove the Battery Cover 9. Insert the batteries according to the "+" and "-" symbols in the Battery Compartment d. -
Page 17: Power On/Off
Power Button NOTICE Logo Screen ● The blue lettered "SEKONIC" logo screen is displayed after battery replacement and 24 hours after power OFF. ● Movement of the blue status bar indicates that the meter is checking its memory and preparing to operate. Do not turn the power OFF. - Page 18 2. Before Use Select the language. (Appears only when turned ON for the first time) The Language Selection screen is displayed. Select the language to use. Language Selection Language Selection Screen Confirmation Screen The selected button will be displayed encircled in blue.
- Page 19 2. Before Use NOTICE ● When the Light Selection Ring is not set to the dark Dark Calibration Position Confirmation Screen calibration position, the message "Please set Light Selection Ring for dark calibration." is displayed. Set the Light Selection Ring to the dark calibration position ) to calibrate the system.
- Page 20 2. Before Use NOTICE ● When the Measuring Button is pressed at the dark calibration position, the message "Measurement failed. Please check Light Selection Ring position." is displayed. Set the Light Selection Ring to the correct position and the Measuring screen will be displayed.
-
Page 21: Automatic Power Off Function
2. Before Use 2-4 Automatic Power OFF Function To save battery capacity, the meter will automatically turn off 5 minutes (factory setting) after the last button is pressed. NOTE ● All measurements, settings and indications are saved in memory even after the meter has automatically turned off. When the power is turned ON, they will be displayed again. -
Page 22: Checking The Battery Capacity
This is an indication that the batteries are depleted and should be replaced immediately. Having spare batteries on hand is recommended. ● When the meter is continuously used at room temperature, the battery life should last 8 hours (based on Sekonic testing methods). -
Page 23: Automatic Power Off Function
2. Before Use 2-6 Automatic Power OFF Function ● Always turn off the power before replacing batteries. If you replace batteries while the power is turned on, the measured values that are obtained during operations are not saved. Also, this may cause a failure. ●... -
Page 24: Screen Operation
3. Screen Operation Screen Operation 3-1 Screen and Operation 3-1-1 Basic Screen and Operation The touch-screen display enables selecting Display Modes and settings with the touch of your finger. Measuring Screen When the dark calibration is complete, the Display Mode Selection screen is displayed. Select the desired display mode and the selected measurement screen is displayed. - Page 25 3. Screen Operation Item List Part Name Description 1 Status Bar Displays the setting contents. ( P14) Displays the current Measuring Mode. ( P23) 2 [Measuring Mode] Icon Touch the icon to switch to the Measuring Mode Selection screen. Displays the current Display Mode. ( P30) 3 ...
- Page 26 3. Screen Operation Status Bar For this description, all icons and menus are displayed. Part Name Description Sufficient battery life remaining. Adequate battery life remaining. Battery Capacity Have a spare battery ready. Indicator Replace the battery immediately. Appears when powered by USB. Displays the number of measured data stored in memory.
- Page 27 3. Screen Operation Part Name Description Appears when Single measurement is selected in Tool Box. Measuring Method Appears when Continuous measurement is selected in Tool Box (in ambient light only). Appears when the screen is unlocked. Key Lock Status Indicator Appears when the screen is locked.
- Page 28 3. Screen Operation Tool Box Screen The following setting can be performed after touching the [Tool Box ( )] icon on the measuring screen. * All icons are displayed for explanatory purposes for the Tool Box screen. It is not the default.
-
Page 29: Icon Operation
3. Screen Operation 3-1-2 Icon Operation Touch Operation Touch the icons on screen to perform various operations. (Ex.) Measuring Screen in Text Mode Touch-enabled Icons Icons with blue under-bar indicate which icons are operational. Touch-enabled Icons Touch-disabled Icons Slide Operation Slide your finger tip up or down over a value to change the value amount. -
Page 30: Input Of Numbers/Characters
3. Screen Operation 3-1-3 Input of Numbers/Characters You can input numbers and characters. Numeric Number Input Screen (Ex.) Display of deviation Numeric Number Method Description Enters a numeric value, plus or minus sign, and a period. When touched, 0-9, +/-, period the entry is displayed at the top of the screen. - Page 31 3. Screen Operation Character Input Screen Figure Input Screen Upper Case Input Screen Lower Case Input Screen (Figures) (Upper Case Letters) (Lower Case Letters) Keypad (Upper Case Input Screen) Keypad (Lower Case Input Screen) Input Method of Characters and Numbers Description 1/A/a Shifts between numbers/upper case letters/lower case letters.
-
Page 32: Locking And Unlocking The Screen
3. Screen Operation 3-1-4 Locking and Unlocking the Screen You can lock the screen to prevent misoperation. When the screen is locked, touch operation is disabled. However, the Memory Button , Measuring Button , and Power Button are still operational. Power The screen will stay locked even when power Button... -
Page 33: Basic Operations
4. Basic Operations Basic Operations 4-1 Basic Measurement Flow The basic operations and screens are as follows. Measurements and measurement changes are operated from the Measuring screen. Power ON Startup Screen Language Selection (for first time only) Make sure the Light Selection Dark Calibration Ring ❷... - Page 34 4. Basic Operations From the previous page [Measuring Mode] Icon Select the measuring mode. Measuring Mode Selection Screen Ambient Light, Flash Light (Cordless, Cord) Measuring Screen Measuring The LCD dims when measuring. Measuring Button When measurement is complete, the LCD returns to the Measurement Screen previous user set brightness, and the measurement results...
-
Page 35: Selecting The Measuring Mode
4. Basic Operations 4-2 Selecting the Measuring Mode 4-2-1 Matching Measuring Mode with Light Sources Select the Measuring Mode to use. NOTICE ● If you change the Measuring Mode, the currently displayed measurement is cleared. Measuring Mode Selection Screen Measuring Mode Icon Description Measures continuous light such as sunlight, tungsten,... - Page 36 4. Basic Operations Operation Touch the [Measuring Mode] icon in the upper left corner of the screen. The Measuring Mode Selection screen will be displayed. Measuring Screen Measuring Mode in Text Mode Selection Screen [Measuring Mode] Icon Touch an icon to select the measuring mode. Select the desired measuring mode.
-
Page 37: Selecting The Exposure Time (Ambient Modes Only)
4. Basic Operations 4-2-2 Selecting the Exposure Time (Ambient Modes Only) Set a Exposure Time for ambient measurement. Operation Touch the [Exposure Time] indication on the Measurement screen. Touch the [Auto], [0.1 sec] or [1.0 sec] button. Measuring Screen Exposure Time Screen The selected button will be displayed... -
Page 38: Selecting The Shutter Speed (Flash Modes Only)
4. Basic Operations 4-2-3 Selecting the Shutter Speed (Flash Modes Only) Set a shutter speed that is appropriate for the intended flash measurement. Operation Touch the [T (Shutter Speed)] indication. (Ex.) Cordless Flash Mode Measuring Screen in Text Mode Select the desired shutter speed. Shutter Speed Screen [Shutter Speed 1/125] [Cancel]... - Page 39 4. Basic Operations NOTE Shutter Speed Options 1 Step 1/15 1/30 1/60 1/125 1/250 1/500 NOTICE ● Measuring data will be erased when the shutter speed setting is changed.
-
Page 40: Customizing Measuring Displays
4. Basic Operations 4-3 Customizing Measuring Displays You can customize displayed information to see exactly what you need in single view. Operation Touch the [Display Item] indication on the Measuring screen. The Display item library screen will be displayed. ( P36) Select the items to be displayed. - Page 41 4. Basic Operations Field of 2° 10° view Name Description Icon Displays the Fidelity index of TM-30-18 in the value Fidelity Index from 0 to 100. Displays the Gamut index of TM-30-18 in the value Gamut Index from 0 to 200. Displays the SSI index in the value from 0 to 100 in SSI Tungsten comparison with CIE Tungsten (3200K).
-
Page 42: Selecting The Display Mode
4. Basic Operations 4-4 Selecting the Display Mode Touching an icon on the Display Mode Selection screen displays lighting information in different ways to suit your needs. * Pressing the Menu Button on the meter returns to the Display Mode Selection screen. ❻... - Page 43 4. Basic Operations Text Spectrum TM-30 CIE1931 (CIE1964) TLCI/TLMF CIE1976 Spectrum Comparison Spectrum CIE1931 (CIE1964) CIE1976 Comparison Comparison Comparison Comparison Setting...
- Page 44 4. Basic Operations Description Icon Display Mode Name Displays user-selected 5 items in numeric [Text] Icon values. ( P35) Displays 3 user-selected values and [Spectrum] Icon spectrum distribution graph. ( P38) Displays the selected average CRI (Ra) or [CRI] Icon individual CRI (R1 ~ R15) numerically.
- Page 45 4. Basic Operations Description Icon Display Mode Name Displays the measured result and the stored [CIE1976 measurement value (up to 2 types of data) Comparison] Icon together with the u' and v' coordinates on the CIE1976 chromaticity diagram. ( P79) [Setting] Icon Displays Setting screen.
- Page 46 4. Basic Operations Press the Measuring Button ❺ to measure. Light Selection Ring ❷ The Light Selection Ring ❷ should be set to L when taking ambient light measurements. When measuring flash units, select Range L or Range H ) depending on the brightness of Light Receptor the flash.
-
Page 47: Displaying In Text [Text] Mode
4. Basic Operations 4-4-1 Displaying in Text [Text] Mode Displays five user-selected items in numeric value. Text Screen [Measuring Mode] Icon [Display Mode] Icon Text Mode [Exposure Time] Indication [Display Item] Indication / [T (Shutter Speed)] indication Operation Touch the [Text] icon on the Display Mode Selection screen. A Text screen will be displayed. - Page 48 4. Basic Operations Touch the desired Display Item indication and [OK] button. The currently selected display item will be encircled in blue. Pressing [OK] button confirms the settings, and returns to the Measuring screen. To cancel the setting, touch the [Cancel] button. Text Screen Display Item Library Screen For a 10°...
- Page 49 4. Basic Operations Touch the [Exposure Time] indication or [T (Shutter Speed)] indication on the Measuring screen. For ambient light measurement, select the [Auto], [0.1 sec] or [1.0 sec] button. ( P25) For flash light measurement, select the desired shutter speed. ( P26) ❷...
-
Page 50: Displaying In Spectrum Graph [Spectrum] Mode
4. Basic Operations 4-4-2 Displaying in Spectrum Graph [Spectrum] Mode Displays three user-selected values and spectral distribution graph. Spectrum Screen [Measuring Mode] Icon [Display Mode] Icon Spectrum Mode [Exposure Time] Indication [Display Item] Indication / [T (Shutter Speed)] indication Operation Touch the [Spectrum] icon on the Display Mode Selection screen. - Page 51 4. Basic Operations ❺ ❷ Press the Measuring Button to measure. Light Selection Ring ❷ The Light Selection Ring should be set to L when taking ambient light measurements. When measuring flash units, select Range L or Range H ) depending on the brightness of the flash.
- Page 52 4. Basic Operations NOTE ● The maximum display value of the Y-axis can be selected by the item [Spectrum Y-axis Scale] icon in page 1 of Setting. ( P140) Memorize the measurement results. ❼ To record measurements, press Memory Button .
-
Page 53: Displaying In Color Rendering Index [Cri] Mode
4. Basic Operations 4-4-3 Displaying in Color Rendering Index [CRI] Mode Displays the selected average CRI (Ra) or individual CRI (R1 ~ R15) numerically. Each CRI is also displayed in a graph. CRI Screen [Exposure Time] Indication / [T (Shutter Speed)] indication [Display Mode] Icon [Measuring Mode] Icon CRI Mode... - Page 54 4. Basic Operations ❺ ❷ Press the Measuring Button to measure. Light Selection Ring ❷ The Light Selection Ring should be set to L when taking ambient light measurements. When measuring flash units, select Range L or Range H ) depending on the brightness of the flash.
- Page 55 4. Basic Operations Touch the [OK] button. To cancel the setting, touch the [Cancel] button. Display Item Library CRI Screen [Display Item] Indication [OK] Button [Cancel] Button Touch the [OK] button. ❼ To record only current measurements, press Memory Button .
-
Page 56: Displaying In Tm-30 [Tm-30] Mode
4. Basic Operations 4-4-4 Displaying in TM-30 [TM-30] Mode Displays four current measurement values (Rf, Rg, Tcp, ⊿ uv) and color vector graphic. P204) The C-7000 with latest firmware shows TM-30-18. TM-30 Screen [Exposure Time] Indication / [T (Shutter Speed)] indication [Measuring Mode] Icon [Display Mode] Icon... - Page 57 4. Basic Operations ❺ Press the Measuring Button to measure. ❷ Light Selection Ring ❷ The Light Selection Ring should be set to L when taking ambient light measurements. When measuring flash units, select Range L or Range H ) depending on the brightness of the flash.
-
Page 58: Displaying In Spectral Similarity Index [Ssi] Mode
4. Basic Operations 4-4-5 Displaying in Spectral Similarity Index [SSI] Mode Compares the current measurement value and up to 2 reference values (color temperature and ⊿ uv), and displays SSI index with the SSI spectrum graph. Reference light source can be set in three ways from standard illuminant, color temperature input or memory recall. - Page 59 4. Basic Operations Press the Measuring Button ❺ to measure. Light Selection Ring ❷ The Light Selection Ring ❷ should be set to L when taking ambient light measurements. When measuring flash units, select Range L or Range H ) depending on the brightness of the flash.
- Page 60 4. Basic Operations There are three ways to select the [Select SSI Reference Light]. Select the item to compare from three options; [Select SSI Standard Light Source], [Input SSI Color Temperature] and [SSI Memory Recall]. Select SSI Standard Light Input SSI Color SSI Memory Recall Screen Source Screen...
- Page 61 4. Basic Operations Select the desired standard illuminant to compare. To select the standard illuminant, match it with the blue background position. Select SSI Standard Light Source Screen Selected Standard Illuminant [OK] Button [Cancel] Button Touch the [OK] button. Confirms the setting and returns to the SSI screen. To cancel the setting, touch the [Cancel] button.
- Page 62 4. Basic Operations Yellow and Red line graphs will be displayed in the SSI spectrum graph. Touch the [Graph Display ON/OFF] check box to hide/show a line graph on the screen. * [] shows line. [] hides line. SSI Screen [Graph Display ON/OFF] Check Yellow or Red Line Touch the [Magnifying Glass (+)] icon.
- Page 63 4. Basic Operations [Color Temperature Input ] Input the color temperature in 100K step from 2500K to 7500K. Touch the [Input Color Temperature] indication on the Select SSI Reference Light screen. The Input SSI Color Temperature screen will be displayed. Select SSI Reference Light Input SSI Color Screen...
- Page 64 4. Basic Operations NOTE Depending on the input color temperature, Display Example calculation of light source is different. 2,500K to 4,900K is the color temperature based on the black body radiation. 5,000K to 7,500K is the color temperature based on daylight illuminant. The input color temperature will be displayed in the reference light source display area on the SSI screen.
- Page 65 4. Basic Operations Touch the [Magnifying Glass (+)] icon. The SSI spectrum graph will be enlarged. The enlarged graph is displayed on the whole screen (landscape). To return to the SSI screen, touch the [Magnifying Glass (-)] icon on the enlarged SSI spectrum graph.
- Page 66 4. Basic Operations [Memory Recall Selection] You can select the reference light source from memory recall. Memorize the measurements to be used as reference light source in advance, and compare the current measurement with memorized light source to see the difference in quality.
- Page 67 4. Basic Operations Touch the [OK] button. Confirms the setting and returns to the SSI screen. To cancel the setting, touch the [Cancel] button. The selected memorized value will be displayed in the reference light source display area on SSI screen. You can select up to two reference light sources.
- Page 68 4. Basic Operations Touch the [Magnifying Glass (+)] icon. The SSI spectrum graph will be enlarged. The enlarged graph is displayed on the whole screen (landscape). To return to the SSI screen, touch the [Magnifying Glass (-)] icon on the enlarged SSI spectrum graph.
-
Page 69: Displaying In Tlci Or Tlmf [Tlci/Tlmf] Mode
4. Basic Operations Displaying in TLCI or TLMF [TLCI/TLMF] Mode 4-4-6 Displays the current measurement values and memorized values (in color temperature and ⊿ uv), TLCI and TLMF with spectrum graph. TLCI stands for Television Lighting Consistency Index. TLMF stands for Television Luminaire Matching Factor. - Page 70 4. Basic Operations Press the Measuring Button ❺ to measure. Light Selection Ring ❷ The Light Selection Ring ❷ should be set to L when taking ambient light measurements. When measuring flash units, select Range L or Range H ) depending on the brightness of the flash.
- Page 71 4. Basic Operations If no measurements have been memorized, the pop-up screen appears to indicate no memorized value. Memory Selection Pop-up Screen After you confirmed the message "No memorized value.", touch the [Close] button. Returns to the TLCI/TLMF screen. After memorizing several values, select the memorized value again. Select the desired memorized value to compare.
- Page 72 4. Basic Operations The title of selected memory will be displayed on the TLCI/TLMF screen. Memory Title Display Selected Memory Title Selected Memorized Value TLMF index is displayed to compare with the selected memorized value. Current Measurement Display Area TLMF Index Line graphs will be displayed in the TLCI/TLMF graph.
- Page 73 4. Basic Operations Touch the [Magnifying Glass (+)] icon. The spectrum comparison graph will be enlarged. The enlarged graph is displayed on the whole screen (landscape). To return to the TLCI/TLMF screen, touch the [Magnifying Glass (-)] icon on the enlarged spectrum comparison graph.
-
Page 74: Displaying In Cie1931 (Cie1964) [Cie1931 (Cie1964)] Mode
4. Basic Operations 4-4-7 Displaying in CIE1931 (CIE1964) [CIE1931 (CIE1964)] Mode Displays the measurement result in text format together with the position on the CIE1931 (or CIE1964) chromaticity diagram. When 2 degrees of view of angle is selected in Hardware Setting, this mode shows CIE1931. - Page 75 4. Basic Operations ❺ Press the Measuring Button to measure. ❷ Light Selection Ring ❷ The Light Selection Ring should be set to L when taking ambient light measurements. When measuring flash units, select Range L or Range H ) depending on the brightness of the flash.
-
Page 76: Displaying In Cie1976 [Cie1976] Mode
4. Basic Operations 4-4-8 Displaying in CIE1976 [CIE1976] Mode Displays the measurement result in text format together with position on the CIE1976 chromaticity diagram. CIE1976 Screen [Measuring Mode] Icon [Display Mode] Icon CIE1976 Mode [Exposure Time] Indication [Display Item] Indication / [T (Shutter Speed)] indication Operation... - Page 77 4. Basic Operations ❺ ❷ Press the Measuring Button to measure. Light Selection Ring ❷ The Light Selection Ring should be set to L when taking ambient light measurements. When measuring flash units, select Range L or Range H ) depending on the brightness of the flash.
-
Page 78: Displaying In Spectrum Comparison [Spectrum Comp.] Mode
4. Basic Operations Displaying in Spectrum Comparison 4-4-9 [Spectrum Comp.] Mode Compares the current measurement value and up to 2 memorized values as yellow and/or red lines in the spectrum distribution graph. Spectrum Comp. Screen [Exposure Time] Indication / [T (Shutter Speed)] indication [Measuring Mode] Icon [Display Mode] Icon... - Page 79 4. Basic Operations ❺ ❷ Press the Measuring Button to measure. Light Selection Ring ❷ The Light Selection Ring should be set to L when taking ambient light measurements. When measuring flash units, select Range L or Range H ) depending on the brightness of the flash.
- Page 80 4. Basic Operations If no measurements have been memorized, the pop-up screen appears to indicate no memorized value. Memory Selection Pop-up Screen After you confirmed the message "No memorized value.", touch the [Close] button. Returns to the Spectrum Comp. screen. After memorizing several values, select the memorized value again.
- Page 81 4. Basic Operations Touch the [OK] button. Confirms the setting and returns to the Spectrum Comp. screen. To cancel the setting, touch the [Cancel] button. The titles and measurements of the selected memories will be displayed on the Spectrum Comp. screen. Memory Title Display Selected Memory Title Selected Memorized Measurement Value...
- Page 82 4. Basic Operations Touch the [Magnifying Glass (+)] icon. The spectrum comparison graph will be enlarged. The enlarged graph is displayed on the whole screen (landscape). To return to the Spectrum Comp. screen, touch the [Magnifying Glass (-)] icon on the enlarged spectrum comparison graph.
-
Page 83: Displaying In Color Rendering Index Comparison [Cri Comp.] Mode
4. Basic Operations Displaying in Color Rendering Index Comparison [CRI 4-4-10 Comp.] Mode Compares the current measurement value and memoried value to show the color temperature and average CRI (Ra). Also individual CRI (R1 to R15) is displayed in each graph. CRI Comp. - Page 84 4. Basic Operations ❺ ❷ Press the Measuring Button to measure. Light Selection Ring ❷ The Light Selection Ring should be set to L when taking ambient light measurements. When measuring flash units, select Range L or Range H ) depending on the brightness of the flash.
- Page 85 4. Basic Operations If no measurements have been memorized, the pop-up screen appears to indicate no memorized value. Memory Selection Pop-up Screen After you confirmed the message "No memorized value.", touch the [Close] button. Returns to the CRI Comp. screen. After memorizing several values, select the memorized value again.
- Page 86 4. Basic Operations Touch the [OK] button. Confirms the setting and returns to the CRI Comp. screen. To cancel the setting, touch the [Cancel] button. The titles and measurements of the selected memories will be displayed on the CRI Comp. screen. Memory Title Display Selected Memory Title Selected Memorized Measurement Value...
-
Page 87: Displaying In Cie1931 (Cie1964) Comparison [Cie1931 (Cie1964) Comp.] Mode
4. Basic Operations Displaying in CIE1931 (CIE1964) Comparison 4-4-11 [CIE1931 (CIE1964) Comp.] Mode Displays the measured result in text format together with the position on the CIE1931 (or CIE1964) chromaticity diagram. The measured result can be compared with up to 2 sets of memorized values. When 2 degrees of view of angle is selected in Hardware Setting, this mode shows CIE1931. - Page 88 4. Basic Operations ❺ ❷ Press the Measuring Button to measure. Light Selection Ring ❷ The Light Selection Ring should be set to L when taking ambient light measurements. When measuring flash units, select Range L or Range H ) depending on the brightness of the flash.
- Page 89 4. Basic Operations If no measurements have been memorized, the pop-up screen appears to indicate no memorized value. Memory Selection Pop-up Screen After you confirmed the message "No memorized value.", touch the [Close] button. Returns to the CIE1931 (1964) Comp. screen. After memorizing several values, select the memorized value again.
- Page 90 4. Basic Operations The titles and measurements of the selected memory data will be displayed on the CIE1931 (1964) Comp. screen. Memory Title Display Selected Memory Title Selected Memorized Measurement Value X mark in yellow or red will be displayed on the CIE1931 (CIE1964) chromaticity diagram.
-
Page 91: Displaying In Cie1976 Comparison [Cie1976 Comp.] Mode
4. Basic Operations Displaying in CIE1976 Comparison 4-4-12 [CIE1976 Comp.] Mode Displays the measurement result in text format together with the position on the CIE1976 chromaticity diagram. The measured result can be compared with up to 2 sets of Memorized Value. CIE1976 Comp. - Page 92 4. Basic Operations ❺ Press the Measuring Button to measure. ❷ Light Selection Ring ❷ The Light Selection Ring should be set to L when taking ambient light measurements. When measuring flash units, select Range L or Range H ) depending on the brightness of the flash.
- Page 93 4. Basic Operations If no measurements have been memorized, the pop-up screen appears to indicate no memorized value. Memory Selection Pop-up Screen After you confirmed the message "No memorized value.", touch the [Close] button. Returns to the CIE1976 Comp. screen. After memorizing several values, select the memorized value again.
- Page 94 4. Basic Operations The titles and measurements of the selected memories will be displayed on the CIE1976 Comp. screen. Memory Title Display Selected Memory Title Selected Memorized Measurement Value X mark in yellow or red will be displayed on the CIE1931 (CIE1964) chromaticity diagram.
-
Page 95: Displaying Setting [Setting] Screen
4. Basic Operations 4-4-13 Displaying Setting [Setting] Screen Displays the settings. The contents can be changed according to usage. For more information about how to set and the details of specifications, see "7-1-1 Item List". ( P135) Setting Screen Setting Screen Page 1 Page 2 * Models sold in some countries do not display illuminance and exposure in "fc (fc·s)"... - Page 96 4. Basic Operations Operation Touch the [Setting] icon on page 2 of Display Mode Selection screen. The Setting screen will be displayed. Display Mode Display Mode Setting Screen Page 1 Selection Screen Selection Screen Page 1 Page 2 Settings show items in white letters and set values in yellow letters.
-
Page 97: Measuring Light Sources [Measurement Screen]
5. Measuring Light Sources [Measurement Screen] Measuring Light Sources [Measurement Screen] 5-1 Measurement Method Take a measurement by facing the Light Receptor towards the light source to correctly measure the color temperature of the light source. Light Receptor NOTICE ● When taking measurements, the C-7000 should be located at a distance that is approximately 10 times (10X) the diameter of the light source being measured. -
Page 98: Measurement In Ambient Light Mode
5. Measuring Light Sources [Measurement Screen] 5-2 Measurement in Ambient Light Mode Select Ambient Light Mode when taking measurements of natural light (sunlight), and continuous light sources such as LED, tungsten lamps and fluorescent lights. WARNING Do not look directly into sunlight or other strong light when measuring. It may cause severe eye damage or even loss of vision. - Page 99 5. Measuring Light Sources [Measurement Screen] Touch the [Exposure Time] indication on the Measuring screen. Exposure Time Screen appears. ( P25) Measuring Screen Exposure Time Screen [Exposure Time] Indication Select the exposure time. Touch the [Auto], [0.1 sec] or [1.0 sec] button. Exposure Time Screen The selected icon will be displayed encircled in blue.
- Page 100 5. Measuring Light Sources [Measurement Screen] Touch the [OK] button. Confirms and returns to the Measuring screen. To return to the Measuring screen without confirming, touch the [Cancel] button. Measuring Screen Tool Box Screen The selected exposure time is displayed on the Measurement screen.
- Page 101 5. Measuring Light Sources [Measurement Screen] NOTE ● You can select a previously created Preset value from Preset Selection in the Tool Box. ( P152) Tool Box Screen Preset Selection Screen Tool Box Screen Blue bar indicates The set content the item selected.
-
Page 102: Measurement In Cordless Flash Mode
5. Measuring Light Sources [Measurement Screen] 5-3 Measurement in Cordless Flash Mode Cordless Flash Mode is preferable when wireless measuring is desired. In this measuring mode, the meter will go into measurement standby mode (for 90 seconds) to wait for a burst of flash to measure. Operation On the Measuring screen, touch the [Measuring Mode] icon and select the [Cordless Flash Mode] icon on the Measuring Mode... - Page 103 5. Measuring Light Sources [Measurement Screen] Touch the [Shutter Speed] indication on the Measuring screen. Set the shutter speed used for measurements. ( P26) Match the blue background with the desired shutter speed. Measuring Screen Shutter Speed Screen The selected value is indicated by the blue...
- Page 104 5. Measuring Light Sources [Measurement Screen] Confirm the light measuring range. Light Selection Ring When you return to the Measurement screen, Range H Range L select Range L ) or Range H depending on the brightness of the flash. Measuring Button NOTE ●...
- Page 105 5. Measuring Light Sources [Measurement Screen] CAUTION ● Do not trigger flash while skin or other objects are in contact with the flash tube. Do not touch the flash tube after repeated flashes. (It may cause burns.) ● Do not trigger flash while near the eyes of people or animals. (It may temporarily affect vision.) ●...
-
Page 106: Measurement In Cord (Pc) Flash Mode
5. Measuring Light Sources [Measurement Screen] 5-4 Measurement in Cord (PC) Flash Mode Cord (PC) Flash Mode is preferable when lighting conditions prevent the use of cordless measurements or when certain types of equipment require a physical sync connection. In Cord (PC) Flash Mode, the meter and flash unit are connected with a Sync Cord (sold separately). - Page 107 5. Measuring Light Sources [Measurement Screen] Touch the [OK] button. Confirms and returns to the Measurement screen. To return to the Measurement screen without confirming, touch the [Cancel] button. Touch the [T (Shutter Speed)] indication on the Measuring screen. Set the shutter speed used for measurements. ( P26) Match the blue background with the desired shutter speed.
- Page 108 5. Measuring Light Sources [Measurement Screen] CAUTION ● Depending on the flash equipment used, the flash may be triggered when the sync cord is connected to the Sync Terminal or when operating the Power Button . Because there is the possibility of burns or negative effects on vision, please handle with care.
- Page 109 5. Measuring Light Sources [Measurement Screen] CAUTION ● Depending on the flash equipment used, the flash may be triggered when the sync cord is connected to the Sync Terminal or when operating the Power Button . Because there is the possibility of burns or negative effects on vision, please handle with care.
-
Page 110: Comparison Function (In Ambient Light Mode Only)
5. Measuring Light Sources [Measurement Screen] 5-5 Comparison Function (in Ambient Light Mode only) In all Display Modes (except Spectrum Comp., CIE1931/1964 Comp. and CIE1976 Comp. modes), when you touch the Delta icon ( ) in the Display mode, it changes to ( While this mode, the difference between preset reference value and currently being measured value is displayed as long as the Measuring Button... - Page 111 5. Measuring Light Sources [Measurement Screen] Select desired preset no. (1 ~ 5). Match the blue background with the desired shutter speed. Preset Selection Screen Blue bar indicates the item selected. [OK] Button [Cancel] Button NOTICE ● Be sure to set Preset Selection to "Not Selected" when no correction is desired.
- Page 112 5. Measuring Light Sources [Measurement Screen] Touch the [Close] button. The preset is set. Returns to the Measurement screen. The selected status will be displayed on the status bar. The selected preset no. is displayed. Touch the [Delta] icon ( The [Delta] icon will change to ( Measuring Screen Measuring Screen...
- Page 113 5. Measuring Light Sources [Measurement Screen] Comparison Function is complete. When the Measuring Button is released, the preset reference value is displayed. Touch the [Delta] icon ( The last measured values are displayed, and the [Delta] icon ( ) will be deactivated.
-
Page 114: When [Over] Or [Under] Is Displayed
5. Measuring Light Sources [Measurement Screen] 5-6 When [Over] or [Under] is Displayed When [Over] or [Under] is displayed, the light source is out of measuring range. 5-6-1 Display of [Over] or [Under] When [Over] is displayed: If the indicated values are higher than the maximum measuring Light Selection Ring range, [Over] is displayed. -
Page 115: Changing The Light Range
5. Measuring Light Sources [Measurement Screen] 5-6-2 Changing the Light Range Change and use the light range depending on the brightness of the flash. Light Selection Ring Content (Status Bar Display) Dark Calibration Select for dark calibration only. Measurement cannot be Position made in this position. -
Page 116: Measurement Tool [Tool Box] Screen
6. Measurement Tool [Tool Box] Screen Measurement Tool [Tool Box] Screen Selecting Screens from the Tool Box Touch the [Tool Box ( )] icon in the Measuring screen to display the Tool Box screen. ( P16) You can select screens from the Tool Box as follows. Exposure Time Preset Selection (2°) Tool Box... -
Page 117: Setting Preset Contents [Preset Selection] Screen
6. Measurement Tool [Tool Box] Screen 6-1 Setting Preset Contents [Preset Selection] Screen You can select a previously created Preset value from Preset Selection in the Tool Box. Select a preset item of Preset Selection (2°) or Preset Selection (10°). If the "Preset Selection List"... - Page 118 6. Measurement Tool [Tool Box] Screen Operation Touch the [Preset Selection (2°) (Preset Selection (10°))] button in the Tool Box. The Preset Selection screen will be displayed. Tool Box Screen Preset Selection (2°) Screen Blue bar indicates the item selected. NOTICE ●...
- Page 119 6. Measurement Tool [Tool Box] Screen NOTICE ● Be sure to set Preset Selection to "Not Selected" when no correction is desired. Touch the [OK] button. Confirm and return to the Measuring screen. To return to the Measurement screen without confirming, touch the [Cancel] button. Tool Box Screen The set content is displayed.
-
Page 120: Using The Memory Function
6. Measurement Tool [Tool Box] Screen 6-2 Using the Memory Function The memory function enables storing light source data for single sources and groups of sources for recall at any time. Up to 999 measurements can be stored. Memory function also enables naming or renaming the title of memory and clearing the stored value. -
Page 121: Naming Measurement Values Being Memorized [Memory Title] Screen
6. Measurement Tool [Tool Box] Screen 6-2-1 Naming Measurement Values Being Memorized [Memory Title] Screen You can create special titles for memorized values to make them easier to select, view and use data later. To use this function the order of operation: * Create memory title * Measure light source * Press Memory button... - Page 122 6. Measurement Tool [Tool Box] Screen Operation Touch and select the [Memory Title] button in the Tool Box. The Memory Title screen will be displayed. Tool Box Screen Memory Title Screen Input Section Enter the memory title. P18) Use the keyboard to create a name for the measured light. Memory Title Screen [OK] Button [Cancel] Button...
- Page 123 6. Measurement Tool [Tool Box] Screen Touch the [Close] button. Returns to the Measuring screen. Tool Box Screen [Close] Button The memory title is entered. NOTICE ● The memory title needs to be entered before memorizing. ● The memory title can be changed after memorizing in Memory Management function.
- Page 124 6. Measurement Tool [Tool Box] Screen Press Memory Button to memorize light source values and link the reading to the created title name. The Memory reflected on the status bar. Status Bar Memory Button...
-
Page 125: Recalling Measurement Results [Memory Recall] Screen
6. Measurement Tool [Tool Box] Screen 6-2-2 Recalling Measurement Results [Memory Recall] Screen The Memory Recall screen enables selecting a specific Title and Memory number to view and inspect values stored in the memory under any Display Mode. Ex.) Memory Recall Spectrum Mode Screen Operation Touch the [Memory Management] button in the Tool Box. - Page 126 6. Measurement Tool [Tool Box] Screen Touch the [Recall] button. The meter will display the Display Mode viewed at the time the light source was measured. To return to the Tool Box screen without confirming, touch the [Close] button. Confirm the memory contents. Display Mode at the time when measured appears.
- Page 127 6. Measurement Tool [Tool Box] Screen Changing Memory Recall Mode Display Touch one of the [Display Mode] icons in Memory Recall Mode, and the specified display with memorized data for that Memory Recall Mode will appear. In Memory Recall Mode, Memory Title of recalled value appears every two seconds on the status bar.
- Page 128 6. Measurement Tool [Tool Box] Screen Display Mode Part Name Description Icon Memory Recall Mode Displays user-selected 5 items in numeric [Text] Icon values. ( P35) Memory Recall Mode Displays 3 user-selected values and [Spectrum] Icon spectrum distribution graph. ( P38) Displays the selected average CRI (RA) Memory Recall Mode or individual CRI (R1 ~ R15).
- Page 129 6. Measurement Tool [Tool Box] Screen Operation Touch the [Display Mode] icon on the Memory Recall Mode. Display modes of Memory Recall Mode will be displayed. Memory Title of recalled value appears every two seconds on the status bar. Memory Recall Display Mode Selection Screen Spectrum Mode Screen [Display Mode]...
-
Page 130: Renaming Memory Title [Memory Rename] Screen
6. Measurement Tool [Tool Box] Screen 6-2-3 Renaming Memory Title [Memory Rename] Screen The title of measurements of the memory can be changed. Memory Rename Screen [OK] Button [Cancel] Button Operation Touch the [Memory Management] button in the Tool Box. Memory Management screen will be displayed. - Page 131 6. Measurement Tool [Tool Box] Screen Touch the [Edit] button. Memory Edit screen will be displayed. Memory Management Screen Memory Edit Screen Move Title and then Memory number into the blue background to make a selection. [Edit] [Colse] Button Button [Rename] Button [Clear] Button Select the "Title"...
- Page 132 6. Measurement Tool [Tool Box] Screen Enter the Memory Title to rename. ( P18) Use the keyboard to create a name for the memorized value. Memory Rename Screen [OK] Button [Cancel] Button Touch the [OK] button. Confirm and return to the Memory Edit screen. To return to the Memory Edit screen without confirming, touch the [Cancel] button.
-
Page 133: Deleting Saved Measurement Results [Memory Clear] Screen
6. Measurement Tool [Tool Box] Screen Deleting Saved Measurement Results [Memory 6-2-4 Clear] Screen You can delete memorized measurement values individually or every Memory Title at once. In Memory Clear, titles and memory contents (memory numbers and measurement values) are displayed in the registered order. Memory Clear Screen Title Memory... - Page 134 6. Measurement Tool [Tool Box] Screen Operation Touch and select the [Memory Management] button in the Tool Box. The Memory Management screen will be displayed. Tool Box Screen Memory Management Screen Blue bar indicates the item selected. [Close] Button [Recall] Button [Edit] Button Touch the [Edit] button.
- Page 135 6. Measurement Tool [Tool Box] Screen Touch the [Clear] button. Memory Clear screen will be displayed. Memory Edit Screen Memory Clear Screen [Close] Button [Clear] Button [Title] Button [Memory] Button [Erasing Individual Values] Select the Title to display the memorized value you want to delete.
- Page 136 6. Measurement Tool [Tool Box] Screen Touch the [Yes] button. “Deleting Memory. Please wait.” will appear while the memory is being deleted. After the memory is cleared, the meter will return to the Memory Clear Screen. While the progress bar is running, the deletion is in progress. The process may require time depending on the number of memories to be deleted.
- Page 137 6. Measurement Tool [Tool Box] Screen Touch the [Title] button. This will delete the title. All the memory data linked to the title will be deleted. This will display the Memory Clear Confirmation screen. "Remove the selected memory title. Are you sure?" will be displayed. Memory Clear Memory Clear Screen Confirmation Screen...
-
Page 138: Selecting Exposure Time [Exposure Time] Screen
6. Measurement Tool [Tool Box] Screen 6-3 Selecting Exposure Time [Exposure Time] Screen Set a Exposure Time for ambient measurement. Exposure Time Screen Select a button Operation Touch the [Exposure Time] button in the Tool Box. The Exposure Time screen will be displayed. Tool Box Screen Exposure Time Screen... - Page 139 6. Measurement Tool [Tool Box] Screen Set a Exposure Time for ambient measurement. Select Auto, 0.1 sec or 1.0 sec. Exposure Time Screen The selected button will be displayed encircled in blue. [OK] Button [Cancel] Button Touch the [OK] button. Confirms and returns to the Tool Box screen.
-
Page 140: Setting The Shutter Speed [Shutter Speed] Screen
6. Measurement Tool [Tool Box] Screen 6-4 Setting the Shutter Speed [Shutter Speed] Screen Set a shutter speed that is appropriate for the intended flash-ambient measurement. Shutter Speed Screen Select a shutter speed in the list. Operation Touch the [shutter Speed] button in the Tool Box The Shutter Speed screen will be displayed. - Page 141 6. Measurement Tool [Tool Box] Screen Select the desired shutter speed. Shutter Speed Options ( P26) Shutter Speed Screen [Shutter Speed 1/125] [Cancel] button [OK] button [Shutter Speed 1/60] Touch the [OK] button. Confirms the settings, and returns to the previous Measuring screen. Touch [Cancel] to return to the previous measuring screen without setting.
-
Page 142: Selecting Measuring Method [Measuring Method] Screen
6. Measurement Tool [Tool Box] Screen Selecting Measuring Method [Measuring 6-5 Method] Screen Set a measuring Method from single measurement or continuous measurement. Single measurement enables to measure at the time when the Measuring button is pressed. Continuous measurement can be made by pressing the Measuring button to start measuring, and pressing the Measuring button again to complete measuring to... - Page 143 6. Measurement Tool [Tool Box] Screen Select the desired measuring method. Select Single Measurement (SNG) or Continuous Measurement (CNT). Measuring Method Screen The selected button will be displayed encircled in blue. [Cancel] button [OK] button Touch the [OK] button. Confirms the settings, and returns to the previous Measuring screen. Touch [Cancel] to return to the previous measuring screen without setting.
- Page 144 6. Measurement Tool [Tool Box] Screen [Single Measurement (SNG)] When the single measurement is selected, [SNG] appears on the status bar. Status Bar Single measurement displays the measure value at the time when the Measuring button is pressed. NOTE ● [Over] or [Under] will be displayed if the light source illumination is too bright or not bright enough, or if the color temperature is out of the measurement range, when the Measuring Button is pressed.
-
Page 145: Meter Settings [Setting] Screen
7. Meter Settings [Setting] Screen Meter Settings [Setting] Screen 7-1 Setting Items Here you can customize your meter for your preference in advance. Display Mode Selection Screen (2°) Display Mode Selection Screen (2°) Page 1 Page 2 [Setting] Icon Setting Setting Page 1 Screen Page 2 Screen... - Page 146 7. Meter Settings [Setting] Screen Operation Touch the [Setting] icon on the Display Mode Selection screen. Setting will be displayed. Touch the one step icons [▲][▼] to display the desired page. Touch the desired setting name. That setting screen will be displayed. When the [Close] button is touched, the display returns to the Display Mode Selection screen.
-
Page 147: Item List
7. Meter Settings [Setting] Screen 7-1-1 Item List The Setting screen items are as follows. Item Name Description Customize Select the unit from lx(lx·s), fc(fc·s) or both when measuring Unit of Illuminance illuminance. ( P138) Spectrum Y-axis Scale Select relative, auto, or spectral irradiance. ( P140) Select the time before the power automatically turns off after last use (5min, 10min, 20min, No Auto Power Off). -
Page 148: Customize
7. Meter Settings [Setting] Screen 7-2 Customize You can set the display contents of 6 items in Customize Setting to customize your meter for your preference. The current setting for each item is displayed in yellow letters. Setting Setting Page 1 Screen Page 2 Screen Item (white letters) -
Page 149: Item Specifications
7. Meter Settings [Setting] Screen 7-2-1 Item Specifications The specifications of each "Customize" item is as follows. No. Setting Name Item (Default) Unit of lx(lx·s)+ lx(lx·s)+ lx(lx·s) fc(fc·s) Illuminance* fc(fc∙s) fc(fc·s) Spectral Radiant Intensity Spectrum Relative Auto Relative Y-axis Scale 1.0μW to 100W·m ·nm Auto Power... -
Page 150: Selecting The Unit Of Illuminance
7. Meter Settings [Setting] Screen 7-2-2 Selecting the Unit of Illuminance Select the unit when measuring illuminance. * Models sold in some countries do not display illuminance and exposure in "fc (fc·s)" due to legal restrictions. In this case, "Unit of Illuminance" button will not appear in Setting screen. - Page 151 7. Meter Settings [Setting] Screen Touch the [Unit of Illuminance] button. Select the unit of illuminance. Unit of Illuminance Screen The selected button will be displayed encircled in blue. [OK] Button [Cancel] Button Touch the [OK] button. Confirms the settings, and returns to Setting screen. To return to the Setting screen without confirming, touch the [Cancel] button.
-
Page 152: Selecting The Spectrum Y-Axis Scale
7. Meter Settings [Setting] Screen 7-2-3 Selecting the Spectrum Y-axis Scale Select Relative, Auto, or any specific number of spectral irradiance as the maximum display value for the spectrum Y-axis. Spectrum Y-axis Scale Screen Default Operation Touch the item [Spectrum Y-axis Scale] button on page 1 of Setting screen. - Page 153 7. Meter Settings [Setting] Screen Select the desired spectrum Y-axis scale. Select from Relative, Auto, or any specific number of spectral irradiance. Spectrum Y-axis Scale Screen Blue bar indicates the value selected. [OK] Button [Cancel] Button Touch the [OK] button. Confirms the setting, and returns to Setting screen.
- Page 154 7. Meter Settings [Setting] Screen NOTE Relative.......Regardless of brightness of light source, the peak of brightness in each measurement and memorized values is regarded as 1.0 to compare the light sources in shape of spectrum graph. Auto ........The appropriate Y-axis value is automatically selected and spectral irradiance can be compared.
-
Page 155: Selecting The Auto Power Off Time
7. Meter Settings [Setting] Screen 7-2-4 Selecting the Auto Power Off Time Select the time delay before the power automatically turns off after last use (5min, 10min, 20min, No Auto Power Off). When No Auto Power Off is set, the automatic power OFF function is not activated. - Page 156 7. Meter Settings [Setting] Screen Touch the desired time delay button on the Auto Power Off screen. Select 5min, 10min, 20min, or No Auto Power Off. Auto Power Off Screen The selected button will be displayed encircled in blue. [OK] Button [Cancel] Button Touch the [OK] button.
-
Page 157: Selecting The Backlight Brightness
7. Meter Settings [Setting] Screen 7-2-5 Selecting the Backlight Brightness Select the LCD backlight brightness from Dark, Normal or Bright to save extra power or adjust the visibility under the surrounding light condition. Backlight Brightness Screen Default Operation Touch the item [Backlight Brightness] button on page 1 of Setting screen. - Page 158 7. Meter Settings [Setting] Screen Touch the desired brightness button on the Backlight Brightness screen. Select Dark, Normal or Bright. Backlight Brightness Screen The selected button will be displayed encircled in blue. [OK] Button [Cancel] Button Touch the [OK] button. Confirms the settings, and returns to Setting screen.
-
Page 159: Selecting The Auto Dimmer Time
7. Meter Settings [Setting] Screen 7-2-6 Selecting the Auto Dimmer Time Select the time before the backlight dims after last use to save extra power. (5sec, 10sec, 20sec, 40sec, 60sec, No Dimmer) Auto Dimmer Screen Default Operation Touch the [Auto Dimmer] button on page 1 of Setting screen The auto dimmer time delays will be displayed. - Page 160 7. Meter Settings [Setting] Screen Touch the desired time delay button on the Auto Dimmer screen. Select 5sec, 10sec, 20sec, 40sec, 60sec, or No Dimmer. Auto Dimmer Screen The selected button will be displayed encircled in blue. [OK] Button [Cancel] Button Touch the [OK] button.
-
Page 161: Selecting The Language
7. Meter Settings [Setting] Screen 7-2-7 Selecting the Language Select the language displayed in the meter from English, Japanese or Chinese. Language Screen Operation Touch the [Language] button on page 1 of Setting screen The language will be displayed. * You can change the language set when power is turned on for the first time. Setting Screen Language Screen... - Page 162 7. Meter Settings [Setting] Screen Touch the desired language to use. Select English, Japanese or Chinese. Language Screen The selected button will be displayed encircled in blue. [OK] Button [Cancel] Button Touch the [OK] button. Confirms the settings, and returns to Setting screen. To return to the Setting screen without confirming, touch the [Cancel] button.
-
Page 163: Reset Customized Items
7. Meter Settings [Setting] Screen 7-2-8 Reset Customized Items Initialize (reset) only contents of “Customize” in Setting to the factory default. Reset Customized Items Screen Operation Touch the item [Reset Customized Items] button on page 1 of Setting screen. "Initialize the contents of "Customize". Are you sure?" is displayed. Setting Screen Reset Customized Items Screen [Yes] Button... -
Page 164: Preset Editing
7. Meter Settings [Setting] Screen 7-3 Preset Editing Select [Preset Editing (2°)] button or [Preset Editing (10°)] button. Preset value is used for the reference value in Monitor Function. This preset reference value can be input manually or set from memorized value if there is data in meter's memory. - Page 165 7. Meter Settings [Setting] Screen Operation Touch the item [Preset Editing (2°)] or [Preset Editing (10°)] button on page 2 of Setting screen. The Preset Editing screen of Setting will be displayed. Preset Editing Screen Setting Screen (Page 1) Touch the [Preset No.] button on page 1 of [Preset Editing (2°)] or [Preset Editing (10°)].
- Page 166 7. Meter Settings [Setting] Screen Select the desired present number (1 ~ 5) to edit. Adjust it to the blue background position. Preset No. Screen Blue bar indicates the value selected. [OK] Button [Cancel] Button Touch the [OK] button. Preset number is confirmed and the display returns to page 1 of the Preset Editing (2°)/(10°) screen.
- Page 167 7. Meter Settings [Setting] Screen [Setting the preset value from memorized value] Touch the [Memory] button on the page 1 of Preset Editing screen. Memory Recall screen is displayed. Preset Editing Screen Memory Recall Screen (Page 1) in Preset Editing The selected memory will be displayed...
- Page 168 7. Meter Settings [Setting] Screen Touch the [OK] button. The selected memory is set as preset information and the display returns to page 1 of the Preset Editing (2°)/(10°). To return to the page 1 of the Preset Editing (2°)/(10°) screen without confirming, touch the [Cancel] button.
- Page 169 7. Meter Settings [Setting] Screen Refer to the following pages for editing each setting item. • Preset Selection List ( P158) • Preset Name ( P160) • Tcp (Correlated Color temperature) ( P162) • uv (deviation) ( P164) ⊿ • Y (tristimulus value) ( P166) •...
-
Page 170: Displaying The Preset Selection List
7. Meter Settings [Setting] Screen 7-3-1 Displaying the Preset Selection List Select to display or not in the Preset Selection list in the Tool Box. Display in the Preset Selection List Screen Operation Touch the [Preset Selection List] button on page 1 of Preset Editing (2°) or Preset Editing (10°). - Page 171 7. Meter Settings [Setting] Screen Select the [Displayed] to set. The selected icon will be displayed encircled in blue. Display in the Preset Selection List Screen The selected button will be displayed encircled in blue. [OK] Button [Cancel] Button Touch the [OK] button. The set item is confirmed, and the display returns to page 1 of the Preset Editing (2°)/(10°) screen.
-
Page 172: Setting The Present Name
7. Meter Settings [Setting] Screen 7-3-2 Setting the Present Name Editing the Preset Name. Preset Name Screen NOTE ● Up to 16 alphanumeric characters can be input for Preset name. Operation Touch the [Preset Name] button on page 1 of Preset Editing (2°) or Preset Editing (10°). - Page 173 7. Meter Settings [Setting] Screen Use the keyboard to create a name for the preset. P18) Preset Name Screen Input number Keypad (Upper Case Input Screen) [OK] Button [Cancel] Button Touch the [OK] button. The Preset name is memorized, and the display returns to the page 1 of the Preset Editing (2°)/(10°) screen.
-
Page 174: Setting The Tcp
7. Meter Settings [Setting] Screen 7-3-3 Setting the Tcp Set the preset Tcp (Correlated Color Temperature). Tcp Screen Operation Touch the [Tcp] button on page 1 of Preset Editing (2°) or Preset Editing (10°). The Tcp Input screen will be displayed. Preset Editing Screen Tcp Screen (Page 1) - Page 175 7. Meter Settings [Setting] Screen Set the Tcp within the range from 1563 to 100000K. P18) If the entered value is within the setting range, the [OK] button is displayed. If it is outside the set range, re-enetred a value. Tcp Screen Tcp Screen (if within the set range)
-
Page 176: Setting The Uv
7. Meter Settings [Setting] Screen 7-3-4 Setting the ⊿ Sets the preset uv (Deviation). ⊿ uv Screen ⊿ Operation Touch the [ uv] button on page 1 of Preset Editing (2°) or Preset ⊿ Editing (10°). uv input screen will be displayed. ⊿... - Page 177 7. Meter Settings [Setting] Screen Set the uv deviation value from -0.1000 to +0.1000. P18) ⊿ If the entered value is within the setting range, the [OK] button is displayed. If it is outside the set range, re-enetred a value. uv screen uv screen ⊿...
-
Page 178: Setting The Tristimulus Value Y
7. Meter Settings [Setting] Screen 7-3-5 Setting the Tristimulus Value Y The preset tristimulus value Y can be set as illuminance (lx). Y Screen Operation Touch the [Y] button on page 1 of Preset Editing (2°) or Preset Editing (10°). The tristimulus value Y input screen is displayed. - Page 179 7. Meter Settings [Setting] Screen Set the tristimulus value Y from 1.0000 to 200000.0000. P18) If the entered value is within the setting range, the [OK] button is displayed. If it is outside the setting range, re-enter a value. Y Screen Y Screen (within the setting range)
-
Page 180: Setting The Λp
7. Meter Settings [Setting] Screen 7-3-6 Setting the λp Setting the preset peak wavelength λp (Peak wavelength). λp Screen Operation Touch the [λp] button on page 2 of Preset Editing (2°) or Preset Editing (10°). The peak wavelength λp input screen is displayed. Preset Editing Screen λp Screen (Page 2) - Page 181 7. Meter Settings [Setting] Screen Set the peak wavelength λp within the range from 380 to 780 nm. P18) If the entered value is within the setting range, the [OK] button is displayed. If it is outside the setting range, re-enter a value. λp Screen λp Screen (within the setting range)
-
Page 182: Setting The Cri
7. Meter Settings [Setting] Screen 7-3-7 Setting the CRI Select the preset CRI (Color Rendering Index: Ra, or R1 to R15). CRI Selection Screen Operation Touch the [CRI] button on page 2 of Preset Editing (2°) or Preset Editing (10°). The Color Rendering Index screen is displayed. - Page 183 7. Meter Settings [Setting] Screen Select the desired color rendering index. P18) Select Ra, or any single index from R1 to R15. Adjust the index under the blue background to select. CRI Selection Screen The selected CRI will be displayed encircled in blue.
-
Page 184: Setting The Value Of Cri
7. Meter Settings [Setting] Screen 7-3-8 Setting the value of CRI Set the preset CRI value for the selected CRI. ( P170) Selected CRI Value Input Screen Operation Touch the [Selected CRI Value Input] button on page 2 of Preset Editing (2°) or Preset Editing (10°). - Page 185 7. Meter Settings [Setting] Screen Set the value of selected CRI from 0 to 100. P18) If the entered value is within the setting range, the [OK] button is displayed. If it is outside the setting range, re-enter a value. Selected CRI Value Input Screen Selected CRI Value Input Screen (within the setting range)
-
Page 186: Setting The Ppfd
7. Meter Settings [Setting] Screen 7-3-9 Setting the PPFD Setting the PPFD (Photosynthetic Photon Flux Density). PPFD Screen Operation Touch the [PPFD] button on page 2 of Preset Editing (2°) or Preset Editing (10°). The PPFD input screen is displayed. Preset Editing Screen PPFD Screen (Page 2) - Page 187 7. Meter Settings [Setting] Screen Set the PPFD from 0.0 to 9999.9 µmol m P18) If the entered value is within the setting range, the [OK] button is displayed. If it is outside the setting range, re-enter a value. PPFD Screen PPFD Screen (within the setting range)
-
Page 188: Setting The Rf
7. Meter Settings [Setting] Screen 7-3-10 Setting the Rf Setting the Rf (Fidelity Index). Rf Screen Operation Touch the [Rf] button on page 3 of Preset Editing (2°) or Preset Editing (10°). The Rf input screen is displayed. Preset Editing Screen Rf Screen (Page 3) - Page 189 7. Meter Settings [Setting] Screen Set the Rf from 0 to 100. P18) If the entered value is within the setting range, the [OK] button is displayed. If it is outside the setting range, re-enter a value. Rf Screen Rf Screen (within the setting range) (outside the setting range)
-
Page 190: Setting The Rg
7. Meter Settings [Setting] Screen 7-3-11 Setting the Rg Setting the Rg (Gamut Index). Rg Screen Operation Touch the [Rg] button on page 3 of Preset Editing (2°) or Preset Editing (10°). The Rg input screen is displayed. Preset Editing Screen Rg Screen (Page 3) - Page 191 7. Meter Settings [Setting] Screen Set the Rg from 0 to 200. P18) If the entered value is within the setting range, the [OK] button is displayed. If it is outside the setting range, re-enter a value. Rg Screen Rg Screen (within the setting range) (outside the setting range)
-
Page 192: Setting The Ssit
7. Meter Settings [Setting] Screen 7-3-12 Setting the SSIt Setting the SSIt (SSI Tungsten). SSIt Screen Operation Touch the [SSIt] button on page 3 of Preset Editing (2°) or Preset Editing (10°). The SSIt input screen is displayed. Preset Editing Screen SSIt Screen (Page 3) - Page 193 7. Meter Settings [Setting] Screen Set the SSIt from 0 to 100. P18) If the entered value is within the setting range, the [OK] button is displayed. If it is outside the setting range, re-enter a value. SSIt Screen SSIt Screen (within the setting range) (outside the setting range)
-
Page 194: Setting The Ssid
7. Meter Settings [Setting] Screen 7-3-13 Setting the SSId Setting the SSId (SSI Daylight). SSId Screen Operation Touch the [SSId] button on page 3 of Preset Editing (2°) or Preset Editing (10°). The SSId input screen is displayed. Preset Editing Screen SSId Screen (Page 3) - Page 195 7. Meter Settings [Setting] Screen Set the SSId from 0 to 100. P18) If the entered value is within the setting range, the [OK] button is displayed. If it is outside the setting range, re-enter a value. SSId Screen SSId Screen (within the setting range) (outside the setting range)
-
Page 196: Setting The Tlci
7. Meter Settings [Setting] Screen 7-3-14 Setting the TLCI Setting the TLCI (Television Lighting Consistency Index). TLCI Screen Operation Touch the [TLCI] button on page 3 of Preset Editing (2°) or Preset Editing (10°). The TLCI input screen is displayed. Preset Editing Screen TLCI Screen (Page 3) - Page 197 7. Meter Settings [Setting] Screen Set the TLCI from 0 to 100. P18) If the entered value is within the setting range, the [OK] button is displayed. If it is outside the setting range, re-enter a value. TLCI Screen TLCI Screen (within the setting range) (outside the setting range)
- Page 198 7. Meter Settings [Setting] Screen 7-4 Dark Calibration Dark calibration is performed when new batteries are used, 24 hours passed since last use or there is a big change in temperature between turning power OFF and ON again. Except the cases above, dark calibration after power ON is skipped. Accordingly, when there are sudden changes in temperature experienced while using the meter may effect measured values.
- Page 199 7. Meter Settings [Setting] Screen Turn the Light Selection Ring to set to the dark calibration position The status bar will display the dark calibration Icon. Status Bar Light Selection Ring Touch the [Yes] button. "Dark calibration in progress. Please wait" and the status bar will appear while meter's measuring system is being calibrated.
-
Page 200: Dark Calibration
7. Meter Settings [Setting] Screen When the Following Screen is Displayed Dark Calibration Position Confirmation Screen If the Light Selection Ring is set to Range H ) or Range L ), dark calibration cannot be performed. Set the Light Selection Ring to the dark calibration position ), and perform dark calibration. -
Page 201: Product Information Display
7. Meter Settings [Setting] Screen 7-5 Product Information Display The Product Information screen displays detailed information not displayed in the Measuring screen. Product Information Screen * The screen contents differs depending on model. Item Name Description Model Name Displays the model number of the meter. Serial Number Displays the serial number of the meter. - Page 202 7. Meter Settings [Setting] Screen Operation Touch the item [Product Information] button on page 2 of Setting. The Product Information screen will be displayed. Product Information Setting Screen Screen [Close] Button Touch the [Close] button. Returns to the Setting screen.
-
Page 203: Regulation Display
7. Meter Settings [Setting] Screen 7-6 Regulation Display The Regulation screen displays the symbols, approved number, regulation names, etc. which the meter is compliance with. Regulation Screen Operation Touch the item [Regulation] button on page 2 of Setting. The Regulation screen will be displayed. The display contents will differ depending on the product you have purchased. - Page 204 8. Hardware Setting Screen Hardware Setting Screen The following items can be set on the Hardware Setting screen. ● Adjust Touch Panel ● Edit User Information ● Field of view ● Factory Setting Hardware Setting Screen Item Name Description Adjust Touch Adjust the positioning of touch panel display.
- Page 205 8. Hardware Setting Screen Operation With the meter turned OFF, hold down the Menu Button 6and press the Power Button 3. * Until the Hardware Setting screen is displayed, do not release the Menu Button and the Power Button If the buttons are released before the Hardware Setting screen is displayed, the Measuring screen will be displayed.
- Page 206 8. Hardware Setting Screen 8-1 Adjust Touch Panel Adjust the position of touch panel display. Adjust Touch Panel Screen Operation Touch the [Adjust Touch Panel] button on the Hardware Setting screen. "Touch the center of cursor." will be displayed. Hardware Setting Adjust Touch Panel Screen Screen...
- Page 207 8. Hardware Setting Screen Touch the center of the white cross in the upper left corner of the screen. The touch position will be shown as a coinciding red cross cursor, and the white cross cursor will appear at the next position. Adjust Touch Panel The touch position is showed The white cross appears...
- Page 208 8. Hardware Setting Screen NOTE ● When a point far from the white cursor is touched, the screen will blink to indicate adjustment failure. Perform the adjustment again. Adjust Touch Panel Screen...
- Page 209 8. Hardware Setting Screen 8-2 Edit User Information user information can be entered in this screen. Edit Edit User Information Screen NOTE ● Up to 16 alphanumeric characters can be entered. Operation Touch the [Edit User Information] button on the Hardware Setting screen.
- Page 210 8. Hardware Setting Screen Edit the user information. P18) Edit User Information Input Screen [OK] Button [Cancel] Button Touch the [OK] button. Registers the user information, and returns to the Hardware Setting screen. To return to the Hardware Setting screen without registering the user information, touch the [Cancel] button.
- Page 211 8. Hardware Setting Screen 8-3 Field of View Set the Field of view for measurement. Field of view Screen Operation Touch the [Field of view] button on the Hardware Setting screen. The Field of view screen is displayed. Hardware Setting Field of view Screen Screen...
- Page 212 8. Hardware Setting Screen Set the Field of view. Select viewing angle 2°or 10°. Field of view Screen The selected button will be displayed encircled in blue. [OK] Button [Cancel] Button Touch the [OK] button. Confirms the settings, and returns to the Hardware Setting screen. To return to the Hardware Setting screen without confirming, touch the [Cancel] button.
- Page 213 8. Hardware Setting Screen 8-4 Factory Setting Return all display and setting contents of the meter to the factory default. Factory Setting Screen Operation Touch the [Factory Setting] button on the Hardware Setting screen. The screen of "Reset to factory default settings. Are you sure?" will be displayed. Hardware Setting Factory Setting Screen Screen...
- Page 214 8. Hardware Setting Screen Touch the [Yes] button. The factory setting confirmation message "All measurements will be lost when you perform this operation. Are you sure?" will be displayed. Confirm again. To return to the Hardware Setting screen without resetting to factory default settings, touch the [No] button.
- Page 215 8. Hardware Setting Screen Touch the [Close] button. The Language Selection screen is displayed. Select the language to use. ( P6) Language Selection Language Selection Screen Confirmation Screen The selected button will be displayed encircled in blue. [OK] Button Press the [OK] to select the language. The language can be switched at any time.
- Page 216 9. Appendix Appendix 9-1 Glossary Term Description Color temperature refers to the chromaticity of a heated object (commonly refer to as a black body) that will vary according to its temperature. The color temperature is measured in units of Kelvin (K) and refers to the temperature of a heated object at a given color or chromaticity.
- Page 217 9. Appendix Term Description Spectral Similarity Index (SSI) is, defined by Academy of Motion Picture Arts and Sciences, Science and Technical Council, the method to express how close a test spectrum is to a reference spectrum. It is the index (SSI) to evaluate the similarity of spectrum of two light sources.
- Page 218 9. Appendix 9-2 Specifications Type ● Spectrometer with CMOS linear image sensor Illuminance meter class ● Conforms to JIS C 1609-1:2006 for General Class A Illuminance Meters ● Conforms to DIN 5032 Part 7 Class C Light receiving method ● Incident light Light receptor ●...
- Page 219 9. Appendix Measurement range ● Illuminance • Ambient light 1lx to 200,000lx 0.1fc to 18,600fc ● Luminous • Flash light Range L: 20lx·s to 640lx·s (f/2.8 to f/16) exposure Range H: 580lx·s to 20,500lx·s (f/11.9 to f/90) ● Photosynthetic Photon Flux Density 0.0 to 9999.9 μmol m ●...
- Page 220 9. Appendix Display range ● Color temperature 1,563K to 100,000K (5lx to 200,000lx) ● Illuminance • Ambient light 1lx to 200,000lx (3 significant digits) ● Luminous • Flash light 20 lx·s to 20,500 lx·s, 1.86 fc·s to 1,900 fc·s exposure (3 significant digits) Shutter speed •...
- Page 221 9. Appendix Operating temperature ● -10°C to 40°C (without condensation) Operating humidity 85%RH or less (at 35°C) (without condensation) ● Transportation and storage conditions ● -10°C to 60°C (without condensation) Dimensions ● Approx. 73 (width) × 183 (height) × 27 (depth) mm (excluding protruding part of light receiving) (max.
- Page 222 9. Appendix Measurement Reference Plane • Tip of the Light Receiving Part Color correction factor of the general illuminating light source against the CIE standard illuminant A: C-7000 Light source Color correction factor supplementary standard illuminant B 0.984 supplementary standard illuminant C 0.978 CIE standard illuminant D 0.977...
- Page 223 FCC Part15 SubpartB ClassA America (US) ICES-003 (Canada) Japan Environmental Containers and Packaging Recycling Law China Environmental China RoHS South KN11 Korea KN61000-6-1 1. 기자재의명칭 (모델명) :COLOR METER (C-7000) 2. 식별부호 :MSIP-REM-SK0-C-700 3. 상호명:SEKONIC CORPORATION 4. 제조자:SEKONIC CORPORATION 5. 제조국가:일본...
- Page 224 10. Optional Accessories Optional Accessories ■ Synchro Cord This is a five-meter (16.4 feet) long cord with three plugs. An exposure meter, a camera and a flash can all be connected at the same time without having to plug or unplug the cord during shooting. Also, the connection terminal (male) on the light meter side of the synchro cord has a locking mechanism to ensure it remains connected to the meter.
- Page 225 11. Troubleshooting Troubleshooting The following cases may not suggest failures. Please check again before requesting repair. When the meter does not function normally after checking the following, it may be damaged. Remove the battery, and ask the retailer or us to repair it. Status Check item Measure...
- Page 226 11. Troubleshooting Status Check item Measure The memory function Is the differential measurement The memory function cannot cannot be used icon displayed? be used when the differential measurement icon is displayed. Cancel the differential measurement mode. Is "Memory Full" displayed when The memory can store up to 999 pressing the Memory Button? values.
- Page 227 12. After-sales Services After-sales Services Contact your local distributor or camera store that you purchased 伪 from for warranty and service. Even within the warranty period, repair services may be provided 伪 on a paid basis. Check the conditions of warranty provided by local distributor or retailer.
- Page 228 12. After-sales Services FCC & IC compliance information This equipment has been tested and found to comply with the limits for a Class B digital device, pursuant to Part 15 of the FCC Rules. These limits are designed to provide reasonable protection against harmful interference in a residential installation.
- Page 229 7-24-14,Oizumi-Gakuen-Cho,Nerima-Ku,Tokyo 178-8686 Japan TEL +81-3-3978-2335 FAX +81-3-3978-5229 http://www.sekonic.com JT5097613 (en) October 2019...