
Related Manuals for Hitachi AXM860E


Summary of Contents for Hitachi AXM860E
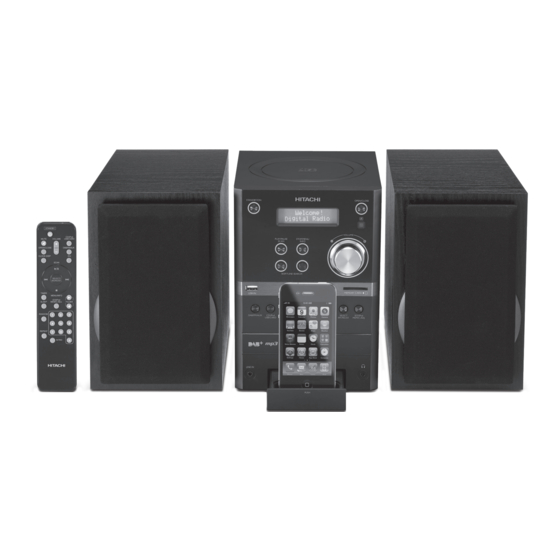
- Page 1 Instruction Manual AXM860E Micro Hi-Fi System with DAB+ Radio and Docking for iPhone/iPod...
-
Page 2: Table Of Contents
Contents Unpacking ..........................8 Product Overview .........................9 Front View ...............................9 Top View ............................... 10 Rear View ..............................10 Remote Control ........................11 Installing Batteries in the Remote Control ...............12 Remote Control Operation Range ..................12 Connections ........................13 Speaker Connections ..........................13 Connecting to the Mains Socket ......................13 Using Earphones............................ - Page 3 Compatible Disc Types .......................23 CD/MP3/WMA Disc Operation ...................23 Playback ................................ 23 To Pause Playback ............................. 23 To Stop Playback ............................23 Skipping to Another Track ........................24 ID3 Operation (For MP3/WMA Mode) ....................24 Repeat Playback (Remote Control Only) ................... 24 Programme Play (Remote Control Only) ...................
- Page 4 SOME DOS AND DON’TS ON THE SAFE USE OF EQUIPMENT This equipment has been designed and manufactured to meet international safety standards but, like any electrical equipment, care must be taken if you are to obtain the best results and safety is to be assured. read the operating instructions before you attempt to use the equipment.
- Page 5 Used correctly, domestic batteries are a safe and dependable source of portable power. Problems can occur if they are misused or abused – resulting in leakage or, in extreme cases, re or explosion. Here are some simple guidelines to safe battery use designed to eliminate any such problems.
- Page 6 Safety Warnings • Read all the instructions carefully before Ventilation using the unit and keep them for future • To prevent the risk of electric shock or reference. fire hazard due to overheating, ensure • Retain the manual. If you pass the unit that curtains and other materials do not obstruct the ventilation vents.
- Page 7 Supervision • Children should be supervised to ensure that they do not play with the unit and the remote control. • Never let anyone especially children push anything into the holes, slots or any other openings in the case - this could result in a fatal electric shock.
-
Page 8: Unpacking
Thank you for purchasing your new HITACHI Micro Hi-Fi System with DAB+ Radio and Docking for iPhone/iPod. We recommend that you spend some time reading this instruction manual in order that you fully understand all the operational features it offers. You will also find some hints and tips to help you resolve any issues. -
Page 9: Product Overview
Product Overview Front View STANDBY/ON OPEN/CLOSE VOLUME PLAY/PAUSE STOP/MENU SCAN INFO SKIP/TUNE SEARCH MEMORY CARD USB IN DAB/FM/AUX CD/iPod SELECT ID3/iPod USB/CARD MONO/ST. MEM/C-ADJ. LINE IN PUSH STANDBY/ON Button 10. OPEN/CLOSE Button (CD Door) LCD Display 11. Remote Control Sensor PLAY/PAUSE/SCAN 12. -
Page 10: Top View
Top View 19. CD Door Rear View 20. Speakers Socket 21. VIDEO OUT Socket 22. Radio Aerial 23. POWER ON/OFF Switch – – 24. Mains Cable VIDEO OUT FM ANT. AC ~... -
Page 11: Remote Control
Remote Control STANDBY/ON Button STANDBY MUTE Button CD/iPod MUTE VOLUME USB/CARD OPEN/CLOSE Button OPEN/CLOSE DAB/FM/AUX CLOCK DISP Button CLOCK DISP PLAY/PAUSE/SCAN Button SCAN SKIP/TUNE SEARCH Button STOP/MENU/INFO Button SELECT/ MONO/ST. TIMER Button SLEEP Button TIMER MENU/INFO 10. ID3/iPod/MEM/C-ADJ. Button ID3/iPod FOLDER MEM/C-ADJ. -
Page 12: Installing Batteries In The Remote Control
Installing Batteries in the Remote Control Slide the back cover to open the battery compartment of the remote control. Insert 2 x AAA size batteries (not included). Make sure to match the (+) and ( – ) ends of the batteries with the (+) and ( –... -
Page 13: Connections
Connections Speaker Connections Attach the speaker covers onto the speakers. Connect the speaker cables at the back of the speakers to the speaker sockets (L/R) at the rear side of the unit. Red: +, Black: – Black: +, White: – R –... -
Page 14: Using Earphones
Using Earphones Turn down the volume before connecting the earphones. Slowly STANDBY/ON OPEN/CLOSE raise the volume with the earphones on until you reach your VOLUME desired volume. When earphones are connected, the speaker is PLAY/PAUSE STOP/MENU SCAN INFO automatically muted. SKIP/TUNE SEARCH USB IN MEMORY CARD... -
Page 15: Basic Operation
Basic Operation Powering ON/OFF When you first connect the unit to the mains socket. Switch the POWER ON/OFF switch at the rear of the unit to the on position. The unit will be in STANDBY mode. Press the STANDBY/ON button on the unit or on the remote control to switch the •... -
Page 16: Manual Setting The Clock
Manual Setting the Clock Connect the unit to the mains socket. Switch the POWER ON/OFF switch at the rear of the unit to the on position. The unit will be in STANDBY mode, and the display will show “00 : 00 : 00”. While in standby mode, press and hold the ID3/iPod/MEM/C-ADJ. -
Page 17: To Cancel The Daily Timer (Remote Control Only)
To Cancel the Daily Timer (Remote Control Only) In Standby mode, press the TIMER button on the remote control repeatedly to select Timer Off mode. The “ ” icon will disappear from the display. Setting the Sleep Timer (Remote Control Only) Use the sleep timer to turn the unit off after a certain number of minutes in play mode. -
Page 18: Dab+/Dab Operation
DAB+/DAB Operation Fully extend the aerial before switching on your unit. If the unit is connected to the mains power, powered on by switching the POWER ON/OFF switch at the rear of the unit, and then switched on from standby mode for the first time, the unit will automatically enter into the DAB mode and perform a full auto scan function. -
Page 19: Storing Stations
Storing Stations You can store up to 30 of your favourite stations to the memory. This will enable you to access your favourite stations quickly and easily. To store a preset, you must first be listening to the station that you would like to save. Press and hold the ID3/iPod/MEM/C-ADJ. -
Page 20: Dab+/Dab Display Modes
DAB+/DAB Display Modes Every time you press the STOP/MENU/INFO button, the display will cycle through the following display modes: Programme Type, DLS, Multiplex Name, Channel no. / Frequency, Audio Mode / Audio Bit Rate, Signal Strength, Time/Date. The information is displayed on the lower segment of the display. Programme Type Programme Type This describes the style of the programme that... -
Page 21: Fm Operation
FM Operation Switching to FM Mode Make sure the unit is in POWER ON mode. Press the DAB/FM/AUX button repeatedly to select FM mode. The display will show FM and the frequency. Auto Scan To search for an FM station automatically, press the PLAY/PAUSE/SCAN button to start the auto scan forward. -
Page 22: Fm Display Modes
Recalling a Stored Station Once you have saved a station to one of the preset stations, you can recall it by pressing the ID3/iPod/MEM/C-ADJ. button. Press the SKIP/TUNE SEARCH buttons to select your desired preset station number. Press the ID3/iPod/MEM/C-ADJ. button to confirm the selection. • The stored stations will be saved into the memory and power off will not erase it. -
Page 23: Compatible Disc Types
Compatible Disc Types Disc Types Disc Logo Recorded Content CD-R (CD Recordable) AUDIO, MP3, WMA CD-RW (CD-Rewritable) AUDIO, MP3, WMA AUDIO-CD (Compact Disc Digital Audio) AUDIO CD/MP3/WMA Disc Operation Press the CD/iPod/USB/CARD button repeatedly to select CD mode. Playback While in POWER ON mode, press the OPEN/CLOSE button and the disc door will open. -
Page 24: Skipping To Another Track
Skipping to Another Track Press the SKIP/TUNE SEARCH • buttons to skip backwards to the beginning of the current track (or the previous track) or skip forwards to the next track. Press and hold the SKIP/TUNE SEARCH • buttons to perform fast forward/reverse playback. -
Page 25: Programme Play (Remote Control Only)
Programme Play (Remote Control Only) You can program up to 32 tracks in CD mode or 64 tracks in MP3/WMA mode in any desired order. Programme mode can only be activated while in STOP mode. When it is activated, “MEM” will show on the display. For CD Mode Press the ID3/iPod/MEM/C-ADJ. -
Page 26: Random Playback (Remote Control Only)
Random Playback (Remote Control Only) All tracks on the disc can be played in a random order. Press the RANDOM button on the remote control. The “RANDOM” indicator will show • on the display. All tracks will be played randomly. Press the SKIP/TUNE SEARCH •... -
Page 27: Usb Operation
USB Operation During POWER ON mode, connect a USB device to the USB IN port directly. Press the CD/iPod/USB/CARD button repeatedly to select USB mode. The unit will search for all available MP3/WMA files, and start playback automatically. Press the FOLDER buttons on the remote control to select the desired folder. -
Page 28: Iphone/Ipod Operation
iPhone/iPod Operation Using the iPhone/iPod dock you can use the unit to play music files stored on your iPhone/ iPod. Inserting the iPhone/iPod and Selecting iPod Mode Press the STANDBY/ON button to turn on the unit. Press the CD/iPod/USB/CARD button repeatedly to select iPod mode. Push the PUSH button on the unit to release the dock. -
Page 29: Ipod Playback
iPod Playback Press the PLAY/PAUSE/SCAN button to start playing. To Pause Playback Press the PLAY/PAUSE/SCAN button to pause playback. To resume playback, press the PLAY/PAUSE/SCAN button again. To Stop Playback Press the STOP/MENU/INFO button to stop playback. Skipping to Another Track Press the SKIP/TUNE SEARCH buttons to skip to the beginning of the current track (or previous track) or the next track. -
Page 30: Video Out Function
• It is not recommended to charge when using the DAB/FM mode. It may interfere with the reception. • To avoid damaging your iPhone/iPod or the unit please take care when inserting and removing your iPhone/iPod from the dock. • The unit does not support charging 1 Generation iPods. -
Page 31: Maintenance
Maintenance Handling Discs • Do not touch the playback side of the disc. • Do not attach paper or tape to the disc. Playback side Cleaning Discs • Fingerprints and dust on the disc cause picture and sound deterioration. Wipe the disc from the centre outwards with a soft cloth. -
Page 32: Hints And Tips
Hints and Tips If a problem does occur, it may often be due to something very minor. The following table contains various tips. Menu Description No power. • Ensure the mains plug is properly connected. • Make sure that the unit is turned on at the rear of the unit. • Make sure that you select ON mode. - Page 33 Menu Description iPod iPhone/iPod does • Your iPhone/iPod battery may have completely discharged. not respond to the First charge it with the adapter provided with your iPhone/ speaker system. iPod, then dock it on the unit again. • iPhone/iPod may not be docked properly or installed properly.
-
Page 34: Specifications
Specifications Model AXM860E Power Supply 230-240V ~50Hz Output Power 20 Watts x 2 Standby Power Consumption 0.6 Watts Unit Dimension 152 (W) x 222 (D) x 218 (H) mm Speaker Box Dimension 140 (W) x 230 (D) x 218 (H) mm Net Weight: 5.5 kg... - Page 36 Notes for battery disposal The batteries used with this product contain chemicals that are harmful to the environment. To preserve our environment, dispose of used batteries according to your local laws or regulations. Do not dispose of batteries with normal household waste. For more information, please contact the local authority or your retailer where you purchased the product.