
Related Manuals for Hitachi AXM75DAB


Summary of Contents for Hitachi AXM75DAB
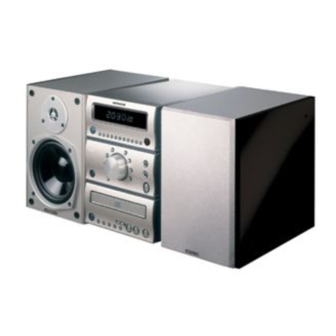
- Page 1 MINI HIFI AUDIO SYSTEM WITH DAB TUNER RECEIVER SYSTEM AXM75DAB Instruction Manual Before operating please read all these instructions thoroughly.
-
Page 2: Some Dos And Don'ts On The Safe Use Of Equipment
SOME DOS AND DON'TS ON THE SAFE USE OF EQUIPMENT This equipment has been designed and manufactured to meet international safety standards but, like any electrical equipment, care must be taken if you are to obtain the best results and safety is to be assured. -
Page 3: Safety Precautions
SAFETY PRECAUTIONS WARNINGS ATTENTION To reduce the risk of electric shock, do not remove the cover. There are no user serviceable parts inside the unit. Refer all servicing to qualified personnel. The lightening flash with arrowhead symbol within the triangle is a warning sign alerting the user of "dangerous voltage"... - Page 4 IMPORTANT The mains lead on this equipment may be supplied with a moulded plug incorporating a fuse, the value of which is indicated on the pin face of the plug. Should the fuse need to be replaced, an ASTA or BS approved BS1362 fuse must be used of the same rating. If the fuse cover is detachable never use the plug with cover omitted.
-
Page 5: Front Panel View
FRONT PANEL VIEW... -
Page 6: Rear View
REAR VIEW... - Page 7 REMOTE HEANDSET VIEW...
-
Page 8: Brief Instruction
BRIEF INSTRUCTION Frontal view MULTI-FUNCTION DISPLAY 12 IR SENSOR indication unit for amplifier, tuner, remote control receiver. and CD player. 13 EQ/TONE DAB/FM AM button to select preset EQ (ROCK/ POPS/JAZZ/DANCE/FLAT/ key to select operating mode Tuner mode/for radio recordings DAB CUSTOM/TREBLE and BASS). -
Page 9: Remote Control
BRIEF INSTRUCTION 26 OPEN CLOSE Remote control to open and close the CD/MP3 36 CLOCK CD-ROM transport drawer. display clock, adjust clock and timer. 27 STOP 37 EQ SETUP to stop CD/MP3 CD-ROM playback. button to select preset EQ setting 28 PLAY (ROCK/POPS/JAZZ/DANCE/FLAT/ to start CD/MP3 CD-ROM playback. -
Page 10: Setting Up And Connecting The Stereo System
BRIEF INSTRUCTION 48 POWER 55 STOP to stop CD playback. switch the system from standby to operating state and off. 56 REPEAT repeat function/repeat of selected reverse/forward track selector. passage. reverse/forward search. 57 0-9/+10 50 MUTE preset station memory pushbutton to save station/track selection. - Page 11 SETTING UP AND CONNECTING THE STEREO SYSTEM Place your set on a stable, horizontal, If you bring your set from a cold place to vibration-free surface where there is a warm place, leave the set switched off no risk of the set falling over or being for a few hours.
-
Page 12: Multi-Function Buttons
SETTING UP AND CONNECTING THE STEREO SYSTEM Connecting the loudspeakers AMPLIFIER AND TUNER Press down the locking levers 34 to insert the loudspeaker cable. Attach the black wire of the loudspeaker cable to Multi-function buttons the corresponding black (negative) terminal of the machine. Connect the The multi-function buttons are positioned second wire accordingly. - Page 13 AMPLIFIER AND TUNER "Bass" can be adjusted at CUSTOM by Manual tuning: pressing EQ/TONE 13, 2 times. It adjusts Press button "FM/AM TUNING" 11. Now you the individual playback sound, in this case have to adjust the desired station with button the low frequencies, BASS appears...
- Page 14 AMPLIFIER AND TUNER band. You can directly call up the saved RDS (RADIO DATA SYSTEM) for stations using the preset station memory FM only pushbuttons on the tuner or on the remote control. RDS (Radio Data System) allows for the name, specific type of program and text The saved stations remain saved even if of the radio station being played to be...
-
Page 15: Dab Tuning
AMPLIFIER AND TUNER DAB Tuning When you switch to DAB mode by pressing "DAB/FM/AM" 2 or on your handset 44, "now tuning" will be shown on multi function display 1. If stations are found The stations will be stored in alphanumeric order. The first station on the list will be selected and you will hear it through the speaker. - Page 16 AMPLIFIER AND TUNER The display will indicate tuning is underway. When finished the unit will return to the station you were listening to and you will hear it through the speakers. All the stations found are now stored in the unit and you can select another station as described in Selecting a station.
- Page 17 AMPLIFIER AND TUNER Changing the display mode The unit has six display modes which enable you to view parts of the broadcast data on the bottom line of the display. Press the "DISPLAY" button 42 and repeat to cycle through the six different display modes.
- Page 18 AMPLIFIER AND TUNER Storing and recalling presets The numeric buttons (1-9) enable you to store radio stations for one-touch access. To store a station You can store a station to a preset while listening to it or when you see the station name on the bottom line of the display while scrolling through the station list.
- Page 19 AMPLIFIER AND TUNER Advanced setup options The unit has a number of advanced features which enable you to change the order and number of stations on the station list, perform manual tuning, apply Dynamic Range Control (DRC) and view the software version. Press the "MENU"...
- Page 20 AMPLIFIER AND TUNER DRC Value DRC (Dynamic Range Control) enables you to alter the dynamic range of the received audio (dependent on broadcast material) by making the quieter sounds in a broadcast more audible. This may be useful in noisy environments or particularly quiet parts of programmes.
- Page 21 AMPLIFIER AND TUNER Guide to digital radio Your unit enables you to receive and listen to DAB radio programmes. Digital Audio Broadcast (DAB) uses digital signals rather than traditional analogue signals enabling near CD-quality audio with virtually interference-free reception. DAB also enables broadcasters to transmit additional data along with the audio including other audio channels, text and in the future, perhaps computer data and images.
-
Page 22: Loading And Removing Discs
COMPACT DISC PLAYER FOR CD CD mode Note: The functions of keys "CD TRACK" 3, "INTRO" 20, "REPEAT" 24, "SKIP" 25, "OPEN/CLOSE" 26, "STOP" 27, "PLAY" 28 and "PAUSE" 29 can be activated using the remote control. Close the CD transport drawer by Loading and removing discs pressing the "OPEN CLOSE"... -
Page 23: Playback Time
COMPACT DISC PLAYER FOR CD When all tracks on the DISC have been Pause played, playback stops and the indication appears in the displayed 1: Press the "PAUSE" button 29 or 54 on remote control, in order to stop for a moment during play. -
Page 24: Repeat Functions
COMPACT DISC PLAYER FOR CD Repeat functions Example: You wish to listen to tracks 14, 2, 9, 12 and 22 in that order on a disc as described above. Repeat: When the scanner has read the disc, "20" and Press the "REPEAT" pushbutton 24 or 56 the total playing time will appear in the display once, the unit will show the current status. - Page 25 COMPACT DISC PLAYER FOR CD Note: Moisture The entire programme will be cleared as soon as you open the disc compartment. If the unit is exposed to extreme temperature fluctuations, moisture will form inside it. Stop Condensation will form on the lens and on other parts inside the unit.
- Page 26 PLAYING MP3 CD-ROM Insert the MP3 CD-ROM disc.The first screen Use " " or " " key 39 to navigate the menu. Use "PLAY" button 28 or 45 to enter the appears on your TV set. The left column is one level higher than right column.
-
Page 27: Time And Alarm Setting
TIME AND ALARM SETTING Turn on the unit by pressing "STANDBY" Sleep: key 18. Press "SLEEP" button 38 on the remote Press "CLOCK" key 15 on the main unit or control to activate sleep function. You select 36 on the remote control once will display the desired sleep time by pressing "SLEEP"... -
Page 28: Specifications
SPECIFICATIONS Power Source : AC230V ~ 50Hz Frequency Range : FM 87.5 - 108 MHz MW 522 - 1629 KHz Dimensions of unit : (W) 166 x (H) 240 x (D) 257 mm Weight of unit : 4.5 kg Weight and dimensions are approximate because we continually strive to improve our products, specifications may change without prior notice. - Page 31 This guarantee does not cover the replacement of exhausted batteries, the adjustment of user controls, or head cleaning and general consumer maintenance tasks. Any parts replaced under this guarantee shall become the property of Hitachi Europe Ltd. Any claims made under guarantee must be directed to the dealer from whom the equipment was originally purchased.
- Page 32 Hitachi Home & Life Solutions, Inc. Hitachi Atago Building, No.15-12, Nishi Shimbashi, 2-chome, Minato-ku, Tokyo, 105-8410 Japan Tel: 03 3502 2111 HITACHI EUROPE LTD. HITACHI EUROPE S.A. Digital Media Group 364, Kifissias Ave. & 1, Delfon Str. Whitebrook Park 152 33 Chalandri...