Table of Contents
Advertisement
Available languages
Available languages
Quick Links
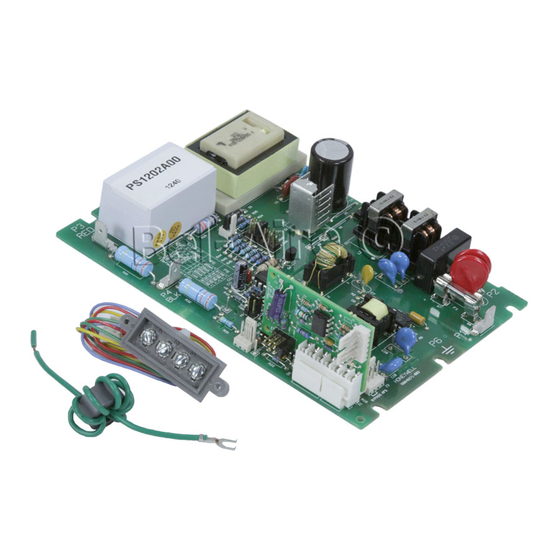
PS1202A Replacement
Power Supply Kit for
Electronic Air Cleaner
APPLICATION
These kits replace the power supplies with W8600E solid
state performance indicators (SSPI) used in the F50F
and F58F Electronic Air Cleaners. See Table 1.
NOTE: The W8600E Board Jumper must be posi-
tioned according to the ionizer current in
order for the W8600E to work properly. False
wash indications will occur if jumper is not
set.
EAC
Model
Electrical Rating
F50F
120 Vac, 60 Hz
220/240 Vac, 50/60 Hz 20 x 12-1/2 508 x 318
F58F
120 Vac, 60 Hz
INSTALLATION
When Installing this Product...
1. Read these instructions carefully. Failure to follow
them could damage the product or cause a hazard-
ous condition such as electrical shock.
2. Check the ratings given in the instructions and on
the product to make sure the product is suitable for
your application.
3. Installer must be a trained, experienced service
technician.
4. After installation is complete, check out product
operation as provided in these instructions.
Table 1. Power Supply Replacement Guide.
Nominal Size
(in.)
(mm)
16 x 20
406 x 508
16 x 25
406 x 635
20 x 20
508 x 508
20 x 25
508 x 635
20 x 12-1/2 508 x 318
20 x 25
508 x 635
INSTALLATION INSTRUCTIONS
NOTE: Use the 120 Vac replacement power supply
in Table 1 when servicing the F50F or F58F
Electronic Air Cleaners that were modified
with the 203365A Transformer Kit to operate
at 220/240 Vac.
The power supply board in the PS1202A Kit has been
calibrated to provide a selectable ionizer current output.
Select the correct ionizer current by moving the P5
shorting bar to the correct position. See Table 1. See Fig.
8 for location of P5.
Ionizer Current
W8600E Board Jumper
(mA)
1.29
PS1202A00
1.65
PS1202A00
1.65
PS1202A00
2.10
PS1202A00
1.05
PS1202A00
1.05
PS1202A00 with 203365
2.10
PS1202A00
WARNING
ELECTRICAL HAZARD.
Can Cause Electrical Shock or Equipment
Damage.
Disconnect power before removing old power
supply board and installing replacement power
supply board.
To Remove Old Power Supply
Board
NOTE: Observe the location of leadwires to be
replaced on the power supply. Label the
leadwires to identify them for reconnecting
later.
Open access door. See Fig. 1.
Open power box.
Position
69-1136EF-01
Advertisement
Table of Contents
Troubleshooting

Related Manuals for Honeywell PS1202A


Summary of Contents for Honeywell PS1202A
- Page 1 (SSPI) used in the F50F at 220/240 Vac. and F58F Electronic Air Cleaners. See Table 1. The power supply board in the PS1202A Kit has been NOTE: The W8600E Board Jumper must be posi- calibrated to provide a selectable ionizer current output.
-
Page 2: Install New Power Supply
PS1202A REPLACEMENT POWER SUPPLY KIT FOR ELECTRONIC AIR CLEANER Install New Power Supply When replacing the power supply, reuse the remaining leadwires in the air cleaner when removing the old REMOVING COVER power supply. FROM POWER BOX. Install W8600E terminal block and wiring supplied with this kit using screws previously removed. - Page 3 PS1202A REPLACEMENT POWER SUPPLY KIT FOR ELECTRONIC AIR CLEANER BLACK COLLECTOR RED IONIZER CONTACT BOARD BLACK BLACK POWER SUPPLY BLACK 0.25mA 0.9mA 1.05mA 1.29mA 1.65mA 2.1mA GRAY TERMINAL STRIP ORANGE FRONT BACK BROWN VIOLET W8600E BLACK WALL BLACK PANEL 1 INTERLOCK SWITCH.
-
Page 4: Troubleshooting And Service
PS1202A REPLACEMENT POWER SUPPLY KIT FOR ELECTRONIC AIR CLEANER BLACK COLLECTOR TEST RED IONIZER BUTTON BLACK CONTACT POWER SUPPLY BOARD BLACK BLACK 0.25mA 0.9mA 1.05mA 1.29mA 1.65mA 2.1mA BROWN BLACK BLUE ORANGE VIOLET GRAY YELLOW GREEN BLACK BLACK BLACK 1 INTERLOCK SWITCH. -
Page 5: Check Led
PS1202A REPLACEMENT POWER SUPPLY KIT FOR ELECTRONIC AIR CLEANER Check Led (Air Cleaners With The solid state power supply assembly has no field serviceable components. If troubleshooting indicates a W8600E) power supply or solid state performance indicator problem, replace the entire power supply assembly. -
Page 6: Modification To Reduce Ozone Odor
PS1202A REPLACEMENT POWER SUPPLY KIT FOR ELECTRONIC AIR CLEANER Modification To Reduce Ozone a. Unplug or disconnect power supply to the air cleaner. Odor b. Open the access door. c. Remove the power box cover. See Fig. 1. d. Locate J8 shorting bar on the power supply. See WARNING Fig. -
Page 7: Limited Two-Year Warranty
Golden Valley, MN 55422 This warranty does not cover removal or reinstallation costs. This warranty shall not apply if it is shown by Honeywell that the defect or malfunction was caused by damage that occurred while the product was in the possession of a consumer. - Page 8 PS1202A REPLACEMENT POWER SUPPLY KIT FOR ELECTRONIC AIR CLEANER Automation and Control Solutions Honeywell International Inc. 1985 Douglas Drive North ® U.S. Registered Trademark Golden Valley, MN 55422 © 2012 Honeywell International Inc. 69-1136EF—01 M.S. 03-12 customer.honeywell.com Printed in United States...
-
Page 9: Installation
REMARQUE : Le cavalier incorporé au circuit W8600E Le circuit d'alimentation électrique dans le nécessaire doit être positionné conformément au PS1202A a été étalonné pour fournir une sortie de courant de l’ionisateur pour que le courant de l’ionisateur sélectionnable. Sélectionner le W8600E fonctionne correctement. - Page 10 NÉCESSAIRE DE BLOC D’ALIMENTATION DE REMPLACEMENT PS1202A POUR ÉPURATEUR D’AIR ÉLECTRONIQUE Pour retirer l’ancienne carte de Retirer les vis à tôle en maintenant le circuit en place et les mettre de côté. circuit d’alimentation Jeter l'ancien bloc d’alimentation.
- Page 11 NÉCESSAIRE DE BLOC D’ALIMENTATION DE REMPLACEMENT PS1202A POUR ÉPURATEUR D’AIR ÉLECTRONIQUE 3. Mettre la soufflante du système en marche. Une 4. Avec une soufflante à plusieurs vitesses, répéter les fois l’épurateur d’air activé, appuyer sur le bouton étapes 1 à 3 pour chaque vitesse de ventilateur.
- Page 12 NÉCESSAIRE DE BLOC D’ALIMENTATION DE REMPLACEMENT PS1202A POUR ÉPURATEUR D’AIR ÉLECTRONIQUE COLLECTEUR NOIR NOIR IONISATEUR ROUGE ROUGE ALIMENTATION PLAQUE À CONTACTS NOIR NOIR 0.25mA 0.9mA 1.05mA 1.29mA 1.65mA 2.1mA ALIMENTATION MARRON NOIR BLEU ORANGE ROUGE GRIS JAUNE VIOLET VERT NOIR...
-
Page 13: Dépannage Et Entretien
NÉCESSAIRE DE BLOC D’ALIMENTATION DE REMPLACEMENT PS1202A POUR ÉPURATEUR D’AIR ÉLECTRONIQUE DÉPANNAGE ET ENTRETIEN BORNE DU COLLECTEUR AVERTISSEMENT BORNE DE L'IONISATEUR BORNE DU RISQUE DE CHOC ÉLECTRIQUE. COLLECTEUR Peut causer des blessures et des dégâts matériels. La notice d’installation est réservée à... -
Page 14: Modification Pour Réduire L'odeur D'ozone
NÉCESSAIRE DE BLOC D’ALIMENTATION DE REMPLACEMENT PS1202A POUR ÉPURATEUR D’AIR ÉLECTRONIQUE DÉPANNAGE DES ÉPURATEURS D’AIR AVEC INDICATEUR DE PERFORMANCE À SEMI-CONDUCTEUR. POUR COMMENCER POUR UTILISER CE TABLEAU : SUIVRE LES ÉTAPES DANS L’ORDRE. À CHAQUE FOIS QU’UN PROBLÈME EST ISOLÉ ET RÉSOLU, RECOMMENCER AU DÉBUT. - Page 15 NÉCESSAIRE DE BLOC D’ALIMENTATION DE REMPLACEMENT PS1202A POUR ÉPURATEUR D’AIR ÉLECTRONIQUE Toutefois, si cela est souhaité, l’ozone généré par e. Replacer le couvercle et la porte d'accès du l’épurateur d’air peut être réduit de l'une des deux bloc d'alimentation. Mettre sous tension.
-
Page 16: Garantie Limitée De Deux Ans
GARANTIE LIMITÉE DE DEUX ANS Honeywell garantit ce produit contre tout vice de fabrication ou de matériau dans la mesure où il en est fait une utilisation et un entretien convenables, et ce, pour deux (2) ans à partir de la date d’achat par le consommateur. En cas de défaut ou de mauvais fonctionnement du produit pendant la période de garantie, Honeywell remplacera ou réparera...