Table of Contents
Advertisement
Advertisement
Table of Contents

Related Manuals for Salus HTRP-RF(50)


Summary of Contents for Salus HTRP-RF(50)
- Page 1 HTRP-RF(50) THERMOSTAT - FULL USER MANUAL...
-
Page 2: Table Of Contents
4.2 Button description ..................................9 4.3 First power up sequence and preparing to the pair process ......................10 5. Installation by SALUS Smart Home application (ONLINE MODE) ..................11 5.1 General informations about SALUS Smart Home application .......................11 5.2 Pairing with underfloor heating wiring centre (KL08RF/Control Box) ..................12 5.3 Pairing with wireless TRV radiator head ............................15... - Page 3 7. Installation in OFFLINE MODE without SALUS SmartHome application ................49 7.1 General informations .................................49 7.2 Pairing with underfloor heating wiring centre (KL08RF/Control Box) ..................50 7.2.1 Available operation modes ............................50 7.2.2 Grouping - installation of the thermostat as a group controller - MASTER ..............53 7.2.3 Installation as a programmable thermostat .......................54...
-
Page 5: Introduction
1. Introduction 1.1 Product Compliance This product complies with the essential requirements and other relevant provisions of Directives 2014/53/EU and 2011/65/EU. The full text of the EU Declaration of Conformity is available at the following internet address: www.saluslegal.com. 1.2 Safety Informations •... -
Page 6: Product Overview
HTRP-RF(50) is a room temperature thermostat that is used for wireless control of iT600 series devices such as: KL08RF wiring centre, TRV radiator valve and RX10RF boiler receiver. In combination with Universal Gateway UGE600 this regulator can be controlled over the Internet using SALUS SmartHome app (Online mode). -
Page 7: About Zigbee Network
3. About ZigBee network 3.1 ZigBee network - creation and work ZigBee is a wireless network based on IEEE 802.15.4 standard and it’s communication takes place in the 2.4 GHz band. The network is based on a mesh topology, which allows for a very large range and high reliability. The maximum range of direct communication between two network nodes (devices) is about 100m in open space. -
Page 8: Compatibility With Salus Devices (Online And Offline)
3.2 Compatibility with SALUS devices (ONLINE AND OFFLINE) COMPATIBILTY WITH OTHER SALUS CONTROLS DEVICES ONLINE MODE OFFLINE MODE Universal Gateway is NOT Universal Gateway is CONNECTED TO THE INTERNET CONNECTED TO THE INTERNET You can use your devices locally You can configure and use all your without the SmartHome App. -
Page 9: Before You Start (First Power Up)
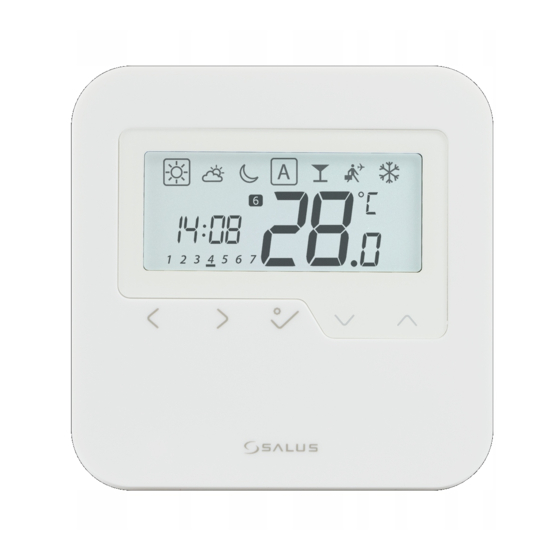
4. Before you start (first power up) 4.1 LCD icon description 1. Comfort temperature 13. Manual mode / override temp. 2. Standard temperature 14. Group controller 3. Economic temperature 15. Current / set temperature 4. Automatic mode 16. Lock function 5. -
Page 10: First Power Up Sequence And Preparing To The Pair Process
4.3 First power up sequence and preparing to the pair process Remove the protection foil and insert ...it will display all icons... After that, thermostat will automatically power 2xAA batteries by removing back cover. up and start boot sequence..then thermostat will display the Set your thermostat for underfloor software version. -
Page 11: Installation By Salus Smart Home Application (Online Mode)
5.1 General informations about SALUS Smart Home application Thanks to UGE600 Universal Gateway and SALUS Smart Home app system allows you to remote control of your heating system in any place you are in the moment by smartphone, tablet or computer with Internet connection. Then you have also access to advanced functions of HTRP-RF(50) thermostat. -
Page 12: Pairing With Underfloor Heating Wiring Centre (Kl08Rf/Control Box)
SALUS SmartHome Set your thermostat for underfloor heating Now thermostat is looking for the Go to SALUS Smart Home app. by „ ” or „ ” buttons. Then signal from the coordinator... - Page 13 Thermostat is connected. Go to the Select your thermostat and press Name your thermostat and go Smart Home app to configure it. „Connect equipment” button. „Next”... Select your KL08RF/Control Box Choose Press gear icon. added before. „UFH Wiring Centre” option.
- Page 14 Press „Finish” button to end the set Select the zone which you want attribute to Choose „No” if you want to set your up process in the app. your thermostat. own schedule later or „Yes” if default now. After that thermostat will display Gateway stop flashing and turn to steady main screen.
-
Page 15: Pairing With Wireless Trv Radiator Head
For easier installation, please make sure you have already added wireless TRV radiator heads to your ZigBee network (please refer to the wireless TRV radiator head manual instruction). SALUS SmartHome Set your thermostat for radiators by Go to SALUS Smart Home app. Now thermostat is looking for the „ ” or „ ” buttons. Then confirm signal from the coordinator... - Page 16 Select your thermostat and press Name your thermostat and go Press gear icon. „Connect equipment” button. „Next”... Choose „No” if you want to set your own schedule later or „Yes” if default now. Select your TRV radiator Now choose Smart Radiator Control. head from the list.
-
Page 17: Pairing With Smart Plug Spe600
For easier installation, please make sure you have already added Smart Plug SPE600 to your ZigBee network (please refer to the Smart Plug SPE600 manual instruction). SALUS SmartHome Set your thermostat for underfloor heating Now thermostat is looking for the Go to SALUS Smart Home app. by „ ” or „ ” buttons. Then signal from the coordinator... confirm by button. - Page 18 Select your thermostat and press Name your thermostat and go Press gear icon. „Connect equipment” button. „Next”... Choose „No” if you want to set your own schedule later or „Yes” if default now. Select your Smart Plug from the list. Now choose Smart Plug.
-
Page 19: Pairing With Smart Relay Sr600
For easier installation, please make sure you have already added Smart Relay SR600 to your ZigBee network (please refer to the Smart Relay SR600 manual instruction). SALUS SmartHome Set your thermostat for underfloor heating Now thermostat is looking for the Go to SALUS Smart Home app. by „ ” or „ ” buttons. Then signal from the coordinator... confirm by button. - Page 20 Select your thermostat and press Name your thermostat and go Press gear icon. „Connect equipment” button. „Next”... Choose „No” if you want to set your own Select your Smart Relay from the list. schedule later or „Yes” if default now. Now choose Smart Relay.
-
Page 21: Pairing With Rx10Rf Receiver
For easier installation, please make sure you have already added RX10RF receiver to your ZigBee network (please refer to the RX10RF receiver manual instruction). SALUS SmartHome Set your thermostat for underfloor heating Go to SALUS Smart Home app Now thermostat is looking for the by „ ” or „ ” buttons. - Page 22 Select your thermostat and press Name your thermostat and go Press gear icon. „Connect equipment” button. „Next”... Now choose Boiler Receiver. If RX10RF is set as Choose „No” if you want to set your own Choose „More” to expand the menu. „RX1”...
-
Page 23: Operating In Online Mode (By App)
6.1 General informations This section will show how to use your HTRP-RF(50) thermostat with the UGE600 Universal Gateway and the Salus Smart Home App. In order to do that, you will need a Salus UG600/UGE600 Universal Gateway, the Salus Smart Home App and Internet connection. Controlling your thermostat via the App gives you a lot of freedom and the possibilities to manage the temperature in your house/office remotely (Smart Home app is available for Android/iOS mobile devices or Internet browser). -
Page 24: Change Thermostat Name (Pencil Icon)
6.3 Change thermostat name (pencil icon) Select the thermostat in Press the thermostat’s name. the main app menu. Click on the pencil icon. Name your termostat and confirm it by „Save” button. -
Page 25: Setpoint Temperature Change
6.4 Setpoint temperature change You can change the setpoint by sliding the cursor to left/right on your App. On your App screen, the setpoint temperature is the number displayed in a larger font. Select the thermostat in Old setpoint value. the main app menu. -
Page 26: Heat/Cool Mode Change (Kl08Rf Connection)
6.5 Heat/Cool mode change (KL08RF connection) HTRP-RF(50) thermostat could be a heating device or cooling device. Default thermostat is set for heating. To set cool mode you have to insert the jumper into „CO” terminal on KL08RF side. Look at the instructions below: HEATING MODE: When there is no jumper at „CO”... -
Page 27: Thermostat Modes
6.6 Thermostat modes 6.6.1 Schedule mode To activate schedule mode: Select thermostat in the Click on the work mode icon. main app menu. Choose „Follow Schedule” When Schedule Mode is activated work mode. then frame will move on the „A” letter. - Page 28 TO SET THE SCHEDULE IN THE APP: Select thermostat in the Press thermostat’s name. Scroll down and press pencil button. main app menu. As you can see there is default schedule. You can delete all default intervals by button. After days period selection use Then add a start time and Choose for which days you want to „Add interval”...
- Page 29 After you’ve added all the intervals, ADDITIONALLY: You can Select thermostat for which you tap „Save” to save it. Your schedule duplicate the same schedule for want to duplicate the schedule. has been saved and set. other thermostat’s. Click on the „Duplicate schedule”...
- Page 30 TO SET DEFAULT SCHEDULE: Select thermostat in the Press thermostat’s name. main app menu. To set default schedule use „Default schedule” Scroll down and press pencil icon. button. It will remove all current intervals and it will set default schedule.
-
Page 31: Temporary Override Mode
6.6.2 Temporary override mode Temporary override mode means manual temperature change during active schedule mode: When you overwrote schedule’s setpoint When you have overwritten the temperature When „Follow schedule” mode is active, temperature then on the thermostat’s then hand icon will appear next to calendar use slider to set new setpoint display you will see the hand icon. -
Page 32: Frost Protection
6.6.4 Frost protection In Frost protection mode the thermostat is displaying actual room temperature and maintain „frost protection” setpoint temperature specified in thermostat settings (please refer to chapter 8.3). When thermostat works in Frost protection mode then you have no possibilities to change temperature setpoint. -
Page 33: Key Lock Function
6.7 Key lock function You can lock/unlock buttons in your thermostat by application. When buttons are locked then also you Click in the thermostat’s name. Click on the „padlock” icon to can see on the thermostat display „key” lock/unlock thermostat buttons. icon. -
Page 34: Compatibility With Window/Door Sensor Os600 / Sw600
6.8 Compatibility with window/door sensor OS600 / SW600 HTRP-RF(50) thermostat paired with window/door sensor OS600/SW600 allows to create OneTouch rules when window/door is opened or closed. If thermostat will receive information from window/door sensor (that window has been opened for example) then OneTouch rule will turn off heating until window close. -
Page 35: Compatibility With Smart Plug Spe600
SPE600 Smart Plug to the SALUS SmartHome system (please refer to the SPE600 manual instruction). To pair SPE600 Smart Plug with HTRP-RF(50) thermostat please follow steps below: Select the thermostat in Press thermostat’s name. -
Page 36: Compatibility With Smart Relay Sr600
(or turn off when there is no need to heat). If you want to have acces to this function then first you have to add SR600 Smart Relay to the SALUS SmartHome system (please refer to the SR600 manual instruction). -
Page 37: Identification Mode
6.11 Identification mode Identification mode can be useful when we are pairing more than one device in one moment and we don’t know which device is which. Beyond, if our system include more that one UGE600 Universal Gateway then we can easily identify which device is paired with which gateway. Select the thermostat in Press thermostat’s name. -
Page 38: Pinning/Unpinning Thermostat To/From Application Dashboard
6.12 Pinning/unpinning thermostat to/from application dashboard To pin/unpin thermostat from dashboard in Smart Home application please follow steps below: Open main menu in the app. Select equipment. Select All equipment option. Select your HTRP-RF(50) Press on the „Pin” icon to pin/unpin thermostat. -
Page 39: User Settings (Basic Settings)
6.13 User settings (basic settings) User settings of HTRP-RF(50) thermostat determine basic thermostat parameters. Please see below how to enter those settings: Select the thermostat in Press thermostat’s name. Select thermostat’s settings. the main app menu. Scroll down to the settings section. BASIC SETTINGS: Turn on or turn off the display on the thermostat. -
Page 40: Admin Settings (Installer Parameters)
6.14 Admin settings (installer parameters) PLEASE NOTE: Admin settings are mainly for qualified installers or knowledgeable users. Select the thermostat in Press thermostat’s name. the main app menu. Scroll down to enter Select thermostat’s settings. „Admin settings”. Please Note: All service parameters with detailed admin settings are described on page 63! -
Page 41: Onetouch Rules (Add/Edit)
6.15 OneTouch rules (add/edit) OneTouch - function that distinguish SALUS Smart Home system in terms of functionality. OneTouch rules are pre-configured set of actions defined in the interface easy in use. You can switch it on or off anytime. OneTouch informs thermostat or other device how it has to work according to pre-set settings. - Page 42 You can also create your own OneTouch rule. As an example we will create OneTouch rule which activates „send me a notification” action under „temperature is below 10 °C” condition. Please look at the steps below how to set this OneTouch rule. Open main menu in the app.
- Page 43 Select which thermostat you want to Choose the condition details for your Enter a temperature setpoint trigger link up with your OneTouch rule. thermostat. In this case select for your OneTouch rule. Press „Set” „Temperature Below” option. button to confirm. To finish OneTouch rule creation press Select „DO THIS”...
- Page 44 As an option OneTouch rule tile can be Newly created OneTouch rule tile can be ... and on your dashboard. pinned to the dashboard. found under OneTouch main menu... To force OneTouch rule activation select ...and press it’s button. OneTouch rule is now activated. In this it tile...
-
Page 45: Error Codes (Exclamation Mark In App)
6.16 Error codes (exclamation mark in app) If there is any error in the Smart Home system which relates to the devices performance or functionality then the Smart Home app will inform user about it by a red exclamation mark in the upper menu. Please look at the example below: Press the exclamation mark button. -
Page 46: Wireless Signal Strength Test
PLEASE NOTE: Every Smart Home system device which is powered 230VAC is also working as a signal repeater of ZigBee network. If system is based on battery devices there could be a need to use repeaters like Salus RE600, Salus RE10RF or any other device of Salus Smart Home series... -
Page 47: Factory Reset (Removing Thermostat From The App And Zigbee Network)
6.18 Factory reset (removing thermostat from the app and ZigBee network) To make thermostat factory reset and remove it from the ZigBee network please follow steps below: Select the thermostat in Press thermostat’s name. the main app menu. At the very bottom of Press „Delete”... - Page 48 You can also do factory reset from the thermostat directly. It will also remove your thermostat from the Zigbee network but you still will be able to see thermostat’s tile. After factory reset thermostat tile will change to dark grey colour. 3 sec.
-
Page 49: Installation In Offline Mode Without Salus Smarthome Application
Please note! If your system has been installed in the OFFLINE mode using the UGE600 Universal Gateway and then connected to the Internet, all devices should be found in the SALUS Smart Home application (using „Scan for equipment” button). All devices found in the application don’t need to be reconfigured, because all settings are automatically copied from the gateway. -
Page 50: Pairing With Underfloor Heating Wiring Centre (Kl08Rf/Control Box)
7.2 Pairing with underfloor heating wiring centre (KL08RF/Control Box) 7.2.1 Available operation modes CASE 1 GROUP 1 - consists of 4 thermostats (in addition, more thermostats can be assigned to a group in further zones located in the wiring centre). Managed by 1 weekly, programmable thermostat, configured as a MASTER (group 1), e.g. - Page 51 CASE 2 GROUP 2 - consists of 2 thermostats. The first thermostat is a daily, non-programmable thermostat, configured as a SLAVE (group 2), e.g. HTRS-RF (30). The second thermostat is a weekly, programmable thermostat, configured as a MASTER (group 2), e.g. HTRP-RF (50). The MASTER thermostat can affect the SLAVE thermostats (HTRS-RF (30)), which will follow the schedule set on the HTRP-RF(50) thermostat.
- Page 52 CASE 3 Programmable temperature thermostat - this is a single, independent thermostat assigned to any zone on the wiring centre, configured as a regular weekly, programmable thermostat (not MASTER, not SLAVE). In Offline mode it is possible to set a weekly schedule and the set temperature can be changed automatically according to the time programs.
-
Page 53: Grouping - Installation Of The Thermostat As A Group Controller - Master
7.2.2 Grouping - installation of the thermostat as a group controller - MASTER In this chapter you will learn how to set HTRP-RF(50) thermostat as a group controller (MASTER). Please look at the instructions below: HTRP-RF(50) AS A GROUP CONTROLLER (MASTER): 5 sec. -
Page 54: Installation As A Programmable Thermostat
7.2.3 Installation as a programmable thermostat PLEASE NOTE! For easier installation, please make sure you have already added Underfloor Heating Wiring Centre / Control Box KL08RF to your ZigBee network (please refer to the wiring centre manual instruction). 5 sec. 5 sec. -
Page 55: Replace The Zone Assigned To Another Thermostat
7.2.4 Replace the zone assigned to another thermostat You can replace zone on the wiring centre, which is occupied by other thermostat (it will remove it from that zone). To do it follow steps below: Press button to confirm zone Confirm by button. -
Page 56: Pairing With Wireless Trv Radiator Head
7.3 Pairing with wireless TRV radiator head PLEASE NOTE! For easier installation, please make sure you have already added wireless TRV radiator heads to your ZigBee network (please refer to the wireless TRV radiator head manual instruction). 10 sec Set your thermostat for radiators Hold the button for 10 seconds, Now thermostat is looking for the... - Page 57 5 sec. 5 sec. TRV has been added. When thermostat is succesfully Close the ZigBee network. paired main screen will be displayed.
-
Page 58: Pairing With Rx10Rf Receiver
7.4 Pairing with RX10RF receiver PLEASE NOTE! For easier installation, please make sure you have already added RX10RF receiver to your ZigBee network (please refer to the RX10RF receiver manual instruction). 3 sec. 3 sec. Now thermostat is looking for the buttons to: Hold + buttons for 3 seconds... -
Page 59: Operating In Offline Mode
8. OPERATING in OFFLINE MODE 8.1 Work modes HTRP-RF(50) offers a few work modes. Frame on a given icon indicates which mode is currently active. In manual mode only one temperature level is maintained. Thermostat follows programmed schedule when AUTO mode is active („A” icon). Detailed description of work modes is located below: - Comfort temperature mode - pre-defined setpoint temperature. -
Page 60: Heat/Cool Mode Change (Kl08Rf Connection)
8.2 Heat/cool mode change (KL08RF connection) HTRP-RF(50) thermostat is designed to work in heating and cooling systems. By default thermostat is set to heating mode. To change from heating to cooling mode it’s necessary to insert jumper into „CO” terminal (KL08RF wiring centre). Look at the instructions below: HEATING MODE: „CO”... -
Page 61: User Settings (Basic Settings)
8.3 User settings (basic settings) 8.3.1 Schedule mode - programming schedule To program schedule in offline mode please follow steps below: 3 sec. Hold button for 3 seconds to Enter into the schedule settings. enter the menu. There are 4 possible schedule variants. Use and buttons to select schedule variant and confirm by button: Separate schedule for WORKING DAYS. - Page 62 Schedule programming example for the WORKING DAYS variant: Select schedule variant by button. buttons to set hour. buttons to set Confirm by button. minutes. Confirm by button. Confirm by button. Schedule editing will jump to the Use and buttons to choose next program’s time setting.
-
Page 63: Time/Date
8.3.2 Time/Date Time/date change or edit can be done only in Offline mode. In Online Mode thermostat will synchronise current time and date based on information taken from the Internet. To set time/date follow steps below: 3 sec. Hold button for 3 seconds to Go to the time and date settings Choose time and date settings option enter the menu. -
Page 64: Thermostat Calibration
8.3.3 Thermostat calibration Thermostat calibration is a function which allows user to recalibrate internal thermostat’s temperature sensor by a given number of degrees (in the range from -3,0 °C to 3,0 °C in 0,5 °C steps). To calibrate thermostat’s temperature sensor please follow steps below: 3 sec. -
Page 65: Key Lock Function
8.3.4 Key lock function To LOCK/UNLOCK HTRP-RF(50) thermostat keys in OFFLINE MODE you have to press and hold buttons for 3 SECONDS. When thermostat is locked, you will see key icon on the display. When thermostat is unlocked padlock icon is not visible. 3 sec. -
Page 66: Installer Parameters
9. Installer parameters To enter installer parameters please follow steps below. Please refer to parameters table description before any changes. Use buttons to move up or down between all parameters. Every change/selection confirm by button: 3 sec. 3 sec. Hold + buttons for 3 seconds to choose to enter the installer mode. - Page 67 Parameter Default Function Description Values Values The controller measures the temperature only at the external sensor Internal relay (active when d03=1) The sensor is used as a protection against overheating of the floor SPAN ±0.5°C d05 (only Control of the cooling mode in UFH) SPAN ±1.0°C Standard ON/OFF algorithm...
-
Page 68: Factory Reset
10. Factory Reset To RESET HTRP-RF(50) thermostat to it’s factory default settings please follow steps below: 3 sec. 3 sec. Hold + buttons for 3 seconds buttons Press button to confirm. to enter the installer mode. to choose code „47”. Select „del”... -
Page 69: Error Codes (Error Codes Description With Possible Solutions)
• Reinstall the TRV head or replace it. If necessary, contact with the TRV paired with thermostat - TRV hardware error. SALUS Technical Department. XX-01 • Set the heating medium temperature or change D14 parameter. Floor is overheated (heating mode). - Page 70 ERROR DISPLAY ERROR DESCRIPTION TROUBLESHOOTING CODE DESCRIPTION (change setpoint temperature). • If LED diode of the Network Status is flashing, pair the wiring centre with the system in accordance to the manual instruction and pair thermostat with wiring centre. • Check TRV head batteries. •...
- Page 71 • Reinstall the TRV head or replace it. If necessary, contact with the TRV head has a problem with the internal gear mechanism. SALUS Technical Department. XX-30 • Check assembly of the TRV head on radiator valve insert and reinstall Adaptation error of the TRV head the TRV head.
-
Page 72: Cleaning And Maintenance
There are no user serviceable parts within the unit; any servicing or repairs could only be carried out by Salus Controls or their appointed agents. 13. Technical Informations... -
Page 73: Warranty
SALUS Controls warrants that this product will be free from any defect in materials or workmanship, and shall perform in accordance with its specification, for a period of five years from the date of installation. SALUS Controls sole liability for breach of this warranty will be (at its option) to repair or replace the... - Page 74 SALUS Controls is a member of the Computime Group. Maintaining a policy of continuous product development SALUS Controls plc reserve the right to change specification, design and materials of products listed in this brochure without prior notice. Issued: 10 VII 2020...