Advertisement
Available languages
Available languages
CONSISTENCIA
EN CADA TAZA
CONSISTENCY IN
EVERY CUP
indicador de frescura
de 30 min
30 Minutes
freshness indicator
BVSTRF100,
MODELOS
MODELS
BVSTRF300
Manual de Instrucciones
CAFETERA PROGRAMABLE PARA 12 TAZAS
LEA TODAS LAS INSTRUCCIONES ANTES DE USAR ESTE APARATO
Instruction Manual
12 CUP PROGRAMMABLE COFFEE MAKER
READ ALL INSTRUCTIONS BEFORE USING THIS APPLIANCE
BVSTRF100_BVSTRF300_19SEM2 (LA).indd 1
4/24/19 9:52 AM
Advertisement
Table of Contents

Related Manuals for Oster RF Series


Summary of Contents for Oster RF Series
- Page 1 CONSISTENCIA EN CADA TAZA CONSISTENCY IN EVERY CUP indicador de frescura de 30 min 30 Minutes freshness indicator BVSTRF100, MODELOS MODELS BVSTRF300 Manual de Instrucciones CAFETERA PROGRAMABLE PARA 12 TAZAS LEA TODAS LAS INSTRUCCIONES ANTES DE USAR ESTE APARATO Instruction Manual 12 CUP PROGRAMMABLE COFFEE MAKER READ ALL INSTRUCTIONS BEFORE USING THIS APPLIANCE BVSTRF100_BVSTRF300_19SEM2 (LA).indd 1...
- Page 2 INTRODUCCIÓN Bienvenido, lo felicitamos por la compra de su nueva cafetera de medida fácil Oster . Su ® nueva cafetera lo despertará por la mañana y le brindará deliciosos momentos durante su agitado día. Depende de cómo usted disfrute su cafetera Medida Fácil Oster ®...
-
Page 3: Medidas De Seguridad Importantes
MEDIDAS DE SEGURIDAD IMPORTANTES Para reducir el riesgo de incendio, descarga eléctrica o lesiones personales, siempre debe seguir precauciones de seguridad básicas cuando utilice aparatos eléctricos incluyendo las siguientes: 1. Lea todas las instrucciones. 2. Este aparato genera calor. No toque las superficies calientes. Use manijas o perillas. 3. Para protegerse contra descarga eléctrica, no coloque o sumerja el cordón, enchufe o el aparato en agua o cualquier otro líquido. - Page 4 Para aparatos Con paneles de servicio: 21. ADVERTENCIA: Riesgo de incendio o descarga eléctrica. No retire esta tapa. No existen partes reparables adentro. Las reparaciones deben hacerse por el personal de servicio autorizado solamente. GUARDE ESTAS INSTRUCCIONES PARA USO DOMÉSTICO SOLAMENTE INSTRUCCIONES PARA EL CABLE ELÉCTRICO Se provee un cordón eléctrico corto (un cordón eléctrico desmontable) para reducir riesgos que pueden resultar de enredos o tropiezos con un cordón largo.
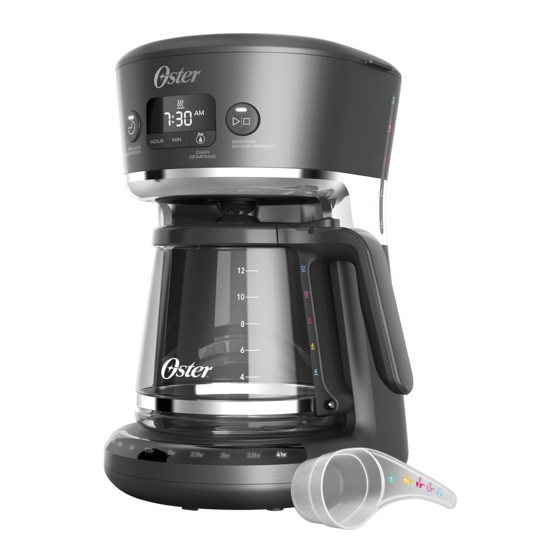
- Page 5 CONOZCA SU MÁQUINA DE CAFÉ 1. Tapa de la canasta de preparación 7. Jarra con guía de colores 2. Depósito de agua (seguro para uso en lavaplatos) 3. Ventana de agua con guía de colores 8. Pausa automática para 4. Indicador de frescura de Servir una taza 30 min iluminado 9. Canasta de filtro Desmontable...
- Page 6 ENTENDIMIENTO DEL PANEL DE CONTROL H. Botón de minuto A. Pantalla del reloj B. Indicador para fijar Preparar después I. Botón de Hora C. Indicador de A.M. /P.M. J. Indicador de Plato Calentador Encendido D. Indicador de Preparar Ahora K. Botón de Preparar después E.
- Page 7 INICIO Desempaque Su Cafetera 1. Desempaque su cafetera y retire las bolsas de plástico, cartones y cinta adhesiva de la unidad. IMPORTANTE: mantenga las bolsas de plástico alejadas de los niños. Limpie Su Cafetera Antes De Usar Simplemente sigan estos pasos: 1. Lave la tapa de la jarra y la canasta del filtro con una mezcla de detergente suave y agua.
- Page 8 2.84 L 2.37 L 1.89 L 1.42 L 0.95 L 1. Llene la jarra con guía de color con agua fría limpia al nivel deseado. (Figura 1) Una taza Oster equivale a cinco onzas ® fluidas. Vierta dentro del tanque de agua. NOTA: Un poco de agua será absorbida por los granos de café y el filtro de agua durante el proceso de preparado. 2. Introduzca y alinee la canasta del filtro desmontable con un filtro de papel estándar tipo...
- Page 9 IMPORTANTE: DEBE FIJAR EL 1. Luego de llenar la cafetera con RELOJ ANTES DE USAR ESTA agua y granos de café, presione el CARACTERÍSTICA botón de Preparar Ahora para iniciar 1. Presione Preparar después. La el preparado instantáneamente. pantalla destellará 12:00 A.M. Para 2. La luz de Preparar Ahora se fijar la hora deseada de preparado, iluminará...
- Page 10 El indicador iluminado de frescura por 30 min le permite saber automáticamente por cuanto tiempo ha estado listo su café. Al final del ciclo de preparado, esta característica se activará automáticamente. El indicador cambia para mostrar el tiempo desde que el preparado se inició, en intervalos de 5 min, hasta 30 min. Luego de 30 min, la luz permanecerá prendida por 10 min, antes de que la cafetera se apague automáticamente.
-
Page 11: Limpieza Rutinaria
• NO TOQUE la placa calefactora durante el uso de la cafetera ni inmediatamente después de haberla apagado o desconectado del tomacorriente. La placa calentadora puede estar caliente después de su uso. Espere a que se enfríe antes de tocarla. Descalcificando su cafetera Oster Medida Fácil ® Los minerales que se encuentran en el agua (calcio, piedra caliza) dejarán depósitos en su cafetera y pueden afectar su rendimiento. -
Page 12: Uso Y Cuidado De La Jarra
SERVICIO DE MANTENIMIENTO Y GARANTÍAS El servicio de mantenimiento y la garantía pueden encontrarse en línea en www.oster.com. Español - 11 BVSTRF100_BVSTRF300_19SEM2 (LA).indd 11 4/24/19 9:52 AM... - Page 13 Welcome and congratulations on the purchase of your new Oster Easy Measure Coffee ® Maker. Your new RF Series Coffee Maker will wake up with you in the morning and provide you tasty breaks during your hectic daily activities. How you enjoy your Oster ®...
-
Page 14: Important Safeguards
IMPORTANT SAFEGUARDS When using electrical appliances, basic safety precautions should always be followed to reduce the risk of fire, electric shock, and/or injury to persons including the following: 1. Read all instructions. 2. This appliance generates heat. Do not touch hot surfaces. Use handles or knobs. 3. To protect against electric shock, do not place or immerse cord, plugs, or appliance in water or other liquid. 4. - Page 15 SAVE THESE INSTRUCTIONS HOUSEHOLD USE ONLY POWER CORD INSTRUCTIONS A short power supply cord (or detachable power-supply cord) may be provided to reduce risks resulting from becoming entangled in or tripping over a longer cord. Longer detachable power-supply cords or extension cords are available and may be used if care is exercised in their use.
-
Page 16: Get To Know Your Coffee Maker
GET TO KNOW YOUR COFFEE MAKER 1. Brew Basket Lid 7. Color Coded Carafe (dishwasher safe) 2. Water Reservoir 8. Grab-A-Cup Auto Pause 3. Color Coded Water Window 9. Removable Filter Basket (dishwasher safe) 4. Illuminated 30 Minutes Freshness Indicator 10. - Page 17 UNDERSTAND YOUR CONTROL PANEL G. Clean Button A. Clock Display B. Set Brew Later Indicator H. Minute Button C. AM/PM Indicator I. Hour Button D. Brew Now Indicator J. Warming Plate On Indicator E. Brew Now Button K. Brew Later Button F.
-
Page 18: Getting Started
GETTING STARTED Unpack your Coffee Maker 1. Unpack your coffee maker and remove plastic bags, cartons and any tape on the unit. IMPORTANT: KEEP PLASTIC BAGS AWAY FROM CHILDREN. Clean Coffee Maker Before Use Just follow these simple steps: 1. Wash the carafe lid and the filter basket in a mixture of mild detergent and water. Rinse each thoroughly. 2. Replace all the parts and close the lid. Then, run a brew cycle by adding only water to the coffee maker. - Page 19 1.89 L 1.42 L 0.95 L 1. Fill the color coded carafe with fresh cold water to the desired level. (Figure 1) 1 Oster “cup” is equivalent to 5 ® fluid ounces. Pour into Water Reservoir. NOTE: Some water will be absorbed into the coffee grounds and water filter during the brewing process.
- Page 20 IMPORTANT: YOU MUST SET 1. After filling the coffee maker with THE CLOCK BEFORE USING THIS water and grounds, press the Brew FEATURE. Now button to brew instantly. 1. Press Brew Later. The display 2. Brew Now light will illuminate to flashes “12:00 AM”. To set desired indicate brewing. brew time, press the Hour and Minute buttons. 2 s of inactivity will 3.
- Page 21 The Illuminated 30-minute Freshness Indicator feature automatically lets you know how long your coffee has been waiting for you. At the end of the brew cycle, the feature will automatically be activated. The indicator changes to show the time since brewing began in 5 minute intervals, up to 30 minutes.
- Page 22 • DO NOT TOUCH the heating plate while using the coffeemaker or immediately after it has been turned off or disconnected from the outlet. The heating plate may be hot after use. Wait for it to cool before touching it. Decalcifying your Oster Easy Measure Coffee Maker ® Minerals (calcium/limestone) found in water will leave deposits in your coffee maker and affect its performance. It’s recommended that you regularly remove these deposits using vinegar.
-
Page 23: User Maintenance
This appliance has no user serviceable parts. Any servicing beyond that described in the Cleaning Section should be performed by an Authorized Service Representative only. SERVICE MAINTENANCE AND WARRANTY Service Maintenance and Warranty can be found online at www.oster.com. English - 11 BVSTRF100_BVSTRF300_19SEM2 (LA).indd 11 4/24/19 9:53 AM... - Page 24 5200 Blue Lagoon Drive, Suite 860, Miami, FL 33126. Garantía limitada de un año – por favor consulte los detalles en el inserto. Printed in China © 2019 Sunbeam Products, Inc. All rights reserved. Distributed by Sunbeam Latin America, LLC, 5200 Blue Lagoon Drive, Suite 860, Miami, FL 33126. One year limited warranty – please see insert for details. Impreso en China www.oster.com Impreso en China Printed in China P.N. 197697 Rev A GCDS-OST464958-LD BVSTRF100_BVSTRF300_18SEM2 (LA) BVSTRF100_BVSTRF300_19SEM2 (LA).indd 12...