
Related Manuals for Saeco IDEA RST Series


Summary of Contents for Saeco IDEA RST Series
- Page 1 Automatic Machine for Espresso Coffee WARNING: This instruction manual is intended exclusively for personnel with adequate expertise.
- Page 2 ITALIANO ENGLISH FRANÇAIS DEUTSCH...
- Page 3 Macchina automatica per caffè espresso ATTENZIONE: Il presente manuale di istruzione è destinato esclusivamente a personale con adeguata specializzazione.
-
Page 4: Parti Principali
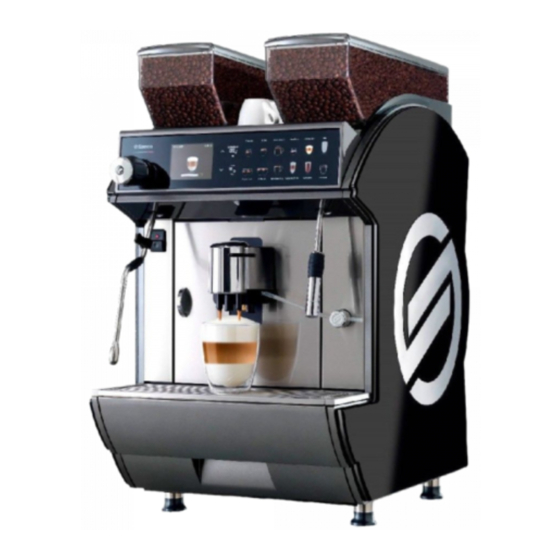
Italiano PARTI PRINCIPALI Mod. LUXE / Mod. COFFEE / Mod. CAPPUCCINO / Mod. CAPPUCCINO USA Pannello sinistro 15 Sportello Vetrinetta 16 Cassetto raccoglifondi 17 Tubo erogatore vapore (escluso allestimento Pannello posteriore COFFEE) Piano scaldatazze 18 Interruttore generale Sportello caffè premacinato (escluso allest. “I”... - Page 5 Italiano Mod. DUO 28 Contenitore caffè in grani sinistro 29 Pomello di regolazione macinatura sinistro 30 Gruppo macinacaffè sinistro...
- Page 6 Italiano NORME DI SICUREZZA Solo per uso professionale. L’apparecchio deve essere installato solo in luoghi ove L'apparecchio tipo esso può essere professionale può supervisionato essere installato in ambienti personale qualificato. esterni, evitare di ubicarlo locali dove Questo apparecchio può temperatura sia inferiore a essere utilizzato da bambini 2°C o superiore a 32°C e di età...
- Page 7 Italiano Prima procedere In caso di sostituzioni dei all'allacciamento tubi di carico, il nuovo set dell'apparecchio alla rete tubi dotazione idrica consultare all'apparecchio deve essere rispettare tutte utilizzato e il vecchio set di normative nazionali tubi non dovrà essere applicabili. riutilizzato.
-
Page 8: Table Of Contents
Italiano SOMMARIO PARTI PRINCIPALI 12.2 INATTIVITÀ ED IMMAGAZZINAMENTO 1 INTRODUZIONE AL MANUALE 13 ISTRUZIONI PER IL TRATTAMENTO A FINE VITA 1.1 PREMESSA 1.2 SIMBOLOGIA UTILIZZATA 2 INFORMAZIONI SULL'APPARECCHIO 2.1 INFORMAZIONI PER L'UTILIZZATORE 2.2 DESTINAZIONE D'USO DELL'APPARECCHIO 2.3 IDENTIFICAZIONE DELL'APPARECCHIO 2.4 DATI TECNICI 3 SICUREZZA 3.1 PREMESSA 3.2 NORME GENERALI DI SICUREZZA... -
Page 9: Introduzione Al Manuale
Italiano INTRODUZIONE AL MANUALE Premessa Centri Assistenza Autorizzati, sono inoltre Il presente manuale è parte disponibili ogni integrante della macchina e chiarimento tecnico, dovrà quindi essere informazioni conservato in luogo noto, funzionamento, assistenza facilmente accessibile, in tecnica e fornitura di parti buone condizioni, per tutta di ricambio. - Page 10 Questo articolo è stato prodotto da SaGa Coffee S.p.A. e modifiche e migliorie ai commercializzato sotto la sua responsabilità. La SaGa Coffee S.p.A. è il garante del prodotto stesso. Saeco è un modelli in oggetto, senza marchio registrato di Koninklijke Philips N.V., il cui uso è...
-
Page 11: Simbologia Utilizzata
Italiano Simbologia utilizzata suddetta pubblicazione contiene diversi tipi d'avvertenze allo scopo di evidenziare i vari livelli di pericolo o di competenze. A completamento del simbolo è riportato un messaggio che spiega le procedure e fornisce informazioni utili. Attenzione Informazioni riguardanti la sicurezza dell’utilizzatore e l’integrità... -
Page 12: Informazioni Sull'apparecchio
Italiano INFORMAZIONI SULL'APPARECCHIO Il Manutentore Tecnico è tenuto alla conoscenza ed al Informazioni per l'utilizzatore rispetto assoluto, dal punto di vista tecnico, delle avvertenze di sicurezza contenute in questo manuale in modo tale che le operazioni di installazione, messa in L’apparecchio deve essere funzione, utilizzo e manutenzione possano essere svolte in condizioni di sicurezza. -
Page 13: Identificazione Dell'apparecchio
Italiano È inoltre considerato uso È assolutamente vietato improprio: manomettere o modificare la targhetta dati. • qualsiasi utilizzo differente da quello previsto e/o con tecniche diverse da quelle indicate in questa pubblicazione; qualsiasi richiesta presso il servizio tecnico, • qualsiasi intervento sull’apparecchio che sia in contrasto con le indicazioni riportate in questa pubblicazione;... -
Page 14: Dati Tecnici
Italiano Gruppo erogatore caffè Dati Tecnici Dimensioni (l x h x p) 410 x 695 x 550 mm Tensione di alimentazione 220-240 V 50-60 Hz Lunghezza cavo di 1.500 mm alimentazione Potenza Mod. LUXE vedere targhetta dati Assorbita Mod. COFFEE vedere targhetta dati Mod. -
Page 15: Sicurezza
Italiano SICUREZZA È obbligatorio: Premessa • verificare conformità della linea elettrica alimentazione; In ottemperanza alle norme e direttive vigenti, la SaGa • utilizzare parti di ricambio originali; Coffee ha costituito presso i propri stabilimenti un • leggere attentamente le istruzioni riportate nella seguente fascicolo tecnico relativo all'apparecchio Idea RST, pubblicazione e nelle documentazioni allegate;... -
Page 16: Requisiti Degli Operatori
Italiano L’apparecchio non è adatto Requisiti degli operatori all’installazione zone Ai fini della sicurezza sono distinti due addetti con diversi nelle quali può essere requisiti: utilizzato un getto d’acqua. Utilizzatore Persona addetta alla sola conduzione e al presidio dell'apparecchio. All'utilizzatore è permesso: la messa in funzione dell'apparecchio, la regolazione dei parametri di L’apparecchio deve essere lavoro, l'arresto dell'apparecchio, il rifornimento, lo... -
Page 17: Dispositivi Di Sicurezza
Italiano Dispositivi di sicurezza Rischi residui Le macchine oggetto della Non utilizzare contenitori presente pubblicazione, che non siano realizzati in sono realizzate materiale “per alimenti”. conformità alle specifiche caratteristiche Normative europee vigenti costruttive delle macchine, e sono pertanto protette oggetto della presente tutte... -
Page 18: Movimentazione E Stoccaggio
Italiano MOVIMENTAZIONE E STOCCAGGIO Scarico e movimentazione Lo scarico dal mezzo di trasporto e la movimentazione dell’apparecchio devono essere effettuati solo da personale competente e con l’utilizzo di mezzi idonei al carico da movimentare. L’apparecchio deve rimanere sempre posizione verticale. Evitare di: •... -
Page 19: Installazione
Italiano INSTALLAZIONE Avvertenze Verificare piano preposto all’installazione L'apparecchio può della macchina, essere installato in ambienti dimensioni e robustezza esterni, evitare di installarlo adeguate a sostenere in locali dove sicurezza, macchina temperatura sia inferiore a stessa. +2°C o superiore a 32°C corretto e in luoghi particolarmente ergonomico... -
Page 20: Disimballo E Posizionamento
Italiano Qualora l’apparecchio debba essere posizionato in prossimità di una parete, è necessario lasciare uno spazio di almeno 8 cm tra lo schienale ed il muro per lasciare libera la griglia di espulsione aria posizionata sullo schienale stesso. Disimballo e posizionamento Viti di fissaggio Al ricevimento dell’apparecchio accertarsi che non abbia piedini di sostegno... -
Page 21: Collegamento Alla Rete Idrica
Italiano Prima allacciare Collegamento alla rete idrica depuratore alla macchina, Prima procedere effettuare lavaggio all'allacciamento finchè l’acqua dell'apparecchio alla rete presenti limpida, procedere idrica consultare quindi al collegamento del rispettare tutte depuratore alla macchina. normative nazionali applicabili. Accertarsi che la rete di distribuzione idrica sia di acqua potabile... -
Page 22: Collegamento Alla Rete Elettrica
Italiano • Collegare alla rete idrica il depuratore. Collegamento alla rete elettrica È cura del Manutentore Tecnico, responsabile dell’installazione dell’apparecchio, accertarsi che: • l'impianto di alimentazione elettrica sia rispondente alle norme vigenti di sicurezza; • la tensione di alimentazione sia corrispondente a quella indicata nella targhetta dati. - Page 23 Italiano - Cavo di alimentazione tipo H05VVF sezione 3x2,5 mm2 Verificare che la spina del cavo di alimentazione sia facilmente accessibile anche dopo l'installazione. Il punto di collegamento (presa elettrica interruttore onnipolare) Neutro - Blu Fase - Marrone deve essere situato in un Terra - Giallo/verde luogo facilmente...
-
Page 24: Descrizione Comandi
Italiano DESCRIZIONE COMANDI Comandi Per qualsiasi intervento di pulizia manutenzione Sull'apparecchio sono presenti i seguenti comandi: • Interruttore generale all'interno della macchina • Pannello comandi scollegare la stessa dalla 6.1.1 Interruttore generale rete elettrica mettendo l'interruttore onnipolare in Con macchina collegata alla rete elettrica e l'interruttore onnipolare è... - Page 25 Italiano 6.1.3 Descrizione tasti fase 6.1.3.2 Selezione del contenitore normale funzionamento (solo mod. DUO) La versione Duo è dotata di 2 contenitori caffè e di 2 macinacaffè. Questo permette il raddoppio dei prodotti erogabili o di inserire una qualità diversa di prodotti. Per selezionare un contenitore si deve agire sul pulsante.
- Page 26 Italiano 6.1.3.3 Funzione lancia vapore automatica (solo nei modelli con lancia vapore automatica) Per attivare il vapore tramite lancia vapore automatica, premere il tasto mostrato in figura per 2 secondi. L’erogazione del vapore si bloccherà automaticamente al raggiungimento della temperatura preimpostata. E’...
-
Page 27: Rifornimenti E Messa In Servizio
Italiano RIFORNIMENTI E MESSA IN SERVIZIO Rifornimento caffè in grani Regolazione della crema • Togliere il coperchio del contenitore. La quantità di crema nelle bevande è proporzionale • Versare il caffè in grani all'interno del contenitore. all’intervento sulla leva di regolazione. •... -
Page 28: Regolazione Della Temperatura
Italiano Regolazione della temperatura Regolazione del grado di macinatura Il latte da utilizzare per il A prescindere dalla miscela Cappuccinatore deve di caffè, una macinatura essere mantenuto molto fine (indice su valori riposto in un apparecchio bassi) aumenta la densità, refrigerante la crema della bevanda e il temperatura... -
Page 29: Prima Accensione Dell'apparecchio
Italiano La macinatura viene impostata in fabbrica, su valori Nonostante tutti i pulsanti standard, ma è possibile modificarla come segue: • Aprire lo sportello, ruotare il pomello in senso antiorario siano programmati già per rendere più fine la macinatura (l'indice si sposta su un valore basso), oppure in senso orario per renderla più... -
Page 30: Menu Di Programmazione E Di Manutenzione
Italiano MENU DI PROGRAMMAZIONE E DI MANUTENZIONE Questo capitolo descrive come impostare modificare i parametri di programmazione dell'apparecchio. È quindi opportuno leggerlo con attenzione, intervenendo solamente dopo aver compreso l'esatta sequenza delle Alcune funzioni prevedono la programmazione anche di uno o più dati (già programmati su valori standard). operazioni da compiere. -
Page 31: Menu Di Programmazione
Italiano Menu di programmazione 8.2.2 Struttura menu programmazione La struttura del menu di programmazione è riportata nel punto "Struttura del menu di programmazione". SETTAGGIO GENERALE N° VOCE VOCE MENU punto "Descrizione messaggi menu Lingua programmazione" si descrivono tutte le voci presenti nel ITALIANO menu di programmazione. - Page 32 Italiano 27...2702 Bassa 10.3. QUANTITA' LATTE Standard 3…180 Alta milk 3.2. DOSE ACQUA 11.1. DOSE MACINATURA 27...2702 Bassa Coffee x2 Standard 4.1. DOSE MACINATURA Alta Bassa 11.2. DOSE ACQUA Standard 27...2702 Alta 11.3. QUANTITA' LATTE 4.2. DOSE ACQUA 3…180 27...2702 FLAT WHITE LARGE COFFEE 12.1.
- Page 33 Italiano 4.2. SOGLIA STOP 4.3. CONTATORE ATTUALE Contatori 5.1. TOTALE CAFFE' 5.2. TOTALE ACQUA Technical MENU' LAVAGGIO N° VOCE VOCE MENU Lavaggio Cappuccinat. LAVAGGIO EROGATORE LAVAGGIO GRUPPO PROGRAMMAZIONE LATTE Test menu...
- Page 34 Italiano 8.2.3 Descrizione messaggi del menu di programmazione SETTAGGIO GENERALE N° VISORE Descrizione VOCE Azionando "OK" dal menu “LINGUA” si può accedere alla selezione della Lingua stessa. ITALIANO DEUTSCH ENGLISH FRANÇAIS ESPAGNOL PORTUGUES NEDERLANDS 한국어 Polski PIANO SCALDATAZZE % (escluso Mod.DUO) 0..100% Questa funzione consente di attivare il piano scaldatazze regolandolo da 0 a 100% a step di 10.
- Page 35 Italiano SETTAGGIO GENERALE Per ogni bevanda è possibile modificare la quantità di acqua e di caffè Espresso macinato utilizzato nell’erogazione e programmata in fase di installazione. 1.1. DOSE MACINATURA Confermando “BASSA” o “ALTA”, la dose viene ridotta di 1 gr o incrementata di 1 gr.
- Page 36 Italiano SETTAGGIO GENERALE Bassa Standard Alta 8.2. DOSE ACQUA 27...2702 8.3. QUANTITA' LATTE 3…180 Cappuccino 9.1. DOSE MACINATURA Bassa Standard Alta 9.2. DOSE ACQUA 27...2702 9.3. QUANTITA' LATTE 3…180 Caffè Latte 10.1. DOSE MACINATURA Bassa Standard Alta 10.2. DOSE ACQUA 27...2702 10.3.
- Page 37 Italiano SETTAGGIO GENERALE Questa funzione, consente di effettuare una breve pausa nella prima fase di Preinfusione erogazione. Questo può migliorare la qualità del caffè che ha modo, durante la pausa, di “infondersi” con la prima parte di acqua ricevuta. Confermando: “OFF”, non viene eseguita alcuna preinfusione.
- Page 38 Italiano SETTAGGIO GENERALE (per informazioni sulle pastiglie rivolgersi ad un Centro di Assistenza seguire istruzioni Autorizzato). Procedura: Il processo inizia da "LAVAGGIO GRUPPO" Premer il tasto "Enter"; sul display "INSERIRE PASTIGLIA GRUPPO" Rimuovere il gruppo caffè; sul display "INSERIRE IL GRUPPO" Inserire la pastiglia all'interno del gruppo caffè...
- Page 39 Italiano SETTAGGIO GENERALE Technical MENU' LAVAGGIO N° VISORE Descrizione VOCE Funzione che consente l’erogazione di una quantità di vapore per evitare la Lavaggio cappucc. formazione di sedimenti nel cappuccinatore. LAVAGGIO EROGATORE Funzione che consente l'erogazione di una minima quantità di acqua calda (circa 5cc) per evitare la formazione di sedimenti nell'erogatore caffè.
- Page 40 Italiano 8.2.4 PROGRAMMAZIONE LATTE "PROGRAMMAZIONE LATTE" è un comando diretto che permette di programmare e memorizzare la quantità di latte per la bevanda scelta. Selezionare Sul display appare l'icona "PROGRAMMAZIONE di programmazione (1) LATTE" Premere e tenere La macchina comincia ad premuto il pulsante erogare solo latte relativo alla bevanda da...
-
Page 41: Funzionamento Ed Uso
Italiano FUNZIONAMENTO ED USO Prima utilizzare I bambini non devono macchina è necessario aver giocare con l'apparecchio. letto attentamente pulizia presente pubblicazione ed manutenzione aver acquisito una buona dell’apparecchiatura conoscenza generale della deve essere fatta macchina stessa. bambini senza supervisione. Dopo periodo inattività... -
Page 42: Accensione Automatica Programmata
Italiano Accensione automatica programmata E’ possibile quando la macchina è in “STANDBY” ed è attiva la funzione “ACCENSIONE AUTOM.”. L’accensione della macchina avviene all’orario programmato. Accensione temporanea da standby Avvio manuale con la macchina in “STANDBY”. Si ottiene mantenendo premuto per 3 secondi il pulsante in figura. - Page 43 Italiano Premere il tasto corrispondente alla bevanda richiesta. I tasti erogazione vanno premuti per circa 1 sec. TABELLA EROGAZIONI Erogazione Sequenza tasti Q.tà Livello Descrizione Alla consegna, le macchine sono programmate su Caffè basso Erogazioni ottenute con valori standard. basso caffè...
- Page 44 Italiano TABELLA EROGAZIONI Bevanda composta da caffè macinato all’istante, Caffè Macchiato (*), H Erogazione ottenuta con alla quale viene aggiunta una piccola dose di caffè macinato più una latte caldo. piccola dose di latte Bevanda composta da latte caldo e caffè Latte Macchiato (*), P Erogazione ottenuta con...
-
Page 45: Vapore
Italiano Vapore Nonostante tutti i pulsanti siano programmati già (Escluso allestimento COFFEE) all’origine, valori • Immergere il tubo erogatore vapore nella bevanda da riscaldare. standard, occorre • Ruotare in senso antiorario il rubinetto erogazione vapore. Raggiunta la temperatura desiderata, richiudere il rubinetto controllare che la bevanda (in senso orario). -
Page 46: Programmazione Tasti Erogazione
Italiano Programmazione tasti Messaggi sul display erogazione Le quantità di bevande associate ai rispettivi tasti possono Di seguito è riportato un essere programmate direttamente dalla tastiera. Per programmare e riprogrammare i tasti seguire le elenco di allarmi (oltre a seguenti istruzioni: Quantità... -
Page 47: Spegnimento Della Macchina
Italiano ERRORE POMPA 1-2 o 3-4 Una delle pompe ha subito un’avaria. La macchina continua a funzionare ma è necessario chiamare il CENTRO DI ASSISTENZA AUTORIZZATO. ERRORE SENSORE 1 2 Appare quando un sensore di tempertura ha subito un’avaria. Spegnere la macchina e chiamare il CENTRO DI ASSISTENZA AUTORIZZATO. -
Page 48: Pulizia E Manutenzione
Italiano PULIZIA E MANUTENZIONE Prima di eseguire qualsiasi In caso di anomalie di operazione funzionamento spegnere manutenzione e/o pulizia, immediatamente spegnere l’apparecchio l’apparecchio, sconnettere ponendo gli interruttori in l’alimentazione elettrica posizione “OFF”, sfilando spina sconnettere l’alimentazione contattare il centro di elettrica sfilando la spina ed assistenza più... -
Page 49: Pulizia E Manutenzione Ordinaria
Italiano Una manutenzione ed una pulizia regolari preservano e mantengono efficiente l’apparecchio per un periodo 10.2 Pulizia e manutenzione maggiore e garantiscono il rispetto delle normali norme ordinaria igieniche. Tutti i componenti devono Per garantire il corretto funzionamento dell'apparecchio è consigliabile attenersi alle disposizioni ed alle tempistiche essere lavati... - Page 50 Italiano 10.2.1 Piano di manutenzione COMPONENTE DA PULIRE Manutenzione Erogatore caffè Vedi paragrafo "Pulizia erogatore caffè". Gruppo caffè Vedi paragrafo "Pulizia gruppo caffè". Vaschetta raccogligocce e relativa Vedi paragrafo "Pulizia vaschetta raccogligocce e relativa griglia griglia". Cassetto fondi Vedi paragrafo "Pulizia cassetto fondi". Tubi erogatori vapore ed acqua Vedi paragrafo "Pulizia tubi erogatori vapore ed acqua calda...
- Page 51 Italiano 10.2.2 Pulizia erogatore caffè 10.2.3 Pulizia gruppo caffè 10.2.2.1 Pulizia manuale erogatore caffè 10.2.3.1 Pulizia manuale del gruppo caffè Si possono rimuovere: • la protezione superiore dell’erogatore, tirandola a sè; Esaurire il caffè in grani, • la protezione inferiore dell’erogatore, svitando il pomello prima di eseguire la pulizia.
- Page 52 Italiano 10.2.4 Pulizia vaschetta raccogligocce e 10.2.9 Pulizia del cappuccinatore relativa griglia Sfilare la vasca raccogligocce dalla macchina e lavarla in eseguire alcuna acqua corrente, con particolare cura per la griglia. operazione di pulizia del 10.2.5 Pulizia cassetto fondi cappuccinatore quando la Lavare in acqua corrente il cassetto raccoglifondi dopo macchina trova...
-
Page 53: Manutenzione Straordinaria
Italiano 10.3 Manutenzione straordinaria Fanno parte della manutenzione straordinaria, tutti gli interventi di riparazione e sostituzione di parti. Sono quindi di esclusiva competenza del Manutentore Tecnico. 10.3.1 Blocco del macinacaffè • Un corpo estraneo nel caffè in grani, può provocare il blocco delle macine con conseguente bloccaggio della macchina, evidenziato dal messaggio “ERRORE MACINA”... - Page 54 Italiano Mod. DUO • Rimuovere le viti. • Rimuovere la ruota dentata. viti ruota dentata • Svitare e rimuovere la ghiera di regolazione e pulire entrambe le macine con l’ausilio di un aspirapolvere e di un pennello. Verificare lo stato di usura delle macine.
- Page 55 Italiano Mod. DUO L’allentamento di 1/2 giro della ghiera di regolazione, è fondamentale per evitare blocco danneggiamento delle macine. • Aprire la paratia. Per riprendere il normale impiego della macchina è necessario eseguire nuovamente la regolazione • Riposizionare la ruota dentata e bloccarla serrando le viti. della macinatura.
-
Page 56: Risoluzione Dei Problemi
Italiano RISOLUZIONE DEI PROBLEMI (TROUBLESHOOTING) Di seguito sono elencate alcune eventuali anomalie di funzionamento della macchina. Quando nella casella “Note / Interventi suggeriti” appare il simbolo del Manutentore Tecnico, l’intervento deve essere eseguito dal Manutentore Tecnico. Inconveniente Causa Note / Interventi suggeriti La macchina non si accende Manca tensione Verificare:... -
Page 57: Inattività Ed Immagazzinamento
Italiano IMMAGAZZINAMENTO - SMALTIMENTO 12.1 Riposizionamento in altro luogo Nel caso in cui l'apparecchio debba essere riposizionato in un altro luogo, occorre: • scollegare l'apparecchio dalle reti di alimentazione; • provvedere alla pulizia generale dell'apparecchio come indicato nel capitolo "Pulizia e manutenzione"; •... -
Page 58: Istruzioni Per Il Trattamento A Fine
Italiano ISTRUZIONI PER IL TRATTAMENTO A FINE VITA INFORMAZIONE AGLI UTENTI ai sensi dell'art. 13 del Decreto Legislativo 25 luglio 2005, n. 151 "Attuazione delle Direttive 2002/95/CE, 2002/96/CE e 2003/108/CE, relative alla riduzione dell'uso di sostanze pericolose nelle apparecchiature elettriche ed elettroniche, nonché... - Page 59 Automatic Machine for Espresso Coffee WARNING: This instruction manual is intended exclusively for personnel with adequate expertise.
-
Page 60: Main Parts
English MAIN PARTS Mod. LUXE / Mod. COFFEE / Mod. CAPPUCCINO / Mod. CAPPUCCINO USA Left panel Door Cup shield Coffee grounds drawer Rear panel Steam wand (except for COFFEE set-up) Cup warming surface 18 Power button Pre-ground coffee door (except for CAPPUCCINO USA set-up) “I”... - Page 61 English Mod. DUO Left coffee bean hopper Left grinder adjustment knob Left coffee grinder group...
- Page 62 English SAFETY INSTRUCTIONS For professional use only. Only install the appliance in places where it can be The professional appliance supervised qualified cannot installed personnel. outdoors. Do not place it areas where temperature is lower than The use by children older 2°C or higher than 32°C than 8 years or by persons and in particularly humid or...
- Page 63 English Before connecting In case of filling tube appliance to the water replacement, use the new mains, please read and set of tubes supplied with follow applicable the appliance. Do not use regulations in force in your the old set anymore. country.
- Page 64 English CONTENTS MAIN PARTS 12.2 INACTIVITY AND STORAGE 1 INTRODUCTION TO THE MANUAL 13 INSTRUCTIONS FOR END OF OPERATIONAL LIFE DISPOSAL 1.1 PREAMBLE 1.2 ICONS USED 2 INFORMATION ABOUT THE APPLIANCE 2.1 INFORMATION FOR THE USER 2.2 INTENDED USE OF THE APPLIANCE 2.3 APPLIANCE IDENTIFICATION 2.4 TECHNICAL SPECIFICATIONS 3 SAFETY...
-
Page 65: Introduction To The Manual
English INTRODUCTION TO THE MANUAL Preamble Authorised Service Centres are also available This manual is an integral technical part of this machine and it explanation, information must be kept in a known on its operation, technical and easily accessible place, assistance and spare parts good conditions,... - Page 66 This product has been manufactured by SaGa Coffee S.p.A. the right to modify and and sold under its own responsibility. SaGa Coffee S.p.A. is the guarantor of the product. Saeco is a registered improve described trademark of Koninklijke Philips N.V. and its use is licensed by Koninklijke Philips N.V.
-
Page 67: Icons Used
English Icons Used Various kinds of warnings are contained in this manual to highlight the different hazard or competence levels. Each icon is followed by a message that describes the procedure and provides useful information. Warning Information about user safety and machine integrity. Prohibition It is used to highlight actions/operations not to be performed. -
Page 68: Information About The Appliance
English INFORMATION ABOUT THE APPLIANCE The Maintenance Technician must carefully read and Information for the User observe the safety warnings contained in this manual to ensure that installation, start-up, use and maintenance operations are performed in complete safety. The appliance must be installed well-lit, sheltered and dry place... -
Page 69: Appliance Identification
English The following are also It is strictly forbidden to considered misuse: tamper with or modify the data plate. • any use other than the intended use and/or employing methods other than those described in this manual; When contacting technical service, always •... -
Page 70: Technical Specifications
English Brew group Technical Specifications Size (w x h x d) 410 x 695 x 550 mm Supply Voltage 220-240 V 50-60 Hz Power cord length 1,500 mm Power Mod. LUXE See the data plate consumption Mod. COFFEE See the data plate Mod. -
Page 71: Safety
English SAFETY It is mandatory to: Preamble • check conformity of the power supply; accordance with applicable standards • use original spare parts; regulations, SaGa Coffee has prepared a technical file • carefully read the instructions contained in this manual and relating to the Idea RST appliance at its premises, in the attached documents;... -
Page 72: Operator Requirements
English Do not install the appliance Operator Requirements in a location where water Two operators with different skills are required in order jets may be used. to guarantee the appliance’s safety: User Person in charge of using and attending the appliance. The user is allowed to: start the appliance, adjust the operating parameters, stop the appliance, refill the appliance, empty Only install the appliance in... -
Page 73: Safety Devices
English Safety devices Residual Risks The machines described in Only use containers made this manual have been materials that manufactured in compliance suitable “for food”. with the relevant European The technical specifications Regulations in force and all of the machines described potentially dangerous in this manual do not... -
Page 74: Handling And Storage
English HANDLING AND STORAGE Unloading and Handling Unloading from the transport vehicle and handling operations of the appliance must be carried out by qualified personnel only and using suitable equipment. The appliance must always be kept in upright position. Do not: •... -
Page 75: Installation
English INSTALLATION Cautions Check that the size and strength of the surface The appliance cannot be where machine installed in external areas. installed are appropriate to Avoid installing it in areas safely bear it. where the temperature is lower than +2°C or higher than 32°C correct... -
Page 76: Unpacking And Positioning
English If the appliance needs to be positioned close to a wall, it is necessary to leave a space of at least 8 cm between the appliance’s back and the wall, in order to make sure that the air outlet grill at the back of the appliance is unobstructed. -
Page 77: Connection To The Water Network
English Before connecting Connection to the Water water filter to the machine, Network Before connecting perform a wash cycle until appliance to the water the water is clear. Then mains, please read and connect the water filter to follow applicable the machine. -
Page 78: Connection To The Electric Network
English • Connect the filter to the water network. Connection to the Electric Network Maintenance Technician, charge of the appliance's installation, shall make sure that: • the power supply system complies with the safety instructions in force; • the voltage corresponds to that indicated on the appliance data plate. - Page 79 English - Power cord type H05VVF section 3x2,5 mm2 Make sure that the power cord plug easily reachable after installation. The electric socket or the all-pole switch which the appliance is connected to Neutral – Blue Phase – Brown must be easily accessible Ground –...
-
Page 80: Description Of Controls
English DESCRIPTION OF CONTROLS Controls When performing any kind of cleaning or maintenance The appliance is equipped with the following controls: • Power button operations inside • Control panel machine, disconnect 6.1.1 Power button from the mains and set the all-pole switch to “0”. - Page 81 English 6.1.3 Button Description during Normal 6.1.3.2 Container Selection Operation (for DUO model only) The Duo version is equipped with 2 coffee bean hoppers and 2 coffee grinders. This allows you to double the products that can be dispensed or insert a different product quality. Press the button to select a container.
- Page 82 English 6.1.3.3 Automatic steam wand function (for models with automatic steam wand only) Press the button shown in the figure for 2 seconds to activate the steam by means of the automatic steam wand. Steam dispensing will automatically stop when the pre-set temperature is reached.
-
Page 83: Supply And Start Up
English SUPPLY AND START UP Coffee Bean Supply Crema Adjustment • Remove the container cover. Crema quantity in beverages depends on the adjustment of • Pour the coffee beans into the hopper. the adjusting lever. • Put the cover back on the container. •... -
Page 84: Temperature Adjustment
English Temperature Adjustment Coffee Grind Adjustment The milk to be used for Regardless of the coffee the Cappuccinatore must blend, a very fine grind be stored in a fridge at a (notch on low values) temperature higher increases the density, the than 4°... -
Page 85: First Appliance Start-Up
English The grinding is pre-set by the manufacturer on standard Although all buttons are values, but it can be changed with the following procedure: • Open the door, rotate the knob counter-clockwise to set previously programmed on a finer grind (the notch moves on a lower value), or clockwise to set a coarser grind (the notch moves to a standard values, check if higher value). -
Page 86: Programming And Maintenance Menu
English PROGRAMMING AND MAINTENANCE MENU This chapter contains instructions on how to set change programming parameters of the appliance. Therefore it is necessary to carefully read it and to understand exact sequence operations before performing them. Some functions also enable to program one or more data (already programmed on standard values). -
Page 87: Programming Menu
English Programming Menu 8.2.2 Structure of the Programming Menu The structure of the programming menu is indicated in section "Structure of the Programming Menu". GENERAL SETTING OPTION NO. MENU ITEM The section "Description of Messages in the Programming Language Menu" describes all the items in the programming menu. ITALIANO DEUTSCH ENGLISH... - Page 88 English 27...2702 10.3. MILK QUANTITY Standard 3…180 High milk 3.2. WATER QUANTITY 11.1. GRINDER SETTING 27...2702 Coffee x2 Standard 4.1. GRINDER SETTING High 11.2. WATER QUANTITY Standard 27...2702 High 11.3. MILK QUANTITY 4.2. WATER QUANTITY 3…180 27...2702 FLAT WHITE LARGE COFFEE 12.1.
- Page 89 English 4.2. STOP THRESHOLD 4.3. ACTUAL COUNTER Counters 5.1. TOTAL COFFEE 5.2. TOTAL WATER Technical WASHING MENU OPTION NO. MENU ITEM Cappuccinatore Rinsing CLEAN BREWING UNIT GROUP RINSING MILK PROGRAMMING Test menu...
- Page 90 English 8.2.3 Description of Messages in the Programming Menu GENERAL SETTING OPTION DISPLAY Description Language Press “OK” from the “LANGUAGE” menu to select the language. ITALIANO DEUTSCH ENGLISH FRANÇAIS ESPAGNOL PORTUGUES NEDERLANDS 한국어 Polski CUP WARMING SURFACE % (except for DUO model) 0..100% This function allows you to activate the cup warming surface by adjusting it from 0 to 100% at intervals of 10.
- Page 91 English GENERAL SETTING The quantity of water and ground coffee used during the dispensing process and Espresso programmed upon installation can be changed for each beverage. 1.1. GRINDER SETTING By selecting “LOW” or “HIGH”, the dose is decreased or increased by 1 g. By confirming “STANDARD”, the dose used during the dispensing process is the one programmed by the Maintenance Technician.
- Page 92 English GENERAL SETTING Standard High 8.2. WATER QUANTITY 27...2702 8.3. MILK QUANTITY 3…180 Cappuccino 9.1. GRINDER SETTING Standard High 9.2. WATER QUANTITY 27...2702 9.3. MILK QUANTITY 3…180 Caffè Latte 10.1. GRINDER SETTING Standard High 10.2. WATER QUANTITY 27...2702 10.3. MILK QUANTITY 3…180 milk 11.1.
- Page 93 English GENERAL SETTING This function allows a short break during the first brewing phase. Prebrewing This can improve the quality of the coffee which, “blends” with the first part of water received during the break. By confirming: “OFF”, pre-brewing is not performed. SHORT “SHORT”, the “pre-brewing”...
- Page 94 English GENERAL SETTING follow instructions (contact an authorised service centre for detailed information on the tablets). Procedure: The process starts from “GROUP RINSING” Press the "Enter" button; the display shows “PUT THE TABLET INTO THE GROUP” Remove the brew group; the display shows “INS.
- Page 95 English GENERAL SETTING Technical WASHING MENU OPTION DISPLAY Description This function allows dispensing a quantity of steam to avoid the building up of deposits in the Cappuccinatore Rinsing Cappuccinatore. CLEAN BREWING UNIT This function allows dispensing a minimum quantity of hot water (about 5 cc) to avoid the building up of deposits in the coffee dispensing spout.
- Page 96 English 8.2.4 MILK PROGRAMMING “MILK PROGRAMMING” is a direct control allowing to program and store the milk quantity for the beverage chosen. Select “MILK The display shows the programming icon (1) PROGRAMMING” Press and hold the button The machine starts dispensing milk only corresponding to the beverage to be...
-
Page 97: Operation And Use
English OPERATION AND USE Before using the machine, Children must not play read this manual carefully with appliance. and make sure users are Children must not carry familiar with the machine. cleaning maintenance operations without being monitored. Machine Statuses After the machine has not With regard to the power supply, the machine can have been used for a certain the following statuses:... -
Page 98: Programmed Automatic Start-Up
English Programmed Automatic Start-up This start-up is possible when the machine is in “STANDBY” mode and the function “AUTOMATIC START-UP” is active. The machine will switch-on at the programmed time. Stand-by Temporary Start-up Manual switching-on when the machine in “STANDBY” mode. This is possible by pressing the button shown in the figure for 3 seconds. - Page 99 English Press the button corresponding to the beverage required. Press brew buttons for approx. 1 second. BREWING TABLE Brewing Button sequence Q.ty Level Description The machines are delivered with factory standard Coffee Brewing obtained from settings. instantly-ground coffee high high This kinds of brewing are programmed for a Pre-ground Coffee C + E...
- Page 100 English BREWING TABLE This beverage consists in instantly ground coffee Coffee with a dash of milk (*), H Brewing obtained from and a small dose of hot milk. ground coffee and a small milk dose This beverage consists of hot milk and instantly Latte Macchiato (*), P Brewing obtained from hot...
-
Page 101: Steam
English Steam Although all buttons are previously programmed on (Except for COFFEE set-up) standard values, check if • Immerse the steam wand into the beverage to be heated. the dispensed beverage • Turn the steam dispensing knob counter-clockwise. Once the required temperature is reached, close the knob has the desired features. -
Page 102: Brew Buttons Programming
English Brew Buttons Programming Display Messages The beverage quantities associated to the corresponding A list of alarms (in addition buttons, can be directly programmed through the keypad. To program and re-program the buttons, follow the to those explained before) instructions below: Coffee quantity: that can be displayed and •... -
Page 103: Switching Off The Machine
English PUMP ERROR 1-2 or 3-4 One of the pumps is faulty. The machine is still working but it is necessary to contact the AUTHORISED SERVICE CENTRE. SENSOR ERROR 1 2 It is displayed when there is a faulty temperature sensor. Switch off the machine and contact the AUTHORISED SERVICE CENTRE. -
Page 104: Cleaning And Maintenance
English CLEANING AND MAINTENANCE Before performing case faults, maintenance and/or immediately turn off the cleaning operation, turn off appliance, disconnect the appliance by setting the from the power supply by switches to the "OFF" removing the plug from position. Disconnect the the socket and contact the appliance from the power nearest service centre. -
Page 105: Cleaning And Scheduled Maintenance
English Periodic maintenance and cleaning will keep the appliance in good working conditions for a longer time and ensure 10.2 Cleaning and Scheduled compliance with basic hygienic standards. Maintenance All parts must be washed Follow the instructions and timing indicated in the "MAINTENANCE SCHEDULE"... - Page 106 English 10.2.1 Maintenance Schedule COMPONENTS TO BE CLEANED Maintenance Coffee dispensing spout See section “Cleaning the Coffee Dispensing Spout”. Brew group See section “Cleaning the Brew Group”. Drip tray and grill See section “Cleaning the Drip Tray and Relative Grill”. Coffee grounds drawer See section “Cleaning the Coffee Grounds Drawer”.
- Page 107 English 10.2.2 Cleaning the Coffee Dispensing 10.2.3 Brew group cleaning Spout 10.2.2.1 Manual Coffee Dispensing 10.2.3.1 Manual Cleaning of the Brew Spout Cleaning Group The following parts can be removed: • the upper protection cover of the dispensing spout, by pulling it outwards; Cleaning must be carried with •...
- Page 108 English 10.2.4 Cleaning the Drip Tray and 10.2.9 Cleaning of the Cappuccinatore Relative Grill Remove the drip tray from the machine and wash it under Never clean running water, paying particular attention to the grill. Cappuccinatore when the 10.2.5 Cleaning the Coffee Grounds machine is in “STANDBY”...
-
Page 109: Unscheduled Maintenance
English 10.3 Unscheduled maintenance Unscheduled maintenance includes every part repair or replacement, that can only be performed by the Maintenance Technician. 10.3.1 Coffee Grinder Block • A foreign body among the coffee beans can cause the grinders block and, subsequently, the machine block; the message “GRINDER ERROR”... - Page 110 English Mod. DUO • Remove the screws. • Remove the gearwheel. screws gearwheel • Unscrew and remove the adjustment ring nut and clean both grinders with a vacuum cleaner and a brush. Check the grinders wear. In case of clear damages, replace them.
- Page 111 English Mod. DUO This 1/2 turn loosening of the ring nut is necessary to avoid grinders block and damage. • Open the partition. Before re-starting machine, it is necessary to adjust the grinding again. • Put the gearwheel back in its position and fix it by tightening the screws.
-
Page 112: Troubleshooting
English TROUBLESHOOTING A list of the possible machine faults is given below. The icon of the Maintenance Technician in the “Notes / Recommended Intervention” box means that the operation must be carried out by the Maintenance Technician only. Fault Cause Notes / Recommended Intervention The machine does not switch No voltage... -
Page 113: Inactivity And Storage
English STORAGE - DISPOSAL 12.1 Location Change Should the machine be placed in a different location, it is necessary to: • disconnect the appliance from the supply network; • carry out the general cleaning of the appliance as indicated in chapter "Cleaning and Maintenance"; •... -
Page 114: Instructions For End Of
English INSTRUCTIONS FOR END OF OPERATIONAL LIFE DISPOSAL INFORMATION TO THE USER in compliance with art. 13 of the Italian Legislative Decree dated 25 July 2005, no. 151 "Implementation of Directives 2002/95/EC, 2002/96/EC and 2003/108/EC on the restriction of the use of certain hazardous substances in electrical and electronic equipment, as well as waste disposal". - Page 115 Machine automatique à expresso ATTENTION : Ce manuel d’instructions est destiné uniquement au personnel spécialisé.
-
Page 116: PiÈCes Principales
Français PIÈCES PRINCIPALES Mod. LUXE / Mod. COFFEE / Mod. CAPPUCCINO / Mod. CAPPUCCINO USA Panneau gauche Volet Protection Tiroir à marc Panneau arrière Buse de distribution de la vapeur (équipement COFFEE exclu) Pl. chauffe-tasses 18 Interrupteur général « I » : Fonctions électriques activées - Machine activée - Lampe Trappe pour café... - Page 117 Français Mod. DUO Réservoir à café en grains gauche Bouton de réglage de la mouture gauche Groupe du moulin à café gauche...
- Page 118 Français CONSIGNES DE SÉCURITÉ Uniquement usage profess. L’appareil ne doit être installé dans L’appareil type endroits où le personnel professionnel ne peut être qualifié peut le surveiller. installé à l’extérieur ni dans locaux où température est inférieure Cet appareil peut être utilisé à...
- Page 119 Français Avant d’effectuer En cas de remplacement connexion de l’appareil au des tuyaux de remplissage, réseau distribution vous devez utiliser d’eau, conformez-vous aux nouveau kit de tuyaux réglementations nationales fourni avec l’appareil et applicables. non le vieux kit. Si le cordon d'alimentation L'accès au parties internes est endommagé, il doit est réservé...
- Page 120 Français TABLE DES MATIÈRES PIÈCES PRINCIPALES 11 DÉPANNAGE 1 INTRODUCTION AU MANUEL 12 STOCKAGE - ÉLIMINATION 1.1 AVANT-PROPOS 12.1 REPOSITIONNEMENT DANS UN ENDROIT DIFFÉRENT 1.2 SYMBOLES UTILISÉS 12.2 INACTIVITÉ ET STOCKAGE 2 INFORMATIONS SUR L'APPAREIL 13 INSTRUCTIONS POUR LA MISE À LA 2.1 INFORMATIONS POUR L’UTILISATEUR DÉCHARGE 2.2 UTILISATION PRÉVUE DE L’APPAREIL...
-
Page 121: Introduction Au Manuel
Français INTRODUCTION AU MANUEL Avant-propos Les Centres d’Assistance Agréés sont également manuel fait partie disponibles pour tout intégrante de la machine et renseignement concernant il est donc à garder en les aspects techniques, le bonnes conditions, dans un fonctionnement, endroit facilement l’assistance technique et les accessible pendant toute la... - Page 122 Cet article a été produit par SaGa Coffee S.p.A. et Le Constructeur se réserve distribué sous sa propre responsabilité. La société SaGa Coffee S.p.A. garantit le produit. Saeco est une marque le droit de modifier ou enregistrée de Koninklijke Philips N.V., dont l'utilisation est permise en vertu d'une licence octroyée par...
-
Page 123: Symboles Utilisés
Français Symboles utilisés présent manuel contient plusieurs types d’avertissements servant à indiquer un danger ou le niveau de compétence requis. Le symbole est complété par un message expliquant les procédures et fournissant des informations utiles. Attention Informations concernant la sécurité de l’utilisateur et l’intégrité... -
Page 124: Informations Sur L'appareil
Français INFORMATIONS SUR L'APPAREIL Le Technicien d’Entretien est tenu de connaître et de Informations pour l’utilisateur suivre, du point de vue technique, les avertissements de sécurité contenus dans ce manuel de sorte que les opérations d’installation, de mise en marche, d’utilisation L'appareil doit être installé... -
Page 125: Identification De L'appareil
Français Par usage impropre on Il est strictement interdit entend également : d’altérer ou de modifier la plaque signalétique. • tout usage autre que celui prévu et/ou avec des techniques différentes de celles indiquées dans ce manuel ; Pour toute demande au service technique, •... -
Page 126: Données Techniques
Français Groupe de distribution du café Données Techniques Dimensions (l x h x p) 410 x 695 x 550 mm Tension d’alimentation 220-240 V 50-60 Hz Longueur du câble d’alimentation 1 500 mm Puissance Mod. LUXE voir la plaque signalétique absorbée Mod. -
Page 127: Sécurité
Français SÉCURITÉ Il est obligatoire de : Avant-propos • vérifier la conformité de la ligne d’alimentation électrique ; Conformément aux normes et aux directives en vigueur, • utiliser des pièces de rechange originales ; SaGa Coffee a constitué, auprès de ses établissements, un •... -
Page 128: Qualités Requises Des Opérateurs
Français N’installez l’appareil Qualités requises des dans des zones où un jet opérateurs Pour des raisons de sécurité, il faut distinguer deux types d’eau peut être utilisé. d’opérateurs qui ont des compétences différentes : Utilisateur Personne préposée uniquement à l’utilisation et à la surveillance de l’appareil. -
Page 129: Dispositifs De Sécurité
Français Dispositifs de sécurité Risques résiduels Les machines présentées dans Utiliser exclusivement des ce manuel ont été réalisées en récipients fabriqués avec des conformité avec matériaux « pour aliments ». Réglementations Européennes caractéristiques en vigueur et sont munies des fabrication des machines protections correspondantes présentés dans ce manuel pour... -
Page 130: Manutention Et Stockage
Français MANUTENTION ET STOCKAGE Déchargement et manutention Le déchargement du moyen de transport et la manutention de l’appareil ne doivent être effectués que par du personnel compétent et à l'aide de moyens adaptés à la charge à manutentionner. L’appareil doit toujours rester en position verticale. -
Page 131: Installation
Français INSTALLATION Avertissements S'assurer plan destiné à l’installation de la L'appareil ne peut être machine ait des dimensions installé à l’extérieur, ni dans robustesse locaux où adéquates à soutenir la température est inférieure machine en toute sécurité. à +2°C ou supérieure à 32°C ainsi que dans des Pour utilisation... -
Page 132: Déballage Et Positionnement
Français Au cas où l’appareil serait placé auprès d’un mur, laisser un espace de 8 cm minimum entre le dos de l’appareil et le mur, afin de dégager la grille d’évacuation de l'air positionnée sur le dos de l’appareil. Déballage et positionnement Vis de fixation S’assurer, lors de la réception de l’appareil, que celui-ci n’a pieds de support... -
Page 133: Raccordement Au Réseau De Distribution D'eau
Français Avant brancher Raccordement au réseau de l’adoucisseur d’eau à la distribution d'eau Avant d’effectuer machine, effectuez connexion de l’appareil au lavage jusqu’à ce que l’eau réseau distribution soit limpide. Procédez d’eau, conformez-vous aux ensuite au branchement de réglementations nationales l’adoucisseur d’eau à... -
Page 134: Raccordement Au Réseau Électrique
Français • Brancher l’adoucisseur d’eau sur le réseau de distribution d’eau. Raccordement au réseau électrique Le Technicien d’Entretien chargé de l'installation de l'appareil devra s’assurer que : • l'installation d'alimentation est conforme aux consignes de sécurité en vigueur ; • la tension d’alimentation correspond à celle indiquée sur la plaque signalétique. - Page 135 Français - Cordon d’alimentation type H05VVF section 3x2,5 mm2 Contrôler que la fiche du câble d’alimentation facilement accessible, même après l’installation. Le point de connexion (prise électrique ou interrupteur omnipolaire) doit se trouver Neutre - Bleu Phase - Marron dans un endroit facilement Terre - Jaune/vert accessible par l’utilisateur de - Raccordement de la fiche à...
-
Page 136: Description Des Commandes
Français DESCRIPTION DES COMMANDES Commandes Pour toute intervention de nettoyage ou d'entretien à L'appareil est équipé des commandes suivantes : • Interrupteur général l'intérieur de la machine, il • Bandeau de commande faut débrancher 6.1.1 Interrupteur général réseau électrique en plaçant l'interrupteur omnipolaire Lorsque la machine est branchée au réseau électrique et... - Page 137 Français 6.1.3 Description des touches en phase de 6.1.3.2 Sélection des réservoir fonctionnement de routine (uniquement pour modèle DUO) La version Duo est équipée de 2 réservoirs à café et de deux moulins à café. Cela permet de doubler la quantité de produit distribuable ou bien d’insérer deux produits de différente qualité.
- Page 138 Français 6.1.3.3 Fonction lance vapeur automatique (uniquement modèles avec lance vapeur automatique) Pour activer la vapeur à l'aide de la lance vapeur automatique, appuyer sur la touche dans la figure pendant 2 secondes. La distribution de la vapeur s'arrête automatiquement dès que la température présélectionnée est atteinte.
-
Page 139: Remplissages Et Mise En Marche
Français REMPLISSAGES ET MISE EN MARCHE Remplissage de café en grains Réglage de la crème • Enlever le couvercle du réservoir. La quantité de la crème est déterminée par l’actionnement • Verser le café en grains à l’intérieur du réservoir. du levier de réglage. -
Page 140: Réglage De La Température
Français Réglage de la température Réglage du degré de mouture Le lait à utiliser avec le Indépendamment Cappuccinatore doit être mélange café, conservé au réfrigérateur à mouture très fine (index température sur des valeurs basses) supérieure à 4° C ; il ne augmente la densité, la doit pas rester hors du crème de la boisson et son... -
Page 141: Première Mise En Marche De L'appareil
Français La mouture est réglée à l'usine sur des valeurs standard, mais il Même si toutes les touches est possible de la modifier en suivant les instructions suivantes : • Ouvrir le volet, tourner le bouton dans le sens inverse des sont déjà... -
Page 142: Menu De Programmation Et D'entretien
Français MENU DE PROGRAMMATION ET D’ENTRETIEN chapitre explique comment régler modifier les paramètres de programmation l'appareil. Il est conseillé de le lire attentivement n’intervenir qu’après avoir compris séquence exacte des opérations à Certaines fonctions permettent de programmer une ou plusieurs données (déjà... -
Page 143: Menu De Programmation
Français Menu de programmation 8.2.2 Structure menu programmation La structure du menu de programmation est indiquée à la section « Structure du menu de programmation ». RÉGLAGES GÉNÉRAUX N° OPT. OPTION MENU La section « Description des messages du menu de Langue programmation »... - Page 144 Français 27...2702 Basse 10.3. QUANTITÉ LAIT Standard 3…180 Élevée milk 3.2. QUANTITÉ EAU 11.1. DOSE DE MOUTURE 27...2702 Basse Coffee x2 Standard 4.1. DOSE DE MOUTURE Élevée Basse 11.2. QUANTITÉ EAU Standard 27...2702 Élevée 11.3. QUANTITÉ LAIT 4.2. QUANTITÉ EAU 3…180 27...2702 FLAT WHITE...
- Page 145 Français 4.2. VALEUR LIMITE ARRÊT 4.3. COMPTEUR ACTUEL Compteurs 5.1. TOTAL CAFÉ 5.2. TOTAL EAU Technique MENU LAVAGE N° OPT. OPTION MENU Lavage Cappuccinatore LAVAGE BUSE DE DISTRIBUT. LAVAGE GROUPE PROGRAMMATION LAIT Menu essai...
- Page 146 Français 8.2.3 Description des messages du menu de programmation RÉGLAGES GÉNÉRAUX N° OPT. INDICATEUR Description Activer « OK » dans le menu « LANGUE » pour accéder à la sélection de Langue la langue. ITALIANO DEUTSCH ENGLISH FRANÇAIS ESPAGNOL PORTUGUES NEDERLANDS 한국어...
- Page 147 Français RÉGLAGES GÉNÉRAUX Pour chacune des boissons il est possible de modifier la quantité d'eau et de café moulu Expresso utilisé pendant la distribution telle qu'elle a été réglée lors de l'installation. 1.1. DOSE DE MOUTURE Confirmer « BASSE » ou « HAUTE », afin de réduire ou d’ a ugmenter la dose d’ u n gramme. Confirmer «...
- Page 148 Français RÉGLAGES GÉNÉRAUX Basse Standard Élevée 8.2. QUANTITÉ EAU 27...2702 8.3. QUANTITÉ LAIT 3…180 Cappuccino 9.1. DOSE DE MOUTURE Basse Standard Élevée 9.2. QUANTITÉ EAU 27...2702 9.3. QUANTITÉ LAIT 3…180 Caffè Latte 10.1. DOSE DE MOUTURE Basse Standard Élevée 10.2. QUANTITÉ...
- Page 149 Français RÉGLAGES GÉNÉRAUX Cette fonction permet d’ e ffecteur une petite pause pendant la première phase de distribution. Préinfusion Cela peut améliorer la qualité du café qui, pendant la pause, « se mêle » avec la première partie d’ e au reçue. Confirmer : «...
- Page 150 Français RÉGLAGES GÉNÉRAUX suivre les instructions (pour toutes informations sur le pastilles contacter un Centre D’ A ssistance Agréé). Démarche : la procédure commence à partir de « LAVAGE GROUPE » Appuyer sur la touche « Entrer » ; le message « INTRODUIRE PASTILLE DANS LE GROUPE » s'affiche Enlever le groupe de distribution du café...
- Page 151 Français RÉGLAGES GÉNÉRAUX Technique MENU LAVAGE N° OPT. INDICATEUR Description Fonction qui permet de distribuer une certaine quantité de vapeur pour prévenir la formation Lavage Cappuccinatore de sédiments dans le Cappuccinatore. LAVAGE BUSE DE DISTRIBUT. Fonction qui permet de distribuer une quantité minimum d'eau chaude (5 cc environ) pour prévenir la formation de sédiments dans la buse de distribution du café.
- Page 152 Français 8.2.4 PROGRAMMATION LAIT « PROGRAMMATION LAIT » est une commande directe qui permet de configurer et de sauvegarder dans la mémoire la quantité de lait pour une boisson sélectionnée. Sélectionner L’icône de programmation s'affiche (1) « PROGRAMMATION LAIT » Presser le bouton La machine commence à...
-
Page 153: Fonctionnement Et Utilisation
Français FONCTIONNEMENT ET UTILISATION Avant d'utiliser la machine, Il est interdit aux enfants il est indispensable d'avoir de jouer avec l'appareil. Le lu attentivement ce mode nettoyage et l'entretien de d'emploi et d'avoir une l'appareil ne doivent pas bonne connaissance être effectués par des générale de la machine enfants hors du contrôle... -
Page 154: Mise En Marche Automatique Programmée
Français Mise en marche automatique programmée Elle est possible si la machine est en « STANDBY » et si la fonction « MISE EN MARCHE AUTOM. » est activée. La machine se met en marche à l’heure programmée. Mise en marche momentanée à partir de la veille Mise en marche manuelle avec la machine en «... - Page 155 Français Appuyer sur la touche relative à la boisson choisie. Les touches de distribution doivent être pressés pendant 1 seconde environ. TABLEAU DISTRIBUTIONS Distribution Séquence des touches Q.té Niveau Description Café Lors de la livraison, les machines sont programmées par défaut. Distributions obtenues avec du café...
- Page 156 Français TABLEAU DISTRIBUTIONS Boisson à base de café moulu sur l’instant, en ajoutant une Café Macchiato (*), H Distribution obtenue avec du café petite dose de lait chaud. moulu en ajoutant une petite dose de lait Latte Macchiato (*), P Boisson à...
-
Page 157: Vapeur
Français Vapeur Même si toutes les touches sont déjà programmées (Équipement COFFEE exclu) par défaut, il faut vérifier si • Introduire la buse de distribution de vapeur dans la boisson à réchauffer. boisson obtenue • Tourner le robinet de distribution de la vapeur dans le sens inverse des aiguilles d’une montre. -
Page 158: Programmation Des Touches De Distribution
Français Programmation des touches de Messages affichés distribution Les quantités de boissons associées aux touches correspondantes Ci-dessous est fournie une peuvent être programmées directement à partir du clavier. Pour programmer et reprogrammer les touches, s'en tenir liste des alarmes (en plus de aux instructions suivantes : Quantité... -
Page 159: Arrêt De La Machine
Français ERREUR POMPE 1-2 ou 3-4 Une des pompe est en panne. La machine fonctionne toujours mais il est nécessaire de contacter le CENTRE D'ASSISTANCE AGRÉÉ. ERREUR SENSEUR 1 2 Il s'affiche lorsque un capteur de température est endommagé. Éteindre la machine et contacter le CENTRE D’ASSISTANCE AGRÉÉ. -
Page 160: Nettoyage Et Entretien
Français NETTOYAGE ET ENTRETIEN Avant d’effectuer toute En cas d’anomalies de opération d’entretien et/ou fonctionnement, éteignez nettoyage, éteignez immédiatement l’appareil, l’appareil en positionnant coupez l’alimentation en interrupteurs retirant fiche « », coupez contactez centre l’alimentation électrique en d’assistance le plus proche. débranchant la fiche et attendez l’appareil... -
Page 161: Nettoyage Et Entretien De Routine
Français Un entretien et un nettoyage réguliers préservent et maintiennent l’appareil en bon état de fonctionnement plus 10.2 Nettoyage et entretien de longtemps et garantissent le respect des normes d’hygiène. routine Les différents composants Afin de garantir le correct fonctionnement de l'appareil, il est conseillé... - Page 162 Français 10.2.1 Plan d'entretien COMPOSANT À NETTOYER Entretien Buse de distribution du café Voir la section « Nettoyage buse de distribution du café ». Groupe de distribution du café Voir la section « Nettoyage du groupe de distribution du café ». Bac et grille d’égouttement Voir la section «...
- Page 163 Français 10.2.2 Nettoyage buse de distribution du 10.2.3 Nettoyage groupe café distribution du café 10.2.2.1 Nettoyage manuel buse de 10.2.3.1 Nettoyage manuel du groupe distribution du café de distribution du café Il est possible d’enlever : • la protection supérieure de la buse de distribution, en la tirant vers soi-même ; Terminer le café...
- Page 164 Français 10.2.4 Nettoyage grille 10.2.9 Nettoyage du Cappuccinatore d’égouttement Enlever le bac d’égouttement de la machine et le laver à N’effectuer aucune l’eau courante en ayant soin de ne pas abîmer la grille. opération de nettoyage du 10.2.5 Nettoyage tiroir à marc Cappuccinatore Laver à...
-
Page 165: Entretien Curatif
Français 10.3 Entretien curatif Toutes réparations remplacements composants font partie de l’entretien curatif. Ces opérations doivent être exécut. seulem. par le Tec. d’entr. 10.3.1 Blocage du moulin à café • La présence d’un corps étranger dans le café en grains peut provoquer le blocage des meules et par conséquent le blocage de la machine : le message «... - Page 166 Français Mod. DUO • Enlever les vis. • Enlever la roue dentée. roue dentée • Dévisser et ôter la bague de réglage et nettoyer les deux meules à l’aide d’un aspirateur et d’un pinceau. Vérifier l’état d’usure des meules. Remplacer les meules si elles sont endommagées.
- Page 167 Français Mod. DUO Le desserrage d’un demi tour de la bague de réglage fondamental, afin d’éviter blocage l’endommagement meules. • Ouvrir la cloison. Pour que la machine puisse recommencer à fonctionner régulièrement, il est nécessaire de régler • Repositionner la roue dentée et la bloquer en serrant les vis.
-
Page 168: 11 Dépannage
Français DÉPANNAGE Ci de suite sont indiquées les anomalies éventuelles de fonctionnement de la machine. Si la case « Remarques / Interventions suggérées » contient le symbole du Technicien d'entretien, cela signifie que l’intervention doit être effectuée par le Technicien d'entretien. Problème Cause Remarques / Interventions suggérées... -
Page 169: Stockage - Élimination
Français STOCKAGE - ÉLIMINATION 12.1 Repositionnement dans un endroit différent Si l'appareil doit être repositionné dans un autre endroit, il faut : • débrancher l'appareil des réseaux d'alimentation ; • effectuer le nettoyage général de l'appareil comme décrit au chapitre « Nettoyage et entretien » ; •... -
Page 170: Instructions Pour La Mise À La Décharge
Français INSTRUCTIONS POUR LA MISE À LA DÉCHARGE INFORMATIONS AUX UTILISATEURS aux termes de l'art. 13 du Décret Législatif Italien n° 151 du 25 juillet 2005, « Application des Directives 2002/95/CE, 2002/96/CE et 2003/108/CE, concernant la réduction de l’utilisation de substances dangereuses dans les équipements électriques et électroniques et à... - Page 171 Automatische Espressomaschine ACHTUNG: Die vorliegende Bedienungsanleitung ist ausschließlich für Personal mit entsprechender Fachausbildung bestimmt.
-
Page 172: Hauptbestandteile
Deutsch HAUPTBESTANDTEILE Mod. LUXE / Mod. COFFEE / Mod. CAPPUCCINO / Mod. CAPPUCCINO USA Linke Seitenwand Tür Tassenabdeckung Kaffeesatzbehälter Rückwand Dampfdüse (fehlt beim Modell COFFEE) Tassenwärmer 18 Hauptschalter Klappe für vorgemahlenen Kaffee (fehlt beim Modell "I" - Elektrische Funktionen freigegeben - Maschine eingeschaltet - CAPPUCCINO USA) Kontrolllampe leuchtet. - Page 173 Deutsch Mod. DUO Linker Kaffeebohnenbehälter Linker Drehknopf für Mahlgrad Linkes Mahlwerk...
- Page 174 Deutsch SICHERHEITSHINWEISE Nur für gewerbliche Nutzung. Das Gerät darf nur an Orten installiert werden, Das Gerät für gewerbliche denen Nutzung darf weder im qualifiziertem Personal Freien noch in Räumen überwacht werden kann. aufgestellt werden, in denen die Temperatur unter 2 °C Dieses Gerät darf von Kindern oder über 32 °C liegt, noch über 8 Jahren oder von...
- Page 175 Deutsch Beim Anschluss des Geräts Bei einem Austausch der an das Wassernetz sollten Zuflussschläuche muss das alle anwendbaren mit dem Gerät mitgelieferte nationalen Vorschriften Schlauch-Set verwendet bekannt sein werden. Das gebrauchte und eingehalten werden. alte Schlauch-Set darf nicht wiederverwendet werden. Bei Schäden am Netzkabel Zugang muss dieses vom Hersteller,...
- Page 176 Deutsch INHALT HAUPTBESTANDTEILE 12 AUFBEWAHRUNG - ENTSORGUNG 1 EINFÜHRUNG IN DIE VERWENDUNG DES 12.1 NEUAUFSTELLUNG AN EINEM ANDEREN ORT HANDBUCHS 12.2 NICHTBENUTZUNG UND EINLAGERUNG 1.1 VORWORT 13 HINWEISE FÜR DIE ENTSORGUNG 1.2 VERWENDETE SYMBOLE 2 INFORMATIONEN ZUM GERÄT 2.1 INFORMATIONEN FÜR DEN BENUTZER 2.2 VERWENDUNGSZWECK DES GERÄTES 2.3 KENNZEICHNUNG DES GERÄTS 2.4 TECHNISCHE DATEN...
-
Page 177: Einführung In Die Verwendung Des
Deutsch EINFÜHRUNG IN DIE VERWENDUNG DES HANDBUCHS Vorwort Der Kundendienst steht außerdem für alle Dieses Handbuch technischen Erklärungen, Bestandteil der Maschine Informationen zum Betrieb, und muss daher während technischen gesamten Kundendienst Betriebslebensdauer Lieferung von Ersatzteilen Maschine (auch im Fall eines zur Verfügung. - Page 178 Dieser Artikel wurde von SaGa Coffee S.p.A. hergestellt Vorankündigung Änderungen und unter seiner Verantwortung vertrieben. SaGa Coffee S.p.A. garantiert für dieses Produkt. Saeco ist ein und Verbesserungen an den eingetragener Handelsname von Koninklijke Philips N.V., dessen Verwendung mit einer von Koninklijke Philips N.V.
-
Page 179: Verwendete Symbole
Deutsch Verwendete Symbole Das oben genannte Handbuch enthält verschiedene Hinweisarten, um die verschiedenen Gefahren- oder Zuständigkeitsstufen zu kennzeichnen. Das Symbol wird mit einer Meldung aufgeführt, die die Vorgehensw. erklärt und alle nützlichen Hinweise liefert. Achtung Informationen zur Sicherheit des Benutzers und der Unversehrtheit der Maschine. -
Page 180: Informationen Zum Gerät
Deutsch INFORMATIONEN ZUM GERÄT Wartungstechniker dazu angehalten, Informationen für den Benutzer Sicherheitshinweise in diesem Handbuch zu kennen und sie in technischer Hinsicht uneingeschränkt zu beachten, so dass die Installation, Inbetriebnahme, der Gebrauch und Das Gerät muss in einem die Wartung unter Einhaltung aller Sicherheitsvorschriften ausgeführt werden können. -
Page 181: Kennzeichnung Des Geräts
Deutsch unsachgemäßer Es ist strikt verboten, das Gebrauch gilt: Datenschild zu beschädigen oder zu verändern. • jeder Einsatz, der vom vorgesehenen abweicht bzw. der Einsatz von Techniken, die von den in diesem Handbuch beschriebenen abweichen; Bei Anfragen an den technischen Kundendienst muss stets auf dieses •... -
Page 182: Technische Daten
Deutsch Kaffeeauslauf Technische Daten Abmessungen (L x H x B) 410 x 695 x 550 mm Versorgungsspannung 220-240 V 50-60 Hz Länge Netzkabel 1500 mm Lei s tungsaufnahme Mod. LUXE siehe Datenschild Mod. COFFEE siehe Datenschild Mod. siehe Datenschild CAPPUCCINO Kaffeeauslauf Mod. -
Page 183: Sicherheit
Deutsch SICHERHEIT Folgendes ist Pflicht: Vorwort • die Konformität Stromversorgungsleitung überprüfen; Gemäß den geltenden Vorschriften und Richtlinien hat • Originalersatzteile zu verwenden; SaGa Coffee betriebsintern eine technische • die Anleitungen in folgender Dokumentation und in den Dokumentation für das Gerät Idea RST erstellt und Anhängen aufmerksam zu lesen;... -
Page 184: Anforderungen An Den Bediener
Deutsch Das Gerät ist nicht für die Anforderungen an den Bediener Installation Bereich. Aus Sicherheitsgründen erfolgt eine Einteilung in zwei geeignet, in denen ein Zuständigkeitsbereiche mit unterschiedlichen Kompetenzen: Wasserstrahl benutzt Bediener werden kann. Person, die ausschließlich für die Bedienung und die Kontrolle des Gerätes zuständig ist. -
Page 185: Sicherheitsvorrichtungen
Deutsch Sicherheitsvorrichtungen Restrisiken Die Maschinen, auf die sich die Es sollten ausschließlich Behälter vorliegende Veröffentlichung aus für Lebensmittel geeignetem bezieht, wurden Material verwendet werden. Übereinstimmung baulichen spezifischen geltenden europäischen Eigenschaften Normen hergestellt und verfügen vorliegenden Handbuch daher über einen Schutz aller beschriebenen Maschinen potentiell gefährlichen Teile. -
Page 186: Versetzung Und Lagerung
Deutsch VERSETZUNG UND LAGERUNG Abladen und Bewegung Das Abladen vom Transportfahrzeug und die Versetzung des Geräts dürfen ausschließlich durch kompetentes Personal unter Verwendung der für die zu versetzende Last geeigneten Mittel durchgeführt werden. Das Gerät muss stets in vertikaler Position gehalten werden. -
Page 187: Inbetriebnahme
Deutsch INBETRIEBNAHME Hinweise Sicherstellen, dass Fläche, Gerät darf nicht Maschine aufgestellt wird, Außenbereichen aufgestellt werden. ausreichend groß Es sollte nicht in Räumen aufgestellt tragfähig ist, werden, in denen die Temperatur Maschine sicher aufstellen unter +2°C oder über 32°C liegt zu können. und die eine hohe Luftfeuchtigkeit Für eine... -
Page 188: Auspacken Und Aufstellung
Deutsch Soll das Gerät in Wandnähe aufgestellt werden, so muss die Rückwand des Geräts zur Wand einen Abstand von mindestens 8 cm aufweisen, damit das Lüftungsgitter an der Rückwand des Automaten frei bleibt. Auspacken und Aufstellung Befestigungsschrauben Bei Ankunft des Geräts sollte sichergestellt werden, dass Stützfüße dieses während des Transports keine Schäden erlitten hat und dass die Verpackung nicht geöffnet und eventuell Teile... -
Page 189: Anschluss An Das Wassernetz
Deutsch Vor dem Anschließen des Anschluss an das Wassernetz Entkalkers an die Maschine Beim Anschluss des Geräts eine Reinigung an das Wassernetz sollten durchführen, alle anwendbaren Wasser klar austritt. Den nationalen Vorschriften Entkalker erst danach an bekannt sein die Maschine anschließen. eingehalten werden. -
Page 190: Anschluss An Das Stromnetz
Deutsch • Den Entkalker an das Wassernetz anschließen. Anschluss an das Stromnetz Der für die Installation des Geräts verantwortliche Wartungstechniker muss sicherstellen, dass: • das Stromnetz den einschlägigen Sicherheitsvorschriften entspricht; • die Netzspannung der auf dem Datenschild angegebenen Spannung entspricht. Zweifelsfällen noch keine... - Page 191 Deutsch - Netzkabel Typ H05VVF Querschnitt 3 x 2,5 mm2 Überprüfen, Stecker Netzkabels auch nach der Aufstellung noch leicht erreichbar ist. Anschlusspunkt (Steckdose oder allpoliger Netzschalter) muss sich in Nullleiter - Blau Phase - Braun einer vom Benutzer leicht Masse - Gelb/grün erreichbaren Position - Anschluss des Steckers an eine Zweiphasenleitung 400...
-
Page 192: Beschreibung Der Bedienelemente
Deutsch BESCHREIBUNG DER BEDIENELEMENTE Bedienelemente Für alle Reinigungs- oder Wartungseingriffe Auf dem Gerät sind folgende Bedienelemente vorhanden: • Hauptschalter Maschine, muss diese vom • Bedienfeld Stromnetz abgenommen 6.1.1 Hauptschalter werden, indem der allpolige Netzschalter Mit an das Stromnetz angeschlossener Maschine und allpoligem Netzschalter in Position "I"... - Page 193 Deutsch 6.1.3 Beschreibung der Tasten in der Phase des 6.1.3.2 Anwahl des Behälters normalen Betriebs (nur Modell DUO) Die Version Duo ist mit 2 Kaffeebehältern und 2 Mahlwerken ausgestattet. Dadurch kann die Anzahl der auszugebenden Produkte verdoppelt oder eine weitere Produktart hinzugefügt werden. Für die Anwahl eines Behälters muss die entsprechende Taste gedrückt werden.
- Page 194 Deutsch 6.1.3.3 Funktion Automatische Dampfdüse (nur bei den Modellen mit automatischer Dampfdüse) Für die Aktivierung des Dampfs über die automatische Dampfdüse muss die in der Abbildung gezeigte Taste für 2 Sekunden gedrückt werden. Die Dampfausgabe wird bei Erreichen der voreingestellten Temperatur automatisch gesperrt.
-
Page 195: Befüllen Und Inbetriebnahme
Deutsch BEFÜLLEN UND INBETRIEBNAHME Befüllen mit Kaffeebohnen Einstellung der Crema • Den Deckel des Behälters entfernen. Die Menge der Crema ändert sich proportional zur • Die Kaffeebohnen in den Behälter füllen. Einstellung des Regulierhebels. • Den Deckel wieder auf den Behälter setzen. •... -
Page 196: Einstellung Der Temperatur
Deutsch Einstellung der Temperatur Einstellung des Mahlgrads für Unabhängig Cappuccinatore Kaffeemischung erhöht ein verwendete Milch sollte in sehr feiner Mahlgrad einem Kühlgerät bei einer (Anzeige niedrigen Temperatur von maximal Werten) die Dichte, die 4°C aufbewahrt werden. Crema-Menge im Getränk Sie sollte nicht länger als 30 Ausgabedauer, Minuten unbenutzt... -
Page 197: Erste Einschaltung Des Geräts
Deutsch Der Mahlgrad wird bereits im Werk auf Standardwerte Obwohl alle Tasten bereits eingestellt, er kann aber wie folgt geändert werden: • Die Tür öffnen, den Knopf im Gegenuhrzeigersinn drehen, im Werk auf Standardwerte um einen feinerer Mahlgrad einzustellen (die Anzeige zeigt einen niedrigen Wert an). -
Page 198: Programm- Und Wartungsmenü
Deutsch PROGRAMM- UND WARTUNGSMENÜ Dieses Kapitel beschreibt, Programmierungsparameter des Geräts eingestellt oder geändert werden können. Daher dieser Punkt aufmerksam zu lesen. Erst wenn die genaue Abfolge der auszuführenden Vorgänge verstanden ist, dürfen die Bei einigen Funktionen können auch ein oder mehrere Daten programmiert werden (bereits auf Standardwerte programmiert). -
Page 199: Programmmenü
Deutsch Programmmenü 8.2.2 Aufbau des Programmmenüs Der Aufbau des Programmmenüs wird unter dem Punkt “Aufbau des Programmmenüs” aufgeführt. ALLGEMEINE EINSTELLUNGEN NR. OPT MENÜOPTION Unter dem Punkt “Beschreibung der Meldungen des Sprache Programmmenüs” werden alle Programmmenü ITALIANO vorhandenen Optionen aufgeführt. DEUTSCH ENGLISH 8.2.1 Zugang zum Programmmenü... - Page 200 Deutsch 27...2702 Niedrig 10.3. MILCHMENGE Standard 3…180 Hoch MILK 3.2. WASSERMENGE 11.1. MAHLMENGE 27...2702 Niedrig Coffee x2 Standard 4.1. MAHLMENGE Hoch Niedrig 11.2. WASSERMENGE Standard 27...2702 Hoch 11.3. MILCHMENGE 4.2. WASSERMENGE 3…180 27...2702 FLAT WHITE LARGE COFFEE 12.1. MAHLMENGE 5.1. MAHLMENGE Niedrig Niedrig...
- Page 201 Deutsch 4.2. STOPPSCHWELLE 4.3. AKTUELLER ZÄHLER Zähler 5.1. GESAMTANZAHL KAFFEE 5.2. GESAMTANZAHL WASSER Technisch REINIGUNGSMENÜ NR. OPT MENÜOPTION Reinigung Cappuccinatore REINIGUNG DES AUSLAUFS REINIGUNG BRÜHGRUPPE PROGRAMMIERUNG MILCH Testmenü...
- Page 202 Deutsch 8.2.3 Beschreibung der Meldungen des Programmmenüs ALLGEMEINE EINSTELLUNGEN NR. OPT ANZEIGE Beschreibung Wird im Menü "SPRACHE" "OK" eingestellt, kann die Sprache angewählt Sprache werden. ITALIANO DEUTSCH ENGLISH FRANÇAIS ESPAGNOL PORTUGUES NEDERLANDS 한국어 Polski BEHEIZTE TASSENABSTELLFLÄCHE % (fehlt beim Mod. DUO) 0..100% Mit dieser Funktion kann die beheizte Tassenabstellfläche eingeschaltet und von 0-100% in 10-Sekunden-Schritten eingestellt werden.
- Page 203 Deutsch ALLGEMEINE EINSTELLUNGEN Für jedes Getränk kann die Menge des Wassers und des gemahlenen Kaffees geändert Espresso werden, die bei der Ausgabe verwendet und bei der Installation programmiert wird. 1.1. MAHLMENGE Wird "TIEF" oder "HOCH" bestätigt, wird die Portion um 1 g reduziert oder erhöht. Wird "STANDARD"...
- Page 204 Deutsch ALLGEMEINE EINSTELLUNGEN Niedrig Standard Hoch 8.2. WASSERMENGE 27...2702 8.3. MILCHMENGE 3…180 Cappuccino 9.1. MAHLMENGE Niedrig Standard Hoch 9.2. WASSERMENGE 27...2702 9.3. MILCHMENGE 3…180 Caffè Latte 10.1. MAHLMENGE Niedrig Standard Hoch 10.2. WASSERMENGE 27...2702 10.3. MILCHMENGE 3…180 MILK 11.1. MAHLMENGE Niedrig Standard Hoch...
- Page 205 Deutsch ALLGEMEINE EINSTELLUNGEN Diese Funktion ermöglicht die Einlegung einer kurzen Pause während der ersten Vorbrühung Ausgabephase. Dies bewirkt eine Verbesserung der Kaffeequalität, weil der Kaffee während der Pause in der ersten Menge Wasser "ziehen" kann. Bestätigung: "OFF", es wird keine Vorbrühung durchgeführt. KURZ Wird "KURZ"...
- Page 206 Deutsch ALLGEMEINE EINSTELLUNGEN Anleitung befolgen (Informationen zu den Tabletten erhalten Sie beim Kundendienst). Vorgehensweise: Der Prozess beginnt mit "REINIGUNG BRÜHGRUPPE" Die Taste "Enter" drücken; auf dem Display "TABLETTE IN BRÜHGRUPPE GEBEN" Die Brühgruppe abnehmen; auf dem Display "BRÜHGRUPPE EINSETZEN" Die Tablette in die Brühgruppe einlegen und diese wieder einsetzen; auf dem Display "TÜR SCHLIESSEN"...
- Page 207 Deutsch ALLGEMEINE EINSTELLUNGEN Technisch REINIGUNGSMENÜ NR. OPT ANZEIGE Beschreibung Diese Funktion erlaubt die Ausgabe einer bestimmten Dampfmenge, um die Bildung von Reinigung Cappuccinatore Ablagerungen im Cappuccinatore zu vermeiden. REINIGUNG DES AUSLAUFS Funktion, die die Ausgabe einer Mindestmenge an heißem Wasser (ca. 5 cc) ermöglicht, um die Bildung von Ablagerungen im Kaffeeauslauf zu vermeiden.
- Page 208 Deutsch 8.2.4 PROGRAMMIERUNG MILCH "PROGRAMMIERUNG MILCH" eine direkter Bedienungsbefehl für die Programmierung und Speicherung der Milchmenge für das jeweilige Getränk. "PROGRAMMIERUNG Das Display zeigt das Programmierungssymbol (1) an MILCH" anwählen Die Taste für das zu Die Maschine beginnt die Ausgabe von Milch programmierende Getränk gedrückt halten Die Taste des gewählten...
-
Page 209: Betrieb Und Verwendung
Deutsch BETRIEB UND VERWENDUNG Vor der Benutzung der Kinder dürfen nicht mit Maschine dieses dem Gerät spielen. Die Handbuch aufmerksam zu Reinigung und Wartung lesen, und die Funktionen des Geräts darf nicht von der Maschine sollten dem Kindern ausgeführt werden, Bediener vertraut sein. -
Page 210: Automatische, Programmierte Einschaltung
Deutsch Automatische, programmierte Einschaltung Diese Einschaltung ist möglich, wenn sich die Maschine im Zustand "STANDBY" befindet und die Funktion "AUTOMAT. EINSCHALTUNG" aktiv ist. Die Einschaltung der Maschine erfolgt zur programmierten Uhrzeit. Zeitweilige Einschaltung aus Standby Manuelle Einschaltung, wenn sich die Maschine im Zustand "STANDBY" befindet. Diese erfolgt, wenn die in der Abbildung gezeigte Taste für 3 Sekunden gedrückt wird. - Page 211 Deutsch Die dem gewünschten Getränk entsprechende Taste drücken. Die Ausgabetasten müssen für ca. 1 Sek. gedrückt werden. AUSGABETABELLE Ausgabemenge Ausgabe Tastenabfolge Menge Beschreibung Bei der Lieferung sind die Maschinen auf Kaffee tief Ausgaben aus frisch Standardwerte programmiert. tief gemahlenem Kaffee hoch hoch Diese Ausgaben sind nur für Einzelportionen unter...
- Page 212 Deutsch AUSGABETABELLE Getränk aus frisch gemahlenem Kaffee, dem eine Kaffee Macchiato (*), H Ausgabe mit gemahlenem Kaffee kleine Portion heißer Milch zugefügt wird. mit einer kleinen Portion Milch Getränk aus heißer Milch und frisch gemahlenem Latte Macchiato (*), P Ausgabe mit heißer Milch Kaffee.
-
Page 213: Dampf
Deutsch Dampf Obwohl alle Tasten bereits im Werk auf Standardwerte (Fehlt beim Modell COFFEE) programmiert wurden, muss • Die Dampfdüse in das zu erwärmende Getränk tauchen. kontrolliert werden, ob das • Den Dampfausgaberegler im Gegenuhrzeigersinn drehen. Nach Erreichen der gewünschten Temperatur das Ventil zubereitete Getränk den schließen (im Uhrzeigersinn drehen). -
Page 214: Programmierung Der Ausgabetasten
Deutsch Programmierung der Displayanzeigen Ausgabetasten Die Ausgabemenge der den einzelnen Tasten zugeordneten Es folgt eine Auflistung der Getränke kann direkt über das Bedienfeld programmiert werden. Die Tasten werden wie folgt programmiert oder Alarme (zusätzlich zu den umprogrammiert: Kaffeemenge: bereits behandelten), die auf •... -
Page 215: Ausschaltung Der Maschine
Deutsch PUMPENFEHLER 1-2 oder 3-4 Bei einer der Pumpen liegt ein Defekt vor. Die Maschine kann weiterhin betrieben werden, es muss jedoch der KUNDENDIENST gerufen werden. SENSORFEHLER 1 2 Wird angezeigt, wenn ein Temperatursensor defekt ist. Die Maschine ausschalten und den KUNDENDIENST rufen. -
Page 216: Reinigung Und Wartung
Deutsch REINIGUNG UND WARTUNG Das Gerät vor Reinigungs- Bei Betriebsstörungen das u./o. Wartungsarbeiten Gerät unverzüglich gleich welcher ausgeschalten und durch ausschalten, indem Ziehen des Netzsteckers Schalter in die Position von der Stromversorgung „OFF“ gestellt werden, die trennen. Wenden Sie sich Stromversorgung durch nächstgelegene... -
Page 217: Reinigung Und Planmäßige Wartung
Deutsch Die regelmäßige Reinigung und Wartung verlängern die Lebensdauer des Geräts und gewährleisten die Einhaltung 10.2 Reinigung und planmäßige der normalen Hygienevorschriften. Wartung Alle Bestandteile dürfen nur mit Für einen einwandfreien Betrieb des Geräts empfehlen wir die Einhaltung der Bestimmungen und Zeitangaben des lauwarmem Wasser und ohne “WARTUNGSPLANS”. - Page 218 Deutsch 10.2.1 Wartungsplan ZU REINIGENDER TEIL Wartung Kaffeeauslauf Siehe Abschnitt "Reinigung Kaffeeauslauf". Brühgruppe Siehe Abschnitt "Reinigung Brühgruppe". Abtropfschale und entsprechender Rost Siehe Abschnitt "Reinigung Abtropfschale und entsprechender Rost". Kaffeesatzbehälter Siehe Abschnitt "Reinigung Kaffeesatzbehälter". Dampf- und Heißwasserdüse Siehe Abschnitt "Reinigung Dampf- und Heißwasserdüse". Cappuccinatore Siehe Abschnitt "Reinigung Cappuccinatore".
- Page 219 Deutsch 10.2.2 Reinigung Kaffeeauslauf 10.2.3 Reinigung der Brühgruppe 10.2.2.1 Manuelle Reinigung Kaffeeauslauf 10.2.3.1 Manuelle Reinigung Brühgruppe Es können entfernt werden: • die obere Schutzabdeckung des Auflaufs durch Herausziehen; Reinigung • die untere Schutzabdeckung des Auslaufs durch Lösen des Kaffeebohnen verbrauchen. unteren Griffs;...
- Page 220 Deutsch 10.2.4 Reinigung Abtropfschale und 10.2.9 Reinigung des Cappuccinatore entsprechender Rost Die Abtropfschale aus der Maschine nehmen und unter laufendem Den Cappuccinatore nicht Wasser spülen. Den Rost besonders sorgfältig reinigen. reinigen, wenn sich die 10.2.5 Reinigung Kaffeesatzbehälter Maschine Zustand Die Abtropfschale herausnehmen, den Kaffeesatzbehälter "STANDBY"...
-
Page 221: Außerplanmäßige Wartung
Deutsch 10.3 Außerplanmäßige Wartung außerplanmäßigen Wartung gehören alle Reparaturarbeiten und der Austausch von Teilen. liegen ausschl. Kompetenz Wartungstechnikers. 10.3.1 Mahlwerkblockierung • Fremdkörper zwischen den Kaffeebohnen können zu einer Blockierung des Mahlwerks und in der Folge zur Sperre des Maschinenbetriebs führen. Dies wird von der Meldung "MAHLWERKFEHLER"... - Page 222 Deutsch Mod. DUO • Die Schrauben entfernen. • Das Zahnrad entfernen. Schrauben Zahnrad • Die Einstellmutter aufschrauben und entfernen und beide Mahlwerke mit einem Staubsauger und einem Pinsel reinigen. Den Verschleißzustand der Mahlwerke überprüfen und diese im Fall sichtbarer Beschädigungen austauschen. Abdeckung Schrauben Werkzeug...
- Page 223 Deutsch Mod. DUO Lockerung Einstellmutter Umdrehung unbedingt notwendig, eine Blockierung und Beschädigung der Mahlwerke zu vermeiden. • Die Abdeckung öffnen. Um den normalen Betrieb Maschine wieder aufnehmen können, muss der Mahlgrad neu • Das Zahnrad wieder anbringen und die Schrauben festziehen.
-
Page 224: Problemlösung
Deutsch PROBLEMLÖSUNG Es folgt eine Auflistung einiger evtl. auftretender Funktionsstörungen der Maschine. Erscheint in der Spalte "Hinweise/Empfohlene Eingriffe" das Symbol "Wartungstechniker", muss der Eingriff vom Wartungstechniker durchgeführt werden. Funktionsstörung Urs. Hinweise/Empfohlene Eingriffe Masch. schaltet nicht ein Keine Spannung vorhanden Folgendes überprüfen: ob der Stecker ans Stromnetz angeschlossen ist ob der allpolige Netzschalter (wenn vorhanden) eingeschaltet ist... -
Page 225: Aufbewahrung - Entsorgung
Deutsch AUFBEWAHRUNG - ENTSORGUNG 12.1 Neuaufstellung an einem anderen Ort Zur Aufstellung des Geräts an einer anderen Stelle wie folgt vorgehen: • das Gerät von allen Versorgungsnetzen trennen; • die allgemeine Reinigung des Geräts vornehmen, wie im Kapitel “Reinigung und Wartung” beschrieben; •... -
Page 226: Hinweise Für Die Entsorgung
Deutsch HINWEISE FÜR DIE ENTSORGUNG BENUTZERINFORMATION gemäß Art. 13 der italienischen Gesetzesverordnung Nr. 151 vom 25. Juli 2005 „Umsetzung der Richtlinien 2002/95/EG, 2002/96/EG und 2003/108/EG, hinsichtlich der Verringerung des Einsatzes von Gefahrenstoffen in elektrischen und elektronischen Geräten sowie zur Abfallentsorgung“. Das Symbol mit dem durchgestrichenen Mülleimer auf dem Gerät oder auf seiner Verpackung gibt an, dass das Produkt zum Ende seines Betriebslebens getrennt vom...