
Related Manuals for Roland SE-02


Summary of Contents for Roland SE-02
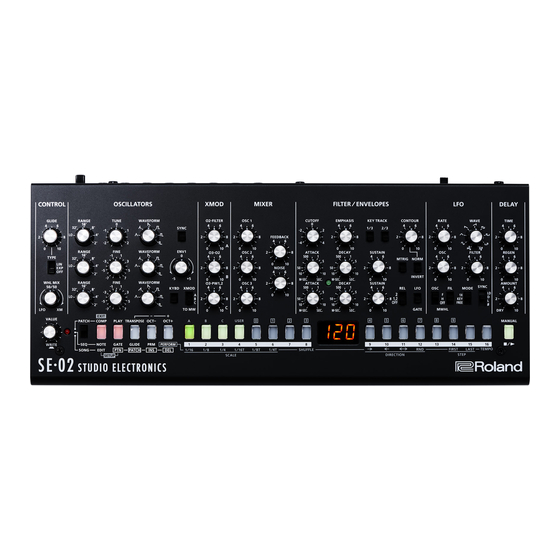
- Page 1 3 OSCILLATOR ANALOG MONOPHONIC SYNTHESIZER SE-02 Manual V1.03 for firmware V1.11 USER’S GUIDE...
-
Page 2: Table Of Contents
CLEARING A PATCH......................6 USB INTERFACE........................7 DATA BACKUP & RESTORE......................7 Backup Patches from SE-02....................7 Restore patches into the SE-02:..................7 Restore the SE-02 to factory settings:................7 PRESET SECTION........................8 BANK A, B and C & D......................8 USER BANK........................... 8 MANUAL MODE........................8 COMPARING PATCHES......................8... - Page 3 CONTOUR..........................14 MTRIG..........................14 NORM/INVERT........................15 ENVELOPES..........................15 FILTER ENVELOPE......................15 ATTACK........................... 15 DECAY..........................15 SUSTAIN.......................... 15 AMPLIFIER ENVELOPE.......................16 ATTACK........................... 16 DECAY..........................16 SUSTAIN.......................... 16 GATE LED........................16 RELEASE......................... 16 LFO/GATE........................16 LFO............................17 RATE............................ 17 WAVE........................... 17 OSC............................17 FILTER..........................
- Page 4 A WORD ABOUT MIDI......................31 ROLAND BOUTIQUE MIDI....................31 To enable transmission of MIDI CC data [5] Or PROGRAM CHANGE [6]:.......31 To enable / Disable Midi Thru [9]..................31 Settings for Studio Electronics SE-02 Editor..............31 MIDI IMPLEMENTATION CHART..................32 QUICK MEMENTO........................34 SOUND SYNTHESIS MEMO......................35 Page 4 of 35 Manual V1.03 for firmware V1.11...
-
Page 5: Credits
MIDI. There are CV inputs for both pitch and filter frequency, as well as trigger in and out, so the SE-02 works great with modular setups and other vintage gear. You can route external audio signals through the filter section, and there’s even USB audio and MIDI capabilities to seamlessly integrate with computer-based setups. -
Page 6: General Functions
These perform different functions depending on which mode you are in. These are the buttons to access the settings for the SE-02. In PATCH mode, use these buttons to access a playable, and transposable keyboard. In SEQUENCE mode, use these buttons to choose the type of data you wish to sequence - Note, Gate, Glide, Parameters, or select the Scale of the sequence. -
Page 7: Usb Interface
SE-02 and then turn it back on. 3. To execute the rest press the MANUAL button 4. When the display reads “F in”, restart the SE-02 and it’ll be just the way it was the day you got it. Page 7 of 35... -
Page 8: Preset Section
MANUAL MODE In order to listen to the current settings of the knobs on the panel of the SE-02 simply press the MANUAL button. This will switch from whichever preset is currently selected to report the physical settings of the synthesizer. To return to the presets select the bank, and desired patch number. -
Page 9: Ii. Functions For Sound Creation
50% LFO and 50% XMOD. Experiment: 1. Connect the SE-02 to a controller keyboard with a Mod Wheel (or establish a connection with a DAW and select MIDI CC data for sending Mod Wheel controllers to the SE-02.) 2. -
Page 10: Oscillators
While there is an auto tuning feature on the SE-02 and the nature of modern electronics is more stable than vintage analog, remember that the SE-02 is still an analog synthesizer and it’s always a good idea to allow them to warm up before tuning, and needing to at least verify the tuning before beginning to play. -
Page 11: Oscillator 3
Experiment: Set Oscillator 1 and 2 to playback sawtooth waveforms. Adjust the tuning of OSC 2 until it feels interesting to you. Now engage sync. What’s happened to the sound? Disengage sync. Listen again. Sometimes you want sync for effect, other times you need sync for stability. Sometimes you really don’t want sync at all. OSCILLATOR 3 RANGE Sets the overall frequency range of the Oscillator’s tuning from LO, 32’, 16’, 8’, 4’... -
Page 12: Xmod
The O2-FILTER knob allows OSC 2 to modulate the cutoff frequency of the filter. This means that when you rotate the O2-FILTER knob, the frequency of the filter for the SE-02 will begin to modulate to the wave shape of OSC 2. -
Page 13: Mixer
This is the section where the outputs of OSCILLATOR 1, 2, 3 and NOISE are established and mixed in relation to one another. There is also a FEEDBACK knob which adjusts how much of the SE-02 output is returned to the input of the FILTER section. -
Page 14: Filter
FILTER/ENVELOPES FILTER These settings determine the brightness and thickness of the sound. Here you can also specify the time- varying change (filter envelope) for the filter and the time-varying change (amp envelope) for the volume. The filter is a 24dB/ octave ladder design and again has a very similar layout when compared to a classic analog mono synth filter section, though there are some additional controls like a contour inverting switch, restart on note press and an option to trigger the amp with a gate or the LFO. -
Page 15: Norm/Invert
NORM/INVERT Specifies the polarity of the envelope that is controlled by the CONTOUR knob. If this is set to “INVERT,” the polarity is inverted. This is a very handy way of immediately transforming a sound just by effectively “flipping” the envelope. Experiment:Create a slow attack sound that you like. -
Page 16: Amplifier Envelope
AMPLIFIER ENVELOPE ATTACK Specifies the time (attack time) from when the key is pressed until the cutoff frequency reaches the maximum level. DECAY Specifies the time (decay time) from when the cutoff frequency reaches the maximum level until it decreases to the sustain level. -
Page 17: Lfo
The SE-02 offers LFO control over the filter, the pitch and the volume of its output. Here you can create cyclic change (modulation) in the sound by applying vibrato (pitch modulation) or tremolo (volume modulation). -
Page 18: Mwhl
PWM LFO Since version 1.10, an other LFO have been added to SE-02. It allows to modulates pulse width of the 3 oscillators, using a triangle Wave This LFO applies only on oscillator whose selected waveform is SQUARE WAVE, PULSE WAVE 1 (wide,) or PULSE WAVE 2 (narrow). -
Page 19: Delay
DELAY This section is where the settings for the delay are made. TIME Adjusts the delay time. NOTE:the timing of the delay will change depending on the sync settings in the LFO section. REGEN Sets the number of repeats the delay reports. Setting this to full counter clockwise will produce minimal repeats. -
Page 20: Patch Setup
PATCH SETUP 1. Press the [COMP] button and [PLAY] button to make them light. (both buttons calls the “SETUP”) 2. Use the [1] – [16] buttons to select a parameter, and use the [VALUE] knob to edit the parameter’s value. The main display will indicate the value set. -
Page 21: Iii. Functions For Performance
III. FUNCTIONS FOR PERFORMANCE SEQUENCER MODE The step sequencer lets you input a note at each of up to 16 steps, and play back the notes as a loop. You can change the number of steps between 1 and 16. Up to 128 patterns can be stored. ENTER STEP SEQUENCE MODE Set the mode select switch to SEQ STEP BUTTON [1] - [16]... -
Page 22: Entering Gates
2. Set the SYNC settings for the sequencer as you want them EX: Clocking the SE-02 sequencer from the GATE output of an external sequencer, or other clock source. 3. Set the key trigger (option 3 of the sequencer setup menu) to "TRIGGER"... -
Page 23: Saving A Pattern
Now you can use a K-25m (sold separately) or an external MIDI device such as a MIDI keyboard connected to the SE-02 to record a pattern in real time. Hold down the [PERFORM] button and press the [START/STOP] button. The [PERFORM] button blinks, the metronome sounds, and real time recording starts. -
Page 24: Song Mode
SONG MODE A song consists of 1 - 16 parts. For each part, you can specify a pattern, the number of times that the pattern is repeated, and the sound/patch used during playback. Up to 16 songs can be stored. TO ACCESS SONG MODE Set the mode select switch to SONG TO EXIT SONG MODE... -
Page 25: Changing The Patch
CHANGING THE PATCH Press the PATCH button to make it light. Use the VALUE knob to select the part whose patch you want to change. Press one of the [A] – [C], double click [A] (bank [D]) or USER buttons to select a bank. Use the [0] - [9] buttons to enter a number (1 - 128) - The display shows the patch number. -
Page 26: Song Setup
SONG SETUP 1. Press the EDIT button and PTN button to make them light (both buttons calls the “SETUP” function) 2. Use the [1] - [5] or [9] buttons to select a parameter, and use the VALUE knob to edit the parameter’s value. The display indicates the value BUTTON PARAMETER... -
Page 27: Iv. System Settings
OMn: All messages are received (transmitted on CH1) CHAIN OFF, ON Increase the polyphony by using a MIDI cable to connect two or more SE-02 units and turning chain mode on. AUTO OFF The power does not turn off automatically 30, 240 The power turns off when the set time elapses. -
Page 28: Patch / Sequencer / Song Setup
For Song Setup see page 26 VELOCITY ROUTING By default the VELOCITY is internally routed to the FILTER CONTOUR of the SE-02. This is how velocity is played or received via MIDI. This can be changed by selecting PATCH SETUP page [5] Using the encoder, set amount of velocity generated CONTOUR. -
Page 29: Iv. Cv/Gate/Trigger
Example: The Arturia Keystep offers CV and Gate output. You would connect a mono 3.5mm cable between the CV jack on the back of the SE-02 and the pitch jack of the Keystep. This allows transmission of pitch voltage from the controller (the Keystep) to the sound source (the SE-02.) This is true of all CV/Gate enabled devices. A vintage CSQ-600 will sequence the heck out of the SE-02 as well as a modern SQUARP Pyramid sequencer. -
Page 30: Trigger
3. Play the external sequence. Notice that the sequencer of the SE-02 will only advance to the next step of the pattern when a TRIGGER pulse is received. This means that the timing of the internal sequencer can be made flexible, and very interesting results can come as the result of programming interesting TRIGGER pulses. -
Page 31: Midi
ROLAND BOUTIQUE MIDI Starting with firmware 1.10 the boutique line of modules from Roland are capable of sending CC data and program changes. This means that all the slider and knob movements performed on the front panel of the SE- 02 are cable of transmitting via MIDI for recording into a DAW or MIDI sequencer. -
Page 32: Midi Implementation Chart
MIDI IMPLEMENTATION CHART SE-02Firmware Version 1.11 Function... Transmitted Recognized Remarks Default Basic Changed 1–16, OFF 1–16, OFF Channel Default Mode 4 Mode 4 Mode Messages Altered ********** ********** Note Number : True Voice 0–127 0–127 Velocity Note On Note Off After Key’s Touch... - Page 33 MIDI CC CHART PARAMETER PARAMETER CONTROL GLIDE FLT MTRIG CONTROL GLIDE TYPE FLT NORM/INVERT CONTROL WHEEL FLT REL XMOD O2FLT FLT GATE/LFO XMOD O3TO FLT EMPHASIS XMOD O3PW FLT ATTACK 2 OSC RANGE 2 FLT CUTOFF OSC WAVEFORM 2 FLT DECAY 2 OSC SYNC MOD SENS OSC RANGE 1...
-
Page 34: Quick Memento
FIRMWARE UPDATE: Connect USB cable to computer. While holding down the [8] button, turn the power on. Copy .bin file to se-02 drive. Eject device on USB, disconnect the cable and press [MANUAL] to start update. Power cycle when finished. -
Page 35: Sound Synthesis Memo
SOUND SYNTHESIS MEMO Page 35 of 35 Manual V1.03 for firmware V1.11...