
Related Manuals for Barco IOSONO ONE Series


Summary of Contents for Barco IOSONO ONE Series
- Page 1 IOSONO ONE Installation And User Manual R9801509 R9801506 R9801507 R5906747/00 16/05/2017...
- Page 2 Barco Audio Technologies Erich-Kästner-Str. 1a, 99094 Erfurt, Germany Phone: +49 361 51143 670 Fax: +49 361 51143 677 Support: www.barco.com/en/support Visit us at the web: www.barco.com Barco NV Beneluxpark 21, 8500 Kortrijk, Belgium Phone: +32 56.23.32.11 Fax: +32 56.26.22.62 Support: www.barco.com/en/support Visit us at the web: www.barco.com...
- Page 3 The period of guarantee begins on the date of transfer of risks, in the case of special systems and software on the date of commissioning, at latest 30 days after the transfer of risks. In the event of justified notice of complaint, Barco can repair the fault or provide a replacement at its own discretion within an appropriate period.
-
Page 5: Table Of Contents
Table of contents TABLE OF CONTENTS 1. Introduction ......................3 About This Manual. - Page 6 Table of contents R5906747 IOSONO ONE 16/05/2017...
-
Page 7: Introduction
About This Manual About This manual is subject to the copyright of Barco N.V. All exploitation, publication, reproduction or distribution in whole or in part is forbidden without the prior written permission of Barco N.V.. All rights created by patent grant or registration of a utility model or design patent are reserved. The manufacturer reserves the right to amend this manual at any time and without notice as result of technical progress. - Page 8 1. Introduction R5906747 IOSONO ONE 16/05/2017...
-
Page 9: Safety
2. Safety 2. SAFETY About Read this chapter thoroughly before attempting to install or operate the IOSONO ONE. To prevent personal injury to users or physical damage to the IOSONO ONE while installing and using your IOSONO ONE, ensure that you understand and follow all safety guidelines, instructions and warnings included in this chapter and this manual. General Considerations About The IOSONO ONE is designed for installation in control cabinets. -
Page 10: Warranty
Barco N.V. shall not be liable for any damage arising from the use of the documentation or the hardware and software components. No claims for changes to products already supplied can be asserted on the basis of the statements, illustrations and descriptions in this documentation. -
Page 11: Hardware
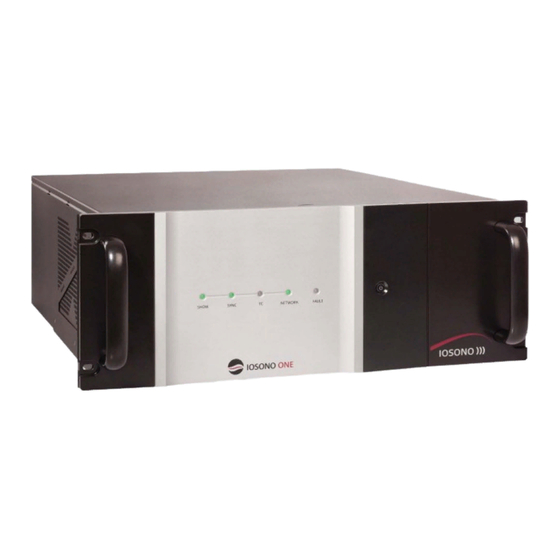
3. Hardware 3. HARDWARE Front Panel Front Panel Image 3-1 The front panel contains the following elements: • Power button with LED • Status LEDs The power button LED and the status LEDs show the current states of the IOSONO ONE. Find out what they stand for in the following lists. -
Page 12: Rear Panel
3. Hardware Network LED Meaning Orange blinking Network command executed (Blinks once, then stays solid) Orange solid Network (cable) connected Fault LED Meaning Dark No error detected Red blinking System error detected, software not running Red solid Software error detected, software running, but in error state Rear Panel Rear Panel Image 3-2... -
Page 13: Control Client Software
4. Control Client Software 4. CONTROL CLIENT SOFTWARE About The Control Client connects a remote computer to the IOSONO ONE. The Control Client Main Window allows access to the File Browser, the Factory Reset options and the Play Config software of the IOSONO ONE. For installation details of the Control Client Software, please see the Quick Start Guide that has been delivered with the IOSONO ONE. -
Page 14: Control Client Main Window
4. Control Client Software 4. Save the file Warning: The used text editor has to be able to create a UNIX textfile. This is not possible with the Windows text editor. You can use for example the free available editor "Notepad++". In this editor you can use the menu entry Edit EOL Conversion UNIX/OSX Format to convert a text file to UNIX mode. -
Page 15: File Browser
4. Control Client Software File Browser About Files can be transmitted from and to the Control Client using the File Browser. To enter the File Browser use the folder button in the lower right corner of the Control Client window. To copy files and folders from the remote computer to the IOSONO ONE, right click on the specific item and choose Upload. -
Page 16: Factory Reset
4. Control Client Software Item No. Element Function Local disx space Shows free disc space of selected local drive IOSONO ONE disc space Shows free disc space of IOSONO ONE Factory Reset About Clear (uploaded) user data and/or restore factory configuration using the arrow button in the lower right corner of the Control Client window (see "Control Client Main Window", page 10). -
Page 17: Play Config Software
5. Play Config Software 5. PLAY CONFIG SOFTWARE Head Display And Navigation Head Display And Navigation Image 5-1 Head display and Navigation Bar of the Play Config software Item No. Element Function Position Timestamp of playback position of active clip Clip Name of active clip System Name... -
Page 18: Main Page
5. Play Config Software Main Page Main Page Image 5-2 Main page of Play Config Item No. Element Function Playlist Displays content of current clip list Back Switches to previous clip within the playlist Play Starts the playback of the current clip. During playback the button changes to pause button Stop Stops the playback of the current clip and resets the position to the beginning... -
Page 19: Status Page
5. Play Config Software Status Page About Image 5-3 Status page of Play Config Item No. Element Function Sync Sources Shows current sync state and sample rate of the IOSONO ONE. Channel count and type of indicators depend on the hardware configuration of the used IOSONO Inputs level meters Level meters for all audio inputs Input expand... -
Page 20: Clip Lists Tab
5. Play Config Software 5.4.1 Clip Lists Tab Clip Lists Tab Image 5-4 Clip list tab in system setup of Play Config Item No. Element Function Clip lists Overview and selection of available clip lists New Clip list Create a new, empty clip list Delete Clip list Delete selected clip list Rename Clip list... - Page 21 5. Play Config Software Image 5-5 Edit clip dialog Item No. Element Function Clip info Format information of the selected clip Title Name of the selected clip Length Length of the selected clip Channels Number of sources of the selected clip Start Timecode Considering start time code of the clip list and duration of previous clips Gain...
-
Page 22: Audio Tab
5. Play Config Software 5.4.2 Audio Tab Audio Tab Image 5-6 Audio tab in system setup of Play Config Item No. Element Function Synchronization Set the audio clock source reference. When clock source is set to signal, the desired AES audio input channel can be selected Sample Rate Select sample rate in case of an AES audio configuration Frame Rate... -
Page 23: Network Tab
5. Play Config Software 5.4.3 Network Tab Network Tab Image 5-7 Network tab in system setup of Play Config Item No. Element Function IP Address IP Address of the IOSONO ONE. Factory setting is 192.168.1.1 Net Mask Subnet Mask for the IP connection. Factory setting is 255.255.255.0 Gateway Network Gateway for the IP connection Factory setting is 0.0.0.0 DHCP... -
Page 24: System Tab
5. Play Config Software 5.4.4 System Tab System Tab Image 5-8 System tab in system setup of Play Config Item No. Element Function System Name Customizable name of the current IOSONO ONE system. The name will be display at the head display of the Play Config software to clearly identify a system if more units are used. -
Page 25: Restore Backup
5. Play Config Software 5.4.5 Restore Backup Restore Backup Image 5-9 Restore backup page of Play Config Item No. Element Function Internal Hard Disk Search for backups to restore at IOSONO ONE internal hard disk External Hard Disk Search for backups to restore from a USB storage device connected to USB connector on the rear side of the IOSONO ONE Include Clips Includes the audio content (audio clips) from the backup... -
Page 26: Create Backup
5. Play Config Software Create Backup Create Backup Image 5-10 Create backup page Item No. Element Function Internal Hard Disk Save backup at the IOSONO ONE internal hard disk External Hard Disk Save backups to a USB storage device connected to USB connector at the backpanel of the IOSONO ONE Disc space info Shows Available space at the selected storage device and needed space for the... -
Page 27: Use Cases
This section describes how to update the Play Config software running on the IOSONO ONE. Software updates are provided by Barco upon request. The software update function can be found at the System Tab of the setup menu, "System Tab", page 20. -
Page 28: Noise Sequence
6. Use Cases Image 6-1 Load IOSONO CORE configuration dialog When the audio I/O of the IOSONO CORE that has been used to create the configuration is different from the IOSONO ONE used (e.g. IOSONO CORE-M vs. IOSONO ONE-A) the audio I/O gets automatically adapted to the IOSONO ONE. -
Page 29: Create And Play A Clip List
6. Use Cases Image 6-2 Audio tab with active Noise sequence in Setup page of Play Config To play back the noise sequence 1. Go to the Audio Tab on the setup page (wrench symbol). 2. Press Activate in Noise Sequence - the output level meters in the Status page (i symbol) indicate output level on a single channel. -
Page 30: Remote Control From External Media Controllers
6. Use Cases 2. Press Play to start the playback Note: The name and the current position of the played clip are displayed in the head display 3. Press the Pause button to stop and resume the playback 4. Press the Back and Next buttons to select other clips for playback 5. -
Page 31: Passthrough Mode
6. Use Cases Passthrough Mode About The IOSONO ONE has a passthrough mode that bypasses the processing and routes all audio inputs to their corresponding outputs, which is useful for system commissioning and content production using an IOSONO ONE. The passthrough mode can be activated by hitting the Passthrough button in the head display. - Page 32 6. Use Cases R5906747 IOSONO ONE 16/05/2017...
-
Page 33: Technical Specifications
7. Technical Specifications 7. TECHNICAL SPECIFICATIONS About The information in this section is subject to change without notice. For current technical information, visit the product website or contact your sales support representative. Technical Specifications Of The IOSONO ONE Specification And Technical Data Housing 19 in. - Page 34 7. Technical Specifications R5906747 IOSONO ONE 16/05/2017...
-
Page 35: Environmental Information
For more information about recycling of this product, please contact your local city office or your municipal waste disposal service. For details, please visit the Barco website at: http://www.barco.com/en/AboutBarco/weee...