Table of Contents
Advertisement
Available languages
Available languages
Quick Links
®
BEWÄSSERUNGSCOMPUTER / PROGRAMMABLE
WATER TIMER / PROGRAMMATEUR D'ARROSAGE
BEWÄSSERUNGSCOMPUTER
Bedienungs- und Sicherheitshinweise
PROGRAMMATEUR D'ARROSAGE
Instructions d'utilisation et consignes de sécurité
ZAVLAŽOVACÍ POČÍTAČ
Pokyny pro obsluhu a bezpečnostní pokyny
PROGRAMADOR DE REGA
Instruções de utilização e de segurança
IAN 282463
PROGRAMMABLE WATER TIMER
Operation and Safety Notes
BESPROEIINGSCOMPUTER
Bedienings- en veiligheidsinstructies
PROGRAMADOR DE RIEGO
Instrucciones de utilización y de seguridad
Advertisement
Chapters
Table of Contents

Related Manuals for Parkside 282463


Summary of Contents for Parkside 282463
- Page 1 PROGRAMMATEUR D’ARROSAGE BESPROEIINGSCOMPUTER Instructions d‘utilisation et consignes de sécurité Bedienings- en veiligheidsinstructies ZAVLAŽOVACÍ POČÍTAČ PROGRAMADOR DE RIEGO Pokyny pro obsluhu a bezpečnostní pokyny Instrucciones de utilización y de seguridad PROGRAMADOR DE REGA Instruções de utilização e de segurança IAN 282463...
- Page 2 DE / AT / CH Bedienungs- und Sicherheitshinweise Seite GB / IE Operation and Safety Notes Page FR / BE Instructions d‘utilisation et consignes de sécurité Page NL / BE Bedienings- en veiligheidsinstructies Pagina 34 Pokyny pro obsluhu a bezpečnostní pokyny Strana Instrucciones de utilización y de seguridad Página 53...
- Page 4 ca. 2 Sek.
-
Page 5: Table Of Contents
Einleitung ............................Seite Bestimmungsgemäße Verwendung .......................Seite Lieferumfang ............................Seite Technische Daten ...........................Seite Teilebeschreibung ..........................Seite Displayanzeigen ............................Seite Sicherheit ............................Seite Sicherheitshinweise ..........................Seite Sicherheitshinweise für Batterien / Akkus ....................Seite Batterien einlegen / wechseln ...................Seite Inbetriebnahme ..........................Seite 10 Betrieb ..............................Seite 10 Produkt ein- / ausschalten ........................Seite 10 Uhrzeit einstellen ............................Seite 11 Bewässerung 1 und 2, Intervall programmieren..................Seite 11 Manuelle Bewässerung .........................Seite 12... -
Page 6: Einleitung
Bewässerungscomputer 1 Adapter 33,3 mm auf 26,5 mm (G1” auf G¾”) 1 Sieb 2 Batterien 1,5 V Typ AA Einleitung 1 Bedienungsanleitung Wir beglückwünschen Sie zum Kauf Ihres neuen Technische Daten Produkts. Sie haben sich damit für ein hochwertiges Produkt entschieden. Die Bedienungsanleitung ist Teil dieses Produkts. -
Page 7: Sicherheit
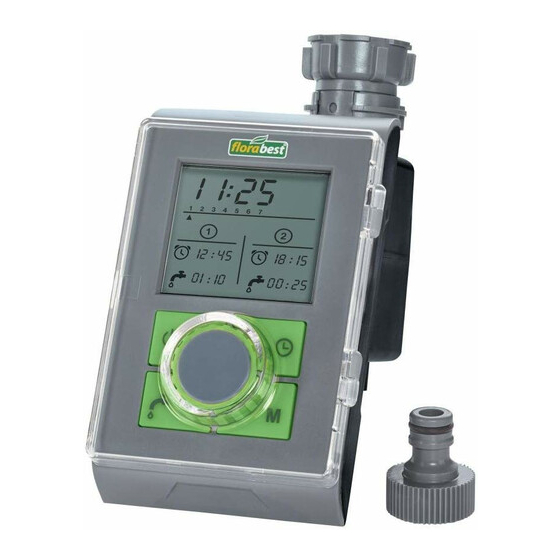
BEWAHREN SIE ALLE SICHERHEITS- Displayanzeigen (Abb. B) HINWEISE UND ANWEISUNGEN FÜR DIE ZUKUNFT AUF! Anzeige Bedeutung Systemzeit Bewässerung / manuelle Bewässerung LEBENS- UND UN- Batteriezustand FALLGEFAHR FÜR KLEIN- Bewässerungsintervall KINDER UND KINDER! Lassen Bewässerung 1 Startzeit Bewässerung 1 Sie Kinder niemals unbeaufsichtigt Dauer Bewässerung 1 mit dem Verpackungsmaterial. -
Page 8: Sicherheitshinweise Für Batterien / Akkus
Kindern ohne Beaufsichtigung Richten Sie den Wasserstrahl nicht durchgeführt werden. auf Personen oder Tiere! Eine Reparatur des Produktes Das Produkt ist nicht zur Trinkwas- während der Garantiezeit darf serentnahme geeignet. nur von einem vom Hersteller autorisierten Kundendienst vorge- Sicherheitshinweise für nommen werden, sonst besteht Batterien / Akkus bei nachfolgenden Schäden kein... -
Page 9: Batterien Einlegen / Wechseln
Sie nicht alte Batterien / Akkus Risiko des Auslaufens der mit neuen! Batterien Entfernen Sie die Batterien / Vermeiden Sie extreme Beding- Akkus, wenn das Produkt längere ungen und Temperaturen, die auf Zeit nicht verwendet wird. Batterien / Akkus einwirken können z. -
Page 10: Inbetriebnahme
Inbetriebnahme muss das Gewinde des Wasserhahns mit Dich- tungsband umwickelt werden. Für einen sicheren und fehlerfreien Betrieb des Öffnen Sie zur Bedienung des Produktes den Produktes muss der Installationsort folgende Voraus- Schutzdeckel . Schließen Sie den Schutz- setzungen erfüllen: deckel danach wieder vollständig. -
Page 11: Uhrzeit Einstellen
Uhrzeit einstellen (Abb. 2–6) Drücken Sie die Taste erneut. Die Minuten- anzeige Startzeit Bewässerung 1 blinkt. Stellen 1. Schalten Sie das Produkt ein. Drücken und halten Sie die Minuten durch Drehen des Einstellrades Sie die Taste EIN / AUS für ca. 2 Sekunden. ein. -
Page 12: Manuelle Bewässerung
grammiermodus zurückspringen, um Änder- Wechseln Sie die Batterien wie im Kapitel ungen an den programmierten Werten vorzu- „Batterien einlegen / wechseln“ beschrieben. Hinweise: Während die Anzeige nehmen. blinkt ist Hinweis: Nach ca. 1 Minute ohne Eingabe keine Bewässerung möglich. Eine eventuell gerade kehrt das Produkt in den Standby-Modus zurück. -
Page 13: Reinigung Und Pflege
Fehler Mögliche Lösung Entnehmen Sie das kegelförmige Sieb aus dem Ursache Wasserzulauf in der Überwurfmutter. Reinigen Sie das Sieb. Bewässerung Wasserhahn Öffnen Sie den Setzen Sie das Sieb wieder ein. startet nicht geschlossen Wasserhahn Schrauben Sie die Überwurfmutter auf das Falsche Pro- Prüfen Sie Gewinde des Wasserhahns bzw. -
Page 14: Garantie
behandlung. Das Triman-Logo gilt nur für durch unsere im Folgenden dargestellte Garantie Frankreich. nicht eingeschränkt. Möglichkeiten zur Entsorgung des ausge- Sie erhalten auf dieses Produkt 3 Jahre Garantie ab dienten Produkts erfahren Sie bei Ihrer Kaufdatum. Die Garantiefrist beginnt mit dem Kauf- Gemeinde- oder Stadtverwaltung. - Page 15 Introduction ............................Page 16 Intended Use ............................Page 16 Scope of delivery ...........................Page 16 Technical Data ............................Page 16 Parts description .............................Page 16 Display indicators ...........................Page 17 Safety ..............................Page 17 Safety instructions ...........................Page 17 Safety instructions for batteries / rechargeable batteries ..............Page 18 Inserting / replacing batteries ...................Page 19 Initial use...
-
Page 16: Introduction
Programmable Water Timer Technical Data Model No.: HG00549 Introduction Operating pressure: 34.5–827 kPa (0.34–8.27 bar) We congratulate you on the purchase of your new Max. water temperature: 40°C product. You have chosen a high quality product. Power supply: 2 x 1.5 V (direct cur- The instructions for use are part of the product. -
Page 17: Display Indicators
KEEP ALL THE SAFETY ADVICE Display indicators (Fig. B) AND INSTRUCTIONS IN A SAFE PLACE FOR FUTURE REFERENCE! Display Meaning System time Irrigation / manual irrigation Battery status DANGER TO LIFE AND Irrigation interval RISK OF ACCIDENT FOR Irrigation 1 INFANTS AND CHILDREN! Start time irrigation 1 Never leave children unsupervised... -
Page 18: Safety Instructions For Batteries / Rechargeable Batteries
Any repairs during the warranty Safety instructions for period must be performed by a batteries / rechargeable manufacturer authorised service batteries centre, or the warranty will be void if subsequent damages DANGER TO LIFE! Keep bat- occur. teries / rechargeable batteries out Always replace defective parts of reach of children. -
Page 19: Inserting / Replacing Batteries
Avoid contact with the skin, eyes When inserting ensure the correct and mucous membranes. In the polarity! This is shown inside the event of contact with battery acid, battery compartment! thoroughly flush the affected area Clean the contacts on the battery with plenty of clean water and and in the battery compartment seek immediate medical attention. -
Page 20: Operation
Switching the product on / off Note: Such mains adapters are available from (Fig. 1) speciality retailers. Check the water connection type available. The product is fitted with a union nut for a tap Press and hold down the ON / OFF button with a 33.3 mm thread (G 1”). -
Page 21: Manual Irrigation
Irrigation interval (1 = every day, 2 = every 2nd system time and duration of irrigation ( day, etc.) ) will flash. Note: By briefly pressing the Standby (programming mode ended and automatic button irrigation activated) can jump back a step in programming mode to change the programmed values. -
Page 22: Troubleshooting
Cleaning and Care Note: If the display flashes, irrigation is not possible. Irrigation which may be occurring will Attention! Potential damage to the product. be interrupted. Programming will be saved for 2 minutes. If chan- Moisture entering the product may result in damage. ging the batteries takes longer, all settings must be Ensure no moisture enters the battery compartment selected again. -
Page 23: Disposal
Disposal Batteries must not be disposed off with domestic waste. They may contain toxic heavy metals and The packaging is made entirely of recy- are subject to hazardous waste treatment rules and clable materials, which you may dispose regulations. The chemical symbols of the heavy met- of at local recycling facilities. - Page 24 Introduction ............................Page 25 Utilisation conforme ..........................Page 25 Contenu de la livraison ..........................Page 25 Caractéristiques techniques ........................Page 25 Description des pièces et éléments .......................Page 25 Affichages sur l‘écran ..........................Page 26 Sécurité ..............................Page 26 Consignes de sécurité ..........................Page 26 Consignes de sécurité relatives aux piles / aux piles rechargeables ..........Page 27 Insérer / remplacer les piles ....................Page 29 Mise en marche...
-
Page 25: Introduction
Programmateur d’arrosage 1 tamis 2 piles 1,5 V de type AA 1 mode d’emploi Introduction Caractéristiques techniques Nous vous félicitons pour l‘achat de votre nouveau produit. Vous avez opté pour un produit de grande qualité. Le mode d‘emploi fait partie intégrante de N°... -
Page 26: Affichages Sur L'écran
Toute responsabilité est déclinée Adaptateur 33,3 mm sur 26,5 mm (G1” sur pour les dommages matériels ou G¾”) Pièce d‘accouplement corporels causés par une manipula- tion incorrecte du produit ou par Affichages sur l‘écran (ill. B) le non-respect des consignes de sécurité ! Affichage Signification... -
Page 27: Consignes De Sécurité Relatives Aux Piles / Aux Piles Rechargeables
de connaissances, s‘ils sont sur- Vérifiez régulièrement le bon veillés ou s‘ils ont été informés de fonctionnement et l‘étanchéité du l‘utilisation sûre du produit et produit, ainsi que de ses conduites. comprennent les risques liés à N‘orientez jamais le jet d‘eau son utilisation. - Page 28 rechargeables au feu ou dans En cas de fuite des piles, retirez-les l’eau. aussitôt du produit pour éviter Ne pas soumettre les piles / tout endommagement. piles rechargeables à une charge Utilisez uniquement des piles / mécanique. piles rechargeables du même type.
-
Page 29: Insérer / Remplacer Les Piles
Insérer / remplacer les piles Placez le tamis dans l‘écrou-raccord comme représenté sur l‘illustration A. Ouvrez le compartiment à piles Pour le filetage 26,5 mm (G ¾”): Vissez l‘adap- Insérez 2 piles de taille AA (LR06 / Mignon) tateur sur le robinet d‘eau. N‘utilisez à cet dans le compartiment à... -
Page 30: Mise En Marche / Arrêt Du Produit
Mise en marche / arrêt du Heure de démarrage de l‘arrosage 1 produit (ill. 1) Durée de l‘arrosage 1 Heure de démarrage de l‘arrosage 2 Appuyez et maintenez la touche ON / OFF Durée de l‘arrosage 2 pour env. 2 secondes, afin d‘allumer ou Intervalle d‘arrosage (1 = chaque jour, 2 = tous les d‘éteindre le produit. -
Page 31: Arrosage Manuel
Appuyez à nouveau sur la touche . L‘affi- La durée paramétrée de l‘arrosage manuel est enre- chage de la flèche pour l‘intervalle d‘arrosage gistrée, et automatiquement utilisée lors du prochain clignote. Réglez l‘intervalle en tournant le bou- arrosage manuel. ton régleur (1 = chaque jour, 2 = tous les 2 jours etc.). -
Page 32: Nettoyage Et Entretien
Dysfonc- Causes Solution Laissez le produit fonctionner au ralenti avec tionnement possibles l‘arrosage manuel. Vissez l‘écrou-raccord sur le filetage du robi- Pas d'affi- Aucune pile Insérez des net d‘eau ou de l‘adaptateur. chage sur insérée piles Enlevez le tamis en forme de cône de l‘alimen- l'écran Les piles sont Remplacez les... -
Page 33: Garantie
Garantie Le produit et les matériaux d’emballage sont recyclables, mettez-les au rebut séparément pour un meilleur traitement Le produit a été fabriqué selon des critères de qualité des déchets. Le logo Triman n’est valable stricts et contrôlé consciencieusement avant sa livrai- qu’en France. - Page 34 Inleiding ............................Pagina 35 Correct gebruik ..........................Pagina 35 Omvang van de levering ........................Pagina 35 Technische gegevens ......................... Pagina 35 Beschrijving van de onderdelen ......................Pagina 35 Displayweergaven ..........................Pagina 36 Veiligheid ............................Pagina 36 Veiligheidsinstructies .......................... Pagina 36 Veiligheidsinstructies voor batterijen / accu‘s ...................
-
Page 35: Inleiding
Besproeiingscomputer 2 batterijen 1,5 V, type AA 1 bedieningshandleiding Inleiding Technische gegevens Hartelijk gefeliciteerd met de aankoop van uw nieuwe product. U heeft voor een hoogwaardig product ge- Modelnr.: HG00549 kozen. De gebruiksaanwijzing is een deel van het Werkdruk: 34,5–827 kPa product. -
Page 36: Displayweergaven
BEWAAR ALLE VEILIGHEIDSIN- Displayweergaven (afb. B) STRUCTIES EN AANWIJZINGEN OM DEZE LATER TE KUNNEN Display Betekenis Systeemtijd RAADPLEGEN! Beregening / handmatige beregening Batterijstatus Beregeningsinterval Beregening 1 LEVENSGEVAAR EN KANS Starttijd beregening 1 OP ONGEVALLEN BIJ Duur beregening 1 KLEUTERS EN KINDEREN! Beregening 2 Starttijd beregening 2 Laat kinderen nooit zonder toe-... -
Page 37: Veiligheidsinstructies Voor Batterijen / Accu's
Kinderen mogen niet met het pro- Richt de waterstraal niet op per- duct spelen. Reiniging en onder- sonen of dieren! houd mag niet door kinderen Het product is niet geschikt voor zonder toezicht worden uitge- het tappen van drinkwater. voerd. Laat een reparatie tijdens de Veiligheidsinstructies garantietermijn alleen door een... -
Page 38: Batterijen Plaatsen / Vervangen
de batterijen / accu‘s zouden Risico op beschadiging van kunnen hebben bijv. radiatoren / het product direct zonlicht. Gebruik uitsluitend het aangege- Vermijd contact met huid, ogen ven type batterij / accu! en slijmvliezen! Spoel in geval Let bij het plaatsen op de juiste van contact met batterijzuur de polariteit! Deze wordt aangege- desbetreffende plekken direct af... -
Page 39: Bedrijf
Bedrijf De minimale bedrijfstemperatuur bedraagt +5 °C. Gebruik alleen helder zoet water. Met de beregeningscomputer kan op elk moment Sluit het product alleen verticaal, met de slan- van de dag volledig automatisch worden beregend. gaansluiting naar beneden aan, om het Voor de beregening kunnen sprinklers, een sprinkler- indringen van water in het batterijvak systeeminstallatie of een druppelbevloeiingssysteem... -
Page 40: Beregening 1 En 2, Interval Programmeren
Opmerking: houd er rekening mee dat u de 5. Stel de minuten in door aan de draaiknop te draaien. duur van de beregening programmeert, en niet 6. Druk ter afsluiting op toets om op te slaan. de eindtijd! Hieronder enkele voorbeelden van mogelijke instellingen / duur van de beregening: Beregening 1 en 2, interval 0:05 = 5 minuten... -
Page 41: Weergave Batterijstatus
direct, de –weergave achter de systeemtijd Verwijder in dit geval de batterijen uit het batterijvak knippert. en plaats deze na 10 minuten opnieuw. Hierdoor Druk op de toets om de duur van de hand- wordt het product volledig teruggezet. Daarna is matige beregening in te stellen. -
Page 42: Zeef Reinigen
Gebruik in geen geval benzine, alcohol of Neem de aanduiding van de verpakkings- andere agressieve middelen voor de reiniging materialen voor de afvalscheiding in acht. van de behuizing. Deze zijn gemarkeerd met de afkortingen (a) en een cijfers (b) met de volgende betekenis: 1–7: kunststoffen / 20–22: Zeef reinigen papier en vezelplaten / 80–98:... -
Page 43: Garantie
verbruikte batterijen daarom af bij een gemeentelijk inzamelpunt. Garantie Het product wordt volgens strenge kwaliteitsrichtlijnen zorgvuldig geproduceerd en voor levering grondig getest. In geval van schade aan het product kunt u rechtmatig beroep doen op de verkoper van het product. Deze wettelijke rechten worden door onze hierna vermelde garantie niet beperkt. - Page 44 Úvod ..............................Strana 45 Použití ke stanovenému účelu......................Strana 45 Obsah dodávky ..........................Strana 45 Technické údaje ..........................Strana 45 Popis dílů .............................Strana 45 Zobrazení na displeji ..........................Strana 46 Bezpečnost .............................Strana 46 Bezpečnostní pokyny ..........................Strana 46 Bezpečnostní pokyny pro baterie a akumulátory ................Strana 47 Vložení...
-
Page 45: Úvod
Zavlažovací počítač Technické údaje Model č.: HG00549 Úvod Provozní tlak: 34,5–827 kPa (0,34–8,27 bar) Blahopřejeme Vám ke koupi nového výrobku. Rozhodli Maximální teplota vody: 40 °C jste se pro kvalitní produkt. Návod k obsluze je sou- Napájení: 2 x 1,5 V částí... -
Page 46: Zobrazení Na Displeji
USCHOVEJTE SI VŠECHNY BEZ- Zobrazení na displeji (obr. B) PEČNOSTNÍ UPOZORNĚNÍ A POKYNY PRO BUDOUCNOST! Zobrazení Význam Systémový čas Zavlažování / manuální Zavlažování BEZPEČÍ OHROŽENÍ Stav baterie ŽIVOTA A ZRANĚNÍ MA- Interval zavlažování LÝCH A VELKÝCH DĚTÍ! Ne- Zavlažování 1 Start zavlažování... -
Page 47: Bezpečnostní Pokyny Pro Baterie A Akumulátory
servis, jinak se za následné škody případě spolknutí okamžitě neručí. vyhledejte lékařskou pomoc! NEBEZPEČÍ VÝBU- Vadné díly se smí nahrazovat jen CHU! Nenabíjecí baterie originálními náhradními díly. Jen tyto díly zaručují splnění bezpeč- nikdy znovu nenabíjejte. Akumu- nostních požadavků. látory nebo baterie nezkratujte Chraňte výrobek před přímým ani je neotevírejte. -
Page 48: Vložení A Výměna Baterií
Vybité baterie nebo akumulátory NOSTE OCHRANNÉ ihned vyjměte z výrobku. RUKAVICE! Vyteklé i poškozené baterie nebo akumulá- tory mohou při kontaktu s pokož- Vložení a výměna baterií kou způsobit její poleptání. Noste proto vhodné rukavice. Otevřete přihrádku na baterie V případě vytečení ihned baterie Vložte 2 baterie, typu AA (LR06 / mignon), do přihrádky na baterie . -
Page 49: Provoz
Nasaďte sítko do převlečné matky podle výrobku je ale možné zavlažovat manuálně (podle znázornění na obrázku A. popisu v kapitole „Manuální zavlažování“). Pro závit 26,5 mm (G ¾”): našroubujte adaptér na vodovodní kohoutek. Nepoužívejte přitom Nastavení času (obr. 2–6) žádné nářadí. Našroubujte převlečnou matku na závit vodovodního kohoutku resp. -
Page 50: Manuální Zavlažování
Upozornění: po 1 minutě bez zadání hodnoty Stiskněte v režimu programování znovu tlačítko . Zobrazení hodiny startu zavlažování se výrobek vrátí do pohotovostního režimu. 1 bliká. Nastavte hodinu otáčením nastavova- Všechny již programované hodnoty zůstanou cího kolečka zachované. Stiskněte znovu tlačítko . -
Page 51: Odstranění Poruch
Čistění a ošetřování Programované hodnoty se na 2 minuty uloží do paměti. Jestliže trvá výměna baterií déle, musí se POZOR! Možná poškození výrobku. všechny hodnoty znovu programovat. Vniknutí vlhkosti může vést k poškození výrobku. Dávejte při čištění pozor, aby se do přihrádky na Odstranění... -
Page 52: Odstranění Do Odpadu
Škody na životním prostředí způ- Skladujte výrobek v suchém prostředí při teplotách nad bodem mrazu. sobené nesprávným odstraněním baterií do odpadu! Odstranění do odpadu Baterie se nesmí vyhazovat do domovního odpadu. Mohou obsahovat jedovaté těžké kovy a musí se Obal se skládá z ekologických materiálů, zpracovávat jako zvláštní... - Page 53 Introducción ..........................Página 54 Uso adecuado ........................... Página 54 Contenido ............................Página 54 Características técnicas ........................Página 54 Descripción de los componentes ...................... Página 54 Visualizaciones de pantalla ......................Página 55 Seguridad ............................Página 55 Indicaciones de seguridad ........................ Página 55 Indicaciones de seguridad sobre las pilas / baterías ..............
-
Page 54: Introducción
Programador de riego 2 pilas 1,5V, tipo AA 1 manual de instrucciones Introducción Características técnicas Enhorabuena por la adquisición de su nuevo pro- ducto. Ha elegido un producto de alta calidad. N.º de modelo: HG00549 Familiarícese con el producto antes de la primera Presión de servicio: 34,5–827 kPa puesta en funcionamiento. -
Page 55: Visualizaciones De Pantalla
En caso de que el manejo inadecuado Adaptador 33,3 mm en 26,5 mm (G1” en G¾”) del producto o el incumplimiento de Pieza de acoplamiento las indicaciones de seguridad pro- voquen daños materiales o perso- Visualizaciones de pantalla (fig. B) nales, ¡no se asumirá... -
Page 56: Indicaciones De Seguridad Sobre Las Pilas / Baterías
de conocimientos, siempre y Cierre siempre el grifo de agua cuando se les haya enseñado cuando no vaya a seguir utili- cómo utilizar el producto de zando el producto forma segura y hayan compren- No utilice el aparato cerca de dido los peligros que pueden llamas abiertas. - Page 57 nunca pilas no recargables. No al entrar en contacto con la piel. ponga las pilas / baterías en cor- Por tanto, es imprescindible el uso tocircuito ni tampoco las abra. Es- de guantes de protección en es- tas podrían recalentarse, explotar tos casos.
-
Page 58: Colocar / Cambiar Las Pilas
Colocar / cambiar las pilas Coloque el filtro en la tuerca de unión tal y como se muestra en la figura A. Abra el compartimento de las pilas Para roscas de 26,5 mm (G ¾”): encaje el Coloque 2 pilas tamaño AA (LR06 / Mignon) adaptador al grifo. -
Page 59: Encender / Apagar El Producto
Encender / apagar el Hora de inicio riego 1 producto (fig. 1) Duración del riego 1 Hora de inicio riego 2 Para encender o apagar el producto presione Duración del riego 2 el botón de ENCENDIDO / APAGADO Intervalo de riego (1 = cada día, 2 = cada durante aprox. -
Page 60: Riego Manual
Visualización del estado Vuelva a pulsar el botón . El producto de la batería cambia al modo de standby. El riego comen- zará automáticamente a la hora programada. Durante el tiempo de riego parpadea el indica- Si las pilas están casi o totalmente gastadas parpa- tras la hora del sistema y el tiempo de deará... -
Page 61: Limpieza Y Conservación
Problema Posible Solución Enrosque la tuerca de unión a la rosca del grifo causa o del adaptador. Abra el grifo de agua. El riego no se El grifo está Abra el grifo de inicia cerrado agua Programación Revise la pro- Almacenamiento errónea gramación... -
Page 62: Garantía
Para obtener información sobre las indicada) no supone una restricción de dichos dere- posibilidades de desecho del producto chos legales. al final de su vida útil, acuda a la admi- nistración de su comunidad o ciudad. Este producto dispone de una garantía de 3 años desde la fecha de compra. - Page 63 Introdução ............................. Página 64 Utilização adequada ......................... Página 64 Material fornecido ..........................Página 64 Dados técnicos ........................... Página 64 Descrição das peças ......................... Página 64 Indicações no visor ..........................Página 65 Segurança ..........................Página 65 Indicações de segurança ........................Página 65 Indicações de segurança relativas às pilhas / baterias ..............
-
Page 64: Pilas 1,5V, Tipo Aa
Programador de rega Dados técnicos Modelo-Nr.: HG00549 Introdução Pressão de operação: 34,5–827 kPa (0,34–8,27 bar) Damos-lhe os parabéns pela aquisição do seu novo Temperatura máxima produto. Acabou de adquirir um produto de grande da água: 40°C qualidade. Familiarize-se com o aparelho antes da Tensão de alimentação: 2 x 1,5 V (Corrente... -
Page 65: Indicações No Visor
GUARDE TODAS AS INDICAÇÕES Indicações no visor (Fig. B) DE SEGURANÇA E INSTRUÇÕES PARA FUTURAS UTILIZAÇÕES! Indicação Significado Hora do sistema Irrigação / Irrigação manual PERIGO Estado da bateria DE MORTE E DE Intervalo de irrigação ACIDENTE PARA BEBÉS E Irrigação 1 CRIANÇAS! Nunca deixe as Hora de inicio da irrigação 1... -
Page 66: Indicações De Segurança Relativas Às Pilhas / Baterias
Um reparo do produto durante o Indicações de segurança relativas período de garantia somente pode às pilhas / baterias ser feito pela assistência ao cliente autorizada pelo fabricante, caso PERIGO DE MORTE! Mantenha contrário pode ser que a garantia as pilhas e baterias fora do al- não seja aplicada em caso de cance das crianças. -
Page 67: Inserir / Substituir As Pilhas
ex. elementos de batterie / gli Perigo de dano ao produto solar direta. Utilize apenas o tipo de pilha ou Evite o contacto com a pele, olhos bateria indicado! e mucosas! Em caso de contacto Ao colocar as pilhas, tenha em com o ácido das pilhas, lave ime- atenção a polaridade correta! diatamente as zonas afetadas... -
Page 68: Operação
A temperatura mínima de operação é de Programe irrigação como descrito no capítulo +5 °C. „Operação“. Somente utilize água doce clara. Somente instale o produto na vertical com a co- Operação nexão de mangueira para baixo, para evitar a entrada de água no compartimento de pilhas Com o computador de irrigação, pode ser irrigado ATENÇÃO! O computador de irrigação so- a qualquer momento e completamente automatica-... -
Page 69: Irrigação 1 E 2, Programar Intervalos
Aviso: Esteja atento para o fato de que estás 4. Prima a tecla . O indicador de minutos do sistema pisca. programando a duração da irrigação e não a 5. Ajuste os minutos girando a roda de ajuste hora de encerrar! 6. -
Page 70: Indicador De Estado Da Bateria
Para ajustar a duração da irrigação manual, e coloque novamente após 10 minutos. Através prima a tecla . O indicador de hora pisca. disso, o produto volta completamente à programa- Ajuste as horas girando a roda de ajuste ção original. Após isso, o produto está pronto para Prima novamente a tecla . -
Page 71: Limpar Peneira
Limpar peneira seguinte significado: 1–7: Plásticos / 20–22: Papel e papelão / 80–98: A peneira precisa ser verificada regularmente Materiais compostos. e limpa caso necessário. Feche a torneira de água. O produto e materiais de embalagem Deixe o produto esvaziar através de irrigação são recicláveis, elimine-os separadamente manual. -
Page 72: Garantia
Garantia O producto foi cuidadosamente fabricado segundo rigorosas directivas de qualidade e meticulosamente testado antes da sua distribuição. Em caso de falhas deste producto, possui direitos legais relativamente ao vendedor do producto. Os seus direitos legais não estão limitados pela garantia representada de seguida. - Page 75 ca. 3 Sek.
- Page 76 Version: 02 / 2017 Stand der Informationen · Last Information Update · Version des informations · Stand van de informatie · Stav informací · Estado de las informaciones · Estado das informações: 01 / 2017 · Ident.-No.: HG00549012017-8 IAN 282463...