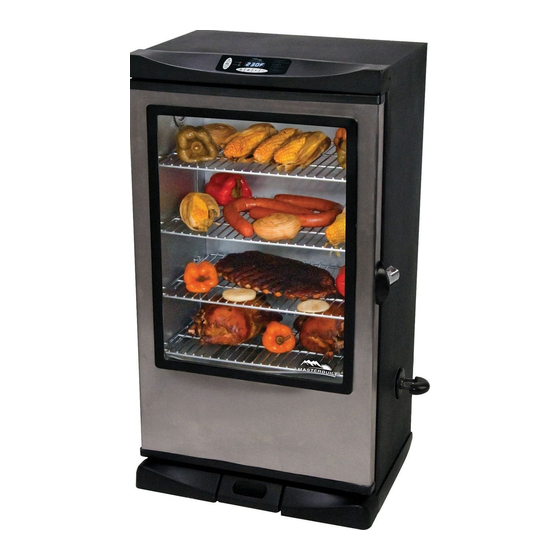
Masterbuilt 20072612 Assembly, Care & Use Manual
Electric smoker
Hide thumbs
Also See for 20072612:
- Assembly, care & use manual (21 pages) ,
- Assembly, care & use manual (10 pages) ,
- Assembly, care & use manual (20 pages)
Advertisement
Table of Contents
- 1 General Warnings and Safety Information
- 2 Parts List
- 3 Hardware List
- 4 Assembly
- 5 Pre-Season Instructions
- 6 How to Use Wood Chip Loader
- 7 How to Use Control Panel & Remote Control
- 8 To Set Temperature
- 9 To Set Timer
- 10 To Use Meat Probe
- 11 To Replace Batteries
- 12 To Test Frequency Range
- 13 Troubleshooting
- 14 Troubleshooting Guide
- 15 Important Facts about Using Smoker
- 16 How to Clean Smoker
- Download this manual
Advertisement
Table of Contents
Troubleshooting

Related Manuals for Masterbuilt 20072612


Summary of Contents for Masterbuilt 20072612
- Page 5 PART NO DESCRIPTION PART NO DESCRIPTION...
- Page 6 MODELS 20072612, 20072712 PART NO REPLACEMENT PART ITEM NO...
- Page 7 **Some assembly steps may already be completed due to pre-assembly at the factory.** STEP 1 Remove all components on inside of smoker before beginning assembly. Carefully position smoker on side as shown. Alternatively, the smoker can be positioned upside down for assembly. However, make sure styrofoam packaging remains on top to prevent damage to control...
- Page 8 STEP 3 STEP 4...
- Page 9 STEP 5 Note: TENSION NUT STEP 6 Carefully position smoker as shown. Note:...
- Page 10 STEP 7 ST4x10 STEP 8...
- Page 11 STEP 9 KEYHOLES STEP 10...
- Page 12 STEP 11 STEP 12 Assembly is complete.
- Page 13 PRE-SEASON SMOKER PRIOR TO FIRST USE. Some smoke may appear during this time, this is normal. NOTE: Never add more than ½ cup (1 lled chip loader) at a time. Additional chips should not be added until any previously added chips have ceased generating smoke.
- Page 14 Step 1- Setting Temperature: 1) Press ON button 2) Press SET TEMP once 3) Use +/- to set desired temperature 4) Push SET TEMP to lock temperature Step 2- Setting Timer: POWER 1) Press SET TIME once 2) Use +/- to set hours MEAT 3) Push SET TIME to set minutes PROBE...
- Page 15 all buttons must be pressed within 5 seconds of each other...
- Page 18 BE A PART OF OUR “DADGUM GOOD” COMMUNITY ONLINE: www.masterbuilt.com | www.dadgumthatsgood.com | www.facebook.com/masterbuilt Twitter @Masterbuilt @JohnMcLemore @DadgumTh atsGood...
- Page 19 Model Number and Serial Number are located on silver label on back of unit.