Advertisement
ASSEMBLY, CARE & USE MANUAL
WARNING & SAFETY INFORMATION
ELECTRIC SMOKER MODELS 20070312, 20070512, 20072612
Masterbuilt Manufacturing, Inc.
THIS PRODUCT IS FOR OUTDOOR USE ONLY
1 Masterbuilt Ct.
Columbus, GA 31907
Customer Service 1-800-489-1581
www.masterbuilt.com
Approximate assembly time
:
25 minutes
Tool needed for assembly: Phillips Head Screwdriver
CARBON MONOXIDE HAZARD
WARNING
This manual contains important
Burning wood chips gives off carbon
information necessary for the proper
monoxide, which has no odor
and safe use of this unit.
and can cause death.
Read and follow all warnings
DO NOT burn wood chips inside homes,
and instructions before using
vehicles, tents, garages or any enclosed areas.
smoker and during use.
Use only outdoors where it is
Keep this manual for future reference.
well ventilated.
Some parts may have sharp edges
handle with care.
Failure to follow these warnings and instructions properly could result in personal injury or death.
Advertisement
Table of Contents
Troubleshooting

Related Manuals for Masterbuilt 070312


Summary of Contents for Masterbuilt 070312
- Page 1 ASSEMBLY, CARE & USE MANUAL WARNING & SAFETY INFORMATION ELECTRIC SMOKER MODELS 20070312, 20070512, 20072612 Masterbuilt Manufacturing, Inc. THIS PRODUCT IS FOR OUTDOOR USE ONLY 1 Masterbuilt Ct. Columbus, GA 31907 Customer Service 1-800-489-1581 www.masterbuilt.com Approximate assembly time 25 minutes...
-
Page 2: Limited Warranty
• Use only approved grounded electrical outlet. This expressed warranty is the sole warranty given by Masterbuilt and is in lieu of all other warranties, • Do not use during an electrical storm. -
Page 3: General Warnings And Safety Information
This equipment generates uses • Accessory attachments not supplied by Masterbuilt Manufacturing, Inc. are not recommended and can radiate radio frequency energy and, if not installed and used in accordance with the and may cause injury. -
Page 4: Let's Get Started
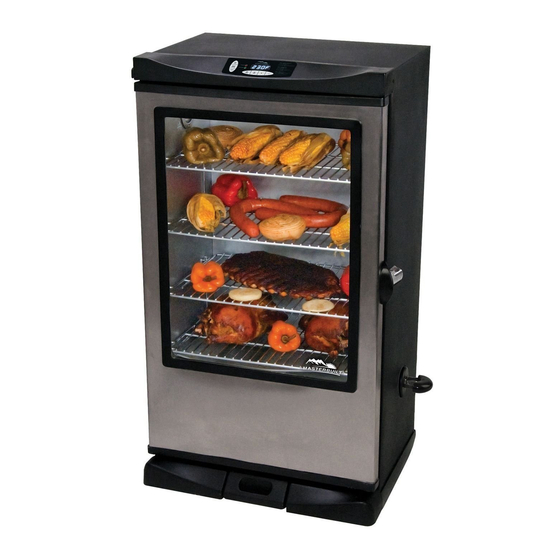
IMPORTANT FACTS ABOUT USING SMOKER LET’S GET STARTED! • Maximum temperature setting is 275°F (135°C). • This is a slow smoker…allow suffi cient time for cooking. Smoker is for OUTDOOR USE ONLY. • Do NOT move unit across uneven surfaces. •... -
Page 5: Troubleshooting Guide
TROUBLESHOOTING GUIDE DO NOT RETURN TO RETAILER For Assembly Assistance, Missing or Damaged Parts Call: MASTERBUILT Customer Service at 1-800-489-1581. STOP! SYMPTOM CAUSE POSSIBLE SOLUTION Please have Model Number and Serial Number available when calling. These numbers are located on silver label on back of unit. -
Page 6: Hardware List
• Be sure to insert batteries correctly. Improper installation may result in leaks and/or possible explosion. DO NOT RETURN TO RETAILER For Assembly Assistance, Missing or Damaged Parts • Do not dispose of batteries in fi re. Call: MASTERBUILT Customer Service at 1-800-489-1581. STOP! • Do not mix old and new batteries. - Page 7 HOW TO USE CONTROL PANEL & REMOTE CONTROL ASSEMBLY • BEFORE ASSEMBLY READ ALL INSTRUCTIONS CAREFULLY. • ASSEMBLE UNIT ON A CLEAN, FLAT SURFACE. Step 1- Setting Temperature: • TOOL NEEDED: PHILLIPS HEAD SCREWDRIVER 1) Press ON button 2) Press SET TEMP once **Some assembly steps may already be completed 3) Use +/- to set desired temperature 4) Push SET TEMP to lock temperature...
- Page 8 ASSEMBLY PRESEASON INSTRUCTIONS STEP 3 Remove adjustable screw leg (11). 1. Make sure water pan is in place with NO WATER. Set aside to be used in Step 5. 2. Set temperature to 275°F (135°C) and run unit for 3 hours. 3.
- Page 9 ASSEMBLY ASSEMBLY STEP 11 STEP 5 Align keyholes on drip Insert adjustable screw leg (11) defl ector (5) with studs on the through bottom of side panel (23) inside of smoker body. Press drip as shown, and into smoker body. defl...
- Page 10 ASSEMBLY ASSEMBLY STEP 7 STEP 9 Position door handle (20) on door Align keyholes on grate supports w/window (19) as shown. Secure (6) with studs on the inside of using screws (A). smoker body as shown. Press grate support down to secure in place.