Sony Handycam CCD-TR502E Operating Instructions Manual
Sony operating instructions video camera recorder ccd-tr501e/tr502e/tr503e/ tr506e/tr720e/tr740e
Hide thumbs
Also See for Handycam CCD-TR502E:
- Operating instructions manual (88 pages) ,
- Service manual (203 pages)
Table of Contents
Advertisement
3-859-173-14 (1)
Video Camera
Recorder
Operating Instructions
Before operating the unit, please read this manual thoroughly,
and retain it for future reference.
Инструкция по эксплуатации
Перед началом эксплуатации данного аппарата просим внимательно
прочесть настоящее руководство и оставить его для будущих справок.
CCD-TR740E
CCD-TR501E/TR502E/TR503E/
TR506E/TR720E/TR740E
© 1997 by Sony Corporation
Advertisement
Table of Contents

Related Manuals for Sony Handycam CCD-TR502E


Summary of Contents for Sony Handycam CCD-TR502E
-
Page 1: Operating Instructions
Before operating the unit, please read this manual thoroughly, and retain it for future reference. Инструкция по эксплуатации Перед началом эксплуатации данного аппарата просим внимательно прочесть настоящее руководство и оставить его для будущих справок. CCD-TR740E CCD-TR501E/TR502E/TR503E/ TR506E/TR720E/TR740E © 1997 by Sony Corporation... - Page 2 English Welcome! Congratulations on your purchase of this Sony Handycam camcorder. With your Handycam, you can capture life’s precious moments with superior picture and sound quality. Your Handycam is loaded with advanced features, but at the same time it is very easy to use.
-
Page 3: Table Of Contents
Recording with the date or time ... 30 Selecting the START/STOP mode ... 31 Fade-in and fade-out ... 32 Enjoying picture effect ... 34 Using the wide mode function (CCD-TR502E/ TR506E/TR720E/TR740E only) ... 36 Focusing manually ... 38 Using the PROGRAM AE function ... 40 Shooting with backlighting ... -
Page 4: Before You Begin Using This Manual
“ CCD-TR740E only”. As you read through this manual, buttons and settings on the camcorder are shown in capital letters. e.g. Set the POWER switch to CAMERA. As indicated with ≥ in the illustrations, you can hear the beep sound to confirm your operation. -
Page 5: Precautions On Camcorder Care
Over 99.99% are operational for effective use. •Do not let the camcorder get wet. Keep the camcorder away from rain and sea water. It may cause a malfunction and sometimes the malfunction cannot be repaired. -
Page 6: Checking Supplied Accessories
(p. 23, 81) 2 NP-33 Battery Pack (1) (p. 7) 3 CR2025 Lithium Battery (1) (p. 49) Already installed in the camcorder. 4 A/V connecting cable (1) (p. 19) * for stereo model 5 R6 (size AA) battery for Remote Commander (2) (p. -
Page 7: Getting Started
Getting started Charging and installing the battery pack Before using your camcorder, you first need to charge and install the battery pack. To charge the battery pack, use the supplied AC power adaptor. Charging the battery pack Charge the battery pack on a flat place without vibration. - Page 8 Charging and installing the battery pack Battery life CCD-TR501E/TR502E/TR503E Battery pack Typical recording time** NP-33 (supplied) NP-55H NP-C65/67 NP-66 NP-77H/78 NP-98 CCD-TR506E Typical Battery pack recording time** NP-33 (supplied) NP-55H NP-C65/67 NP-66 NP-77H/78 NP-98 CCD-TR720E/TR740E Battery pack Typical recording time** NP-33 (supplied) NP-55H NP-C65/67...
- Page 9 VTR (DC OUT) and disconnect the mains lead. After about one minute, reconnect the mains lead and set the selector to CHARGE again. •You cannot operate the camcorder using the AC power adaptor while charging the battery pack. Зарядка и установка...
-
Page 10: Installing The Battery Pack
Note on installing the NP-98 battery pack Use the camcorder while lifting up the viewfinder slightly. Note on the battery pack Do not carry the camcorder by grasping the battery pack. To remove the battery pack Slide BATT, and then pull the lower part of the battery pack. -
Page 11: Inserting A Cassette
Inserting a cassette Make sure that a power source is installed. (1) While pressing the small blue button, slide EJECT in the direction of the arrow. The cassette compartment automatically opens. (2) Insert a cassette (not supplied) with the window facing out. (3) Press the PUSH mark on the cassette compartment to close it. -
Page 12: Basic Operations Camera Recording
Make sure that a power source and a cassette is inserted and that the START/STOP MODE switch is set to When you use the camcorder for the first time, power on it and reset the date and time to your time (p. 51) before you start recording. The date is automatically recorded for 10 seconds after you start recording (AUTO DATE feature). - Page 13 Then, eject the cassette and remove the battery pack. Note on standby mode If you leave the camcorder for 5 minutes or more with a cassette inserted in Standby mode, the camcorder goes off automatically. This prevents wearing down the battery and wearing out the tape.
- Page 14 Camera recording To focus the viewfinder lens If the viewfinder is not in focus at all or when you use the camcorder after someone else has used it, focus the viewfinder lens. Turn the viewfinder lens adjustment ring [a] (CCD-...
-
Page 15: Using The Zoom Feature
Camera recording Note on the AUTO DATE feature The clock is set at the factory to Sydney time for Australia and New Zealand models, to Tokyo time for the models sold in Japan and to Hong Kong time for other models. You can reset the clock. -
Page 16: Hints For Better Shooting
Camera recording Notes on digital zoom – CCD-TR502E/TR506E/TR720E/TR740E only •More than 15x zoom is performed digitally, and the picture quality deteriorates as you go toward the “ T ” side. If you do not want to use the digital zoom, set D ZOOM to OFF in the menu system. - Page 17 If you have a tripod for a still camera, you can also use it with the camcorder. When attaching a non-Sony tripod, make sure that the length of the tripod screw is less than 6.5 mm (9/32 inch). Otherwise, the screw may damage the inner parts of the camcorder.
-
Page 18: Checking The Recorded Picture
(Rec Review). Hold down the – side of EDITSEARCH until the camcorder goes back to the scene you want. The last recorded portion is played back. To go forward, hold down the + side (Edit Search). -
Page 19: Connections For Playback
Connections for playback Connect the camcorder to your VCR or TV to watch the playback picture on the TV screen. When monitoring the playback picture by connecting the camcorder to your TV, we recommend you to use mains for the power source. - Page 20 LASER LINK is a system which transmits and receivers a picture and sound between video equipment having the mark by using infrared rays. LASER LINK is a trademark of Sony Corporation To connect the AV cordless IR receiver to your TV...
- Page 21 IR receiver and the TV or VCR. With this connection, the sound is monaural. To play back on a TV (1) Set the POWER switch on the camcorder to PLAYER. (2) After connecting your TV and AV cordless IR receiver, set the POWER switch on the AV cordless IR receiver to ON.
-
Page 22: Playing Back A Tape
Playing back a tape You can monitor the playback picture in the viewfinder. You can also monitor a picture on a TV screen, after connecting the camcorder to a TV or VCR. (1) While pressing the small green button on the POWER switch, set it to PLAYER. - Page 23 •Streaks appear and the sound is muted in the various playback modes. •When playback pause mode lasts for 5 minutes or more, the camcorder automatically enters stop mode. Note on the lens cover The lens cover does not open when the POWER switch is set to PLAYER.
-
Page 24: Advanced Operations Using Alternative Power Sources
This mark indicates that this product is a genuine accessory for Sony video product. When purchasing Sony video products, Sony recommends that you purchase accessories with this “GENUINE VIDEO ACCESSORIES” mark. Усовершенствованные операции Использование альтерна- тивных... -
Page 25: Using The Mains
Using alternative power sources Using the mains To use the supplied AC power adaptor: (1) Connect the mains lead to the mains. Insert the top of the connecting plate of the AC power adaptor into the top of the battery mounting surface. -
Page 26: Using A Car Battery
The adaptor is removed in the same way as the battery pack. Using a car battery Use Sony DCP-77 DC pack (not supplied). Connect the cord of the DC pack to the cigarette lighter socket of the car (12 V or 24 V). Connect the DC pack to the battery mounting surface of the camcorder. -
Page 27: Changing The Mode Settings
Changing the mode settings You can change the mode settings to further enjoy the features and functions of the camcorder. (1) Press MENU to display the menu. (2) Turn the control dial to select the desired item, and press the dial. -
Page 28: Selecting The Mode Setting Of Each Item
•Выберите CENTER для расположения надписи в центре изображения. •Выберите BOTTOM для расположения надписи внизу изображения. TITLE1 SET*/TITLE2 SET* Запоминание Ваших собственных надписей. D ZOOM* <ON/OFF> (только CCD-TR502E/ TR506E/TR720E/TR740E) •Выберите ON для активизации цифровой трансфокации. •Выберите OFF для выключения цифровой трансфокации. Видеокамера возвратится к... - Page 29 To look at the demonstration at once Eject the cassette, if inserted. Select ON of DEMO MODE. Erase the menu display. The demonstration will begin. If you turn off the camcorder once, DEMO MODE automatically returns to STBY. Изменение режимных установок CLOCK SET* Дату...
-
Page 30: Recording With The Date Or Time
Recording with the date or time Before you start recording or during recording, press DATE or TIME. You can record the date or time displayed in the viewfinder with the picture. You cannot record the date and time at the same time. Except for the date or time indicator, no indicator is recorded. -
Page 31: Selecting The Start/Stop Mode
Selecting the START/STOP mode Your camcorder has two modes besides normal start/stop mode. These modes enable you to take a series of quick shots resulting in a lively video. (1) Set START/STOP MODE to the desired mode. : Recording starts when you press START/STOP, and stops when you press it again (normal mode). -
Page 32: Fade-In And Fade-Out
When fading out, the picture gradually fades to black while the sound decreases. When fading in [a] (1) While the camcorder is in Standby mode, press FADER. The FADER indicator starts flashing. (2) Press START/STOP to start recording. The FADER indicator stops flashing. - Page 33 Fade-in and fade-out To cancel the fade-in/fade-out function Before pressing START/STOP, press FADER to turn off the FADER indicator. When the date or time indicator is displayed The date or time and a title indicator does not fade in or fade out. When the START/STOP MODE switch is set to or 5 SEC...
-
Page 34: Enjoying Picture Effect
Enjoying picture effect Selecting picture effect You can make pictures like those of television with the Picture Effect function. MOSAIC [a] the picture is mosaic. SOLARIZE [b] The light intensity is more clear, and the picture looks like a painting. B&W The picture is monochrome (black and white). - Page 35 Enjoying picture effect Using picture effect function While the camcorder is in Standby mode, press PICTURE EFFECT to select the desired Picture Effect mode. Returning to normal mode Press PICTURE EFFECT until the Picture Effect indicator disappears. Note on the picture effect When you turn the power off, the camcorder returns automatically to normal mode.
-
Page 36: Using The Wide Mode Function (Ccd-Tr502E/ Tr506E/Tr720E/Tr740E Only)
TV [e] is horizontally compressed. You can watch the picture of normal images on a wide- screen TV [f]. Использование функции широкоформатного режима – Только CCD-TR502E/TR506E/ TR720E/TR740E Выбор желаемого режима Вы можете записывать изображение как в кинотеатре (CINEMA) или широкоформатное... - Page 37 Using the wide mode function Using the wide mode function While the camcorder is in Standby mode, press 16:9 WIDE repeatedly so that the desired mode indicator appears. To cancel wide mode Press 16:9 WIDE repeatedly until the wide mode indicator disappears.
-
Page 38: Focusing Manually
Focusing manually When to use manual focus In the following cases you should obtain better results by adjusting the focus manually. •Insufficient light [a] •Subjects with little contrast — walls, sky, etc. •Too much brightness behind the subject [c] •Horizontal stripes [d] •Subjects through frosted glass •Subjects beyond nets, etc. - Page 39 Focusing manually Focusing manually When focusing manually, first focus in telephoto before recording, and then reset the shot length. (1) Set FOCUS to MANUAL. The f indicator appears. (2) Turn the focus dial to focus on the subject. Turn to the NEAR side to focus on a nearer object.
-
Page 40: Using The Program Ae Function
Using the PROGRAM AE function You can select from three PROGRAM AE (Auto Exposure) modes to suit your shooting situation. When you use PROGRAM AE, you can capture high-speed action or night views. Selecting the best mode Select the best mode by using the following examples. - Page 41 Using the PROGRAM AE function Using the PROGRAM AE function While the camcorder is in Standby mode, set the mark of the desired mode to r mark above the PROGRAM AE dial. Returning to automatic mode Turn PROGRAM AE until the PROGRAM AE indicator disappears.
-
Page 42: Shooting With Backlighting
Shooting with backlighting When you shoot a subject with the light source behind the subject or a subject with a light background, use the BACK LIGHT function. Press BACK LIGHT. The c indicator appears in the viewfinder. [a] Subject is too dark because of backlight. [b] Subject becomes bright with backlight compensation. -
Page 43: Releasing The Steady Shot Function (Ccd-Tr720E/Tr740E Only)
– CCD-TR720E/TR740E only When you shoot, the Ó indicator appears. This indicates that the SteadyShot function is working and the camcorder compensates for camera- shake. You can release the SteadyShot function when you do not need to use the SteadyShot function. -
Page 44: Superimposing A Title
Superimposing a title You can select from eight preset titles and two titles you made to superimpose it on the picture during recording. Each time you press TITLE, the preset titles appear one by one. To superimpose from the beginning (1) Set the POWER switch to CAMERA. - Page 45 Superimposing a title Titles cycle as follows Original title 1 n Original title 2 n HELLO! n HAPPY BIRTHDAY n HAPPY HOLIDAYS n CONGRATULATIONS! n OUR SWEET BABY n WEDDING n VACATION n THE END When you press TITLE with “THE END” displayed, the titles disappear.
-
Page 46: Making Your Own Titles
We recommend to eject the cassette before you begin so that the power is not turned off on the way. (1)While the camcorder is in Standby mode, press MENU to display the menu. (2) Turn the control dial to select TITLE1 SET or TITLE2 SET, then press the dial. - Page 47 Making your own titles To erase the title you have made Press MENU, select the title you want to erase, and press the dial. Select at the leftmost character, then press the dial. Do not select the blank to erase a character. Otherwise, the blank is stored as a title in memory.
-
Page 48: Editing Onto Another Tape
(2) Insert a blank tape (or a tape you want to record over) into the VCR and insert your recorded tape into the camcorder. (3) Play back the recorded tape on the camcorder until you locate the point where you want to start editing, then press P to put the camcorder in playback pause mode. -
Page 49: Additional Information
5 seconds when you set the POWER switch to CAMERA. In this case, replace the battery with a Sony CR2025 or Duracell DL-2025 lithium battery. Use of any other battery may present a risk of fire or explosion. -
Page 50: Changing The Lithium Battery In The Camcorder
Changing the lithium battery in the camcorder WARNING The battery may explode if mistreated. Do not recharge, disassemble, or dispose of in fire. Changing the lithium battery When replacing the lithium battery, keep the battery pack or other power source attached. -
Page 51: Resetting The Date And Time
Resetting the date and time You can reset the date and time in the menu system. (1) Set the POWER switch to CAMERA. (2) Press MENU to display the menu. (3) Turn the control dial to select CLOCK SET, then press the dial. (4) Turn the control dial to select the desired year, then press the dial. -
Page 52: Playback Modes
The year indicator changes as follows: Note on the time indicator The internal clock of this camcorder operates on a 24-hour cycle. Playback modes The playback mode (SP/LP) is selected automatically according to the format in which the tape has been recorded. -
Page 53: Tips For Using The Battery Pack
Tips for using the battery pack This section shows you how you can get the most out of your battery pack. Preparing the battery pack Always carry additional batteries Have sufficient battery pack power to do 2 to 3 times as much recording as you have planned. Battery life is shorter in cold environment Battery efficiency is decreased, and the battery... - Page 54 POWER switch to OFF on the camcorder and replace the battery pack. Leave the tape in the camcorder to obtain smooth transition between scenes before and after the battery pack has been replaced.
- Page 55 Battery pack care •Remove the battery pack from the camcorder after using it, and keep it in a cool place. When the battery pack is installed to the camcorder, a small amount of current flows to the camcorder even if the POWER switch is set to OFF.
- Page 56 Tips for using the battery pack Notes on charging A brand-new battery A brand-new battery pack is not charged. Before using the battery pack, charge it completely. After long storage Recharge the battery pack after a long period of storage. If the battery pack is charged fully but not used for a long time (about one year), it becomes discharged.
-
Page 57: Maintenance Information And Precautions
How to prevent moisture condensation When bringing the camcorder from a cold place to a warm place, put the camcorder in a plastic bag and allow it to adapt to room conditions over a period of time. (1) Be sure to tightly seal the plastic bag containing the camcorder. -
Page 58: Video Head Cleaning
Do not use a commercially available wet-type cleaning cassette. It may damage the video heads. Note If the V8-25CLH cleaning cassette is not available in your area, consult your nearest Sony dealer. Информация по уходу за аппаратом и предосторожности Очистка головок Для обеспечения нормальной записи и... - Page 59 Maintenance information and precautions Removing dust from inside the viewfinder – CCD-TR501E/TR502E only (1) Remove the screw with a screwdriver (not supplied). Then, while sliding the RELEASE knob, turn the eyecup in the direction of the arrow and pull it out. (2) Clean the surface with a commercially available blower.
- Page 60 •Should any solid object or liquid fall into the casing, unplug the camcorder and have it checked by your nearest Sony dealer before operating it any further. •Avoid rough handling or mechanical shock. Be particularly careful of the lens.
- Page 61 •Do not let sand get into the camcorder. When you use the camcorder on a sandy beach or in a dusty place, protect it from the sand or dust. Sand or dust may cause the unit to malfunction, and sometimes this malfunction cannot be repaired.
- Page 62 •If the liquid get into your eyes, wash your eyes with a lot of water and then consult a doctor. If any difficulty should arise, unplug the unit and contact your nearest Sony dealer. Информация по уходу за аппаратом и предосторожности...
-
Page 63: Using Your Camcorder Abroad
TV colour systems. Before using your camcorder abroad, check the following points. Power sources You can use your camcorder in any country or area with the supplied AC power adaptor within 110 V to 240 V AC, 50/60 Hz. Difference in colour systems This camcorder is a PAL system-based camcorder. -
Page 64: Trouble Check
English Trouble check If you run into any problem using the camcorder, use the following table to troubleshoot the problem. Should the difficulty persist, disconnect the power source and contact your Sony dealer or local authorized Sony service facility. Camcorder... - Page 65 The camcorder is not malfunctioning. m Change locations. • The video heads may be dirty. m Clean the heads using the Sony V8-25CLH cleaning cassette. (p. 58) • The camcorder is not malfunctioning. • If 10 minutes elapsed after you set the POWER switch to CAMERA without inserting a cassette, the camcorder automatically starts the demonstration.
- Page 66 • The POWER of the receiver is turned off. m Set the POWER switch on the receiver to ON. (p. 21) • The camcorder and the receiver are not facing each other. m Adjust the position and angle of both units. (p. 80) •...
- Page 67 The problem is with the AC power adaptor. Please contact our nearest Sony dealer in connection with the product with the problem. If you use a battery pack which you have just bought or which has been left unused for a long time, the CHARGE lamp may flash at the first charging.
-
Page 68: Проверка Неисправностей
Проверка неисправностей Если у Вас возникла проблема при использовании видеокамеры, воспользуйтесь следующей таблицей для выяснения проблемы. Если трудности все еще остаются, то отсоедините источник питания и свяжитесь с дилером Sony или местным уполномоченным предприятием по обслуживанию аппаратуры Sony. Видеокамера Питание Признак... - Page 69 Проверка неисправностей Признак Исчезает индикатор даты или времени. Не активизируется функция устойчивой съемки (только CCD-TR720E/TR740E) Функция автоматической фокусировки не работает. Запись останавливается через несколько секунд. Сдвинуто положение индикации надписи. Функция плавного введения изображения не работает. Нет звука или только низкий звук...
- Page 70 Проверка неисправностей Прочее Признак Прилагаемый пульт дистанционного управления не работает. Запылился видоискатель. (только CCD-TR501E/TR502E) Не работает система передачи инфракрасных лучей не работает (только CCD-TR740E). Причина и/или действия по устранению • COMMANDER установлен в положение OFF. m Установите его в положение ON. (стр. 28) •...
-
Page 71: Сетевой Адаптер Перемненного Тока
Имеется проблема у сетевого адаптера перем. тока. Обратитесь, пожалуйста, к Вашему ближайшему дилеру Sony в связи с проблемой у изделия. * Если Вы используете батарейный блок, который Вы только что купили, или который был оставлен на длительное время, то лампока CHARGE может мигать при первой зарядке. Это... -
Page 72: Specifications
CCD-TR501E/TR502E: Black and white CCD-TR503E/TR506E/ TR720E/TR740E: Colour Lens Combined power zoom lens, CCD-TR501E/TR503E: 15x (Optical) CCD-TR502E/TR506E/ TR720E/TR740E: 15x (Optical), 180x (Digital) F1.4 – 2.4 Filter diameter 37 mm (1 ⁄ inches) Focal distance f = 4.1 – 61.5 mm ( –... - Page 73 DC OUT in operation mode 7.5 V, 1.8 A Battery charge terminal 10 V, 1.1 A in charge mode Application Sony battery packs NP-33 (supplied), NP-55H, NP-C65, NP-66, NP-67, NP-77H, NP-78, NP-98 Operating temperature 0°C to 40°C (32°F to 104°F) Storage temperature –20°C to +60°C (–4°F to +140°F)
-
Page 74: Технические Характеристики
ССD-TR501E/TR502E: черно- белый CCD-TR503E/TR506E/ TR720E/TR740E: цветной Объектив Комбинированный объектив с приводным трансфокатором, CCD-TR501E/TR503E: 15- кратный (Оптический) CCD-TR502E/TR506E/ TR720E/TR740E: 15-кратный (Оптический), 180-кратный (Цифровой) F1,4—2,4 Диаметр фильтра 37 мм Фокусное расстоянине f= 4,1—61,5 мм При использовании переходника для фотоаппарата с 35-мм пленкой... - Page 75 режиме 7,5 В; 1,8 А Гнездо для зарядки батарейного блока 10 В; 1,1 А в режиме зарядки Применение Батарейные блоки Sony NP- 33 (прилагается), NP-55H, NP-C65, NP-66, NP-67, NP- 77H, NP-78, NP-98 Рабочая температура От 0°С до 40°С Температура хранения...
-
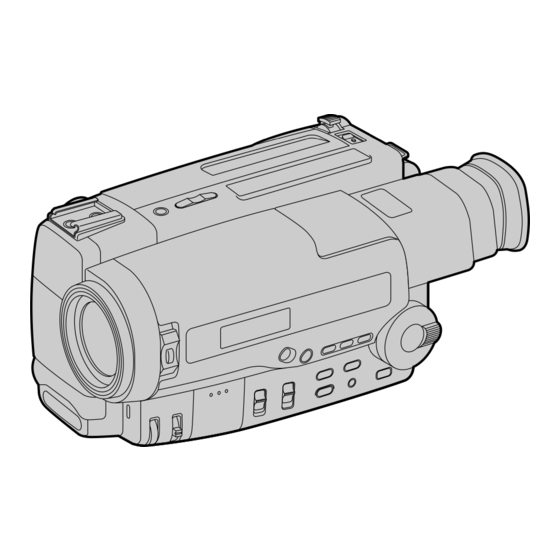
Page 76: Identifying The Parts
8 Power zoom lever (p. 15) 9 Lighting aperture (CCD-TR503E/TR506E/ TR720E/TR740E only) 0 Viewfinder (p. 14) !¡ 16:9 WIDE button (CCD-TR502E/TR506E/ TR720E/TR740E only) (p. 37) !™ STEADY SHOT button (CCD-TR720E/ TR740E only) (p. 43) Опознавание деталей 1 Кнопки перемещения ленты... - Page 77 Identifying the parts !£ TIME button (p. 30) !¢ DATE button (p. 30) !∞ Accessory shoe !§ START/STOP MODE switch (p. 12, 31) !¶ Recording lamp !• Focus dial (p. 39) !ª FOCUS switch (p. 39) @º Viewfinder adjustment ring (CCD-TR501E/ TR502E only) (p.
- Page 78 Identifying the parts @¶ POWER switch (p. 12, 22) @• Display window (p. 85) @ª FADER button (p. 32) #º BACK LIGHT button (p. 42) #¡ PROGRAM AE dial (p. 41) #™ Eyecup #£ Viewfinder adjustment lever (CCD-TR503E/TR506E/TR720E/TR740E only) (p. 14) #¢...
- Page 79 Identifying the parts #ª EJECT knob (p. 11) $º Eyecup release knob (CCD-TR501E/TR502E only) (p. 59) $¡ Hooks for shoulder strap $™ Battery mounting surface (p. 10) $£ Grip strap (p. 17) $¢ Cassette compartment (p. 11) $∞ RFU DC OUT (RFU adaptor DC out) jack $§...
- Page 80 Identifying the parts AV cordless IR receiver – CCD-TR740E only 1 VIDEO/AUDIO OUT jack (p. 20) 2 DC IN 6V jack (p. 20) 3 Infrared sensor (p. 21) 4 POWER switch (p. 21) Опознавание деталей Беспроводный ИК-ресивер аудио-/видеосигнала – Только CCD-TR740E 1 Гнездо...
- Page 81 Using the Remote Commander Make sure that COMMANDER is set to ON in the menu system. The buttons that have the same name on the Remote Commander as on the camcorder function identically. 1 Transmitter Point toward the remote sensor to control the camcorder after turning on the camcorder.
- Page 82 Identifying the parts To prepare the Remote Commander Insert two R6 (size AA) batteries by matchingthe + and – on the batteries to the diagram inside the battery compartment. Note on battery life The batteries for the Remote Commander last about 6 months under normal operation.
- Page 83 VTR 2. The commander modes (1, 2, and 3) are used to distinguish this camcorder from other Sony VCRs to avoid remote control misoperation. If you use another Sony VCR at commander mode VTR 2, we recommend you change the commander mode or cover the remote sensor of the VCR with black paper.
- Page 84 4 SteadyShot indicator (CCD-TR720E/TR740E only) (p. 43) 5 Back light indicator (p. 42) 6 FADER indicator (p. 32) 7 Wide mode indicator (CCD-TR502E/ TR506E/TR720E/TR740E only) (p. 37) 8 Picture Effect indicator (p. 35) 9 Lithium battery indicator (p. 49) !º SP/LP recording mode indicator (p. 12) !¡...
- Page 85 Identifying the parts !™ Tape counter (p. 14) !£ 5 SEC recording indicator (p. 31) !¢ Warning indicator (p. 86) !∞ Remaining battery indicator (p. 54) !§ AUTO DATE indicator (p. 12) !¶ Date or Time (p. 30) !• Recording lamp/battery lamp (p. 12) In the display window 1 Warning indicators (p.
-
Page 86: Warning Indicators
7 The video heads may be contaminated. (p. 58) 8 Some other trouble has occurred. Disconnect the power source and contact your Sony dealer or local authorized facility. 9 The lithium battery is weak or is not installed. (p. 49) This indicator flashes just only after powering on. -
Page 87: Index
Index Adjusting viewfinder ... 14 AUTO DATE ... 15 BACK LIGHT ... 42 BEEP ... 14, 28 Camera recording ... 12 Car battery ... 26 Charging battery ... 7 Cleaning video heads ... 58 COUNTER RESET ... 14 DATE/TIME ... 30 Demonstration ... - Page 88 Литиевая батарейка ... 49 Монтаж ... 48 Н, О Надпись ... 44 Наезд видеокамеры ... 15 Очистка видеоголовок ... 58 Sony Corporation Printed in Japan П Пауза воспроизведения ... 23 Перемотка ленты вперед .. 22 Перемотка ленты назад ... 22 Плечевой...