Table of Contents
Advertisement
Operating the
NCD+Contact Gun
Instruction & Maintenance Manual
Do not permit untrained persons to install, operate or maintain the equipment. Do not
attempt to install or operate the equipment until you have read and fully understand these
instructions.
If you do not fully understand these instructions, contact your supplier for further information. Be sure
to read the Safety section before utilizing this equipment.
© 2016 Nelson Stud Welding, Inc.
All Rights Reserved.
These instructions are for experience operators.
If you are not fully familiar with the principles of operation and safe
practices for arc welding equipment, we urge you to read AWS SP – "Safe
Practices" available from the American Welding Society.
Page 1
January 2016
Part No. 729-110-043 Rev. 1.02
Advertisement
Table of Contents

Related Manuals for Nelson NCD+


Summary of Contents for Nelson NCD+
- Page 1 If you do not fully understand these instructions, contact your supplier for further information. Be sure to read the Safety section before utilizing this equipment. © 2016 Nelson Stud Welding, Inc. Page 1 All Rights Reserved. January 2016...
- Page 2 NCD+ Limited Warranty Nelson’s only warranty is that goods being sold will be free from defects in workmanship and material. This warranty is expressly in lieu of other warranties, expressed or implied and whether statutory or otherwise, including any implied warranty of merchantability or fitness for a particular purpose.
- Page 3 Refer to ANSI/ASC Standard Z49.1 (see listing on next page) for from the National Fire Protection Association, Batterymarch specific ventilation recommendations. Park, Quincy, MA 02269 © 2016 Nelson Stud Welding, Inc. Page 3 All Rights Reserved. January 2016 Part No. 729-110-043 Rev. 1.02...
- Page 4 Keep hands, hair, loose clothing, and tools away from moving parts. Reinstall panels or guards and close doors when servicing is finished and before reenergizing welder. © 2016 Nelson Stud Welding, Inc. Page 4 All Rights Reserved. January 2016 Part No. 729-110-043 Rev. 1.02...
-
Page 5: Table Of Contents
Contact Gun with LED Option (751-650-610) ............. 22 8.2.1 Parts List ......................22 8.2.2 Exploded Drawing .................... 24 Electrical Functions of Guns ..................25 8.3.1 Triggering Contact ................... 25 © 2016 Nelson Stud Welding, Inc. Page 5 All Rights Reserved. January 2016 Part No. 729-110-043 Rev. 1.02... - Page 6 Gun Dimensions ....................29 10.2 Accessories ......................30 Contact Information ....................31 Table of Weld Parameters ....................32 Spring Pressure Chart ....................33 © 2016 Nelson Stud Welding, Inc. Page 6 All Rights Reserved. January 2016 Part No. 729-110-043 Rev. 1.02...
-
Page 7: Overview
1 Overview The Nelson NCD+ stud welding gun is made to be used with Nelson NCD+ stud welding power units, which utilize the capacitor discharge principal of stud welding. This system is designed to use fasteners, which are manufactured with a small projection on the weld end and are welded by the Contact method. -
Page 8: Contact Mode Capacitor Discharge Welding
The LED option provides the user with remote indication of whether or not the unit is ready to weld and after the weld if the measured values were within the selected weld parameters. © 2016 Nelson Stud Welding, Inc. Page 8 All Rights Reserved. -
Page 9: Led Option
2 LED Option © 2016 Nelson Stud Welding, Inc. Page 9 All Rights Reserved. January 2016 Part No. 729-110-043 Rev. 1.02... -
Page 10: Features
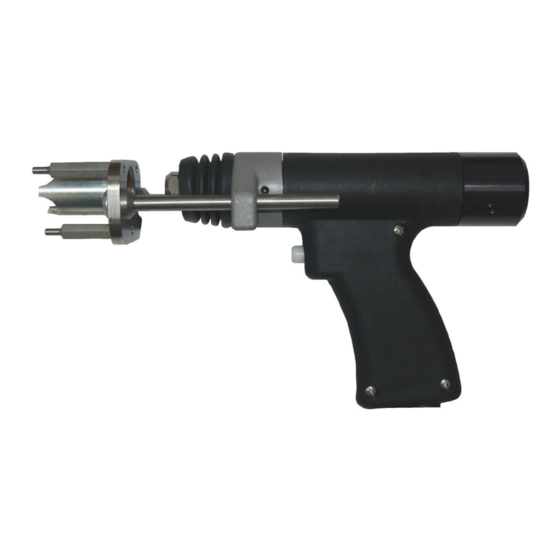
Refer to Setting Up Foot and Leg Assembly. CHUCK NUT LEG SCREWS TRIGGER SPRING PRESSURE GAUGE CONTROL CABLE SPRING PRESSURE ADJUSTMENT WELD CABLE GUN BODY (2 HALVES) LED STATUS © 2016 Nelson Stud Welding, Inc. Page 10 All Rights Reserved. January 2016 Part No. 729-110-043 Rev. 1.02... -
Page 11: Gun Set-Up
If this procedure is not followed, chuck life may be substantially shortened. Figure 4.1 Chuck and Stop Assembly © 2016 Nelson Stud Welding, Inc. Page 11 All Rights Reserved. January 2016 Part No. 729-110-043 Rev. 1.02... -
Page 12: Adjusting Stud Stop Assembly
Reattach the leg screws to the legs. Maintain concentricity between the chuck and spark shield. Figure 4.2 Foot & Leg Assembly © 2016 Nelson Stud Welding, Inc. Page 12 All Rights Reserved. January 2016... -
Page 13: Setting Spring Pressure
Tighten leg screws to lock tripod foot or spark shield in place. Figure 4.3 Contact Gun with NCD+ Set-Up Tool #525-001-200 © 2016 Nelson Stud Welding, Inc. Page 13 All Rights Reserved. January 2016... -
Page 14: Weld Setup
Check concentricity of chuck and spark shield. 10 Begin production welding after samples weld have been validated for strength and appearance. 11 For finer contact gun adjustments, refer to Error! Reference source not found.. © 2016 Nelson Stud Welding, Inc. Page 14 All Rights Reserved. -
Page 15: Maintenance Of Stud Welding System
To ensure all energy is discharged, wait at least one minute before removing cover and servicing the power control unit. Use voltmeter to check voltage between (+) & (-) grid for 0 Volts. © 2016 Nelson Stud Welding, Inc. Page 15 All Rights Reserved. -
Page 16: Troubleshooting
Before starting any stud welding operation, or after the equipment has remained idle for a period of time, trial or test studs should be welded to a plate for testing. Testing should continue until there is no failure of a test stud. © 2016 Nelson Stud Welding, Inc. Page 16 All Rights Reserved. - Page 17 Changes in sheet metal can usually be compensated for by changing the settings on the power supply. Springs inside weld tool have fatigued Return weld tool to Nelson for service. and don’t apply the same pressure. © 2016 Nelson Stud Welding, Inc.
- Page 18 Dirt inside weld tool prevents smooth Return weld tool to Nelson for service. operation and hangs up or slows gun operation. Problem: Arc Blow Characterized by weld spatter of fillet on only one side of the stud (looks like molten metal was “blown” out from only the one side of the stud).
-
Page 19: Exploded Drawings & Parts List
SPARK SHIELD 524-005-100 SCREW, OHM, M4 X 16MM LG 524-005-101 SCREW, FHSC, M5 X 16MM LG 524-005-102 SCREW, FHSC, M4 X 12MM LG © 2016 Nelson Stud Welding, Inc. Page 19 All Rights Reserved. January 2016 Part No. 729-110-043 Rev. 1.02... - Page 20 CONTROL CABLE, 12 PIN 720-519-081 WELD CABLE 526-001-232 SPRING, GROUND SENSE WIRE Additional Parts Needed for Repair Part Number Description 524-005-106 M5x25 FHSHCS © 2016 Nelson Stud Welding, Inc. Page 20 All Rights Reserved. January 2016 Part No. 729-110-043 Rev. 1.02...
-
Page 21: Exploded Drawing
8.1.2 Exploded Drawing © 2016 Nelson Stud Welding, Inc. Page 21 All Rights Reserved. January 2016 Part No. 729-110-043 Rev. 1.02... -
Page 22: Contact Gun With Led Option (751-650-610)
ARMATURE, SPRING RETAINER 524-005-323 STANDOFF, HEX MMC#93655A091 526-001-266 COMPRESSION RING 524-005-330 SCREW, M3X10 FPSS MMC#92605A104 751-650-219 SPRING PRESSURE ADJUSTMENT NUT 524-005-324 SPACER MMC#92871A171 © 2016 Nelson Stud Welding, Inc. Page 22 All Rights Reserved. January 2016 Part No. 729-110-043 Rev. 1.02... - Page 23 504-001-056 LEG, 8MM X 110MM, SS 103-475-610 WIRE, BLACK, 18AWG, 4” OR .333’ 751-614-005 PCB, NCD+ GUN L.E.D. 751-650-503 HOLDER, L.E.D. BOARD © 2016 Nelson Stud Welding, Inc. Page 23 All Rights Reserved. January 2016 Part No. 729-110-043 Rev. 1.02...
-
Page 24: Exploded Drawing
8.2.2 Exploded Drawing © 2016 Nelson Stud Welding, Inc. Page 24 All Rights Reserved. January 2016 Part No. 729-110-043 Rev. 1.02... -
Page 25: Electrical Functions Of Guns
Reassemble the rear cap with the slot towards the top of Coil the gun and the front cover with its bottom perpendicular to the gun handle. © 2016 Nelson Stud Welding, Inc. Page 25 All Rights Reserved. January 2016 Part No. 729-110-043 Rev. 1.02... -
Page 26: Schematics
9 Schematics 9.1 NCD+ CTRL to GUN, 7 PIN, Contact © 2016 Nelson Stud Welding, Inc. Page 26 All Rights Reserved. January 2016 Part No. 729-110-043 Rev. 1.02... - Page 27 NCD+ CTRL TO GUN, 12 PIN, Contact © 2016 Nelson Stud Welding, Inc. Page 27 All Rights Reserved. January 2016 Part No. 729-110-043 Rev. 1.02...
-
Page 28: Ncd+ Ctrl To Gun, 12 Pin W/Led, Contact
9.2 NCD+ CTRL TO GUN, 12 PIN W/LED, Contact © 2016 Nelson Stud Welding, Inc. Page 28 All Rights Reserved. January 2016 Part No. 729-110-043 Rev. 1.02... -
Page 29: Technical Specifications
-5°C to 50°C (23°F - 122°F) Operating Temperature (°C) 0°C to 40°C (32°F - 104°F) IP Rating Stud Placement Tolerances +/- 0.010 (0.250 mm) 10.1.1 Gun Dimensions © 2016 Nelson Stud Welding, Inc. Page 29 All Rights Reserved. January 2016 Part No. 729-110-043 Rev. 1.02... -
Page 30: Accessories
Stud Stop Pin Assembly Part Number Stud Length 500-017-017 1/4" - 5/8” 500-017-018 3/4” - 1-1/8” 500-017-019 1-1/4” - 1-5/8” 500-017-020 1-3/4” - 2-1/8” © 2016 Nelson Stud Welding, Inc. Page 30 All Rights Reserved. January 2016 Part No. 729-110-043 Rev. 1.02... -
Page 31: Contact Information
Fax: 510.293.0677 905.795.8275 800.635.9353 Fax: 972.438.7883 Fax: 909.468.2112 Subsidiaries International England | Nelson U.K. Ltd. Middle East & Europe | Nelson Germany 47-49 Edison Rd. Postfach 40-20 Rabans Lane Ind’l Estate 58272 Gevelsberg Germany Aylesbury HP19 8TE, UK Phone: 44.1296.433500 Phone: 49.2332.661.0... -
Page 32: A Table Of Weld Parameters
Aluminum alloy 3003 was used to set the above parameters. Other alloys may require parameter adjustments. If settings are needed (or desired) other than those listed above, please consult your Nelson representative. © 2016 Nelson Stud Welding, Inc. Page 32 All Rights Reserved. -
Page 33: B Spring Pressure Chart
Steel C ≤ 0.25 Steel plate, galvanized <25µm Stainless Steel Brass (no free machining Copper Aluminum 1100 Aluminum 5356 Aluminum 6061 Ø STUDS (mm) © 2016 Nelson Stud Welding, Inc. Page 33 All Rights Reserved. January 2016 Part No. 729-110-043 Rev. 1.02...