Sangean DT400W Operating Instructions Manual
Fm stereo / am / wx 19 memory presets pll synthesized receiver
Hide thumbs
Also See for Sangean DT400W:
- Brochure (1 page) ,
- Specifications (1 page) ,
- Manual (11 pages)
Advertisement
Table of Contents
- 1 Limited Warranty
- 2 Display
- 3 Battery Installation
- 4 Tuning the Radio
- 5 Seek Tuning
- 6 Manual Step Tuning
- 7 Memory Tuning
- 8 Weather Band and Weather Alert Operation
- 9 Setting Memory
- 10 About Weather Band Standby Mode
- 11 Setting the Clock
- 12 Change am (MW) Band Tuning Step
- 13 Specification
- Download this manual
Advertisement
Table of Contents

Related Manuals for Sangean Sangean DT400W


Summary of Contents for Sangean Sangean DT400W
- Page 1 381RKS1-A Operating instruction FM STEREO / AM / WX 19 MEMORY PRESETS PLL SYNTHESIZED RECEIVER DT-400W...
-
Page 2: Limited Warranty
Limited Warranty Sangean America, Inc. warrants this product to be free from defects in material and workmanship under normal use and conditions for a period of 90 (Ninety) days from the date of original purchase on parts and labor. Should service be necessary for any reason due to manufacturing defect or malfunction during the warranty period Sangean America, Inc. - Page 3 Any applicable implied warranties, including the warranty of merchantability, are limited in duration to a period of 90 (Ninety) days from the date of original purchase. No other warranties, whether expressed or implied shall apply to this product thereafter. Sangean America, Inc.
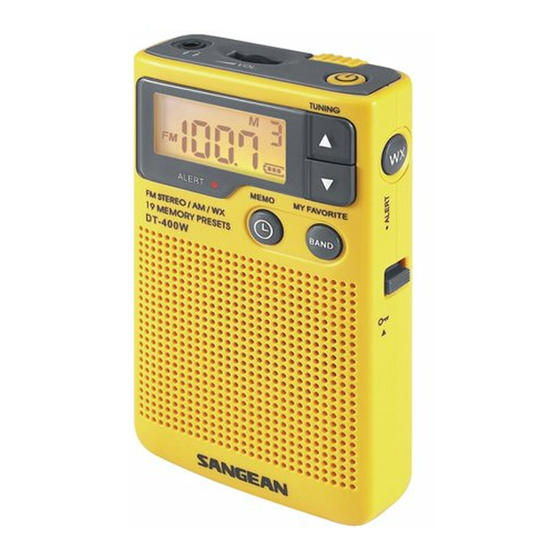
- Page 5 Headphone/Antenna Jack The earphone also acts as the FM antenna when plugged into the earphone jack. While listening via speaker, you may plug the supplied wire antenna into the earphone jack, and set the ST/MO/SP. Volume Control DBB-Deep Bass Boost Switch on the DBB switch on the back top of the radio to activate the Deep Bass Boost to have stronger bass sound.
- Page 7 ST/MO/SP (Stereo/Mono/Speaker) Switch the switch to SP (speaker) position, while you listen to the radio program via speaker. Make sure to plug the supplied wire antenna or the earphones to get best FM reception. This radio is capable of receiving FM stereo radio program by plug the supplied earphones into the earphones jack and set the ST/MO/SP switch to ST (stereo) position, display will show stereo...
- Page 9 My Favorites Lock Switch The lock switch prevents accidental changing of any of the radio settings. Slide the lock switch to the up ‘locked’ position, symbol will appear in the display. The power and all other buttons will be disabled. Belt Clip A removable belt clip is provided on the back of the unit.
-
Page 10: Battery Installation
Battery Installation Turn radio off. Prepare replacement batteries to ensure a quick and easy change. Failure to change batteries within 1 minute will reset presets and clock settings. The battery cover is located on the back of the unit. Apply a gentle downward pressure and slide the door to the right side of the unit. - Page 11 Manual Step Tuning Turn radio on using the On/Off button located on the top of the radio. Select desired band by pressing the “Band” selector on the front of the unit. Press the desired tuning button (Up/Down) repeatedly until desired frequency is found. Memory Tuning To tune in stations already programmed into memory.
- Page 12 Setting Memory Turn radio on using the On/Off button located on the top of the radio. Select desired band by pressing the “Band” selector on the front of the unit. Tune to desired station using either Manual Step Tuning or Scan Tuning options. Press Memory Button located on the front of radio unit and use the tuning controls (Up/Down) to reach memory position as indicated in the top-right of...
- Page 13 4. Press the WX button to confirm the setting. 5. Press the POWER button to turn off the radio. And the ALERT indicator flashes every 3 seconds and the word “ALERT” is shown on the display. You can press the WX button and the display shows the Weather Alert channel and remained time.
-
Page 14: Setting The Clock
Setting the Clock This unit features a clock that will display the current time while off. To set the clock: Turn unit off by depressing the power button located on the top of the radio. Press and hold MEMO or CLOCK button until the hour setting begins blinking and the colon is no longer blinking. - Page 15 Change AM (MW) band tuning step In Europe and other parts of the world, AM (MW) tuning step are 9 kHz, in America the AM tuning step is 10 kHz. To change the AM tuning step from 10 kHz to 9 kHz, proceed as follows: 1.