Table of Contents
Advertisement
EXCELL PRECISION CO., LTD.
PH3 IP 68 Waterproof
Check-weighing Indicator
© EXCELL PRECISION CO., LTD. 2018. All rights reserved worldwide.
The information contained herein is the property of EXCELL PRECISION CO., LTD.
and is supplied without liability for errors or omissions. No part may be reproduced or
used except as authorised by contract or other written permission. The copyright and
the foregoing restriction on reproduction and use extend to all media in which the
information may be embodied.
User Manual
Advertisement
Table of Contents

Related Manuals for Excell PH3


Summary of Contents for Excell PH3
- Page 1 User Manual © EXCELL PRECISION CO., LTD. 2018. All rights reserved worldwide. The information contained herein is the property of EXCELL PRECISION CO., LTD. and is supplied without liability for errors or omissions. No part may be reproduced or used except as authorised by contract or other written permission. The copyright and the foregoing restriction on reproduction and use extend to all media in which the information may be embodied.
-
Page 2: Table Of Contents
EXCELL PRECISION CO., LTD. TABLE OF CONTENTS BEFORE USING THE SCALE ..................... 3 PRECAUTIONS FOR USE ......................3 PREPARING TO USE THE SCALE ..................... 4 SPECIAL NOTICE ........................6 CHAPTER 1 INTRODUCTION ....................7 1-1 F ..........................7... - Page 3 EXCELL PRECISION CO., LTD. 3-1-15 HI / LO / OK Positive / Negative Weight Settings ......38 3-1-16 HI / LO / OK Tare Time Settings ..........39 .................. 40 EIGHT ALIBRATION 3-2-1 Weight Calibration ................41 3-2-2 Restore to the Default setting ............42 RS-232 B ..........
-
Page 4: Before Using The Scale
EXCELL PRECISION CO., LTD. BEFORE USING THE SCALE Thank you for purchasing an EXCELL Electronic Digital Indicator. In order to use the indicator properly, please read this User Manual carefully before use. If you have a problem concerning the indicator, please contact your supplier. -
Page 5: Preparing To Use The Scale
EXCELL PRECISION CO., LTD. PREPARING TO USE THE SCALE Locate the scale on a firm level surface free from vibrations for accurate weight readings. Avoid operating the scale in direct sunlight or drafts of any kind. If possible, avoid connecting the scale to AC power outlet sockets which are adjacent to other appliances to minimise the possibility of interference affecting the performance of the scale. - Page 6 EXCELL PRECISION CO., LTD. Due to the storage battery adopt the advanced free-maintaining technique, customers need not to replenish electrolyte. The scale should be recharged every 3 months to prevent failure of the internal rechargeable battery. 1. The battery should be charged for 8~10 hours.
-
Page 7: Special Notice
EXCELL PRECISION CO., LTD. SPECIAL NOTICE In some certain conditions, the stainless case of indicator will be opened to set up the load cell, connect the power cable, or replace the new rechargeable battery, please contact your local service people to avoid any damage of waterproof. -
Page 8: Chapter 1 Introduction
EXCELL PRECISION CO., LTD. CHAPTER 1 INTRODUCTION 1-1 Features IP68 waterproof: moisture-proof, mist-proof, with IP68 waterproof and dustproof Adjustable weighing speed: three weighing speed modes (fast, moderate, and slow) supported. Selectable units: kilogram (kg), gram (g), pound (lb), and ounce (oz) weighing units ... -
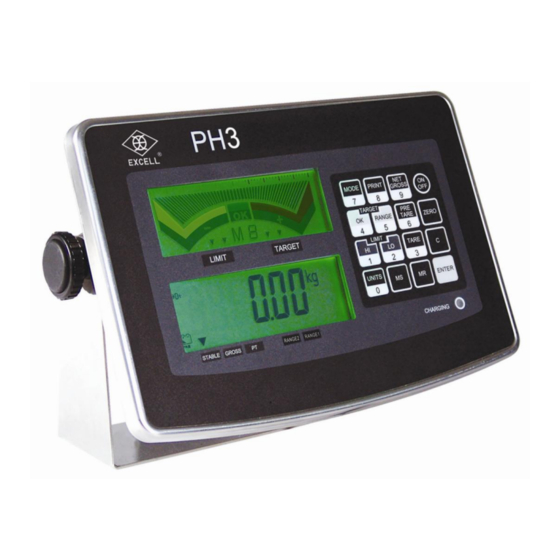
Page 9: Scale Appearance
EXCELL PRECISION CO., LTD. 1-3 Scale Appearance 256 mm The package includes: x1 1. Indicator 2. Power Cable x1 3. User Manual x1 170 mm When you unpack the indicator and find any of the above items are missing, please contact your supplier. -
Page 10: Explanation Of Display
EXCELL PRECISION CO., LTD. 1-5 Explanation of Display HI, LO, OK status In the Simple mode, if the TARGET indication LIMIT indication indication weight is over the maximum graduation, the “+” zone will be flashing. LCD1 : Analog indication column with maximum 50 graduation LCD2:Digital Display... -
Page 11: Explanation Of Keypad
EXCELL PRECISION CO., LTD. 1-6 Explanation of Keypad Press this key to switch the display on/off. Press this key to obtain a zero reading, when the platter is empty (free of load) and the display is not showing zero. When the weight value is within the zero range, the zero function operates to zero the scale or cancel the tare function. - Page 12 EXCELL PRECISION CO., LTD. Digit 8 Press this key to output the displayed values via the built-in interface to a printer or a computer. Digit 5 In Target weight mode, press this key to preset the allowable “Range” value. Digit 2 In Limit weight mode, press this key to input “Low”...
-
Page 13: Chapter 2 Basic Operating Functions
EXCELL PRECISION CO., LTD. CHAPTER 2 BASIC OPERATING FUNCTIONS PH3 has three weight modes: Simple, Limit and Target, press switch. Simple weight mode In this mode, the weight value can be displayed by means of analog and digital. For example, when an object weighs 20 kg, the LCD2 shows the digits 20 and LCD1 has slight changes on its graduation. - Page 14 EXCELL PRECISION CO., LTD. Simple Weight Mode Limit Weight Mode Target Weight Mode 02006100 ZSME300000379...
-
Page 15: Simple Weight Mode
EXCELL PRECISION CO., LTD. 2-1 Simple Weight Mode Steps: Turn on the scale ”------“ Scale starts to count down, LCD2 displays 000000”. ” After reaching to Zero, LCD2 displays 2. If needed, select the weight unit. Zero the scale, if the Zero point value is floating Put object on the platter LCD1 (analog) and LCD2 (Digit) display the object’s weight... - Page 16 EXCELL PRECISION CO., LTD. 3. Use “0” ~ “9” keys to input the High value. After inputting one digit, the cursor will move to right. Press “ENTER” key when finishing. (For example 30 kg, press 0030 ) When input incorrectly, press “C” key to clear.
-
Page 17: Target Weight Mode
EXCELL PRECISION CO., LTD. 2-3 Target Weight Mode Steps: Press “MODE” key, select Target Weight Mode, the Target icon is switched on. Press ZERO key to zero the scale, if the weight is floating. Set the target weight (There are two methods) Method 1: input value via keypad Press “OK”... - Page 18 EXCELL PRECISION CO., LTD. Put the sample on the platter, press “ENTER” key. The screen displays “------”. After the weight is stable, the sampling is finished. 20 kg The previous setting is 20 kg. Set the Range Value Press “RANGE” key,the screen displays the previous setting.
-
Page 19: Tare Function
EXCELL PRECISION CO., LTD. 6. Put objects into the container and observe the changes of graduation on LCD1. When the weight reaches the OK section, stop adding the objects and LCD2 displays the weight at OK status. The Range value can be shown as percentage. -
Page 20: Cancel Tare Function
EXCELL PRECISION CO., LTD. 2-5 Cancel Tare Function Steps: Move the full container from the platter. The “Net” icon is switched off. Zero the scale and Tare The “Net” icon is switched off. Clear Tare 2-6 Pre-Tare Function Steps: Zero the scale, if needed. -
Page 21: Cancel Pre-Tare Function
EXCELL PRECISION CO., LTD. 2-7 Cancel Pre-Tare Function Method 1 Steps: Remove the full container from the platter Zero the scale and Tare The “PT” icon is switched off Cancel the Pre-Tare. Method 2 Steps: The screen displays the previous Pre-Tare value for two seconds Enter Pre-Tare mode ... -
Page 22: Memory Store And Recall Functions
EXCELL PRECISION CO., LTD. This function is only used in TARE and Pre-Tare modes. All keys except for “On/Off” and “Net/Gross” do not work, while the Gross icon is on. 2-9 Memory Store and Recall Functions Store When the settings of HI, LO, OK and Range are finished, LCD2 displays “MEM S”, input any digits from “0”... -
Page 23: Chapter 3 Exteral Calibration
EXCELL PRECISION CO., LTD. CHAPTER 3 EXTERAL CALIBRATION In the weighing mode, press the TARE and ZERO keys at the same time to enter the Advanced Function settings mode. The LCD2 shows use MR to select the desired mode. Overall workflow of the Advanced Function settings mode is as follows:... -
Page 24: General Function Settings
EXCELL PRECISION CO., LTD. General Function Settings There are 16 functions in the General Function settings mode from Press Enter Refer to the following overview of General Functions To exit the general function settings, key in “00” and press Enter ... - Page 25 EXCELL PRECISION CO., LTD. Overview of the General Functions Return to the Advanced Function Settings Mode Automatic Backlight Function Settings Automatic Power-off Timer Settings HI / LO Weight Check Settings HI / LO Alarm Settings Function Analog and Digital Display Settings...
-
Page 26: Automatic Backlight Function Settings
EXCELL PRECISION CO., LTD. 3-1-1 Automatic Backlight Function Settings Select in the General Function settings mode to change the backlight function settings. Press Enter Parameter settings: 01 Turn on automatic backlight 00 Turn off automatic backlight Factory default setting: 00... -
Page 27: Automatic Power-Off Timer Settings
EXCELL PRECISION CO., LTD. 3-1-2 Automatic Power-off Timer Settings Select in the General Function settings mode to change the automatic Power-off timer function settings. Press Enter Enter a number from 01 to 06 so as to instruct the scale to be automatically... -
Page 28: Hi / Lo Weight Check Settings
EXCELL PRECISION CO., LTD. 3-1-3 HI / LO Weight Check Settings Select in the General Function settings mode to set the HI / LO weight check function. Press Enter Parameter settings: 00 Check the weight whatever it is stable or not 01 ... -
Page 29: Hi / Lo Alarm Settings Function
EXCELL PRECISION CO., LTD. 3-1-4 HI / LO Alarm Settings Function Select in the General Function settings mode to set the HI / LO Alarm function. Parameter settings: 00 No Alarm Press Enter 01 The Beeper sounds intermittently at LO status 02 ... -
Page 30: Analog And Digital Display Settings
EXCELL PRECISION CO., LTD. 3-1-5 Analog and Digital Display Settings Select in the General Function settings mode to change the Analog and Digital display function settings. Press Enter Parameter settings: 00 Both Analog and Digital displays are enable 01 Only display Digital... -
Page 31: Weighing Speed Settings
EXCELL PRECISION CO., LTD. 3-1-6 Weighing Speed Settings Select in the General Function settings mode to set the weighing speed function. Press Enter Parameter settings: 00 Slow reaction 01 Moderate reaction 02 Fast reaction Factory default setting: 01... -
Page 32: Operation Mode Settings
EXCELL PRECISION CO., LTD. 3-1-7 Operation Mode Settings Select in the General Function settings mode to change the operation mode function settings. Press Enter Parameter settings: 00 Enter “Simple Weight Mode” after turn on 01 Enter “Limit Weight Mode” after turn on 02 ... -
Page 33: Weight And Percentage Mode Settings
EXCELL PRECISION CO., LTD. 3-1-8 Weight and Percentage Mode Settings Select in the General Function settings mode to change the weight and percentage mode settings. Press Enter Parameter settings: 00 Display in weight mode 01 Display in percentage mode... -
Page 34: Lock Function Settings
EXCELL PRECISION CO., LTD. 3-1-9 Lock Function Settings Select in the General Function settings mode to change the Lock function settings. Press Enter Parameter settings: 00 All keys act normally 01 Only ON/OFF ZERO TARE are enable. Press... -
Page 35: Relay Settings
EXCELL PRECISION CO., LTD. 3-1-10 Relay Settings Select in the General Function settings mode change the relay function settings. Press Enter Parameter settings: 00 Default open 01 Default short Factory default setting: 00 Press Enter clear parameter key ... -
Page 36: Auto Zero Tracking
EXCELL PRECISION CO., LTD. 3-1-11 Auto Zero Tracking Select in the General Function settings mode to set auto zero tracking. Only for none-approved model Press Enter Parameter settings: 00 1/4 d 01 1/2 d 02 1 d 03 ... -
Page 37: Printer Key Accumulation Function
EXCELL PRECISION CO., LTD. 3-1-12 Printer Key Accumulation Function Select in the General Function settings mode set printer key accumulation function. This function is enabled only when the parameter in is set as “11”. Press Enter Parameter settings: Turn off the accumulation function ... -
Page 38: Tare Cancellation Settings
EXCELL PRECISION CO., LTD. 3-1-13 Tare Cancellation Settings Select in the General Function settings mode change the tare cancellation settings. Press Enter Parameter settings: 00 Use TARE key to call off settings 01 TARE value cancelled automatically by moving objects from the platter... -
Page 39: Previous Zero Record Settings
EXCELL PRECISION CO., LTD. 3-1-14 Previous Zero Record Settings Available in non-approved model only Press Enter Parameter settings: 00 To abort previous zero recording 01 To enable previous zero recording Factory default setting: 00 Press Enter clear parameter key ... -
Page 40: Hi / Lo / Ok Tare Time Settings
EXCELL PRECISION CO., LTD. 3-1-16 HI / LO / OK Tare Time Settings Parameter settings: 00 To tare after being stable for 1/2 s 01 To tare after being stable for 1 s 02 To tare after being stable for 2 s... -
Page 41: Weight Calibration
EXCELL PRECISION CO., LTD. Weight Calibration There are 2 functions in the Weight Calibration settings mode from is set as “01” or “03” The function is disable when the parameter in (for approval model). Press Enter Input parameter from 00 ~ 02 To exit the weight calibration, key in “00”... -
Page 42: Weight Calibration
EXCELL PRECISION CO., LTD. 3-2-1 Weight Calibration Select in the General Function settings mode to set weight calibration. The LCD displays the calibration weight value (the maximum capacity of 1 unit) and the unit. The digit on the left side keeps flashing. -
Page 43: Restore To The Default Setting
EXCELL PRECISION CO., LTD. 3-2-2 Restore to the Default setting Select in the General Function settings mode restore the default setting. Press Enter Key in parameter Parameter settings: 00 Exit the settings from 00 to 01 01 Restore to the factory... -
Page 44: Rs-232 Bi-Directional Function Settings
EXCELL PRECISION CO., LTD. RS-232 Bi-directional Function Settings There are 14 functions in the Bi-directional function settings mode from Press Enter Refer to the following overview of Key in parameter from 00 to 14 RS-232 Bi-directional Settings To exit RS-232 Bi-directional settings mode, key in “00”... - Page 45 EXCELL PRECISION CO., LTD. Overview of RS-232 Bi-directional Settings Exit the RS-232 Bi-directional Settings Mode Baud Rate Settings Communication Protocol Settings Output Format Settings Continuous Transmission Settings Selection of Continuous Transmission Rate Output Condition Settings ...
-
Page 46: Baud Rate Settings
EXCELL PRECISION CO., LTD. 3-3-1 Baud Rate Settings Select in the RS-232 Bi-directional settings mode to set the Baud Rate. Press Enter LCD displays the last setting. Factory default value: 04 Parameter settings: 00 600 (bits/s) 01 1 200 (bits/s) 02 ... -
Page 47: Communication Protocol Settings
EXCELL PRECISION CO., LTD. 3-3-2 Communication Protocol Settings Select in the RS-232 Bi-directional settings mode to set the communication protocol. Press Enter LCD displays the previous setting. Factory default setting: 00 Parameter settings: 00 N 8 1 (none parity check, 8 data bits, 1 stop bit) 01 ... -
Page 48: Output Format Settings
EXCELL PRECISION CO., LTD. 3-3-3 Output Format Settings Select in the RS-232 Bi-directional settings mode to set the output format. LCD shows the last setting. Factory default setting: 11 Press Enter Parameter settings: 00 Same data as the scale in general format 01... -
Page 49: Continuous Transmission Settings
EXCELL PRECISION CO., LTD. 3-3-4 Continuous Transmission Settings Select in the RS-232 Bi-directional settings mode to set the continuous transmission. Press Enter LCD shows the last setting. Factory default setting: 00 Parameter settings: 00 Command mode 01 Continuous transmission mode... -
Page 50: Selection Of The Continuous Transmission Rate
EXCELL PRECISION CO., LTD. 3-3-5 Selection of the Continuous Transmission Rate Select in the RS-232 Bi-directional settings mode to set the continuous transmission rate. Press Enter LCD shows the last setting. Factory default setting: 02 Parameter settings: 00 1 times/s 01 ... -
Page 51: Output Condition Settings
EXCELL PRECISION CO., LTD. 3-3-6 Output Condition Settings Select in the RS-232 Bi-directional settings mode to set the output condition. Press Enter LCD shows the last setting. Factory default setting: 01 Parameter settings: 00 Output all the time 01 ... -
Page 52: Auto Transmission At Zero
EXCELL PRECISION CO., LTD. 3-3-7 Auto Transmission at Zero Select in the RS-232 Bi-directional settings mode to set the auto transmission at zero. Press Enter LCD shows the last setting. Default setting: 05 Parameter settings: Please enter a number from 00... -
Page 53: Reset Of Auto Transmission
EXCELL PRECISION CO., LTD. 3-3-8 Reset of Auto Transmission Select in the RS-232 Bi-directional settings mode to reset the auto transmission. Press Enter LCD shows the last setting. Default setting: 00 Parameter settings: Please enter number from 00 to 99 to set its value from 00d to 99d accordingly. - Page 54 EXCELL PRECISION CO., LTD. RS1 07 & RS1 08 Settings Instruction 1. Under auto transmission mode, if RS1 07 and RS1 08 are all set at “00”, no matter what weight it is, no any data of the weight will be transmitted out.
-
Page 55: Condition Of Manually Printing
EXCELL PRECISION CO., LTD. 3-3-9 Condition of Manually Printing Select in the RS-232 Bi-directional settings mode to set the condition of manually printing. Press Enter LCD shows the last setting. Parameter settings: 00 Transmit immediately 01 Transmit when stable ... -
Page 56: Real Time Clock (Hour)
EXCELL PRECISION CO., LTD. 3-3-10 Real Time Clock (Hour) Select in the RS-232 Bi-directional settings mode to set the real time clock for time. Press Enter LCD shows the current time (24 hours) Use“0” ~ “9” keys to key in “hour”, “minute”... -
Page 57: Real Time Clock (Date)
EXCELL PRECISION CO., LTD. 3-3-11 Real Time Clock (Date) Select in the RS-232 Bi-directional settings mode to set the real time clock for date. Press Enter LCD shows the current date (A.D.) Use “0” ~ “9” keys to input “YY”, “MM”... -
Page 58: Rs-232 Serial Interface Settings Mode
EXCELL PRECISION CO., LTD. 3-3-12 RS-232 Serial Interface Settings Mode This function is enabled only when the parameter in is set as “11”. Select in the RS-232 Bi-directional settings mode to set the RS-232 serial interface. Press Enter Start to receive... -
Page 59: Rs-232 General Or Simple Output Weight Selection
EXCELL PRECISION CO., LTD. 3-3-13 RS-232 General or Simple Output Weight Selection Press Enter Parameters instruction 00 6 digits Input parameters “00”、“01” 01 7 digits default value: 00 Press Enter clear parameter key perform action Enter ... -
Page 60: Appendix 1 Rs-232 Serial Interface
EXCELL PRECISION CO., LTD. Appendix 1 RS-232 Serial Interface RS-232 Command format: (1) The Host (PC) writes the data to the EEPROM of Slave (Scale). (2) The Host (PC) reads the data in the EEPROM of Slave (Scale), and the Slave (Scale) has the data feedback to the host (PC). - Page 61 EXCELL PRECISION CO., LTD. Final First EEPROM EEPROM Code Item address address Gross Tare Pre-Tare Target Weight Range High Limit Low Limit Percent (%) Weight units EEPROM address First unit EEPROM address Second unit EEPROM address Third unit EEPROM address...
- Page 62 EXCELL PRECISION CO., LTD. Format CR LF …………………. n Write EEPROM Code ( 59 ~ 63 ) numbers ( < 15 ) code n =number CR LF EEPROM Read ( 59 ~ 63 ) Write above two commands to the Host (PC), the Slave (Scale) has the following format feedback to the Host (PC).
- Page 63 EXCELL PRECISION CO., LTD. EEPROM address Format Transmission Press “Print” key in Simple Format Simple Weight mode Press “Print” key in Limit Format Limit Weight mode Press “Print” key in Target Format Target Weight mode Transmission of accumulation Press “Enter” key...
- Page 64 EXCELL PRECISION CO., LTD. Command Mode Command Format A Host Command Slave Command Zero Manually transmit Tare Command mode Gross weight Switch to the first unit Net weight Switch to the second unit Switch operation mode Switch to the third unit...
- Page 65 EXCELL PRECISION CO., LTD. Command Format C Host Command+ Data Slave Command+ Data Write Weight Comparison Settings Value WSXXXXXX : group (00 ~ 09) : settings item XXXXXX: Settings value Write LO settings value Write HI settings value Write Target settings value...
- Page 66 EXCELL PRECISION CO., LTD. Output Data Format 1. Seven digits (without including one decimal point) Weight format Gross 7 SP SP o Tare 6 SP SP k Plus OL + SP SP SP SP SP SP SP SP SP SP SP SP...
- Page 67 EXCELL PRECISION CO., LTD. 2. Six digits (without including one decimal point ) General weight format Gross 7 SP SP o weight Net weight S Tare 6 SP SP k Positive + SP SP SP SP SP SP SP SP SP SP SP...
- Page 68 EXCELL PRECISION CO., LTD. Serial Data Transfer / Receive Format n , 8 , 1 8-bit data STOP e , 7 , 1 7-bit data P STOP o , 7 , 1 7-bit data P STOP Notes: : Start bit...
-
Page 69: Appendix 2 Error Messages
EXCELL PRECISION CO., LTD. Appendix 2 Error Messages EEPROM does not function. Zero value* after power on is too high. Zero value* after power on is too low. The internal value is unstable. The platter is slanted (i.e. not level). -
Page 70: Appendix 3 7-Segment Display Characters
EXCELL PRECISION CO., LTD. Appendix 3 7-Segment Display Characters Number Display Letter Display Letter Display °C 02006100 ZSME300000379...