Table of Contents
Advertisement
Advertisement
Table of Contents

Related Manuals for ESI ES1247


Summary of Contents for ESI ES1247
- Page 1 ES1247 1 Channel Programmer User and Installation Instructions...
-
Page 3: Table Of Contents
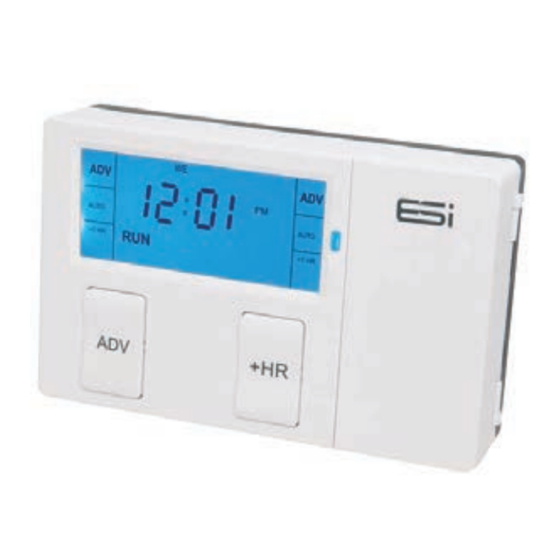
INDEX User Instructions What is a Channel Programmer? Introduction to the 1 Channel Programmer Programming the Unit- The Factory-set Programme - Changing the Programme Operating the Unit - Choosing the Operating Mode - Using the Advance Function - Using the +HR Boost Function Basic Settings - Setting the Time &... - Page 4 INDEX Installation Instructions Technical Data Installation Safety Instructions, Maintenance & Safety Notice Pre-Installation Unit Set Up Fitting the Back Plate New Installations Existing Installations Wiring Diagram Fitting the Programmer Commissioning Configuration...
- Page 5 User Instructions...
- Page 6 What is a Channel Programmer?... An explanation for householders Programmers allow you to set ‘On’ and ‘Off’ time periods. Some models switch the Central Heating and domestic Hot Water on and off at the same time, while others allow the domestic Hot Water and Heating to come on and go off...
- Page 7 Introduction to the 1 Channel Programmer This programmer can automatically switch your Central Heating or Hot Water ON and OFF up to 3 times a day, at whatever times you choose. Timekeeping is maintained through power interruptions by a non replaceable battery designed to last for the lifetime of the programmer and the clock is automatically put forward 1 hour at 1:00am on the last Sunday of March and back 1 hour at 2:00am on the last Sunday of October.
-
Page 8: Changing The Programme
Programming the Unit The Factory-Set Programme This is the factory-set programme built into the unit. If the user changes from the factory-set programme and wishes to return to it, pressing the reset button with a non metallic pointed tool will return the unit to the factory-set programme. - Page 9 To change the Programme times 1. Press the SET button (1) four times until the programme icon (2) flashes, and the first ON time appears. 2. Press the +/- buttons (3) to adjust the ON time. Please note, the time will change quicker if pressed continually. 3.
-
Page 10: Choosing The Operating Mode
Operating the Unit Choosing the Operating Mode Mode ON : Central Heating and Hot Water is ON continuously AUTO: Central Heating and Hot Water will be switched ON and OFF in accordance with set programmes ALL DAY: Central Heating and Hot Water will switch ON at the first ON and switch OFF at last OFF OFF: Central Heating and Hot Water will be permanently OFF... -
Page 11: Using The Advance Function
Using the Advance Function The ADVANCE function allows the user to move to the next ON/OFF programme for a “one off” event, without having to change the programme or use the ON or OFF buttons. NB: The ADVANCE function is only available when the programme is in AUTO or ALL DAY operating modes. -
Page 12: Using The +Hr Boost Function
Using the +HR Boost Function The +HR function allows the user to have up to 3 hours of extra Central Heating or Hot Water, without having to change the programme or use the ON or OFF buttons. NB: The +HR function is only available when the programme is in AUTO, ALL DAY or OFF operating modes. - Page 13 Basic Settings Setting the Time (refer to fig.4) 1. Press the SET button (1) once. The configuration setting will appear on the screen. (E.G. 2PU) 2. Press the SET button (1) again. The clock icon (2) on the screen will flash. 3.
-
Page 14: Setting The Backlight
Setting the Backlight The backlight can either be set permanently ON or OFF. The programmer backlight is pre-set to be permanently OFF. When the backlight is permanently OFF, the backlight will turn ON for 15 seconds when + or – button is pressed, then turn OFF automatically. To change setting to permanently ON, press SET repeatedly until L IR is displayed. - Page 15 Installation Instructions...
-
Page 16: Technical Data
Technical Data... - Page 17 Installation Safety Instructions The unit must be installed by a suitably qualified person in accord- ance with the latest IEE Wiring Regulations. Isolate mains supply before commencing installation. Please read all instructions before proceeding. Ensure that the fixed wiring connections to the mains supply is via a fuse rated at not more than 6 amps and class ‘A’...
-
Page 18: Pre-Installation Unit Set Up
Pre-Installation Unit Set Up Before installing, set the bank of 4 DIP Switches on the back to configure the unit according to the chart below: Not Used Not Used 7 Day 24 Hr 5/2 Day 2 On/Off 3 On/Off (DIP Switches shown in Factory Default Positions. 24 Hr: runs the same programme every day. -
Page 19: New Installations
Valves, Room Stats etc are general representations only. However, the wiring detail can be applied to the corresponding model of most manufacturers e.g. Horstmann, Honeywell, Danfoss Randall, Drayton, ESi Controls etc. Existing Installations 1. Remove old programmer from its back plate mounting loosening any securing screws as dictated by its design. -
Page 20: Wiring Diagram
Wiring Diagram... -
Page 21: Fitting The Programmer
Fitting the Programmer Loosen the two ‘captive’ retaining screws on the bottom of the back plate. Now fit the programmer to the back plate, ensur- ing the lugs of the back plate engage with the slots on the programmer. Swing the bottom of the programmer into position ensuring the connection pins on the back of the unit locate into the terminal slots in the back plate. -
Page 22: Configuration
Configuration When setting time, date or changing programme times the first screen displayed indicates the configuration. The 24 hour, 5 day/2day, or 7 day programming options as set up by the installer can also be verified at this stage by how the Monday to Sunday indicators are displayed. - Page 24 ESi Controls Limited sales@esicontrols.co.uk www.esicontrols.co.uk Version 3.1...