Table of Contents
Advertisement
Quick Links
Advertisement
Chapters
Table of Contents

Related Manuals for Yamaha DTX402K


Summary of Contents for Yamaha DTX402K
- Page 1 ELECTRONIC DRUM KIT DTX402K DTX432K DTX452K Owner’s Manual...
- Page 2 This product should be used only with the components supplied or; a When installing batteries, never mix old batteries with new ones, and cart, rack, or stand that is recommended by Yamaha. If a cart, etc., is never mix different types of batteries. Batteries MUST be installed cor- used, please observe all safety markings and instructions that accom- rectly.
- Page 3 Compliance with FCC regulations does not guarantee that interference will not * This applies only to products distributed by YAMAHA CORPORATION OF AMERICA. (class B) DTX402K DTX432K DTX452K Owner’s Manual...
-
Page 4: Important Safety Instructions
Netspændingen til dette apparat er IKKE afbrudt, sålænge netledningen sidder i en stikkontakt, som er tændt — også selvom der er slukket på apparatets afbryder. VAROITUS: Laitteen toisiopiiriin kytketty käyttökytkin ei irroita koko laitetta verkosta. DTX402K DTX432K DTX452K Owner’s Manual... -
Page 5: Table Of Contents
For DTX432K & DTX452K Owners ....57 Crash Cymbal ..........25 Connecting to a Computer......58 Performing with Installing the Yamaha Steinberg USB Driver ... 58 a Selected Music Category..... 26 MIDI-related Reference ........58 Selecting a Music Category ......26 Adjusting Kit Sensitivity........ -
Page 6: Precautions
For AC adaptor WARNING CAUTION • This AC adaptor is designed for use with only Yamaha electronic • When setting up, make sure that the AC outlet is easily accessible. If instruments. Do not use for any other purpose. some trouble or malfunction occurs, immediately turn off the power switch of the instrument and disconnect the AC adaptor from the outlet. - Page 7 Yamaha cannot be held responsible for damage caused by improper use or modifications to the instrument, or data that is lost or destroyed. Always turn the power off when the instrument is not in use.
- Page 8 Yamaha Corporation is not to the internal components or unstable operation. required in such cases.
-
Page 9: Welcome
Describes how to connect smart devices such as an iPhone and iPad. The digital format manuals listed above can be obtained from the Yamaha Downloads web page. To do so, go to the web page using the following URL, enter your drum kit name in the “Model Name” field, and then click “Search.”... -
Page 10: Setup
• Basic techniques used when operating and playing the electronic drum kit are described in the Basic Techniques section (pages 25 to 40). • More complex methods are described in the Advanced Tech- niques section (pages 41 to 56). DTX402K DTX432K DTX452K Owner’s Manual... -
Page 11: Package Contents
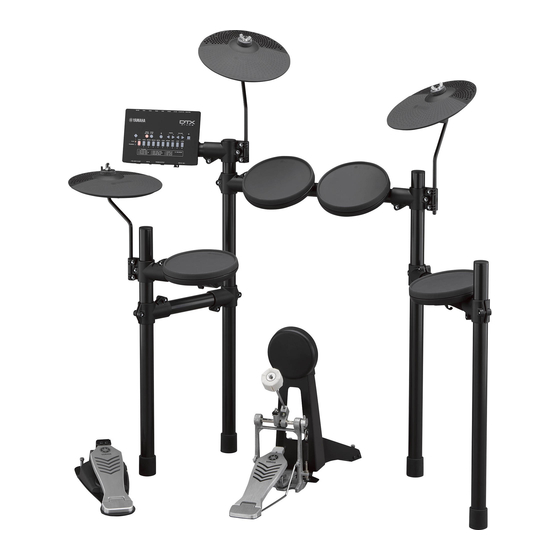
HH40 Hi-hat controller KU100 Kick unit Nine-channel snake cable Drum key Cable bands (×2) AC adaptor * May not be included depending on your particular area. Please check you’re your Yamaha dealer. Owner’s Manual (this booklet) DTX402K DTX432K DTX452K Owner’s Manual... - Page 12 Kick pad Foot pedal Nine-channel snake cable Drum key Cable bands (×2) AC adaptor * May not be included depending on your particu- lar area. Please check you’re your Yamaha dealer. Owner’s Manual (this booklet) DTX402K DTX432K DTX452K Owner’s Manual...
- Page 13 Kick pad Foot pedal Nine-channel snake cable Drum key Cable bands (×2) AC adaptor * May not be included depending on your particu- lar area. Please check you’re your Yamaha dealer. Owner’s Manual (this booklet) DTX402K DTX432K DTX452K Owner’s Manual...
-
Page 14: Assembly Guide
• The assistance of at least one other person will be required when assembling the elec- tronic drum kit. • Once a piece has been assembled, be sure to tighten the corresponding key bolts. • To disassemble your electronic drum kit, carry out the assembly sequence in reverse. DTX402K DTX432K DTX452K Owner’s Manual... - Page 15 Stand up the Small rack as shown in the figure and support it by hand. For the DTX452K, the snare pad will be attached to the Small rack in the following step. Loosen the key bolt. Open the lower pipe approximately 70° as shown in the Top view. DTX402K DTX432K DTX452K Owner’s Manual...
- Page 16 Place the snare pad on the hexagonal rod and slide it fully back. Then tighten the S wing bolt to secure the snare pad in place. Loosen the key bolt and adjust the angle of the snare pad. When finished, retighten the key bolt to secure the snare pad in place. DTX402K DTX432K DTX452K Owner’s Manual...
- Page 17 When correctly inserted, the tip of the hi-hat holder will protrude slightly from the bottom of the snare part. • When correctly oriented, the hi-hat holder will be horizontal to the snare part as shown in the Top view. Tighten the two key bolts to secure the hi-hat holder. DTX402K DTX432K DTX452K Owner’s Manual...
- Page 18 Loosen the s key bolt and slide the drum module fully back into the joint in Step 1 and s key bolts to secure the drum module in place. Tighten the DTX402K DTX432K DTX452K Owner’s Manual...
- Page 19 Place the cymbal pad on the cymbal holder, with the holder passing through the central hole. Step 1 Replace the felt pad removed in above the cymbal pad. Cymbal pad Tighten the wing nut to secure the cymbal pad in place. Felt pad Cymbal holder DTX402K DTX432K DTX452K Owner’s Manual...
- Page 20 Operate the pedal and confirm whether the beater head strikes the kick pad near the center. If not, adjust the length of the beater or move it left or right as required. Beater head Assembly bracket Raised section T-bolt DTX402K DTX432K DTX452K Owner’s Manual...
- Page 21 Arrange the hi-hat controller and the kick drum parts or kick unit as shown in the figure. IMPORTANT The hi-hat controller and the kick unit from the DTX402K are almost identical in appearance. They can be told apart by the sticker on the base section.
- Page 22 Right-handed • • • • • • • • • • • • • • • • Left-handed • • • • • • • • • • • • • • • • • • DTX402K DTX432K DTX452K Owner’s Manual...
-
Page 23: Setting Up For Sound
1/8" stereo-mini to stereo-mini cable Plug Standard 1/4" stereo-audio jack Slide the plug as indicated Portable music player, The shape of the plug etc. differs depending on your area. Standard 1/4" mono-audio jack Headphones Powered speakers DTX402K DTX432K DTX452K Owner’s Manual... -
Page 24: Turning On The Drum Module
For The drum module’s lights will flash and the Factory details, see the description of the Auto Power-Off Time Reset will be restored. parameter from Menu Mode (page 54). DTX402K DTX432K DTX452K Owner’s Manual... -
Page 25: Panel Controls & Functions
• In Training Mode, it is also used to start and stop train- • In Menu Mode, they are used to select settings. (page ing sessions. • Also in Menu Mode, they are used to enter setting val- ues directly. (page 41) DTX402K DTX432K DTX452K Owner’s Manual... -
Page 26: Bottom Panel
KP65, you can add another pad using the PAD > pads. IN jack on the KP65 (page 57). ⁄5 [HI-HAT CTL] jack (page 20) The Hi-hat Control jack is used to connect a hi-hat con- troller. DTX402K DTX432K DTX452K Owner’s Manual... -
Page 27: Basic Techniques
NOTE Head shots If using an HH40 Hi-hat Controller with the DTX402K, the velocity is fixed regardless of how strongly or softly the hi-hat Hitting the main surface of the pad produces a head shot controller’s pedal is depressed. -
Page 28: Performing With A Selected Music Category
• The selected sensitivity is common to the drum module’s ten kits. • If you wish to set sensitivities on an individual pad basis, see the descriptions of the Trigger Settings parameters from Menu Mode (page 48). DTX402K DTX432K DTX452K Owner’s Manual... -
Page 29: Performing With A Song
• Each time you press the VOLUME[–] button, you NOTE decrease the song volume by one. The score (PDF) is available at the Yamaha website: https://download.yamaha.com/ NOTE The set volume is common to the drum module’s ten songs. After accessing the Support website (and clicking on “Man- ual Library”), enter the appropriate model name. -
Page 30: Adjusting The Volume Of Muted Drum Parts
Each time you press the VOLUME[–] button, you decrease the volume of the muted drums by one. By pressing the [DRUM ON/OFF] button once again, you can unmute the drum parts and restore their normal vol- umes. DTX402K DTX432K DTX452K Owner’s Manual... -
Page 31: Using The Metronome
[1][0][8]. • Each time you press the VOLUME[–] button, you decrease the metronome volume by one. NOTE If you wish to turn off the voice guidance function, see 7-1. Voice Guidance Volume (page 53). DTX402K DTX432K DTX452K Owner’s Manual... -
Page 32: Adjusting The Tempo
Metronome pattern (in English). • Metronome length in beats • Example: Setting a tempo of 138 BPM Metronome sound Press the number buttons in the sequence • Number-button lighting pattern when using the metro- [1][3][8]. nome DTX402K DTX432K DTX452K Owner’s Manual... -
Page 33: Practicing In Training Mode
To start a different exercise, you need to reenter the training mode. Press the Mode switch to turn the “PLAY” light on (Play Mode). Press the Mode switch again to turn the “TRAINING” light on (Training Mode). DTX402K DTX432K DTX452K Owner’s Manual... -
Page 34: Rhythm Gate
Play the pads as rhythmically “tight” as you can along struck exactly in time. (Menu Mode “Ignore Timing”; with the song or the metronome. page 51.) DTX402K DTX432K DTX452K Owner’s Manual... -
Page 35: Dynamic Gate
Press number buttons [1] or [10] to select the level. [1] to [3] is “weak,” [4] to [7] is “normal,” and [8] to [10] is “strong.” The number buttons in the selected level become half lit. Weak Normal Strong DTX402K DTX432K DTX452K Owner’s Manual... -
Page 36: Song Part Gate
Song Part Gate, you can confidently work on Song Score Gate (page 35) for playing the entire song! NOTE The score (PDF) is available at the Yamaha website: https://download.yamaha.com/ After accessing the Support website (and clicking on “Man- ual Library”), enter the appropriate model name. -
Page 37: Song Score Gate
Song Part Gate (page 34) as much as possi- ble—and get you on your way to be a great drummer! NOTE The score (PDF) is available at the Yamaha website: https://download.yamaha.com/ After accessing the Support website (and clicking on “Manual Library”), enter the appropriate model name. -
Page 38: Measure Break
• The exercise time can be adjusted. (Menu Mode “Timer”; page 51.) Play the pads. To end the exercise, press the [ ] button. DTX402K DTX432K DTX452K Owner’s Manual... -
Page 39: Change Up
• You can set whether the pads produce sound Your score will be displayed. (For details, see page 31.) whenever they are struck or only when they are struck exactly in time. (Menu Mode “Ignore Timing”; page 51.) DTX402K DTX432K DTX452K Owner’s Manual... -
Page 40: Part Mute
To unmute, press the number but- ton again. The number button lights up. Press the [ ] button to start the exercise. Play along the song on the pads. To end the exercise, press the [ ] button. DTX402K DTX432K DTX452K Owner’s Manual... -
Page 41: Fast Blast
The timer will start when you strike the first pad. Strike pads as fast as possible. When the training has ended, your score will be dis- played. To stop the exercise, press the [ ] button. DTX402K DTX432K DTX452K Owner’s Manual... -
Page 42: Recorder
When you finish your performance, leave all pads with- out striking for certain period of time. The recording will be automatically stopped and the recorded performance will be played back. To end the exercise, press the Mode switch. DTX402K DTX432K DTX452K Owner’s Manual... -
Page 43: Advanced Techniques
7-10. Factory Reset ..........Page 56 ues. To enter the value 105, for example, press the number buttons in the order [1][10][5]. [10] is used to enter the value zero. You cannot use [10] to enter the number ten. DTX402K DTX432K DTX452K Owner’s Manual... -
Page 44: Metronome Settings
Hold down the Mode switch to activate Menu Mode. Press number button [1] to select the Metronome Set- tings parameter group. Press number button [3] to select the Sound parameter. DTX402K DTX432K DTX452K Owner’s Manual... -
Page 45: Kit Settings
Press number button [2] to select the Kit Settings parameter group. Press number button [2] to select the Pad Volume parameter. Strike a pad to select it. Enter a new volume using the TEMPO[+]/[–] buttons. Setting 0 to 127 DTX402K DTX432K DTX452K Owner’s Manual... -
Page 46: Pad Tuning
Hold down the Mode switch to activate Menu Mode. Small Stage Press number button [2] to select the Kit Settings Plate parameter group. Early Reflection [10] Gate Reverb Press number button [4] to select the Double Bass Drum parameter. DTX402K DTX432K DTX452K Owner’s Manual... -
Page 47: Midi Settings
• The drum module’s internal tone generator will continue to respond to received MIDI data when Local Control is turned off. • The drum module will continue to output drum performances as MIDI data when Local Control is turned off. DTX402K DTX432K DTX452K Owner’s Manual... -
Page 48: Hi-Hat Settings
“Off” if you do not want to play foot splashes. Hold down the Mode switch to activate Menu Mode. Press number button [4] to select the Hi-hat Settings parameter group. Press number button [2] to select the Splash Sensitiv- ity parameter. DTX402K DTX432K DTX452K Owner’s Manual... -
Page 49: Foot Close Velocity
Velocity parameter. Press number button [5] to select the Kick Velocity Enter a new velocity using the TEMPO[+]/[–] buttons. parameter. Setting Enter a new velocity using the TEMPO[+]/[–] buttons. 1 to 127 Setting 1 to 127 DTX402K DTX432K DTX452K Owner’s Manual... -
Page 50: Trigger Settings
Press number button [1] to select the Pad Velocity Curve parameter. Strike a pad to select it. Enter a new velocity curve setting using the Trigger input level TEMPO[+]/[–] buttons. Setting 1 to 25 Trigger input level Trigger input level Trigger input level DTX402K DTX432K DTX452K Owner’s Manual... -
Page 51: Crosstalk
• You can use setting [5] or [6] to switch (or reverse) the drum sounds assigned to Rim 1 and Rim 2. This makes it easier for left-handed drummers to configure their electronic drum kit. DTX402K DTX432K DTX452K Owner’s Manual... -
Page 52: Pedal Type
[2] to [5]. Press number button [6] to select the Minimum Level parameter. Strike a pad to select it. Enter a new setting (%) using the TEMPO[+]/[–] but- tons. Setting 0 to 99 (%) DTX402K DTX432K DTX452K Owner’s Manual... -
Page 53: Training Settings
• Song Score Gate • Change Up Hold down the Mode switch to activate Menu Mode. Press the number button [6] to select the Training Set- tings. Press the number button [3] to select Ignore Timing. DTX402K DTX432K DTX452K Owner’s Manual... -
Page 54: Rhythm Gate Indicator Flipped
High Limit. Set the threshold value using the TEMPO[+]/[–] but- tons. Setting 2 to 99 NOTE This setting may be automatically fixed so as not to be below the setting value of Dynamic Gate Low Limit. DTX402K DTX432K DTX452K Owner’s Manual... -
Page 55: Other Settings
Press the number button [2] to select Operation Sound Volume. Set your preferred volume using the number button [1] to [10]. Setting 1 to 10 NOTE Setting this parameter to [1] turns off the Operation Sound. DTX402K DTX432K DTX452K Owner’s Manual... -
Page 56: Usb Audio Output Settings
Press the number button [4] to select USB Audio Out- put Gain. Select the gain level using the number button [1] to [5]. Number button Setting -12 dB -6 dB 0 dB +6 dB +12 dB DTX402K DTX432K DTX452K Owner’s Manual... -
Page 57: Stereo/Mono
The song will be deleted. Steps: Hold down the Mode switch [7] [7] [1] [1] Hold down the Mode switch to activate Menu Mode. Press the number button [7] to select the Other Set- tings. DTX402K DTX432K DTX452K Owner’s Manual... -
Page 58: Revert To Last Power On
VOLUME[+] and [–] buttons held • If you do not wish to proceed with initialization, press down (page 22). the Mode switch now to exit Menu Mode. Press the number button [1]. • The settings will be initialized. DTX402K DTX432K DTX452K Owner’s Manual... -
Page 59: Integrating Separately Sold Accessories
By upgrading the KU100 Kick Unit and/or the hi-hat con- Turn off the drum module. troller included as part of the DTX402K, you can make your The HH65 Hi-hat Controller must be connected with electronic drum kit feel much closer to the real thing. -
Page 60: Connecting To A Computer
Yamaha Steinberg USB Driver. NOTE When you use a macOS computer or when you use a Windows computer only to handle MIDI data, installation of the Yamaha Steinberg USB Driver is not required. Download the latest Yamaha Steinberg USB Driver from the following URL. - Page 61 • Ensure that the Double Bass Drum parameter from Menu Mode is set to “Off” . (See page 44) • If you are using an HH65 Hi-hat Controller, set the Foot Close Position parameter from Menu Mode to a small value. (See page 46) DTX402K DTX432K DTX452K Owner’s Manual...
-
Page 62: Reference Troubleshooting
• Adjust the Gain parameter from Menu Mode. High settings will result in loud drum sounds. (See page 50) • Adjust the Pad Velocity Curve parameter from Menu Mode. (See page 48) • Ensure that you are using only the recommended Yamaha pads. (Products from other manufacturers can output excessively large signals.) ... - Page 63 If choke function does not work, try the following. • Ensure that you are using a crash cymbal pad with sensor. (See page 17) * You can also find troubleshooting tips in the MIDI Reference Manual (PDF). (See page 58) DTX402K DTX432K DTX452K Owner’s Manual...
-
Page 64: Data List
149 HipHopCr 4 68 Snap 1 108 T9-1 M 150 HipHopCr 5 69 Snap 2 109 T9-1 L 151 RevCym 1 70 Snap 3 110 Syn H 152 RevCym 2 111 Syn M 112 Syn L DTX402K DTX432K DTX452K Owner’s Manual... - Page 65 214 Darbuka Sl 266 KoTaik2Tsu 215 Darbuka Mt 267 TsuzumiPon 216 Sangban Op 268 TsuzumiBnd 217 Kenkeni Op 269 OokawaChon 218 AfricanBlH 270 Temple Blk 219 AfricanBlL 271 KontikiKon 220 Tombak Op 272 Kontiki Ki DTX402K DTX432K DTX452K Owner’s Manual...
-
Page 66: Specifications
* The contents of this manual apply to the latest specifications as of the publishing date. To obtain the latest manual, access the Yamaha website then download the manual file. Since specifications, equipment or separately sold accessories may not be the same in every locale, please check with your Yamaha dealer. -
Page 67: Index
Cable bands ....9, 10, 11, 20 MIDI Settings ........45 CHANGE UP ........37 Mode switch ........23 Choke ..........25 Music category list ......62 Yamaha Steinberg USB Driver ..58 Click..........29 Music Player ........21 Close ..........25 Mute ..........28 Closed rim shots......25 Computer.........58... - Page 68 Information on Disposal in other Countries outside the European Union: This symbol is only valid in the European Union. If you wish to discard these items, please con- tact your local authorities or dealer and ask for the correct method of disposal. (weee_eu_en_02) DTX402K DTX432K DTX452K Owner’s Manual...
- Page 69 DTX402K DTX432K DTX452K Owner’s Manual...
- Page 70 1 Year Coverage: YAMAHA will, at its option, repair or replace the product covered by this warranty if it becomes defective, malfunctions or otherwise fails to conform with this warranty under normal use and service during the term of this warranty, without charge for labor or materials. Repairs may be performed using new or refurbished parts that meet or exceed YAMAHA specifications for new parts.
- Page 71 Yamaha Vertragshändlern in den jeweiligen Bestimmungsländern erhältlich. Pour plus de détails sur les produits, veuillez-vous adresser à Yamaha ou au Para detalles sobre productos, contacte su tienda Yamaha más cercana o el distributeur le plus proche de vous figurant dans la liste suivante.
- Page 72 Yamaha web site https://www.yamaha.com/ Yamaha Downloads https://download.yamaha.com/ Manual Development Group ©2018 Yamaha Corporation Published 04/2018 POMA*.*-**A0 ZZ03340...