Advertisement
Quick Links
DIN-AP3
DIN Rail 3-Series
Automation Processor
®
Installation & Operation Guide
Description
The DIN-AP3 is a Crestron
®
3-Series Control System
®
automation processor that is
designed for DIN rail-mounting applications. The device includes built-in control ports,
high-speed Ethernet, Cresnet
®
network support, and BACnet network/IP support. DIN
rail mounting allows for con guring complete automation systems using the DIN-AP3
along with additional Crestron and third-party DIN rail-mountable devices.
Additional Resources
Visit the product page on the Crestron website (www.crestron.com)
for additional information and the latest rmware updates. Use a QR
reader application on your mobile device to scan the QR image.
Installation
CAUTION: This equipment is intended for indoor use only. Mount the DIN-AP3 in a
well-ventilated area. The ambient temperature must be 0 ˚C to 40 ˚C (32 ˚F to 104 ˚F).
The relative humidity must be 10% to 90% (noncondensing).
CAUTION: To prevent overheating, do not operate the DIN-AP3 in an area that
exceeds the environmental temperature range listed above. Consider using forced air
ventilation to reduce overheating. Also use caution if installing the control system in a
closed or multiunit rack assembly, since the operating ambient temperate of the
environment may be greater than the room ambient temperature. Contact with thermal
insulating materials on all sides of the unit should be avoided.
NOTES: Observe the following guidelines:
• Install and use the DIN-AP3 in accordance with appropriate electrical codes and
regulations.
• A licensed electrician must install the DIN-AP3.
• When installing in an enclosure, group high-voltage devices separately from
low-voltage devices.
NOTE: Before using the DIN-AP3, ensure that the device is using the latest rmware.
Check for the latest rmware for the DIN-AP3 at www.crestron.com/ rmware. Load the
rmware onto the device using Crestron Toolbox™ software.
Preparing and Connecting Wires
When making connections, strip the ends of the wires approximately 7/16 in (11 mm).
Use care to avoid nicking the conductors. Tighten the connector to 5 in-lb
(0.5 to 0.6 Nm). The wire gauge should be 14 to 26 AWG.
Installing the DIN-AP3
Use the DIN-AP3 in a well-ventilated area. The venting holes should not be obstructed
under any circumstances. The DIN-AP3 is designed for installation in a DIN rail. Refer to
the following diagram when installing.
Installing the DIN-AP3
DIN-AP3
Rail mount (top)
DIN rail
(not included)
DIN rail
release tab
Use the following procedure to install the DIN-AP3:
1. Use a at object (such as a at-head screwdriver) to pull the DIN rail release tab
downward.
2. Place the top of the DIN-AP3's rail mount over the top of the DIN rail.
3. Tilt the bottom of the DIN-AP3 toward the DIN rail until it snaps into place.
NOTE: When mounting DIN rail products, use a at-head screwdriver to pull the
DIN rail release tab while snapping the device onto the DIN rail.
To remove the DIN-AP3 from the DIN rail, use a small, at object (such as a at-head
screwdriver) to pull the DIN rail release, and then tilt the bottom of the DIN-AP3 away
from the DIN rail.
NOTE: Certain third-party DIN cabinets provide space for an informational label
between each DIN rail row. Crestron's Engraver software (version 4.0 or later) can
generate appropriate labels for all Crestron DIN rail products.
Hardware Hookup
Make any necessary connections to the device, and apply power after all connections
have been made.
NOTE: When making connections to the DIN-AP3, observe the following points:
• Use Crestron power supplies for Crestron equipment.
• The included cable cannot be extended.
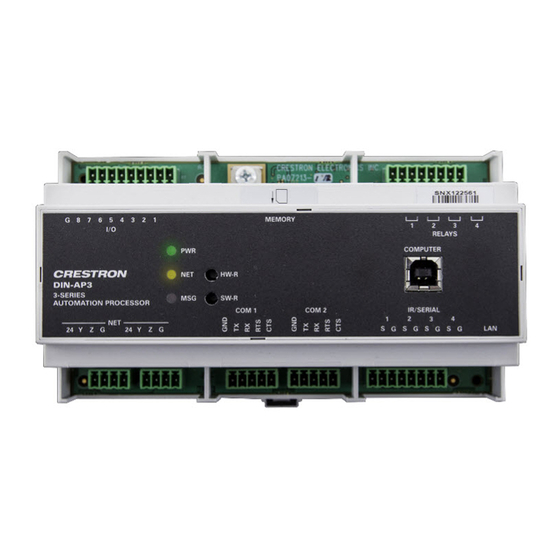
Hardware Connections for the DIN-AP3 (Front View)
I/O (G, 8—1):
To controllable devices
from device outputs
RELAY (1—4):
(contact closure or
To controllable
relay closure)
Ground
devices
NET (24 Y Z G):
COM (1—2):
IR/SERIAL (1—4):
To any Cresnet
To RS-232/-422/-485
To IRP2 or serial
network device
devices
devices
Hardware Connections for the DIN-AP3 (Bottom View)
LAN:
10Base-T/100Base-Tx
Ethernet to LAN
Hardware Connections for the DIN-AP3 (Top View)
Memory:
For SD card
NOTE: Ensure that the unit is properly grounded by connecting the chassis ground lug
to an earth ground (building steel).
NOTE: To prevent overheating, do not operate this product in an area that exceeds
the environmental range stated in the "Installation" section.
COM Port Wiring Connections
The DIN-AP3 provides two bidirectional RS-232/-422/-485 ports (COM 1–2). Refer to the
following table when making connections to the COM ports.
DIN-AP3 COM Port Pinout
PORT
RS-232
RS-422
G
GND
GND
TX
TX (from DIN-AP3)
TX- (from DIN-AP3)
RX
RX (to DIN-AP3)
RX+ (to DIN-AP3)
RTS
RTS (from DIN-AP3)
TX+ (from DIN-AP3)
CTS
CTS (to DIN-AP3)
RX- (to DIN-AP3)
1. RS-422 transmit and receive are balanced signals requiring two lines plus a ground in each direction.
RXD+ and TXD+ should idle high (going low at the start of data transmission). RXD- and TXD- should
idle low (going high at the start of data transmission). If necessary, RXD+/RXD- and TXD+/TXD- may be
swapped to maintain correct signal levels.
COMPUTER:
2. A ground terminal connection is recommended but not required.
To computer
console
Con gure the Control System
The control system can be con gured using Crestron Toolbox or the built-in, web-based
setup tool.
Crestron Toolbox
Use Crestron Toolbox to establish communication with and to con gure the control
system. For details, refer to the embedded Crestron Toolbox help le.
Web-Based Setup Tool
1. Use Crestron Toolbox to set the time and the time zone. For details, refer to the
embedded Crestron Toolbox help le.
2. Open the Internet Explorer
web browser and enter the IP address of the DIN-AP3.
®
The control system's splash page is displayed.
NOTE: The web-based setup tool is accessible only from Internet Explorer.
NOTE: If a security warning is displayed, click Install to continue.
DIN-AP3 Splash Page
3. Click Setup to display the DIN-AP3 setup menu. The DIN-AP3 Setup menu
displays the IP address, hostname, and MAC address of the device. The screen
also allows access to various setup and programming screens.
DIN-AP3 Setup Menu
1
RS-485
GND
2
TX-/RX-
Not Used
TX+/RX+
Not Used
4. From the DIN-AP3's Setup menu, click the following options to con gure the
control system:
• Ethernet Setup con gures the DIN-AP3's Ethernet settings and displays DHCP,
hostname, IP address, subnet mask, default router, domain, and MAC address
settings. In the Ethernet Setup menu, there are additional options:
• Click Advanced Settings to specify DNS servers, web server settings, and
SSL settings.
• Click MyCrestron Dynamic DNS to configure the myCrestron.com Dynamic
DNS service.
• Click Ethernet Diagnostics to test the Ethernet communications.
• Click Reboot to reboot the DIN-AP3.
• Application Setup selects the programs to be loaded on start-up and the
controls that programs are running.
• Diagnostics displays information about the connected devices, hardware
con guration, and error logs.
• About displays rmware information.
Click the back button (
) to return to the previous screen.
Advertisement

Related Manuals for Crestron DIN-AP3


Summary of Contents for Crestron DIN-AP3
- Page 1 DIN rail release tab while snapping the device onto the DIN rail. Additional Resources To remove the DIN-AP3 from the DIN rail, use a small, at object (such as a at-head screwdriver) to pull the DIN rail release, and then tilt the bottom of the DIN-AP3 away Visit the product page on the Crestron website (www.crestron.com)
- Page 2 Agreement. Crestron product operating system software is licensed to Crestron dealers, CSPs, and Laboratories Inc. proprietary interest in the marks and names of others. Crestron is not responsible for errors in harmful interference to radio communications. However, there is no guarantee that interference will not end-users under a separate End-User License Agreement.