Table of Contents
Advertisement
Quick Links
Assembling the ANT3038XR
BEFORE YOU START!!!
Please read the IMPORTANT SAFETY INFORMATION sheet included in this
package.
Step 1: Unpack
Remove all three sections of the antenna and the hardware bag from package.
Make sure the following parts are in the package:
• (3) Antenna sections (rear, large/middle, and front booms)
• (1) Boom brace
• (1) Hardware bag
The hardware bag contains the following pieces:
(2) U-Bolts
(2) Mast clamp inserts
(10) #10 Flange nuts
(8) #10 Washers
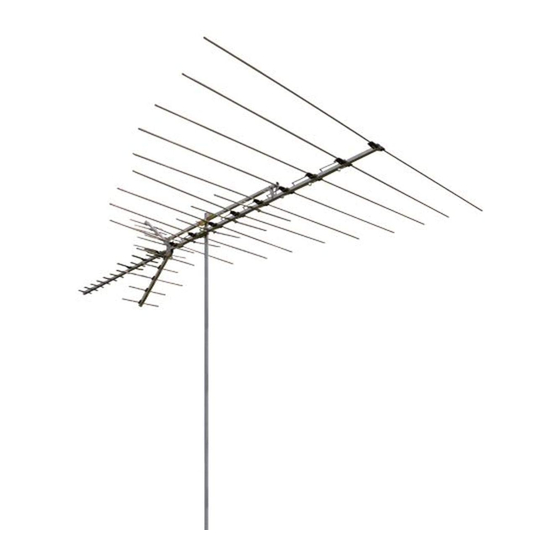
Rear Boom
Fig.1: ANT3038XR fully assembled
ANT3038XR
Outdoor Antenna
User's Guide
Para obtener instrucciones en español,
consulte la página 9.
• (2) Refl ector booms
(4) 1/4" Flange nuts
(5) End caps
(4) #10 Screws
(1) Matching transformer
Boom Brace
Large Boom
Mast
(Not Included)
(mast not inclued)
Front Boom
Reflector
Booms
Advertisement
Table of Contents

Related Manuals for RCA ANT3038XR


Summary of Contents for RCA ANT3038XR
- Page 1 The hardware bag contains the following pieces: (2) U-Bolts (2) Mast clamp inserts (10) #10 Flange nuts (8) #10 Washers Rear Boom Fig.1: ANT3038XR fully assembled ANT3038XR Outdoor Antenna User’s Guide Para obtener instrucciones en español, consulte la página 9.
- Page 2 Step 2: Connect the refl ector booms to the front (small) boom Fig. 1 Fig. 2 Locking Tab FRONT Main Boom Fig. 2A Step 3: Unfold the rest of the antenna Unfold all the other elements on the antenna until they lock into place ensuring that they are fl...
- Page 3 Step 4: Connect the middle (large) section to the front (small) section Find the middle (large) section. Locate the end of the middle section that matches fi gure 4. Middle section Fig. 4 Step 5: Connect the phasing lines Place the phasing lines from the front section over the studs. Secure them to the studs with #10 fl...
- Page 4 Step 6: Connect the rear section to the middle (large) section Step 7: Connect the phasing lines Phasing line Stud Fig. 7 On the open end of the middle (large) section, remove the rear nut and screw. Screw Find the rear section. Slide the narrow boom of the rear antenna into the middle (large) section.
- Page 5 Step 8: Connect the boom brace Lay the boom brace on top of the antenna. Make sure the mast clamps (the brass-colored sections) on the boom brace and antenna are facing the same direction. Fig. 8 Fig. 9 Screw Step 9: Install the transformer Find the downlead connection on the bottom of the front section of the antenna, just beyond the refl...
- Page 6 Step 10: Insert end caps Fig. 11 Step 11: Mount the antenna to a mast #10 Nuts Boom brace Clamp insert Main boom Clamp insert Fig. 12 Fig. 13 Insert two of the plastic end caps in the ends of the antenna as shown in fi...
- Page 7 Step 12: Connect the coax downlead to your TV or preamplifi er Fig. 14 NOTE: Point the small end of the antenna towards the station(s). Important: Point The Antenna Toward Your Local Broadcast Towers Visit www.antennaweb.org to see the locations of your local broadcast towers.
- Page 8 12 Month Limited Warranty Audiovox Electronics Corporation (the “Company”) warrants to the original retail purchaser of this product that should this product or any part thereof, under normal use and conditions, be proven defective in material or workmanship within 12 months from the date of original purchase, such defect(s) will be repaired or replaced (at the Company’s option) without charge for parts and repair labor.
Need help?
Do you have a question about the ANT3038XR and is the answer not in the manual?
Questions and answers