Rinnai RU98i Installation Manual
Common vent
Hide thumbs
Also See for RU98i:
- Installation manual (88 pages) ,
- Installation and operation manual (107 pages) ,
- Service manual (60 pages)
Table of Contents
Advertisement
Common Vent Installation Manual
For the RU98i (REU-KB3237FFUD-US) Condensing Water Heater
This manual is a supplement to the appliance manual.
Additional information can be obtained from the Rinnai water heater manual.
The exhaust vent system, CVent, is supplied by Ubbink.
WARNING
— Do not store or use gasoline or other flammable vapors and liquids in the vicinity of this or any other
appliance.
— WHAT TO DO IF YOU SMELL GAS
Do not try to light any appliance.
Do not touch any electrical switch; do not use any phone in your building.
Immediately call your gas supplier from a neighbor's phone. Follow the gas supplier's instructions.
If you cannot reach your gas supplier, call the fire department.
— Installation and service must be performed by a licensed professional.
This entire manual must be left for the consumer. The consumer must read and
refer to this manual for proper operation and maintenance of the common vent system.
100000287 Version B
12/2012
Certified to ANS Z21.10.3 - CSA 4.3
Only for U.S. installations
If the information in these instructions is not followed exactly, a fire or explosion
may result causing property damage, personal injury or death.
1
Rinnai CVent
Advertisement
Table of Contents

Related Manuals for Rinnai RU98i


Summary of Contents for Rinnai RU98i
- Page 1 For the RU98i (REU-KB3237FFUD-US) Condensing Water Heater This manual is a supplement to the appliance manual. Additional information can be obtained from the Rinnai water heater manual. The exhaust vent system, CVent, is supplied by Ubbink. Certified to ANS Z21.10.3 - CSA 4.3 Only for U.S.
-
Page 2: Table Of Contents
For the exhaust flue, CVent utilizes a CSA-certified and tested polypropylene venting material from Ubbink, the same supplier for Rinnai's innovative line of concentric venting. The various sections are self locking and sealing and can be pushed together without use of cement or glue. -
Page 3: Safety Symbols
121,600 NOTE: Installation is certified for sea level (0-2000 ft) * RU98i (REU-KB3237FFUD-US) only. For installations above 2000 ft refer to the Altitude: 0-2000 feet Rinnai Operation and Installation Manual for Natural and propane gas other venting options. Rinnai CVent... -
Page 4: Parts/Kits
CVENT ELBOW D4 X 87° WITH CLEANOUT CVENT EXTENTION, D4 X L18 CVENT APPLIANCE ADAPTER, CHECK VALVE AND HOSE TRAP CVENT COMB. AIR COLLECTOR, 1 CONNECTION, D8 X L20 X D3 CVENT COMB AIR FLEX FITTING, D3 CENTROCERIN LUBRICANT Rinnai CVent... - Page 5 CVENT COLLECTOR, 2 CONNECTION, D8 X L20 CVENT ELBOW D4 X 87° WITH CLEANOUT CVENT EXTENSION, D4 X L18 CVENT APPLIANCE ADAPTER WITH CHECK VALVE AND TRAP CVENT COMB. AIR COLLECTOR, 2 CONNECTION, CVENT COMB. AIR FLEX FITTING, D3 CENTROCERIN LUBRICANT Rinnai CVent...
- Page 6 CVent 8-in Roof Termination Adapter Lubricant (Outer shell: Stainless Steel) (For Combustion Air PVC transition) Cvent 8-in Wall Termination Kit (Combustion Air & Exhaust) 790004 Ø0.24” (Qty. 4) 31” Ø7.89” Ø12.2” Centrocerin lubricant Interior Slip (Material: Stainless Steel) Fit Wall Plate Rinnai CVent...
- Page 7 Combustion Air PVC Adapter Kit #780037 CVent 8-in CVent 8in Vent CVent 8in Vent Rain Cap Bracket #790024 Distancer #790031 #790034 CVent Flat Roof Flashing #790002 CVent 8-in Chase Cover #790030 CVent Pitched Roof Flashing (Including Storm Collar) #790003 Rinnai CVent...
-
Page 8: Sample Roof Installation
CVent 8-in Rain Cap #790034 Field Supplied 8” PVC Flashing NOTE: Use PVC adapter (illustrate above) at the combustion air header when transitioning to CVent 8-in Roof Termination Kit with PVC Adapter #790001 Cvent pitched roof moldable flashing #790003 Rinnai CVent... -
Page 9: Sample Horizontal Termination Installation
Combustion Air & Exhaust (Qty 2) (Qty. 2) Field Supplied PVC Components Part Number: 790008 CVent Back-2-Back Kit (QTY. 4) Part Number: 790005 CVent Starter Kit (Qty. 1) Part Number:780037 Combustion Air PVC Adapter Kit (Qty. 1) Field Supplied PVC Components Rinnai CVent... -
Page 10: Spare Parts List
780045 Combustion Air Collector, 2 connection, D8 x L20, D3 connection 790008 Ø8 Ø3 Ø3 Ø3 790007 780050 CVent flex Line D3 790008 Appliance Adapter Ø4 790007, 790038 CVent Appliance and Check Valve & hose (new!) 790008 Ø3 Rinnai CVent... -
Page 11: Venting Guidelines
INFORMATION contain corrosive compounds. Unless recovering a tank, Rinnai recommends MUST DO installing an MSB controller when common • The water heater dip switch setting must always... -
Page 12: Maximum Equivalent Vent Length
IS GREATER with a length of more than 59 in (1.5 m), must, depending on the amount of wind and snow level expected, be additionally secured to the building with guys or EXHAUST - CVent braces. INTAKE - PVC Rinnai CVent... -
Page 13: Cvent Termination Clearances
As a result a plume of water vapor may be seen leaving the exhaust. EXHAUST VENT MAXIMUM 20’ MINIMUM 36” COMBUSTION VENT Rinnai CVent... -
Page 14: Exhaust Vent Termination Clearances
[2] Permitted only if veranda, porch, deck, or balcony is fully open on Clearance to opposite wall is 24 inches (60 cm). a minimum of two sides beneath the floor. Rinnai CVent... -
Page 15: Additional Clearances
Represents the exhaust vent of CVent common venting. (0.91 m) between 60" 36” terminals at different levels 36” (0.91 m) between terminals at same level Rinnai CVent... -
Page 16: Maintenance Clearances
5.15” Water Heater Clearances Follow the minimum clearances from the water heater. Indoor to top to Non- model Combustibles Combustibles RU98i inches (mm) inches (mm) Top of Heater 6 * (152) 2 *(51) Back of Heater 0 (zero) 0 (zero) -
Page 17: Installation Instructions
Securing Screw connector to the Combustion Air Collector. Combustion Air Collector Exhaust Collector Flex Connector • Connect the open end of the elbow to the exhaust header. Elbow Rinnai CVent... - Page 18 Fasten, secure, and support all vent materials using manufacturer and industry standards to avoid potential intake air leaks or blockage. Support horizontal vent runs a minimum of every 4 feet and all vertical vent runs a minimum of every 6 feet. Rinnai CVent...
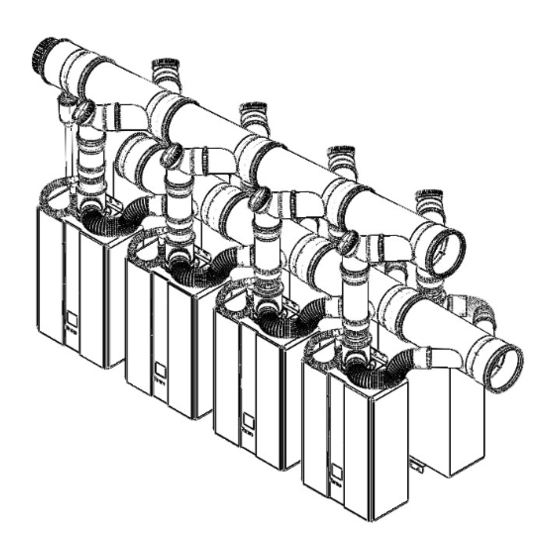
- Page 19 Installation Instructions Refer to the Ubbink appendix of this manual for the vent system assembly instructions. Follow these Rinnai installation instructions in this manual in addition to the Ubbink vent system assembly instructions. Install the venting according to one of the 2 configurations below. Do not locate the common vent remotely from the water heaters.
- Page 20 20.5” spacing (center line to center line) between water heaters. If a different spacing is needed, please contact Rinnai concerning your application. Rinnai recommends using our Tankless Rack System (TRS) which is designed for 20.5” spacing. Our engineered system is designed to make installation simple which greatly reduces labor time and the chance of miscalculations.
- Page 21 A condensate pump must be used if the condensate outlet is lower than the public sewage system. Rinnai recommends installing a condensate neutralizer which allows condensate to flow through neutralizing media to raise the pH of the condensate to a level that will help prevent corrosion of the drain and public sewer system.
-
Page 22: Common Header Check Valve Maintenance
When seal rings are damaged by the inspection these must be replaced, they cannot be repaired by using a silicon sealant or other. Note: Rinnai recommends replacing the check valve when replacing the water heater. Rinnai CVent... -
Page 23: Final Checklist
Final Checklist □ Reference the Rinnai Water Heater Operation and Installation Manual for proper installation of the Rinnai water heaters. □ Clearances from the water heater unit are met. □ Clearances from the exhaust termination(s) and the combustion air termination(s) are met. -
Page 24: Ubbink Cvent Assembly Instructions
• Installation of components which are not part of the CVent system. • Subsequent damage, which occurred through further use of the CVent system despite known defects. • Intentional damage. These installation instructions should be kept with the appliances for maintenance Rinnai CVent... - Page 25 These installation instructions were compiled in accordance with the current state of technology and with the greatest care. They serve as a general guideline for the construction and operation of the CVent Common Vent System as sup- plied by Rinnai US, manufactured by Ubbink. If you have any further questions please contact our experts .
-
Page 26: A9 List Of Components
All vent joints shall fully engage the male / female socket assembly • Installed vent system shall be clean and free of any foreign debris before operation. • Vent system shall be rigidly supported as instructed in this manual and include the appropriate 3° slope. Rinnai CVent... - Page 27 Pipes are always shortened on the male end. Never cut or modify formed vent components such as elbows or collectors. 1/4 “ ( Cut straight ,perpendicular to the tube and chamfer the edges approxi- mately 15° at 1/4”. Rinnai CVent...
-
Page 28: A7 Condensate And Condensate Drain
• Conversions or change to the system components are not permissible without approval by Rinnai. • After assembly of the CVent Common Vent System a visual inspection of all seals must be completed. - Page 29 8”transparent vent pipe can be shortened using a fine tooth saw. Always deburr the edges. 8. Confirm the termination is in the vertical position then install item 7 (Termination Clamp) to the structure beneath the roof flashing. Rinnai CVent...
-
Page 30: A10 Preliminary Works On The Chase
Both intake and exhaust terminations are appropriately positioned and comply with the manu- facturers installation instructions and local codes. The CVent Common Vent System Installation Instructions and the Appliance Installation In- structions have been secured to the system or provided to the end user. Rinnai CVent... -
Page 31: A14 Installation And Maintenance Of The Check Valves
The chimney is put into operation together with the heating appliance. • Regular cleaning and maintenance in accordance with valid country-specific regulations Note The check valves must be inspected for debris and checked annually, or after 4000 operation hours. Rinnai CVent... -
Page 32: A18 Application Manufacturer's Information
Nominal diameter of the selected system chimney: Constructor of the chimney with full name ((Stamp) legible and with signature): (Name) (Street address) (Signature) OEM Manufacturer identification Ubbink/Centrotherm Centrotec Sustainable AG Verhuellweg 9 6984AA Doesburg, The Netherlands Mail: rolux@ubbink.nl Rinnai CVent...