Advertisement
Quick Links
Advertisement

Related Manuals for Rangemaster GLX490 RM


Summary of Contents for Rangemaster GLX490 RM
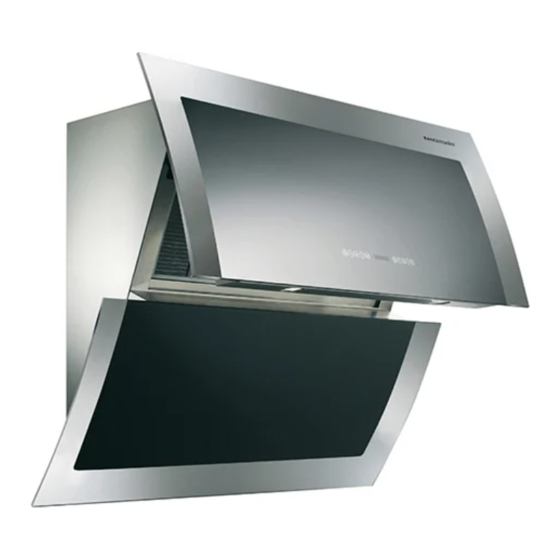
- Page 1 GLX490 RM GALAXY HOOD GLASS Instructions Manual www.rangemaster.co.uk...
-
Page 2: Table Of Contents
Instructions Manual INDEX RECOMMENDATIONS AND SUGGESTIONS ... 3 CHARACTERISTICS ... 4 INSTALLATION... 6 USE ... 9 MAINTENANCE ... 11... -
Page 3: Recommendations And Suggestions
RECOMMENDATIONS AND SUGGESTIONS The Instructions for Use apply to several versions of this appliance. Accord- ingly, you may find descriptions of individual features that do not apply to your specific appliance. INSTALLATION • The manufacturer will not be held liable for any damages resulting from incor- rect or improper installation. -
Page 4: Characteristics
CHARACTERISTICS Dimensions... - Page 5 Components Ref. Q.ty Product components Cooker hood with control unit, lights, blower unit, filters Upper chimney Lower chimney Air outlet grid Reducer flange Ø 150-120 Adapting ring ø 120-125 mm 14.1 Air Outlet Connection Extension Air Outlet Connection Cover for recycling version Ref.
-
Page 6: Installation
INSTALLATION Hood body mounting • Firstly, it is necessary to adjust the two Vr-screws of the 11a-brackets, at minimun (B). • Hang the hood body on the two brackets 11a. • Connect the hood to the mains supply by means of a bipolar switch with at least 3 mm contact gap. - Page 7 RECYCLING VERSION AIR OUTLET To install the hood in recycling version, the optional charcoal filter kit must be purchased. • Remove the chimney angle bracket. • Screw the filter cover onto the air outlet, using four screws 12c (2.9 x 12.5). •...
- Page 8 Flue assembly Upper exhaust flue • Slightly widen the two sides of the upper flue and hook them behind the brackets 7.2.1, making sure that they are well seated. • Secure the sides to the brackets using the 4 screws 12c (2,9 x 9,5) supplied.
-
Page 9: Use
Key Function Upper panel closed: when pressed for about one sec- ond it opens the upper panel. It switches the motor on at the latest selected speed. Upper panel open: when shortly pressed it switches the motor on/off. Decreases the suction speed. Increases the suction speed. - Page 10 REMOTE CONTROL (OPTIONAL) The appliance can be controlled using a remote control powered by a 1.5 V carbon-zinc alkaline batteries of the standard LR03-AAA type. • Do not place the remote control near to heat sources. • Used batteries must be disposed of in the proper manner.
-
Page 11: Maintenance
MAINTENANCE Metal grease filters Filters can be washed in the dish machine. They need to be washed when Drop-sign appears on the display or in any case every 2 months, or even more frequently in case of particularly intensive use of the hood. Alarm reset •... - Page 12 This filter cannot be washed or regenerated. It must be replaced when the C appears on the display or at least once every 4 months. The filter saturation alarm has to be activated already before. Activation of the alarm signal •...
- Page 13 Replacing the fuser The hood panel opening and closing mechanism is con- trolled by a starter motor which is activated by a fuser. This fuser works only on the starter motor. In case the fuser gets damaged when the panel is closed it is be necessary to manually unblock the panel.
- Page 16 AGA RANGEMASTER LTD. 436004217_ver1...