Table of Contents

Related Manuals for Fluke IDA-5


Summary of Contents for Fluke IDA-5
- Page 1 IDA-5 Infusion Device Analyzer Users Manual FBC-0039 April 2013 Rev. 1 © 2013 Fluke Corporation. All rights reserved. Specifications are subject to change without notice. All product names are trademarks of their respective companies.
- Page 2 Fluke Biomedical warrants this instrument against defects in materials and workmanship for one year from the date of original purchase OR two years if at the end of your first year you send the instrument to a Fluke Biomedical service center for calibration. You will be charged our customary fee for such calibration. During the warranty period, we will repair or at our option replace, at no charge, a product that proves to be defective, provided you return the product, shipping prepaid, to Fluke Biomedical.
-
Page 3: Unpacking And Inspection
Fluke Biomedical, we recommend using United Parcel Service, Federal Express, or Air Parcel Post. We also recommend that you insure your shipment for its actual replacement cost. Fluke Biomedical will not be responsible for lost shipments or instruments that are received in damaged condition due to improper packaging or handling. - Page 4 To ensure the accuracy of the Product is maintained at a high level, Fluke Biomedical recommends the product be calibrated at least once every 12 months. Calibration must be done by qualified personnel. Contact your local Fluke Biomedical representative for calibration.
-
Page 5: Table Of Contents
Table of Contents Title Page Introduction ......................1 Intended Use ...................... 1 Unpack the Product .................... 1 Safety Information ..................... 2 Symbols ......................3 Instrument Familiarization ................. 4 Product Connections ..................6 Connect Infusion Devices ................6 Connect Drains to the Product ............... 7 Connect Accessories .................. - Page 6 IDA-5 Users Manual Product Maintenance ..................29 Clean the Product ..................29 Outside ...................... 29 Inside ......................29 Test Fluid ....................... 29 Storage ......................30 Shipping ......................30 Specifications ..................... 30 General Specifications ................... 30 Performance Specifications ................30 Other Specification ..................31 Appendices Remote Operation ....................
- Page 7 Contents (continued)
-
Page 9: List Of Tables
List of Tables Table Title Page Symbols ........................3 Front-Panel Controls and Connections ..............4 Rear-Panel Controls and Connections ..............5 Channel Setup Screen Controls ................10 Device Information Fields ..................11 Device Information Controls .................. 12 Device Detail Information Fields ................12 Flow Screen Menu Controls ................... - Page 10 IDA-5 Users Manual...
-
Page 11: List Of Figures
List of Figures Figure Title Page Infusion Device Connections to the Product ............6 Drain Connections to the Product ................7 Status All Channels Screen ..................8 Utilities Screen ....................... 9 Channel Flow Screen ..................... 13 Channel Flow Graph ....................15 Occlusion Graph Screen .................. - Page 12 IDA-5 Users Manual viii...
-
Page 13: Introduction
Introduction The Fluke Biomedical IDA-5 Infusion Device Analyzer (the Product) is a precision instrument that examines the performance of medical infusion devices. The Product measures the flow rate and volume supplied, and the pressure generated in occlusion or blockages of the fluid line. A maximum of 4 infusion devices can be independently examined with the four-channel version of the Product. -
Page 14: Safety Information
IDA-5 Users Manual Safety Information A Warning identifies hazardous conditions and actions that could cause bodily harm or death. A Caution identifies conditions and actions that could harm the Product, the equipment under test, or cause permanent loss of data. -
Page 15: Symbols
Product Category: With reference to the equipment types in the WEEE Directive Annex I, this product is classed as category 9 "Monitoring and Control Instrumentation” product. Do not dispose of this product as unsorted municipal waste. Go to Fluke’s website for recycling information. -
Page 16: Instrument Familiarization
IDA-5 Users Manual Instrument Familiarization Tables 2 and tell you about the controls and connections on the front and rear panels of the Product. Table 2. Front-Panel Controls and Connections gir01.eps Item Description Display (LCD) Power on indicator ... - Page 17 Infusion Device Analyzer Instrument Familiarization Table 3. Rear-Panel Controls and Connections gir02.eps Item Description Handle Power switch Power inlet Equipotential post USB “B” connector – Computer connection. USB “A” connectors – Connect a maximum of four accessories such as: Keyboard ...
-
Page 18: Product Connections
IDA-5 Users Manual Product Connections The Product connects to infusion devices through the front-panel inlet ports. Fluid drain hoses and accessories connections are made through the rear-panel connections. Connect Infusion Devices As shown in Figure 1, it is recommended that all infusion device connections be made to the Product front-panel inlet connectors through 3-way stopcocks. -
Page 19: Connect Drains To The Product
Infusion Device Analyzer Connect Accessories Caution Do not use delivery set or components that have been used for prior testing for patient infusion. Note Before you use the delivery set (tubing, syringe, etc.), make sure it is within the specified use period of the manufacturer. Many sets are made to be used only once. -
Page 20: Keyboard
IDA-5 Users Manual Keyboard It is recommended that a small footprint USB keyboard be used with the Product. The keyboard is necessary to record data about the infusion device under test. Note The keyboard must not have an internal USB hub (for example, no extra USB ports). -
Page 21: Preferences
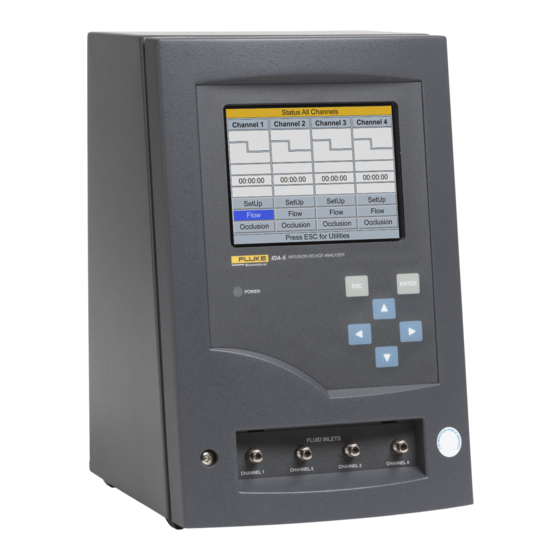
Infusion Device Analyzer Product Operation Preferences To set your personal preferences, use the Utilities menu. To access this menu, select ESC while the Status All Channels screen is shown. The Utilities menu in Figure 4 lets you set user preferences such as LCD brightness, beeper volume, time and date, test preferences, and lets you record text to use as a header of all reports. -
Page 22: How To Test Infusion Devices
IDA-5 Users Manual How to Test Infusion Devices When you test an infusion device, it is recommended that you record the details of the device you are testing and the test parameters. From the Status All Channels screen, select SETUP for the relevant channel. These examples use channel 1. - Page 23 Infusion Device Analyzer Product Operation Select Device Information to record data for the test. The Device Information screen discussed in Table 5 is shown. Initially, only the fields in the top-half of the screen can be seen. Record the applicable data in the fields and push ENTER to accept the value and move to the subsequent field.
- Page 24 IDA-5 Users Manual When the data fields are filled in, the menu in Table 6 lets you choose what to do next. Table 6. Device Information Controls More Flow Occl Save Menu_bar_1.eps Control Description More Shows the data fields that let you record infusion device data.
-
Page 25: Flow Tests
Infusion Device Analyzer Flow Tests Flow Tests To do a flow test, select Flow on the menu and then ENTER to open the Channel Flow screen shown in Figure 5. The screen shown is in Prime mode. C ha nn el 1 F l o w Average Flow 0.00 ml/h Volume 0.00... - Page 26 IDA-5 Users Manual Table 8. Flow Screen Menu Controls C ha nn el 1 F l o w Average Flow 0.00 ml/h Volume 0.00 Elapsed Time 00: 00: 00 Inst. Flow ml/h Back Pressure mmHg AutoStart Start Press ESC for Status Screen gir09.eps...
- Page 27 Infusion Device Analyzer Flow Tests Select Graph on the menu and then push ENTER to show a graph of the test progress as shown in Figure 6. Push End and then ENTER to complete the test and go to the Flow screen (End Mode).
- Page 28 IDA-5 Users Manual Table 11. Flow Screen in End Mode C ha nn el 1 F l o w Average Flow 59.70 ml/h Volume 20.00 Elapsed Time 00:20:00 Inst. Flow 0.00 ml/h Back Pressure mmHg Save Save & Print Print...
-
Page 29: Occlusion Tests
Infusion Device Analyzer Occlusion Tests Occlusion Tests When Occl is selected from the Device Information screen, the Occlusion Start Mode screen in Table 12 is shown. Table 13 tells you about each field. When the Occlusion Start Mode screen is first shown, Start briefly shows Wait as the pressure circuit is zeroed. - Page 30 IDA-5 Users Manual When you select Start, the Channel Occlusion screen in Table 13 shows measurement data as the test continues. Select Graph to show the test data as a graph. Table 13. Occlusion Screen in Active Mode Channel 1 Occ l us ion Pressure 7.50...
- Page 31 Infusion Device Analyzer Occlusion Tests Table 14. Occlusion Screen in End Mode Channel 1 Occlus ion P eak Pressure 8 . 0 4 p s i Time of Peak 00: 07: 23 Total Test Time 00: 09: 10 Set Flow Rate 5.00 ml/h Save...
-
Page 32: How To Test Pca Pumps
IDA-5 Users Manual How to Test PCA Pumps When PCA is selected from the Device Information screen, the PCA/Dual Flow Information screen in Table 15 is shown. Necessary PCA pump data can be added from this screen. For test purposes, a dual flow pump can be considered to be a PCA pump that delivers a single, large bolus. - Page 33 Infusion Device Analyzer How to Test PCA Pumps When ENTER is pushed in the Loading Dose field, the PCA screen changes to the Prime Mode screen shown in Figure 8. Refer to the Flow Tests section and prime the channel. gir18.bmp Figure 8.
-
Page 34: Dual Flow Pump Test
IDA-5 Users Manual Channel 1 PCA/Dual Flow Graph ml/h Bolus Count Basal Avg Bolus Avg 65.00 Total Vol 6.00 15 min VIEW DETAIL Press ESC for Status Screen gir20.eps Figure 9. PCA Graph Screen Caution To avoid inaccurate readings, always repeat a test when “Bubble”... -
Page 35: Define A Template
Infusion Device Analyzer Templates Define a Template To define a template: 1. From the Status All Channels screen, select ESC for Utilities. 2. Select Edit Templates. 3. On the Templates screen, select Add. The Template Detail screen is shown in Table 4. -
Page 36: Template Operation
IDA-5 Users Manual 5. Repeat for steps 2 and 3. Use the values shown in Table 17. 6. At step 4, keep the Type field empty and push ENTER. Save is highlighted. 7. Push ENTER. The Templates screen is shown with your template added to the list. -
Page 37: Utilities
Infusion Device Analyzer Utilities Utilities To open the Utilities menu screen shown in Figure 10, select ESC from the Status All Channels screen. The subsequent sections tell you more about the menu items. U t i l i t i e s Recall Tests Instructions Set Clock... -
Page 38: Set Clock
IDA-5 Users Manual At the bottom of the screen, there are context-sensitive prompts. Use the up and down arrows to highlight or un-highlight a test, then use the left or right arrows to move to the Options menu. Set Clock Use Set Clock to set the time for your time zone. -
Page 39: Calibration
Infusion Device Analyzer Utilities The Product can automatically do tests in a specific manner when specified conditions are met. Test-stop preferences specifies the default actions that are to occur. Default values can be changed at the start of each test. Set which step to edit from the drop-down list in the When field: •... -
Page 40: Troubleshooting
IDA-5 Users Manual Troubleshooting Tables 19 and 20 show you Bubble and Air Lock errors and their solutions. Table 19. Bubble Errors Possible Cause Solution Make sure to remove all air when you connect the Air caught in the delivery tube infusion device to the analyzer. -
Page 41: Product Maintenance
Infusion Device Analyzer Product Maintenance Product Maintenance The subsequent sections tell you how to maintain the Product. Clean the Product Caution To prevent possible damage to the Product or to equipment under test, remove the input signals before you clean the Product. -
Page 42: Storage
IDA-5 Users Manual Storage Remove all water from the Product before storage, particularly if temperatures can fall below 5 °C (41 °F). Do not pressurize the inlet ports. It is safest to use a medical suction pump to drain the measuring channels and use the Cycle Valves from the Calibration menu (follow on-screen instructions). -
Page 43: Other Specification
Infusion Device Analyzer Specifications Volume Measurement Method ......Volume is measured directly by the measuring module in minimum sample sizes of 60 μl Range ......0.06 ml to 9999 ml Accuracy ....... 1 % of reading ±1 LSD for flow rates of 16 to 200 ml/h for volumes over 20 ml. - Page 44 IDA-5 Users Manual...
-
Page 45: Remote Operation
Appendix A Remote Operation Introduction This appendix tells you how to use HydroGraph software to control tests on the Product. With HydroGraph you can see the graph of all channels installed in the Product at one time as shown in Figure A-1. 28.bmp Figure A-1. - Page 46 IDA-5 Users Manual Connect HydroGraph Connect the Product to a PC with the supplied USB cable. The Product shows the Status All Channels screen and it must NOT be active on any channel when HydroGraph is started. HydroGraph will sense a Product connected to the PC. On the first connection, you must select the device name in the left and right boxes of the connection dialog.
- Page 47 Remote Operation Start Tests with HydroGraph Flow Test The test data requested is the same as shown in Figure A-3 for the Product. 30.bmp Figure A-3. HydroGraph Flow Setup Dialog...
- Page 48 IDA-5 Users Manual Fill in the data for the test and click OK. The syringe symbol highlighted in Figure A-4 shows that priming is necessary. 31.bmp Figure A-4. HydroGraph Prime Indicator When primed, the syringe symbol goes away and the green start flag button highlighted in Figure A-5 is enabled.
- Page 49 Remote Operation Start Tests with HydroGraph Occlusion Test Select the Occlusion tab shown in Figure A-6 and record the necessary data for the test. Click OK. 33.bmp Figure A-6. HydroGraph Occlusion Dialog When the Product is ready, the Start Channel button (green flag) is enabled. Click this to start the test.
- Page 50 IDA-5 Users Manual PCA / Dual Flow Tests Select the PCA / Dual tab that is highlighted in Figure A-7 and enter the required data for the test. Click OK. 34.bmp Figure A-7. PCA / Dual Flow Dialog Prime the Product and start the test in the same way described in the Flow Tests section.
- Page 51 Remote Operation Start Tests with HydroGraph Template-Controlled Tests Select the Template tab shown in Figure A-8. Record the infusion device data and select the necessary template from the list. 35.bmp Figure A-8. HydroGraph Template Selection Dialog Each step of the template is started in the same manner as a manual test of the same type.
- Page 52 IDA-5 Users Manual Stop Tests with HydroGraph When test conditions are met or when Stop is clicked, the tests ends. From here, you can save and print the results if you wish. Answer Yes or No to each question. Recall, View, and Print Results...
- Page 53 Remote Operation Recall, View, and Print Results Select Print from the main menu or toolbar to print the graph or data, whichever is selected. Click the View Data Table button highlighted in Figure A-10. 37.bmp Figure A-10. Flow Test View...
- Page 54 IDA-5 Users Manual Default Parameters From the main menu, select Control and HydroGraph Parameters to set a Report Header, a path to stored records, flow tolerance, graph-line width, and pressure units. See Figure A-11. 38.bmp Figure A-11. Default Parameters Dialog Header 1, 2, 3 These three lines will be printed on all reports.
- Page 55 The Template tab will import template definitions from the IDA-5 to HydroGraph. The selection method is the same as for records. Import User Notes tab lets user notes be imported from the IDA-5 and kept in a text file on the PC.
- Page 56 Export Instruction Manual will send user instructions, supplied by your IDA-5 vendor, to the IDA-5. Export User Notes will send user notes to an IDA-5. This is for you to use in conjunction with the Import User Notes feature to let user notes be shared between multiple IDA-5 products on a site.
- Page 57 Power save features (particularly on laptops) must be disabled as these can disrupt connection with the IDA-5. If connection is lost the IDA-5 will continue ongoing tests until it is turned off. The IDA-5 will recover the results at power on. These results can then be imported to HydroGraph.
- Page 58 IDA-5 Users Manual A-14...