
Related Manuals for Yamaha EAD10


Summary of Contents for Yamaha EAD10
- Page 1 Electronic Acoustic Drum Module Owner’s Manual Quick Guide page 6 Features of the EAD10 page 10...
- Page 2 This product should be used only with the components supplied or; a never mix different types of batteries. Batteries MUST be installed cor- cart, rack, or stand that is recommended by Yamaha. If a cart, etc., is rectly. Mismatches or incorrect installation may result in overheating used, please observe all safety markings and instructions that accom- and battery case rupture.
- Page 3 Yamaha Corporation of America or its subsidiaries. of other electronic devices. Compliance with FCC regulations does * This applies only to products distributed by YAMAHA CORPORATION OF AMERICA. (class B) EAD10 Owner’s Manual...
-
Page 4: Important Safety Instructions
Protect the power cord from being walked on or pinched particularly at plugs, convenience receptacles, and the point where they exit from the apparatus. WARNING TO REDUCE THE RISK OF FIRE OR ELECTRIC SHOCK, DO NOT EXPOSE THIS APPARATUS TO RAIN OR MOISTURE. (UL60065_03) EAD10 Owner’s Manual... - Page 5 Information on Disposal in other Countries outside the European Union: This symbol is only valid in the European Union. If you wish to discard these items, please contact your local authorities or dealer and ask for the correct method of disposal. (weee_eu_en_02) EAD10 Owner’s Manual...
-
Page 6: Precautions
For AC adaptor WARNING CAUTION • This AC adaptor is designed for use with only Yamaha electronic instruments. Do • When setting up, make sure that the AC outlet is easily accessible. If some trouble not use for any other purpose. - Page 7 Yamaha cannot be held responsible for damage caused by improper use or modifications to the instrument, or data that is lost or destroyed. Always turn the power off when the instrument is not in use.
-
Page 8: About This Manual
(pages 25 and 30). Please read page 30 • The names of buttons, terminals, and the like from the EAD10’s before using a USB flash drive. front, rear and top panels are enclosed in [ ] (square brackets). - Page 9 You should note this serial number in the space provided below and retain this manual as a permanent record of your purchase to aid identification in the event of theft. Model No. Serial No. (bottom_en_01) EAD10 Owner’s Manual...
-
Page 10: Quick Guide
IN (auxiliary input) and Met- ronome (click)—sounds other than what you play Hit all drums and cymbals in the drum set to make sure that the EAD10 is picking up the sound. Changing Sounds (page 33) Turn the [SCENE] knob to select different sounds (Scenes). - Page 11 Play the drums while listening with head- phones. Recording Your Performance (page 41) Press the [RECORDER] button. 2, 4 Press the button below “ ” to start record- ing. Play the drums. Press the button below “ ” to stop record- ing. EAD10 Owner’s Manual...
-
Page 12: Table Of Contents
Contents PRECAUTIONS Quick Guide Included Accessories Features of the EAD10 How the EAD10 makes sound........... 11 About the Manuals Printed Manual ..............12 Digital Manual (PDF) ............12 Panel Controls and Functions Main Unit ................13 Sensor Unit................ 15 About the Trigger Input Jacks..........16 Setup Guide Setting Up................ -
Page 13: Included Accessories
Welcome Thank you for purchasing this Yamaha product. To get the most out of your EAD10, be sure to read this Owner’s Manual carefully. And after reading through this manual, be sure to store it in a safe place so that you can refer back to it again as needed. -
Page 14: Features Of The Ead10
Main Unit Sensor Unit The EAD10 lets you easily change the sound of your acoustic drums into the sound of your liking. Connect a smart phone to the EAD10 and enjoy playing the drums along with your favorite music. Also, it can be used in a wide range of applications from practice, recording to live situations. -
Page 15: How The Ead10 Makes Sound
How the EAD10 makes sound Sensor Unit Audio signal from Trigger signal from the drum set the bass drum Trigger sensor Mic sensor Main Unit (Mic sound &) Trigger Sound Effects (internal Voices) Reverb The Sensor Unit sends two types of signals to the Main Unit; an audio signal captured with the mic sensor, and a trigger signal captured with the trigger sensor. -
Page 16: About The Manuals
Describes how to connect smart devices such as an iPhone and iPad. The digital format manuals listed above can be obtained from the Yamaha Downloads web page. To do so, go to the web page using the following URL, enter “EAD10” in the “Model Name” field, and then click “Search.”... -
Page 17: Panel Controls And Functions
Opens the Store screen. Stores Scenes Press several times to return to the Scene screen. that you have created. NOTE When in the Scene Screen, this button can also be used as a Panic Button to stop any sounds. EAD10 Owner’s Manual... -
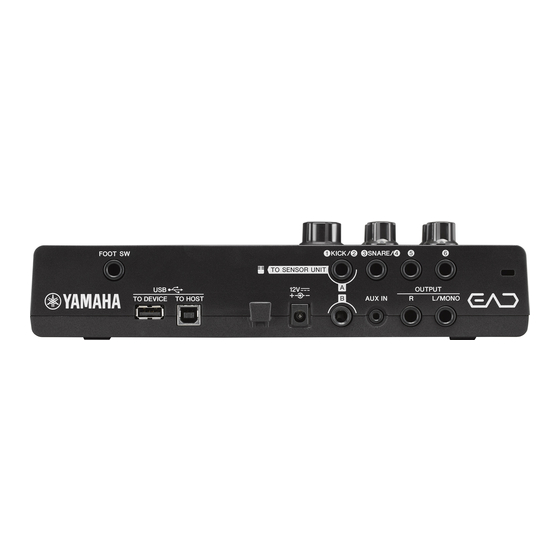
Page 18: Rear Panel
DC IN jack (page 17) drive. Stereo mini plug Use the AC adaptor that Cannot be used with other (3.5 mm) came with the EAD10. USB devices. Cord hook (page 17) Wrap the AC adaptor cord around this hook to prevent accidental unplugging dur- ing use. -
Page 19: Sensor Unit
Converts vibrations produced when the bass drum is hit into a trigger signal. [B] jack Connect to the TO SENSOR UNIT [B] jack on the rear panel using the connector cable (included). Sends the mic sensor signal. EAD10 Owner’s Manual... -
Page 20: About The Trigger Input Jacks
For more information on connections of separately sold accessories, see “Enhance Your Drum Set with Separately Sold Add-Ons” (page 48). Yamaha Downloads: http://download.yamaha.com/ * Yamaha Corporation reserves the right to modify this URL at any time without prior notice. EAD10 Owner’s Manual... -
Page 21: Setup Guide
When instruments such as the ride cymbal are positioned too close to the Sensor Unit, the sound will be too loud and out of balance. Using the sensor with double bass drum set ups gives an uneven and unbalanced sound, so we do not recommend using it in this situation. EAD10 Owner’s Manual... - Page 22 Make sure the uneven surface is filled with adhe- sive cushions to provide a secure attachment for the sensor. The Sensor Unit may fall off if the adhesive cushions is not used. Attach the sensor using the same procedure as for a standard hoop drum. EAD10 Owner’s Manual...
- Page 23 Tighten the module holder wing nuts to securely fasten the Main Unit and module holder. We recommend attaching the Main Unit to a position where it cannot be hit by your knees. Exploded view Main Unit Cymbal Stand Module holder Attachment Module holder wing bolts Cymbal Stand Attachment EAD10 Owner’s Manual...
- Page 24 [A] jack on the rear panel of the Main Unit [A] jack on the Sensor Unit [B] jack on the Main Unit Sensor Unit [B] jack on the Sensor Unit CAUTION Do not connect or disconnect cables while the power is EAD10 Owner’s Manual...
- Page 25 Use the Cable band to secure the Connector Cables close to the Viewed from above Sensor Unit. Cable band When mounting the Main Unit on a hi-hat stand, use the Cable band to keep the cables from interfering with the foot pedal. Cable band EAD10 Owner’s Manual...
-
Page 26: Connecting The Ac Adaptor
Also, make sure you keep any foreign objects out of the plug. This can cause electrical shock, short circuit, or failure. Connect the AC adaptor. WARNING Make sure to use the specified AC Adaptor. DC IN jack (page 63) EAD10 Owner’s Manual... - Page 27 (power lamp is off/display is off), electricity is still flowing to the instrument at the minimum level. When you are not using the EAD10 for a long period of time, make sure that you unplug the AC adaptor from the wall AC outlet.
-
Page 28: Connect With Other Devices And Expand The Fun
• When using the Main Unit with an external device for sound output, turn the Main Unit power on first, and then the power on the external device. When turning power off, do so in the reverse order. Not following the proper order can damage the equipment. EAD10 Owner’s Manual... -
Page 29: Turning On Or Off
- Quit any open application software on the computer. • While the computer is connected to the EAD10, you should wait for six seconds or more between these opera- tions: (1) when turning the power of the EAD10 off then on again, or (2) when alternately connecting/disconnect- ing the USB cable. - Page 30 Turn the [MASTER VOLUME] knob fully counterclockwise to lower the volume to its minimum. Hold down the [ ] (Standby/On) switch. The EAD10 is in Standby and the display and lights are Hold down off. All off EAD10 Owner’s Manual...
-
Page 31: Setting Up The Sensor Unit
Detection may fail in some cases, particularly if there is background noise. When detection fails, try the Auto Setting several times. Fine adjustments should be done manually. If the Auto setting is not successful after several attempts, adjust manually. EAD10 Owner’s Manual... - Page 32 Mics is poor. NOTE The same value is displayed in the Mic gain right [L] setting in the SENSOR UNIT (fine adjustment) screen and in the “MIC” setting in the SENSOR UNIT screen. EAD10 Owner’s Manual...
-
Page 33: Changing The Overall Settings
To set the Auto Power-Off to a time other than 30 minutes, access the setting from the [MENU] button. (MENU/Utility/General) Auto Power-Off Quick Cancel While holding down the [STORE] button, press the [ (Standby/On) button to cancel the Auto Power-off. The func- tion will remain off until you set a new Auto Power-Off time. EAD10 Owner’s Manual... -
Page 34: Using A Usb Flash Drive
When connecting a USB device to the terminal, be sure to follow the important precautions below. NOTE For more information about the handling of USB flash drives, refer to the owner’s manual of your USB flash drive. EAD10 Owner’s Manual... - Page 35 When connecting a USB device to the [USB TO DEVICE] terminal, make sure that the connector on the EAD10 is appro- priate and that it is connected in the proper direction. The EAD10 conforms to the USB 1.1 specification. USB 2.0 and USB 3.0 flash drives can also be used.
-
Page 36: Basic Guide
Also, you can save Scene settings as User Scenes, and recall User Scenes by turning the [SCENE] knob. (page 35) For live use, you can sort and save Scenes in any order then recall Scenes by turning the [SCENE] knob or hitting a pad. For more information, refer to the Reference Manual (Advanced) (PDF). (MENU/Job/Scene, MENU/Utility/PadFunction) EAD10 Owner’s Manual... - Page 37 This is to remind you that Scene settings have changed but have not yet been saved (Store). The mark disappears when you store the settings (page 37). When you select another Scene without first storing the settings, the changes will be lost. EAD10 Owner’s Manual...
- Page 38 NOTE P***: Preset Scene (Presets that are already When you select another Scene before storing stored in the EAD10) the Scene being edited, you can use the recall function to recall the edited contents. For more U***: User Scene (Scene you have created) information, refer to the Reference Manual (Advanced) (PDF) (MENU/Job/Scene/Recall).
-
Page 39: Creating Your Own Scene
Effect not applied. Each press of the [F3] button turns the bypass set- ting on or off. When you select “BYPASS” while the knob is turned fully to the mini- mum position, the two lamps below the knob dimly flash. EAD10 Owner’s Manual... - Page 40 Trigger Sound using the same procedure as in step 3. If you want to make more precise changes to the settings, press the [MENU] button to make detailed settings. For more information, refer to the Reference Manual (Advanced) (PDF). (MENU/Scene Edit/Inst or MENU/Scene Edit/Voice) EAD10 Owner’s Manual...
- Page 41 Creating Your Own Scene Using Imported Sounds (.wav) You can import audio files (.wav) into the EAD10 to use as Trigger Sounds. For more information on importing audio files and settings, refer to the Reference Manual (Advanced) (PDF). (MENU/Job/ Wave) For more information on using a USB flash drive, see “Using a USB Flash Drive”...
- Page 42 If you do not want to overwrite, press the button below “NO” ([F3]) and return to the previous screen where you can select another Scene number. When the Store operation is complete, the display returns to the Scene screen. EAD10 Owner’s Manual...
-
Page 43: Using The Click (Metronome)
(continued to the next page) The tapped tempo is detected and appears on the screen. NOTE You can also set the tempo by striking the bass drum or a pad connected to the Trig- ger Input jacks. EAD10 Owner’s Manual... - Page 44 Use the buttons below “<” or ”>” ([F1] The CLICK VOICE screen opens. or [F2]) to move the cursor. Use the [–] or [+] buttons to adjust the volume. Use the [–] or [+] buttons to change the Click Sound. EAD10 Owner’s Manual...
-
Page 45: Recording Your Performance
Recording Your Performance Recording Your Performance Use the EAD10 to record your performance. When a USB flash drive is connected to the unit, audio is recorded to the USB flash drive. Recording to the Main Unit (when no USB flash drive is connected to the terminal) Press the [RECORDER] button. - Page 46 NOTE If you want to change the file name, press the button below “NAME” ([F1]) and enter a new name. (page The RECORDER SAVE screen Press the button below opens. “ ” ([F2]) to stop playback. EAD10 Owner’s Manual...
- Page 47 Press the button below “YES” ([F1]). The setting is changed to the AUX IN recording. NOTE Your performance does not sound and is not recorded while in AUX IN recording. After you finish recording, the EAD10 returns to the normal record settings. EAD10 Owner’s Manual...
- Page 48 NOTE • Some of the audio files may not play back even when the above requirements are met. • The EAD10 does not recognize the audio file if it is in a folder. • Importing from the [AUX IN] Jack Connect a portable music player or other such device to the [AUX IN] jack on the rear panel, and have the song ready for playback.
- Page 49 AUX IN Recording. Press the button below “ ” ([F1]) on the EAD10 to start recording, and simultane- ously press Playback on the portable music player to start playback of the accompani- ment song. After the song playback finishes, press the button below “...
- Page 50 After you finish playing, press the button below “ ” ([F1]) to stop recording. NOTE Pressing the button below “ ” ([F2]) stops accompaniment playback, but recording continues. You have now just recorded yourself over the song on the USB flash drive. EAD10 Owner’s Manual...
- Page 51 Recording with Smart Device Apps NOTE To eliminate the risk of interference due to noise by your iPhone or iPad when used in combination with the EAD10, turn on the Air- plane Mode and then turn on Wi-Fi. NOTICE Be sure to place your iPhone or iPad on a stable surface to prevent it from falling over and being damaged.
-
Page 52: Application Guide
(*1) About the Pads Within this Owner’s Manual, the separately sold external pads that may be connected to the EAD10 are referred to by model name. Please note that these model names were up-to-date as of printing of this manual. Details regarding any subsequently released models will be made available via the following web site. - Page 53 • In this manual, the term “FC3” refers to the FC3 and all other equivalent products, such as the FC3A. • In this manual, the term “FC4” refers to the FC4 and all other equivalent products, such as the FC4A. * May not be available depending on your area. Check with your Yamaha dealer. EAD10 Owner’s Manual...
- Page 54 Attach the DT50S between two of the tension DT50S rods on the snare drum. NOTE Position the Drum Trigger far from the drummer to prevent it Head from being struck accidentally. For more information, refer to the DT50S Owner’s Man- Clamp screw ual. Hoop EAD10 Owner’s Manual...
- Page 55 Select the appropriate pad from the pad type list. For more information, refer to the Reference Manual (Advanced) (PDF). (MENU/Trigger/Pad Type) • Specify the function of the connected trigger Play trigger sounds (page 35) This completes set up. EAD10 Owner’s Manual...
- Page 56 Example) Connecting a TP70S Turn off the Main Unit. Make sure the Main Unit is turned off before connecting. All off Attach the pad. Clamp rod Example Cymbal stand Electronic Drum Pad (TP70S) Cymbal stand attachment CSAT924A EAD10 Owner’s Manual...
- Page 57 Reference Manual (Advanced) (PDF). (MENU/Trigger/Pad Type) • Specify the function of the connected pad • Play trigger sounds (page 35) • Switch functions (refer to the Reference Manual (Advanced) (PDF)) (MENU/Utility/PadFunction) This completes set up. EAD10 Owner’s Manual...
- Page 58 Select the pedal you connected from MENU/Trigger/ FootSwSelect • Specify the function of the connected pedal • Specify the function of the connected pedal (MENU/ Utility/PadFunction) • Select the Trigger Sound (to play sounds) (page 35) This completes set up. EAD10 Owner’s Manual...
-
Page 59: Reference
Voice Volume ..Trigger Sound Voice Volume Tempo ......Tempo for Selected Scene EAD10 Owner’s Manual... - Page 60 BypassSw ....Bypass Switch Phones EQ EQ LowGain ... . EQ Low Gain EQ HighGain ... . EQ High Gain EAD10 Owner’s Manual...
- Page 61 Memory Info ... . . USB Flash Drive Memory Information Factory Reset ....Factory Reset EAD10 Owner’s Manual...
-
Page 62: Troubleshooting
Troubleshooting Troubleshooting Symptom Possible cause Solution Reference page No sound EAD10 is not turned on Make sure that the power is turned page 25 The volume is not turned up Check the [MASTER VOLUME] page 13 knob setting. The cable is not properly connected... - Page 63 Sensor Unit. Check the Trigger Sensitivity setting. If the bass drum sound plays when page 17 striking the snare drum, move the snare drum farther away from the Sensor Unit. More distance between the two might improve the problem. EAD10 Owner’s Manual...
- Page 64 Main Unit, then you can overdub your performance onto the song. Cannot record the Click EAD10 is not designed to record the Click. Not enough memory in the USB flash Check the available memory in the drive USB flash drive.
-
Page 65: Message List
Appears when saving a file to the USB device and a file with the same name already exists in the USB device. Appears when attempting to rerun the Store User Scene operation for the Scene previously saved. EAD10 Owner’s Manual... - Page 66 USB device’s transfer speed too slow. Appears when the transfer speed to the USB device is insufficient. For information on devices that have been tested and confirmed to work properly with the EAD10, refer to the “Compatible USB Device (*1) List”...
-
Page 67: Specifications
* The contents of this manual apply to the latest specifications as of the publishing date. To obtain the latest manual, access the Yamaha website then download the manual file. Since specifications, equipment or separately sold accessories may not be the same in every locale, please check with your Yamaha dealer. EAD10 Owner’s Manual... -
Page 68: Index
Pad.......... 48, 52 Drum Trigger ......48, 50 Pedal..........49 [PHONES] jack ......15 Portable Music Player ....24 E mark........... 33 Preset Scene......... 34 [EFFECT] knob ......13 Effects ........11, 32 [EXIT] button ......... 13 EAD10 Owner’s Manual... - Page 69 You will be responsible for any installation or removal charges and for any initial shipping charges if the product(s) must be shipped for warranty service. However, YAMAHA will pay the return shipping charges to any destination within the USA if the repairs are covered by the warranty. This warranty does not cover (a) damage, deterioration or malfunction resulting from accident, negligence, misuse, abuse, improper installation or operation or failure to follow instructions according to the Owner’s Manual for this product;...
- Page 70 EAD10 Owner’s Manual...
- Page 71 Niederlassung und bei Yamaha Vertragshändlern in den jeweiligen Bestimmungsländern erhältlich. Pour plus de détails sur les produits, veuillez-vous adresser à Yamaha ou au distributeur le plus proche de vous figurant dans la liste suivante. Para detalles sobre productos, contacte su tienda Yamaha más cercana o el distribuidor autorizado que se lista debajo.
- Page 72 Manual Development Group © 2017 Yamaha Corporation Published 06/2017 POHD*.*- **A0 Printed in China ZW72890...