Table of Contents
Advertisement
Advertisement
Table of Contents

Related Manuals for Yamaha RX21


Summary of Contents for Yamaha RX21
- Page 1 YAMAHA AUTHORIZED PRODUCT MANUAL DIGITAL RHYTHM PROGRAMMER...
- Page 2 YAMAHA DIGITAL RHYTHM PROGRAMMER OWNER’S MANUAL...
-
Page 3: Table Of Contents
The 44 preset patterns stored in the RX21’s memory are detailed in the accompanying RX21 PATTERN BOOK. It also contains other rhythm patterns for you to try out, a pattern chart in which you can note down your own personally programmed patterns, and a song chart. -
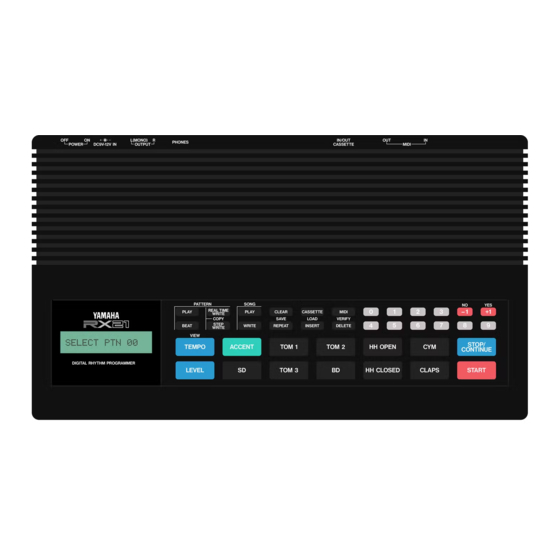
Page 4: Control Panel
CONTROL PANEL... -
Page 5: Connections
CONNECTIONS MIDI IN QX SEQUENCER CASSETTE MIDI OUT IN/OUT MIDI EQUIPMENT CX5M MUSIC COMPUTER OUT R PHONES A wide variety of MIDI compatible equipment may be used. These are just a few examples. DX SYNTHESIZER... - Page 6 PA-1 POWER SUPPY DC9V~ OUTPUT TO SOUND/MONITOR SYSTEM 12V IN POWER ON/OFF OTHER MULTITRACK RECORDER SOURCES PA OR OUT L RECORDING MIXER CASSETTE "OUT" OR "EAR" JACK CASSETTE "IN" OR "MIC" JACK DATA CASSETTE RECORDER...
-
Page 7: Precautions
Be sure to connect the RX21 to an AC power supply that meets the power supply specifications listed on the rear of the unit. Ideally, you should use the PA-1 power supply unit supplied with the RX21. -
Page 8: Setting Up
AC voltage to the voltage required to power the RX21 (9 to 12 V). A brief output pulse appears at the RX21 outputs when the power is initially turned on. To prevent this from possibly damaging your speaker system, make sure the master volume control of your sound system, or the volume of the mixer channel to which the RX21 is connected, is set to minimum before the RX21 is turned on. -
Page 9: The Instruments
Using either a pair of headphones plugged into the RX21 PHONES jack, or a sound system fed from the RX21 L and R OUTPUT jacks, turn the RX21 on and repeatedly tap any of the black instrument buttons (SD, TOM1, TOM2, etc.). You can now “play”... -
Page 10: Instrument Level
Press the PATTERN PLAY button to exit the instrument level mode. Instrument Level (Example: Increase TOM 1 level from 15 to 22) Output from the RX21 can be either in STEREO (connect cables to both L and R Stereo Positioning outputs), or MONO (connect to L output ONLY). -
Page 11: Setting Accent Levels
When you record a pattern, pressing the ACCENT key to add an accent to a beat (no need to press an instrument key at the same time) will affect ALL instruments sounding on that beat, according to their individual accent levels. For instruments which are not to be accented, simply set their accent level to zero. -
Page 12: Pattern Operations
With the RX21, a "pattern" denotes a one bar (one measure) drum sequence, which Pattern Selection repeats when you play it back. The RX21 is capable of storing a total of 100 different patterns in its internal pattern memory. Pattern memories 56 through 99 contain 44 preset patterns that provide a variety of exciting and usable drum patterns that you can play immediately. -
Page 13: Tempo Control
LCD, and the RX21 will switch to the new pattern at the end of the pattern that is presently playing (i.e. at the end of the measure). The LCD will then display only the new pattern number. Pattern Change During Playback (Example: Patterns 00... - Page 14 Normally, the LCD will switch to “LENGTH=// /16” (// is the pattern length) with the cursor flashing to the right of the length number. The RX21 measures patterns in sixteenth notes, so for example a bar of 4/4 time (four quarter notes per bar) would be indicated by the setting “16/16”...
- Page 15 Press BEAT a third time, to return the RX21 to the real time write mode. You are now ready to program your pattern. Tap the red START button, and you’ll hear the “click track” rhythm accents. If, by mistake, you have selected a preset, there will be no click track.
-
Page 16: Step-Write Pattern Programming
This method is ideal for programming rhythm patterns from written scores, or from the pattern charts provided in the RX21 PATTERN BOOK accompanying this manual. It also makes it possible to input complex rhythm patterns that would be extremely difficult to program using the real time method. - Page 17 QUANTIZE function, described later in this chapter). The RX21 will then cycle back to the first beat of the bar, allowing you to continue to add new instruments. In the step write mode, only one instrument (or accent) can be entered at a time.
- Page 18 Dot Display. You can call up a Dot Display on the RX21’s LCD, as described in the STEP WRITE DOT DISPLAY section later in this chapter. Each dot represents a note (entered by pressing an instrument key) and each dash represents a rest (entered by pressing the +1/YES key).
-
Page 19: Quantize
PLAY INSTRUMENT KEYS TO ENTER MORE NOTES. USE ACCENT KEY TO ENTER ACCENTS, +1/YES KEY TO ENTER RESTS, CLEAR KEY PLUS IN- STRUMENT KEY TO CLEAR MISTAKES. You can now playback your pattern in the usual way, adjusting the tempo as desired. Basically, quantize determines the smallest note-increments which can be pro- Quantize grammed. -
Page 20: The Step Write Dot Display
REAL TIME PATTERN PRO- GRAMMING and STEP WRITE PATTERN PROGRAMMING sections. To make step write programming of patterns easier and more rapid, the RX21 features The Step Write Dot a Dot Display which gives a visual indication of each instrument. This is called... - Page 21 Just remember that the pairs of vertical dots indicate the primary beats in each bar, and you’ll find that the Dot Display is a valuable aid for programming your RX21 rapidly and accurately in the step write mode. You can exit the step write mode from the Dot Display in the usual manner, by pressing the STOP/CONTINUE key.
-
Page 22: Beat Exchange
You can use the Dot Display function to examine any pattern, whether programmed in real time or step write. This is a good way to learn what rhythms look like when displayed visually–you’ll find that even complex rhythms quantized at 1/32 look really simple on the Dot Display. - Page 23 IMPORTANT: If you switch from a higher quantize rate to a lower one, only the notes occuring on the new beats will remain-all other notes will be cleared. For example, if you have programmed a part at a quantize rate of 1/32, the Beat Exchange function will switch the quantize rate to 1/16, and all notes which originally appeared on beats 2, 4, 6, 8 etc.
-
Page 24: Click Level
You can set the level of the RX21’s click track (rhythm guide during real time re- Click Level cording) before or during recording. Simply press the LEVEL key twice, then the BEAT key. You can now set the click track level using the -1/NO and +1/YES keys. -
Page 25: Instrument Clear
A single instrument’s entire part may be immediately cleared from a pattern, when Instrument Clear the RX21 is in the pattern select mode, holding the CLEAR button while pressing the appropriate instrument key. The LCD will show “CLEAR PTpp XXXX?” where “pp”... -
Page 26: Pattern Copy
You can use this function to copy one of the RX21’s preset patterns, then alter it to create your own personally programmed pattern. You could also use the Copy... - Page 27 Pattern Copy (Example: Copy pattern 79 to pattern 00)
-
Page 28: Song Operations
When used in a song, the individual patterns are referred to as “parts” of the song. The RX21 has a song memory which is separate from the pattern memory, and is capable of storing up to 4 different songs (numbered 0 through 3). -
Page 29: Editing (Assembling A Song)
ON”. If you now press START the song that is already selected will play. If you press REPEAT, the RX21 will revert to the select song mode, and you can select another song. The REPEAT function will now apply to playback of any song programmed into the RX21. -
Page 30: Break Patterns
We’ll use this song as a working example throughout this section of the manual. Song Editing (Example: song 0, patterns 22,5,79,4) The first four of the RX21 presets (numbers 56 thru 59) are blank patterns of various Break Patterns lengths that enable you to rapidly enter breaks into songs. These are as follows:... -
Page 31: The Insert Function
While in the Edit mode, the Insert function permits new patterns to be inserted The lnsert Function anywhere in the song, between already-programmed parts. Let’s take our song example, in which we’ve already programmed parts 1 through 4, and add a new part between parts 2 and 3, leaving us with a total of 5 parts instead of 4. -
Page 32: The Delete Function
You can also delete repeats within a song, without losing any parts. See the DE- LETING REPEATS section for an explanation of this simple procedure. No, nothing to do with repeat playback of songs. The RX21 has a useful repeat Repeats function enabling you to save a considerable amount of time by making it possible to repeat any part or group of parts up to 99 times. -
Page 33: Deleting Repeats
Still in the editing mode, you can now use the -1/NO and +1/YES keys and locate the repeats, which are displayed just before the corresponding part (in the case of Begin Repeat signs) or just after (in the case of End Repeat signs) and once located, you can delete repeats in the same way as parts (see the DELETING RE- PEATS section). -
Page 34: Song Clear
Having located the repeat sign, press DELETE, and the LCD will show "DELETE REPEAT ?”, then press +1/YES to delete, or -1/NO to cancel the delete function. Delete Repeat (Example: delete Begin Repeat at pattern 2) NOTE: If you delete a Begin Repeat sign, the corresponding End Repeat sign will be ineffective, and vice versa. - Page 35 The "clear all songs" function initializes (zeros) the song memory, and can be used to restore normal operation should an operation error cause the RX21 software to malfunction. It’s advisable to save the contents of the song memory onto a cassette tape (see the CASSETTE OPERATIONS chapter) to prevent loss of songs you wish to keep.
-
Page 36: Cassette Operations
Before you begin a cassette operation, check that your cassette recorder is properly connected to the RX21 8- pin DIN CASSETTE IN/OUT terminal (see “CONNECTIONS” diagram). -
Page 37: Load
EXECUTING”. If the load operation is completed and no errors are detected, the RX21 will return directly to either the song or pattern mode. If a load error is detected the LCD display will read “LOAD ERROR!" In this case return to the cassette control mode by pressing the CASSETTE button and carry out the load process again. - Page 38 Load Data From Cassette...
-
Page 39: Midi Functions
The RX21 features MIDI (Musical Instrument Digital Interface) IN and OUT terminals on the rear panel (see the CONNECTIONS diagram for details). This means that your RX21 can control or be controlled by other MIDI in- struments, so that it functions as part of a state-of-the-art digital music system, as well as a sophisticated unit in its own right. - Page 40 In this example, which in effect has the same sound potential as the previous one, the RX21 controls the QX7 which in turn controls a TX7. It outputs STOP and START signals, and the MIDI Clock signal, which will control the tempo of the QX7, which has its clock set to EXTERNAL.
-
Page 41: Clock Modes
-1/NO button. Once the selection has been made, press any other main function key to exit. If you turn the RX21 power off, the next time you turn it on again, the internal clock mode will be selected. -
Page 42: Midi Parameters
1, and rhythm data to the RX21 on channel 2. The RX21 must therefore be set to receive on channel 2, to prevent the melody data from triggering the rhythm machine. - Page 43 Key Number Reception 3. SYSTEM lNFORMATlON AVAILABLE In this mode, the RX21 can send or receive the entire contents of pattern and song memories, in the form of MIDI data, to or from another RX21. This means that, without having to use cassette save/load operations, you can quickly and easily transfer an enormous amount of pattern/song data.
-
Page 44: Tape Sync With The Rx21
Yamaha YMC10 MIDI Converter, which converts the signal back into normal MlDI signals, which can then be used to control the RX21, QX7 and TX7. The tape sync signal contains START and STOP signals, and sets the Clock Rate of both the RX21 and the QX7. -
Page 45: Programming Reference Guide
PROGRAMMING REFERENCE GUIDE Total Level (Example: reducing total level from 63 to 50) INSTRUMENT OPERATIONS Instrument Level (Example: Increase TOM 1 level from 15 to 22) Accent Level (Example: increase TOM 1 accent level from 5 to 15) -
Page 46: Pattern Operations
Selecting Patterns (Example: patterns 00, 01, 24) PATTERN OPERATlONS Pattern Change During Playback (Example: Patterns 00 TEMPO Function (Example: Change tempo from 120 to 140 during playback of pattern 00) Real Time Write (Example: 3/4 time, Quantize Rate 1/16, on pattern 00) - Page 47 PLAY INSTRUMENT KEYS TO ENTER PATTERN. USE ACCENT KEY TO ENTER ACCENTS, CLEAR KEY PLUS INSTRUMENT KEY TO CLEAR MISTAKES. Step Write (Example: 4/4 Time, Quantize Rate 16, on pattern 00) PLAY INSTRUMENT KEYS TO ENTER MORE NOTES. USE ACCENT KEY TO ENTER ACCENTS, +1/YES KEY TO ENTER RESTS, CLEAR KEY PLUS IN- STRUMENT KEY TO CLEAR MISTAKES.
- Page 48 Beat Exchange (Example: on pattern 00) Setting CIick level (Example: reducing level from 31 to 20, while recording on pattern 00)
- Page 49 Pattern Clear (Single) (Example: clear pattern 00) Pattern Clear (All Patterns, Except Presets) Instrument Clear (Example: clear HH CLOSED from pattern 00) Pattern Copy (Example: Copy pattern 79 to pattern 00)
-
Page 50: Song Operations
Song Playback (Example: playback of song 2) SONG OPERATIONS Repeat Playback of Song (Example: repeat playback of song 0) - Page 51 Song Editing (Example: song 0, patterns 22,5,79,4) Insert (Example: insert pattern 59 between parts 2 and 3) Delete (Example: delete part 3)
- Page 52 Entering Repeats (Example: repeat parts 2 and 5, 3 times) Delete Repeat (Example: delete Begin Repeat at pattern 2) Song Clear (Single) (Example: clear song 0)
-
Page 53: Cassette Operations
Song Clear (All Songs) Save Data to Cassette and Verify CASSETTE OPERATIONS START RECORDER IN RECORD MODE START CASSETTE RECORDER IN PLAYBACK MODE Load Data From Cassette... -
Page 54: Midi Functions
Clock Mode Selection MIDI FUNCTIONS TO RETURN TO INTERNAL CLOCK: MIDI Receive Channel Setting (Example: set to channel 2) Key Number Reception Transmitting MIDI Data... -
Page 55: Error Messages
No machine is unlimited, and from time to time the RX21’s LCD may present you with an error message indicating that something has gone wrong, or that you have made an operating error. These error messages are as follows: Cause:... - Page 56 (due to lightning, etc.) Check all cables. Make sure MIDI connectors are clean and dry, and the MIDI cables are not too long (10 meters or less). Move the RX21 away from any other electrical equipment which could cause inter- ference (TV, radio, etc.).
-
Page 57: Specifications
SOUND SOURCE ROM: 256 KBIT WAVE ROMx2 NO. OF VOICES: 9 MEMORY CAPACITY NO. OF PATTERNS: 100 (00-55 programmable, 56-99 preset) NO. OF SONGS: 4 MAXIMUM NO. OF PARTS WITHIN SONGS: 512 CONTROLLERS BUTTONS TEMPO, LEVEL, ACCENT, SD, TOM1, TOM2, TOM3, BD, HH OPEN, HH CLOSED, CYM, CLAPS, START, STOP/CONTINUE PATTERN KEYS (PLAY, BEAT, REAL TIME WRITE, STEP WRITE) SONG KEYS(PLAY, WRITE, INSERT, DELETE, REPEAT) CLEAR, CASSETTE, MIDI SWITCH... -
Page 58: Block Diagram
BLOCK DIAGRAM... - Page 59 D i g i t a l Rhythm Programmer Model RX21 F u n c t i o n . . . B a s i c D e f a u l t C h a n n e l...
- Page 60 (within three meters), interference may occur. This series of Yamaha professional music equipment has been type tested and found the comply with the specifications set for a class B computing device in accordance with those specifica- tions listed in subpart J of part 15 of the FCC rules.
- Page 61 YAMAHA SINCE 1887 NIPPON GAKKI CO., LTD. HAMAMATSU, JAPAN OMD-136 85 11 10.0 CR Printed in Japan...
- Page 62 YAMAHA Recyclab!e RX21 OM Yamaha Corporation of America R X 2 1 O M 6600 Orangethorpe Avenue, P.O. Box 6600, Buena Park, CA 90622-6600 Recycled 9/10/98 29645...