Table of Contents
Advertisement
FCC TEST REPORT
Report No.: EMC-FCC-R0106
http://www.emc2000.co.kr
Appendix 6.
User manual
EMC
compliance
Ltd.
480-5 Shin-dong, Yeongtong-gu, Suwon-city, Gyunggi-do, 443-390, Korea
82 31 336 9919 (Main) 82 31 336 4767 (Fax)
This test report shall not be reproduced except in full, Without the written approval.
Advertisement
Table of Contents

Related Manuals for DirecTV R34


Summary of Contents for DirecTV R34
-
Page 1: User Manual
FCC TEST REPORT Report No.: EMC-FCC-R0106 http://www.emc2000.co.kr Appendix 6. User manual compliance Ltd. 480-5 Shin-dong, Yeongtong-gu, Suwon-city, Gyunggi-do, 443-390, Korea 82 31 336 9919 (Main) 82 31 336 4767 (Fax) This test report shall not be reproduced except in full, Without the written approval. -
Page 2: Welcome To The Directv Family
Activation”. IMPORTANT: • You must subscribe to HD Access or DIRECTV Advanced Receiver Service (ARS) to view the HD channels included in your programming package. • DIRECTV hardware and programming and HD fees available separately. For information and pricing regarding programming... -
Page 3: Safety And Care
Do not install near any heat sources such as radiators, heat registers, stoves or other apparatus (including amplifiers) that produce heat. Use only the power supply (power cord) that came with your DIRECTV Receiver. Failure to use the authorized power supply (power cord) may cause electric shock, fire, bodily injury and/or property damage. - Page 4 Blocking the airflow to the unit could impair performance or damage your receiver and other components. came with your DIRECTV receiver. Failure to use the • Do not stack electronic components or other objects on top of the DIRECTV Receiver. Also, do not stack the receiver on top of ®...
-
Page 5: Your Remote Control
POWER button to turn it off or on. The mode switch must always be in the left-most position to control your DIRECTV ® Receiver. If the mode switch is in a position that has not been... -
Page 6: Navigation And Destination Buttons
NAVIGATION AND DESTINATION BUTTONS The buttons in the middle of the remote are navigation and destination keys. Press the GUIDE button to go to the program guide screen. Press the ACTIVE button to go to the DIRECTV Interactive ™ channel. The LIST button takes you to the Playlist screen. Press EXIT to get out of any menu screen and return to live TV. - Page 7 Watching a recorded program does not require a tuner. See your RVU-enabled TV’s User Guide for more information on connecting to the Genie (Adv Whole-Home) HD DVR. You will need to activate the RVU-enabled TV by calling DIRECTV at 1.800.531.5000.
- Page 8 To begin, connect, plug in and turn on the Client. Once it detects the Genie HD DVR, it will prompt you to enter a PIN. On your DIRECTV HD DVR, press MENU, then select “Settings & Help”, then “Settings”. Select “Whole-Home” from the left menu, then select “Add a Client”.
-
Page 9: Back Panel Example
POWER – Your receiver must be plugged in at all times to function properly. WARNING: Use only the power supply (power cord) that came with your DIRECTV receiver. Failure to use the authorized power supply (power cord) may cause electric shock, fire, bodily injury and/or property damage. If the power supply (power cord) becomes... -
Page 10: Troubleshooting Tips
On a computer, go to directv.com/reauthorize and follow the onscreen instructions. You will need to be logged into your account on directv.com to complete this process. Running the System Test (at the end of this section) can also help you diagnose and solve many common problems. -
Page 11: System Software Updates
TROUBLESHOOTING TIPS SYSTEM SOFTWARE UPDATES DIRECTV periodically sends system software updates to your receiver to improve performance and upgrade features and functions. These updates will occur automatically. The receiver will give you the option to download software “now” or “later.”... - Page 12 If your system does not pass the System Test, check any of these potential trouble areas: cabling, pointing the satellite dish, phone connection and access card. If you continue to have problems, call DIRECTV Customer Service at 1.800.531.5000. You should run a system test several times before concluding that there is a problem. Occasional fluctuations in the phone...
-
Page 13: Frequently Asked Questions
If there are obstructions blocking the dish’s clear view of the satellite, you should contact a professional to remove them or a DIRECTV installer at 1.800.531.5000 to relocate your dish. If your signal strength is lower than 70 (60 or lower on HD receivers) on most transponders in good weather, contact a... - Page 14 ® If you don’t see the your DIRECTV picture, verify the input your TV is on by turning the TV on and off. Most TVs display the input in the upper right- or left-hand corner. If the input is set to something other than your DIRECTV receiver, toggle through the inputs with the “input”...
- Page 15 Check the HD output resolutions and deselect those not supported by your TV. For 1080p programs, some TVs do not support the 24 frame-per-second rate DIRECTV provides. Press the RES button on your receiver’s front panel to change the resolution to one your TV supports.
-
Page 16: Limited 90-Day Warranty
DIRECTV. If DIRECTV cannot reasonably repair or replace the Receiver then DIRECTV may, at its sole discretion, refund the price you paid for the product or the current retail price of the product. -
Page 17: What Is Excluded
DIRECTV will void this limited warranty. Except in the case of hardware or software provided by DIRECTV, installing software modifications, “hacks”... - Page 18 TO GET WARRANTY SERVICE... Warranty service will be provided by DIRECTV. If you believe you need service for your Receiver, contact DIRECTV at 1-800-DIRECTV. A representative will go through a diagnostic checklist with you. If it is determined that the product needs to be returned for service or exchanged, you will receive a return authorization number.
-
Page 19: Directv Protection Plan
*Limitations and exclusions apply. Please visit www.directv.com/protection. The DIRECTV PROTECTION PLAN is offered by Asurion Service Plans, Inc. in all states except Florida (in which Asurion Service Plans of Florida, Inc offers the plan) and underwritten by Continental Casualty Company. Pricing, terms and conditions of the... -
Page 20: Fcc Customer Information
• Increase the separation between the equipment and the DIRECTV Receiver. • Connect the equipment into an outlet on a circuit different from that to which the DIRECTV Receiver is connected. • Consult the dealer or an experienced radio/TV technician for help. - Page 21 The REN for this product is part of the product identifier that has the format US: AAAEQ##TXXXX. The digits represented by ## are the REN without the decimal point (e.g., 03 is a REN of 0.3). If this DIRECTV Receiver causes harm to the telephone network, the telephone company will notify you in advance that temporary ®...
- Page 22 If trouble is experienced with this unit, for repair or warranty information, please contact DIRECTV Customer Care at the address and phone number listed below. If the equipment is causing harm to the network, the telephone company may request that you disconnect the equipment until the problem is resolved.
-
Page 23: Terms And Conditions For Use Of Software ("Terms")
The source code to certain software subject to the GNU GPL and other open source licenses that is used in connection with the Receiver is made available to you by DIRECTV following the written request to DIRECTV. Use of such Software is also subject to the terms of any applicable agreement between you and each such provider. - Page 24 C. Ownership of Software and Reservation of Rights The Software is licensed, not sold, to you for use only under the terms of this license agreement, DIRECTV is NOT transferring title or any ownership rights in the Software to you and DIRECTV and its suppliers reserve all rights not expressly granted to you. Except as stated above, this license agreement does not grant to you any intellectual property rights in the Software.
- Page 25 Certain additional terms and information for the Software and certain third party software (including the text of licenses applicable to any free, open source and other similar software that may be included in the Software) may be found in the DIRECTV website located at www.directv.com, and the GNU website located at www.gnu.org.
- Page 26 TERMS AND CONDITIONS FOR USE OF SOFTWARE (“TERMS”) Preamble The licenses for most software are designed to take away your freedom to share and change it. By contrast, the GNU General Public License is intended to guarantee your freedom to share and change free software--to make sure the software is free for all its users. This General Public License applies to most of the Free Software Foundation’s software and to any other program whose authors commit to using it.
- Page 27 TERMS AND CONDITIONS FOR USE OF SOFTWARE (“TERMS”) GNU GENERAL PUBLIC LICENSE TERMS AND CONDITIONS FOR COPYING, DISTRIBUTION AND MODIFICATION 0. This License applies to any program or other work which contains a notice placed by the copyright holder saying it may be distributed under the terms of this General Public License.
- Page 28 TERMS AND CONDITIONS FOR USE OF SOFTWARE (“TERMS”) These requirements apply to the modified work as a whole. If identifiable sections of that work are not derived from the Program, and can be reasonably considered independent and separate works in themselves, then this License, and its terms, do not apply to those sections when you distribute them as separate works.
- Page 29 TERMS AND CONDITIONS FOR USE OF SOFTWARE (“TERMS”) 4. You may not copy, modify, sublicense, or distribute the Program except as expressly provided under this License. Any attempt otherwise to copy, modify, sublicense or distribute the Program is void, and will automatically terminate your rights under this License. However, parties who have received copies, or rights, from you under this License will not have their licenses terminated so long as such parties remain in full compliance.
- Page 30 TERMS AND CONDITIONS FOR USE OF SOFTWARE (“TERMS”) This section is intended to make thoroughly clear what is believed to be a consequence of the rest of this License. 8. If the distribution and/or use of the Program is restricted in certain countries either by patents or by copyrighted interfaces, the original copyright holder who places the Program under this License may add an explicit geographical distribution limitation excluding those countries, so that distribution is permitted only in or among countries not thus excluded.
- Page 31 TERMS AND CONDITIONS FOR USE OF SOFTWARE (“TERMS”) EVEN IF SUCH HOLDER OR OTHER PARTY HAS BEEN ADVISED OF THE POSSIBILITY OF SUCH DAMAGES. END OF TERMS AND CONDITIONS How to Apply These Terms to Your New Programs If you develop a new program, and you want it to be of the greatest possible use to the public, the best way to achieve this is to make it free software which everyone can redistribute and change under these terms.
- Page 32 TERMS AND CONDITIONS FOR USE OF SOFTWARE (“TERMS”) Yoyodyne, Inc., hereby disclaims all copyright interest in the program `Gnomovision’ (which makes passes at compilers) written by James Hacker. <signature of Ty Coon>, 1 April 1989 Ty Coon, President of Vice This General Public License does not permit incorporating your program into proprietary programs.
- Page 33 Appendix 3: Receiver Front and Back Panels ......151 Appendix 4: How to Network Your HD DVR ........155 Professionaly Installed DIRECTV Cinema Connection Kit ..156 Self-Installed DIRECTV Cinema Connection Kit - Wireless ..157 Wired ..................157 Wireless ..................159 Appendix 5: About High-Definition ..........162...
-
Page 34: Appendix 1: Setup And Activation
If your receiver was not professionally installed, or you have had to reset your receiver for any reason, you will need to follow the guided setup screens before starting DIRECTV service. Make sure the MODE switch at the top of the remote control is set to DIRECTV, which is the far-left position. Press PWR. The DIRECTV Receiver will turn on. -
Page 35: Your Phone Connection
If you disconnect the phone line, the receiver will not allow you to purchase PPV programs and some features of our interactive channels will be limited. If your receiver is connected to the Internet, either directly or via a DIRECTV Home Network connection, you do not need to be connected to a phone line. -
Page 36: Connections For Auxiliary Equipment
WARNING: Use only the power supply (power cord) that came with your DIRECTV receiver. Failure to use the authorized power supply (power cord) may cause electric shock, fire, bodily injury and/or property damage. If the power supply (power cord) becomes damaged or needs to be replaced, please contact DIRECTV Customer Service to obtain an authorized replacement. - Page 37 SD Video Connections These cables are provided for convenience only, and do not present an HD picture. They are useful if you have to connect your DIRECTV HD DVR to an older CRT TV, a VCR, or other non-HD device.
- Page 38 The following images show examples of how your receiver may be connected using the supported video and audio connections for the TV, the surround sound, and the DVD player/burner or VCR. Several models of DIRECTV Receivers are shown,...
- Page 39 APPENDIX 2: CONNECTIONS TO TV & EQUIPMENT HD TV CONNECTIONS Example: TV with HDMI Connector - RECOMMENDED Here is an example using a TV that has an HDMI connector as the best video/audio input. Note: Only an HDMI connection provides a 1080p picture and 3D TV. HDMI Cable...
- Page 40 APPENDIX 2: CONNECTIONS TO TV & EQUIPMENT HD TV CONNECTIONS Example: TV with Component Video Connectors Here is an example using a TV that has component video connectors as the best video input. Note: A Component Video connection will not provide a 1080p picture nor 3D TV.
- Page 41 APPENDIX 2: CONNECTIONS TO TV & EQUIPMENT SD TV CONNECTIONS (This connection does not provide an HD picture.) Example: TV with RCA Connectors Here is an example of a TV that has an S-Video connector as the best video input (Not all receivers have an S-Video connector.) S-Video requires a separate audio connection.
- Page 42 APPENDIX 2: CONNECTIONS TO TV & EQUIPMENT SD TV CONNECTIONS (This connection does not provide an HD picture.) Example: TV with RCA Connectors Here is an example of a TV that has RCA connectors as the best video input. RCA cables are often bundled as a three-way cable with one video and two audio connections.
-
Page 43: Audio Connections
APPENDIX 2: CONNECTIONS TO TV & EQUIPMENT AUDIO CONNECTIONS Of all the video connections, only HDMI provides an audio signal with the video. The other connections all require a separate audio cable. Of these, your best quality signal will be from the Digital Audio Out/Optical connector, followed by the Digital Coax connector, followed by the RCA Audio Out connector. -
Page 44: Connections To Other Equipment
VCR. Instead, use an available connection from your DIRECTV Receiver. For example, if you use the HDMI connection on your DIRECTV Receiver to connect to your TV, you can use the Component Video, Composite Video RCA, or S-Video Out to... -
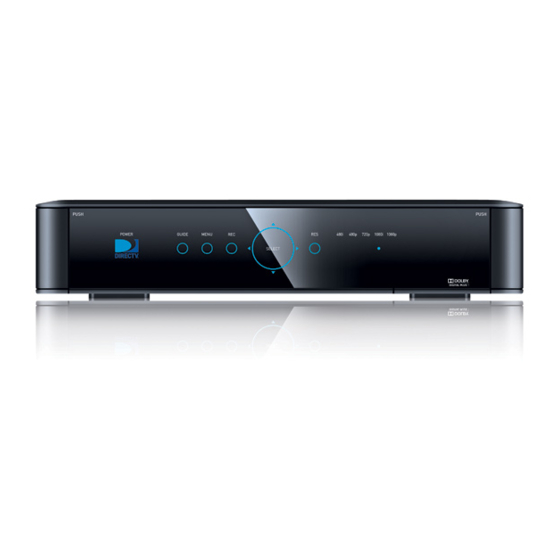
Page 45: Appendix 3: Receiver Front And Back Panels
APPENDIX 3: RECEIVER FRONT AND BACK PANELS Front Panel Example The buttons on the front panel perform the same functions as similarly named buttons on the remote control. You can use the front panel buttons at any time, but they are especially useful if you misplace your remote control or the batteries die. Your equipment may not look exactly like the model illustrated. - Page 46 SELECT – Selects the item highlighted. RES (RESOLUTION) – The RES key switches the output resolution of the DIRECTV Receiver. Each time you press the key, it cycles to the next available resolution: 480i, 480p, 720p, 1080i and 1080p (supported on some models). Note: The RESOLUTION button on the front panel only changes the resolution.
- Page 47 APPENDIX 3: RECEIVER FRONT AND BACK PANELS Back Panel Examples 9 10 11 12 DIRECTV HD DVR GENIE™ HD DVR Your equipment may not look exactly like the model illustrated.
- Page 48 APPENDIX 3: RECEIVER FRONT AND BACK PANELS SATELLITE IN 1 – Connect one line from your satellite dish here. A Single Wire Multi-Switch (SWM) connection, if applicable, is made to this satellite in port. SATELLITE IN 2 – Connect the second line from your satellite dish here. S-VIDEO OUT –...
-
Page 49: Appendix 4: How To Network Your Hd Dvr
APPENDIX 4: HOW TO NETWORK YOUR HD DVR To use your DIRECTV HD DVR on your home network, you will need: A compatible DIRECTV Receiver, such as the DIRECTV HD DVR (models HR44, HR34, HR20 or later) or DIRECTV Plus ®... -
Page 50: Professionally Installed Directv Cinema Connection Kit
If you have DECA Connected Home Adapters connected to your HD DVR (Models HR20- 23, R22), you must use either a professionally installed DIRECTV CINEMA Connection Kit, or the DIRECTV CINEMA Connection Kit - Wireless, to connect to the Internet. Your professionally installed DIRECTV CINEMA Connection Kit will include a Broadband DECA similar to one shown of the models here. - Page 51 APPENDIX 4: HOW TO NETWORK YOUR HD DVR SELF-INSTALLED DIRECTV CINEMA CONNECTION KIT - WIRELESS You can also order the DIRECTV CINEMA Connection Kit - Wireless from directv.com, or by calling 1.800.531.5000. Please follow the installation instructions in the kit’s user guide.
- Page 52 Internet (See figure A). Select Done to complete the setup process (See figure B). If your DIRECTV HD DVR does not immediately recognize the network connection, you will get the option to choose the Figure C connection method. Choose Wired (See Figure C).
- Page 53 Connect the other end of the Ethernet cable to the Ethernet port into DVR Receiver on the back of your DIRECTV HD DVR. If using the DIRECTV Cinema Connection Kit – Wireless, follow connection instructions found in the user’s manual that came with the device (or go to directv.com/getconnected) to determine...
- Page 54 Highlight your wireless network and press SELECT to display a blue dot next to your network. Then select Continue. Follow the onscreen instructions to complete the set-up process of the wireless adapter. NOTE: If you are having difficulty connecting to the Internet or need more information, visit www.directv.com/getconnected.
- Page 55 Internet (See figure A). Done Select to complete the setup process (See figure B). If your DIRECTV HD DVR does not immediately recognize the network connection, you will get the option to choose the Figure C Wireless connection method. Choose (See Figure C).
-
Page 56: Appendix 5: About High-Definition
— you may occasionally need to change the resolution and/or screen format. There are two keys that can be used to make changes: the FORMAT key on the remote control and the RES (Resolution) key on the front panel of the DIRECTV HD DVR. - Page 57 Resolution (RES) Key on Receiver Front Panel This key is used to cycle through all available resolutions on your DIRECTV HD DVR. It does not cycle through format settings. If video and audio are not appearing, it may be because the current resolution setting is not supported by your television. By pressing this key, you can check all available resolutions to see if that solves the problem.
- Page 58 APPENDIX 5: ABOUT HIGH-DEFINITION SUPPORTED RESOLUTIONS The following table shows the resolutions that can be output from each type of connection: Output Connection Available Resolutions HDMI 1080i, 1080p, 720p, 480i, 480p Component Video (YPbPr) 1080i, 720p, 480i, 480p S-Video 480i Video (RCA Type/Yellow) 480i NOTE: 720p, 1080i and 1080p are HD formats: 480i and 480p are not.
-
Page 59: Wide-Screen Vs. Standard Formats
APPENDIX 5: ABOUT HIGH-DEFINITION WIDE-SCREEN VS. STANDARD FORMATS 4:3 TVs Showing 16:9 program For a standard 4:3 TV showing a wide screen program, the program is too wide to fit on the screen. To alleviate this, choose: Letterbox: With this format, the 16:9 image is shrunk until the entire width of the program fits on your TV. Since the aspect ratio of the program is maintained, the image is no longer tall enough to fill your screen, so gray or black bars are seen at the top and bottom of the screen To change the bar color, press MENU, select “Settings &... - Page 60 APPENDIX 5: ABOUT HIGH-DEFINITION 16:9 TVs Showing 4:3 programs For a wide screen 16:9 TV showing a standard 4:3 TV program, the program is too tall to fit the screen. Your choices here include: Pillar Box: Here the 4:3 image is shrunk until the entire height of the program fits on your TV. Since the aspect ratio is maintained, the image is no longer wide enough to fill the screen, so gray or black bars are seen at the left and right edges.
- Page 61 Cyclone Design logo, DIRECTV Active, DIRECTV INTERACTIVE, DIRECTV PLUS, GENIE, HomePlug and the DIRECTV Plus DVR and DIRECTV HD DVR logos are trademarks of DIRECTV. All other trademarks and service marks are the property of their respective owners.
-
Page 62: Icon Reference
ICON REFERENCE Indicate that a show’s start or end time is earlier or later than is visible in the Guide program cell. LEFT and RIGHT arrows on the remote offer special functionality. Arrow Icons Objects are scrollable above or below the visible window. UP and DOWN arrows on the receiver front panel offer special functionality. - Page 63 Indicates a Program is in the Queue. All episodes of an ongoing programs are in the Queue. Indicates a program is about to expire Indicates that the programs comes from DIRECTV CINEMA. Indicates a recorded program is not available for viewing.
Need help?
Do you have a question about the R34 and is the answer not in the manual?
Questions and answers