Datalogic Magellan 8300 Product Reference Manual
Hide thumbs
Also See for Magellan 8300:
- Product reference manual (558 pages) ,
- Technical manual (94 pages) ,
- Quick start manual (18 pages)
Table of Contents
Advertisement
Quick Links
Advertisement
Table of Contents

Related Manuals for Datalogic Magellan 8300


Summary of Contents for Datalogic Magellan 8300
- Page 1 Magellan™ 8300/8400 Product Reference Guide...
- Page 2 Datalogic representative. Electronic versions may either be downloadable from the Datalogic website (www.datalogic.com) or provided on appropriate media. If you visit our web- site and would like to make comments or suggestions about this or other Datalogic publications, please let us know via the "Contact Datalogic" page.
-
Page 3: Table Of Contents
Chapter 1. INTRODUCTION............................1 Manual Overview ............................... 1 How to Use This Manual ........................... 2 Technical Support .............................. 4 Datalogic Website Support ........................4 Reseller Technical Support ........................4 Telephone Technical Support ........................4 Scanner and Scanner/Scale Features ......................5 Connections ................................ - Page 4 Checkstand Mounting ..........................30 Checkstand Vibration ..........................30 Installation Overview ............................30 Unpacking ..............................31 Operational Verification .......................... 32 Diagnostic Modes ............................ 34 Cables & Connections ..........................36 Remote Scale Display Placement/Installation .................... 37 Lighting Considerations .......................... 37 Viewing Angle ............................38 Remote Display Cabling ..........................
- Page 5 Automatic Zero Tracking Test ........................83 Preparing the Scanner/Scale for Calibration ....................84 Calibrating the Scale (Pounds & Kilograms) ....................84 Calibration Verification (U.S. Pounds) ......................87 Increasing-Load Test (Phase 1) ......................87 Shift Test ..............................88 Increasing- Load Test (Phase 2) ......................89 Blanking Test ............................
- Page 6 Power-up Beep Control ......................... 127 Good Read Beep Control ........................128 Good Read Beep Frequency ........................129 Good Read Beep Length ........................131 Good Read Beep Volume ........................132 Good Read When to Indicate ........................ 135 Scale Features ..............................137 Scale Enable ............................
- Page 7 RS-232 TTL Invert ..........................206 RS-232 ICL DC1 Character Delay Enable ..................... 207 RS-232 Team POS ICL Scale ......................... 208 RS-232 Beep on ASCII BEL ........................209 RS-232 Beep After Weigh ........................210 RS-232 Beep on Not on File ......................... 211 RS-232 ACK NAK Enable ........................
- Page 8 UPC-E Enable ..............................265 UPC-E Number System Character Transmission ................266 UPC-E Check Character Transmission ....................267 Expand UPC-E to UPC-A ........................268 Expand UPC-E to EAN-13 ........................269 UPC-E Label ID ............................270 UPC-E 2-Digit Supplemental Label ID ....................271 UPC-E 5-Digit Supplemental Label ID ....................
- Page 9 EAN Two Label Minimum Reads ......................322 UPC/EAN Correlation ..........................324 UPC/EAN Minimum Segment Length ....................325 Addons ..............................331 Addon Timer ............................335 2-Digit Add-ons Minimum Reads ......................336 5-Digit Add-ons Minimum Reads ......................338 Code 128 Add-ons Minimum Reads ....................340 GTIN Enable ..............................
- Page 10 Code 128 Label ID ........................... 381 Code 128 Length Control ........................382 Code 128 Length 1 ..........................383 Code 128 Length 2 ..........................384 Code 128 Correlation ..........................385 Code 128 Stitching ..........................386 Code 128 Minimum Reads ........................387 EAN-128 Enable .............................
- Page 11 Code 93 Label ID ............................. 430 Code 93 Length Control ......................... 431 Code 93 Length 1 ........................... 432 Code 93 Length 2 ........................... 433 Code 93 Correlation ..........................434 Code 93 Stitching ........................... 435 Code 93 Minimum Reads ........................436 MSI/Plessey Enable ............................
- Page 12 Appendix E. KEYBOARD FUNCTION KEY MAPPINGS ..................479 Keyboard Model Cross Reference ........................ 479 Appendix F. FACTORY DEFAULTS......................... 489 Appendix G. HANDHELD DATA FORMAT REQUIREMENTS ................515 Handheld Data Format Requirements General .................. 515 Datalogic Handheld Data Format Requirements ................516 AIM Formats ............................523 Magellan™ 8300/8400...
-
Page 13: Chapter 1 Introduction
Chapter 1 Introduction This Product Reference Guide contains comprehensive instructions on scanner or scanner/scale installation. Either model may be termed “scanner” for the purpose of simplicity in this manual. Also included are feature configuration using special programming fea- ture bar code labels and advanced user information as described in the following chapter descriptions. -
Page 14: How To Use This Manual
Chapter 5, Calibration , explains scale calibration and verification procedures, including procedures for calibrating the scale in pounds as well as kilograms. Chapter 6, Programming , highlights the function(s) of each pro- grammable feature and provides a dedicated set of bar codes for configuring scanner and scanner/scale features. -
Page 15: Manual Conventions
Manual Overview Manual Conventions ‘NOTE’ blocks contain information that is helpful and recommended. They provide information that is crit- ical to operations and/or procedures described in this manual. NOTE ‘LEGAL NOTE’ blocks indicate procedures or activities LEGAL which may be regulated under law by governmental NOTE agencies. -
Page 16: Technical Support
Technical Support Datalogic Website Support The Datalogic website (www.datalogic.com) is the complete source for technical support and information for Datalogic products. The site offers product support, product registration, warranty informa- tion, product manuals, product tech notes, software updates, demos, and instructions for returning products for repair. -
Page 17: Scanner And Scanner/Scale Features
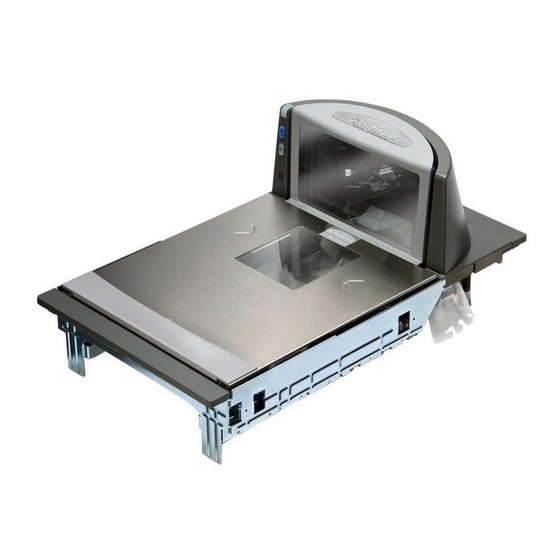
Scanner and Scanner/Scale Features Scanner and Scanner/Scale Features Figure 1 Controls, indicators and other features are shown in Figure 1. Scanner/Scale Features Weighing Surface — Lean Oversize Produce Here Scanner LED All Weighs™ Platter Vertical Window Bonnet Horizontal Window Volume/Tone Push Button Scale Zero Push Button... -
Page 18: Connections
Connections Two connector panels are located on either side of the scanner as Figure 2 shown in . The appearance of these panels will vary depending upon the factory options purchased with your model. Additionally, a service “pigtail” extends from the scanner’s base to connect the control panel cable from the Bonnet area. -
Page 19: Physical Parameters
Physical Parameters Physical Parameters This chapter provides specifications for performance, environmen- Chapter 2, Site Prepara- tal and electrical parameters. Reference tion and Installation , for physical measurements of all models and some accessories. Scanning The scanner has a scan zone between the two windows where the scanner projects laser light in order to scan items. -
Page 20: Warm-Up Time
Automatic Zero Maintenance The scale’s software constantly monitors and adjusts the Zero point as long as the deviation is within acceptable limits, while compen- sating for debris accumulation or removal. During power-up, the scale automatically re-zeros after verifying that all subsystems are functional. -
Page 21: Electrical Specifications
(86,080 LUX) Humidity Hot / Wet 40°C / 95% RH Spill Proof Hot / Dry 40°C / 15% RH (Datalogic MS-0006-13-0004) Cold / Dry 10°C / 1 5% RH Warm / Wet 25%C / 50% RH Storage +70 C +158 F... -
Page 22: Bar Codes Supported
Bar Codes Supported The scanner can read/decode the following bar code types (symbol- ogies): Retail Codes • UPC Versions A & E with full expansion E to A, plus A and E to 13 capability • UPC Supplementals and Add-ons (Bookland & Coupon code, UPC two character supplemental encodation and UPC five character supplemental encodation and supplemental C128) with support for conditional add-ons... -
Page 23: Chapter 2. Site Preparation And Installation
Chapter 2 Site Preparation and Installation This chapter provides a reference for preparing most checkstands to receive the scanner or scanner/scale. Included are physical parameters and instructions for checkstand preparation, power and ventilation considerations, cable routing information and unit installation. Site Preparation lists all procedures necessary to prepare the check- stand. -
Page 24: Models
Models Scanner and scanner/scale models (reference Figure 4) are available in different lengths, allowing them to fit with little or no modifica- tion into openings cut for previously installed scanners such as Dat- ® alogic™ Magellan™ scanners, or NCR scanner models 7820/24 and 7870. -
Page 25: Pre-Installation Considerations
Pre-Installation Considerations Figure 6. Produce Bar and Produce Rail Produce Produce Bar Option Rail Option Pre-Installation Considerations It should be noted that the scope of this manual does not encom- pass all factors related to worker safety and checkstand design. It does, however, offer a list of considerations that may be helpful in ensuring greater safety and productivity. -
Page 26: Checkstand Design
Checkstand Design 1. Select a design which allows load-sharing by several muscle groups (for example designs which allow the cashier to use both hands for scanning and bagging). 2. Select checkstands which deliver products to the cashier on an input belt and do not require the unloading of items from a cart. -
Page 27: Scanner Installation
Scanner Installation 12. Provide adequate toe space, foot rests or rails, antifatigue mats, and where feasible, an adjustable seat or stand against which the cashiers can lean. Scanner Installation 1. Mount the horizontal surface of the scanner flush with the countertop to encourage slide scanning rather than lifting. -
Page 28: Scanner Usage
Scanner Usage 1. Minimize handling of heavy/bulky products. Leave these items in the cart and use an alternative entry method such as key entry of short PLUs, or handheld scanning. 2. Regularly train cashiers in proper scanning methods and ergo- nomics principles, such as: •... - Page 29 Site Preparation Overview Routine operations such as ‘zeroing’ Service Access Requirements — and calibration do not require removal of the scanner from the checkstand or disassembly of the product. The installer should plan service access for the AC/DC Power Supply and cables. Since the typical grocery envi- Recommended Power Installation —...
-
Page 30: Ventilation And Spacing
sure). Should such an enclosure be unavoidable, an alternate method of platter removal using two coins may be employed, how- ever a minimum vertical clearance of 1.5” (3.8 cm) MUST be pro- vided (reference Figure 7). Another consideration is that the scan zone must be kept free of obstructions such as enclosures, key- board mounts, etc. - Page 31 Ventilation and Spacing If motors, conveyor belts, or other heat producing equipment are located near the scanner, forced air ventilation may be required. In most installations, a 30 cfm (.84 cmm) axial fan should provide suf- ficient air movement. If a ventilation fan is installed, one with a removable filter that may be washed or replaced is recommended.
-
Page 32: Service Access
Service Access The scanner and scanner/scale have been engineered to allow per- formance of all routine service and maintenance (such as “zeroing” and calibration) without removing the scanner from the checkstand. Additionally all cable connections made at the scanner can be con- nected and removed while the unit is sitting on the countertop. -
Page 33: Checkstand Preparation
Checkstand Preparation Checkstand Preparation Reference Figure 9. When performing a first time installation into a new checkstand, verify before cutting that room will be allowed for cabling, the AC/DC Power Supply, and any EAS peripheral equip- ment (such as controller boxes, etc.). When making the opening, take extra care to accurately cut to the correct dimensions. -
Page 34: Liquid Spills And Moisture
Liquid Spills and Moisture Select a checkstand design which allows fluids to flow through, and directs liquids away from any electronic equipment or storage areas. Counter Cutout The most important consideration when planning the counter open- ing for the scanner is the operator’s comfortable reaching distance. The ideal, ergonomically sound installation allows items to be directed within easy reach, and a scanning area requiring no lifting or special orientation of items. - Page 35 Counter Cutout 3. Install the AC/DC Power Supply, the Remote Scale Display cable (if Remote Display is used) and the interface cable(s) observing the following: Interface cables (and display cable, if applicable) should be routed away from all highly inductive electrical devices, like motors and conveyor belts, and even away from the unit’s power cable if possible.
- Page 36 Figure 10. Typical Checkstand Design & Cutout Location Remote Display Conveyor POS Terminal & Printer Optional Item Diverter Deadplate 6.3" (16.0cm) Scanner Keyboard Cash Drawer (Below Scanner) Scan & Bag Well (Optional) Check Writing Flush — Correct Stand Take-Away (Optional) Belt Bagging Above Flush —...
- Page 37 Counter Cutout Figure 11. Short Shelf Model 8301/8401 Cutout Dimensions Model 8301/8401 (Short) Max. Radius = 0.25" Minimum Cutout (0.635cm) 4x Dimensions 14.00" (35.6cm) min. 11.625" (29.53cm) min. Model 8301/8401 (Short) 4.08" (10.36cm) Supports Liquid Drainage Liquid Drainage Support Rails Figure 12.
- Page 38 Figure 13. Medium Shelf Models 8302/8304/8402/8404 Cutout Dimensions Models 8302/8304/8402/8404 (Medium Shelf) Optional Leveling Feet Minimum Cutout Dimensions Max. Radius = 0.25" (0.635cm) 15.825" (40.2cm) min. 11.625" (29.53cm) min. 1.76" Leveling (4.47cm) Feet 6.89" (17.5cm) Models 8302/8304/8402/8404 (Medium Shelf) Supports 4.08"...
- Page 39 Counter Cutout Figure 15. Medium Flanged Models 8302/8304/8402/8404 Cutout Dimensions Models 8302/8304/8402/8404 (Medium Flanged) 18.00" (45.7cm) Minimum Cutout Dimensions 16.625" Rail Max. Radius = 0.25" (42.23cm) (0.635cm) 3.06" (7.77cm) 0.75" (1.905cm) 11.625" (29.53cm) (Center Line) Rail 3.06" If leveling feet are needed, 0.75"...
- Page 40 Figure 17. Long Shelf Models 8303/8305/8403/8405 Cutout Dimensions Models 8303/8305/8403/8405 (Long Shelf) Optional Leveling Feet Cutout Max. Radius = 0.25" (0.635cm) 17.87" (45.4cm) 11.625" (29.53cm) 1.76" Leveling (4.47cm) Feet 6.89" (17.5cm) Models 8303/8305/8403/8405 (Long Shelf) Supports 4.08" ( 10.36 cm) Shelf/ 10.83"...
- Page 41 Counter Cutout Figure 19. Long Flanged Models 8303/8305/8403/8405 Cutout Dimensions Model 8303/8305/8403/8405 (Long Flanged) Cutout 20.00" (50.8cm) Max. Radius = 0.25" 18.625" (0.635cm) 4x Rail (47.308cm) 3.06" (7.77cm) 0.75" (1.905cm) 11.625" (Center Line) (29.53cm) Rail 3.06" (7.77cm) 0.75" If leveling feet are needed, (1.905cm) use the placement shown here, 0.375"...
-
Page 42: Checkstand Mounting
Checkstand Mounting There are a number of things to take into account when installing the unit into a checkstand. Key factors are ergonomic/worker safety, loading capacity and stability. Consider the scanner or scan- ner/scale’s weight when calculating the robustness of construction needed to support it as well as maximum capacity of weighed and scanned items. -
Page 43: Unpacking
Installation Overview Unpacking To unpack the unit: • Inspect the package for signs of damage that may have occurred during shipping. If damage is found, report it to your carrier immediately. • Lift out the accessory box containing the AC/DC Power Supply, optional Remote Scale Display and cable (if present), and the Quick Reference Guide. -
Page 44: Operational Verification
Figure 21. Remove Protective Vinyl Protective vinyl MUST be removed from the platter before use. • Proceed to Operational Verification below. Operational Verification Follow these steps to ensure that your unit has arrived undamaged and is fully functional before installing it in the counter and con- necting it to your POS system. - Page 45 Installation Overview • The scanner indicator (top-most, green LED) will be lit (dim) steadily. • The 7-segment display will flash the number ‘8’. indicating initialization. • If the Selftest detects a problem, the 7-segment display will display a number code. Refer to Chapter 4, Problem Isolation, for a description of failure codes and problem isolation proce-...
-
Page 46: Diagnostic Modes
The way in which EAS labels are deactivated is depen- EAS System — dent upon which aftermarket EAS system was purchased and installed. See the user’s manuals and other documentation accom- panying that EAS equipment. If the Yellow (bottom) LED/Button is not lit, press that but- Scale —... - Page 47 Installation Overview few seconds, then sound six rapid tones; after which you should immediately release the button. While in Scanner Diagnostic Mode, identification numbers for inter- face type, firmware and configuration will scroll continually across the scanner’s 7-segment FRU (Field Replaceable Unit) display. This is useful information for field diagnostics.
-
Page 48: Cables & Connections
Cables & Connections Considerations when routing the power and interface cables for the scanner and scanner/scale are: • Ensure that cables are not pinched, kinked or pierced. • Do not route interface cables in close proximity to electrical motors or other sources of electromagnetic interference. Do not plug the AC power cord into the outlet at this time. -
Page 49: Remote Scale Display Placement/Installation
Remote Scale Display Placement/Installation Figure 23. Physical Measurements: AC/DC Adapter 1.23" (3.1 cm) Remote Scale Display Placement/Installation The modular Remote Display is designed so that single display heads can be stacked to form a dual display as shown in Figure in order to address the specific viewing needs of both the customer and the cashier. -
Page 50: Viewing Angle
Viewing Angle The optimum display angle is directly facing the viewer. Tilt and rotatioin adjustments can be made as shown in Figure 24b. To ensure that displays are easily readable for customers/cashiers of average height, display heads should be between 48” to 60” (122 to 152 cm) from the floor. -
Page 51: Remote Display Cabling
Remote Scale Display Placement/Installation Remote Display Cabling Your installation should also take into account the routing of Remote Display cabling. Ensure that distance and obstacles spanned by the routed cable will not kink, pinch or stretch it. Also keep in mind you may need to drill a hole through which to route it. The Remote Scale Display connector end may be secured with a rubber band during shipping to prevent damage to the “locking tabs”... - Page 52 Figure 25. Physical Measurements: Remote Display 18.5mm Dual Display Single Display 28.4mm 60mm 60mm 112mm 112mm 329mm 264mm 292.5mm 325mm 227.5mm 116.39mm 116.39mm 25.5mm 41.99mm 85.1mm 5. Feed the entire length of the Remote Scale Display interface cable through the cable routing hole so that the assembled Remote Scale Display can be positioned over the mounting screw holes.
- Page 53 Remote Scale Display Placement/Installation Figure 26. Remote Scale Display Mounting Mounting Example Dual Display Heads Single Display Head (optional cable routing) Figure 27. Remote Scale Display Mounting Template 116.39mm 41.99mm 85.1mm 25.5mm Product Reference Guide...
-
Page 54: Changing Weighing Modes
Changing Weighing Modes Your scanner/scale has been programmed for weighing in either pounds or kilograms depending upon the initial operating environ- ment that was specified when you ordered your scanner/scale. If you need to change from pounds to kilograms or vice-versa, call technical support. - Page 55 Set-Up & Installation If you have a scanner with no scale, there will be only one interface cable to the POS terminal. 4. Connect the power cord to the scanner and route the other end down through the checkstand to the AC power outlet. DO NOT plug the power cord in at this time.
-
Page 56: Installation
Installation 1. Make sure that all cables are firmly attached (except that the AC/DC power supply should not be connected to the AC outlet yet). Reference Figure 9 Figure 2. Remove the platter to gain access to the interior lift handle. Grasp the platter in the positions shown in Figure 29 and gen-... - Page 57 Set-Up & Installation DO NOT attempt to lift the unit using the plastic edges, scale frame, or any features other than the lift handles. Figure 30. Using the Lift Handles Interior Lift Handle Rear Lift Handle 4. Lower the unit into the counter opening, ensuring that none of the cables are pinched, pierced or crimped.
- Page 58 Figure 31. Using the Bubble Level Models vary and may not contain a bubble level Bubble Level 6. Re-install the Platter and verify that it is flush or just below flush with the countertop. This is necessary to provide smooth scanning from either direction.
- Page 59 Set-Up & Installation Figure 32. Adaptive Scale Platter Option Some Platters have been shipped with installed spacers on their undersides at all four corners. These specially-configured Platters are provided for customers wishing to add an adaptive scale to their unit at a later date. Until such time as the adaptive scale is installed, the four spacers should be left in place to ensure that the Platter rests evenly at its correct height when positioned on the scanner.
-
Page 60: System Power-Up Recap
System Power-Up Recap The System Power-Up procedure may vary depending upon the requirements of your POS system. It is generally a good practice to power-down (switch off) all equipment prior to connecting cables. Check with your System Supervisor and/or refer to your POS termi- nal manual for proper power-down and power-up procedures and interface requirements when connecting any peripheral device. - Page 61 System Power-Up Recap 6. Power-up the scanner or scanner/scale by connecting the power cord to an AC power outlet. Wait for the unit to com- plete the Self test routine (10 seconds maximum). Successful scanner power-up is signified by any or all of the following: •...
- Page 62 NOTES Magellan™ 8300/8400...
-
Page 63: Chapter 3. Operation And Maintenance
Chapter 3 Operation and Maintenance The information contained in this chapter describes how to operate and maintain the scanner, and optional scale and EAS systems. Top- ics include “how to’s” on scanning, EAS label deactivation, weighing, re-zeroing the scale, removing the top cover and cleaning the upper and lower windows. - Page 64 Figure 34. Scan Zone Note that eyes..indicate what the scanner "sees." Vertical Window Scan Zone Horizontal Window Scan Zone Checker Side Scan Zone Proper Scanning Technique The scanner was designed to provide the ultimate in ergonomic enhancements for Point-Of-Sale (POS) scanning. To take advantage of these advancements: Practice the techniques below to improve scanning efficiency: •...
-
Page 65: Deactivating Security Labels
• Learn how the scanner functions and where the scanning area is located. Deactivating Security Labels EAS (Electronic Article Surveillance) labels can be detected and deactivated by a system equipped with this option. This is accom- plished by means of a deactivation antenna mounted under the scanner platter. -
Page 66: Operational Controls
2. Once weighed items are in place, enter PLU (price Look- Up) data as described in your POS system instructions. Item weight is displayed on the Remote Display and/or the host display. 3. Remove the item from the weigh platter. Operational Controls The function of scanner and scale controls and indicators is listed in Appendix A, LED/Beeper Indications &... -
Page 67: Operational Configuration
Operational Modes Error Reporting If a fatal error is detected during Selftest or operation, the unit will not advance to Normal Operation Mode. Selftest diagnostics will cause the unit to sound a long, low tone and/or display an error message on the 7-segment display indicating where the failure occurred. -
Page 68: Operating Mode
Operating Mode Operating Mode includes Normal Operation (scanning, EAS deacti- vation and weighing) and Sleep Mode. These two modes are most commonly observed by the user/operator. Normal Operation This condition is indicated by the scanner green LED being on dim and steady. -
Page 69: Additional Functions
Additional Functions Additional Functions Additional scanner and scale functions include programming, run- ning scanner or scale diagnostics, initiating a reset, zeroing the scale, and calibrating the scale. Programming When your scanner or scanner/scale is shipped from the factory it is configured to work with the POS system interface at your store and read the bar code symbologies you designated. -
Page 70: Scale Adjustments
Scale Adjustments The scale allows two user adjustments: zeroing and calibration. The first, and most frequently performed, is ‘zeroing’ the scale. This operation resets the scale’s “at rest” reading to zero which must be within the range of - 0.2 pounds (- 0.09kg) to +0.6 pounds (0.27kg) since the last calibration. - Page 71 Additional Functions Calibrating the Scale The second adjustment, calibration, defines and sets a standard reference weight range against which all product weights are com- pared. If your scale is set for weighing in pounds, this range is 0 - 30 pounds, and, if your scale is set for weighing in kilograms, the range is 0 - 15 kilograms.
-
Page 72: Operational Maintenance
Operational Maintenance The scanner or scanner/scale will provide dependable service for many years. The following maintenance procedures will keep your scanner or scanner/scale operating at peak performance. Cleaning the Platter and Scan Windows Clean the exterior surfaces of the horizontal and vertical scan windows at least twice daily with a nonabrasive, mild, water-based glass cleaner and paper towels or lint-free cleaning tissues. -
Page 73: Vertical Scan Window Replacement
Operational Maintenance Vertical Scan Window Replacement The Vertical Scan Window is a replaceable part. Follow the instruc- tions below to remove and replace a standard or L-Platter Vertical Scan Window. Standard Vertical Scan Window Removal 1. Lift up on the vertical bezel as shown in a and Figure 36 tilt its top up and away from the scanner as shown. - Page 74 4. Fully seat the new Vertical Scan Window into the window channel, engaging it within the retention tabs. Reference d and Figure 36 Figure 36 5. Clean both sides of the new Vertical Scan Window using a paper towel or lint free cleaning tissues dampened with a mild, water-based glass cleaner.
- Page 75 Operational Maintenance 2. If the top edge of the platter is blocked, you may find it easier to use a coin to lift up an edge of the platter as shown in b, then grasp the platter vertical bezel Figure 37 or other exposed edge.
-
Page 76: Horizontal Scan Window Replacement (Wrg)
6. Re-install the platter. Vertical Scan Window replacement is now complete. Horizontal Scan Window Replacement (WRG) Wear Resistant Glass (WRG) horizontal scan windows are replaceable and can be removed and replaced following the instructions below. Sapphire glass does not require replacement, so it is permanently fas- tened in place. - Page 77 Operational Maintenance Figure 39. Removing/Replacing the WRG Window Window Retainer Window Platter Gasket Window Product Reference Guide...
- Page 78 NOTES Magellan™ 8300/8400...
-
Page 79: Chapter 4. Problem Isolation
Chapter 4 Problem Isolation In the event of a suspected functional problem, use the trouble- shooting references provided in this chapter. This useful informa- tion will help you to identify and resolve the cause of the problem. The scanner/scale has a number of features that indicate when a scanner or scale problem occurs. -
Page 80: Diagnostic Procedures
sounded, an error code is shown on the 7-segment display, and operation may be halted. If you press the Volume/Tone Push Button at that time, a series of tones will be sounded that matches the error code displayed. Diagnostic Tests Chapter 2, Diagnostic Modes, for details about running diag- nostic tests for the scanner and/or scale. -
Page 81: Error Codes
Error Codes Error Codes If an error is detected, the scanner will sound a long low tone (for one second) and alternately flash its LEDs, indicating a failure. Fol- lowing the long low tone, an error code will appear on the 7-seg- ment display (refer to Figure 40). - Page 82 Table 2. Error Codes Error Probable Cause Corrective Action Code No POS interface has been selected (Null interface). See Chap- Configuration ter 6, Interface Type to select the required interface using pro- Blinking gramming bar codes. See Chapter 6, Programming, for details about configuring the Configuration Error scanner using programming bar codes.
- Page 83 Error Codes Figure 40. 7-Segment LED Display Vertical Window Seven-Segment Display Horizontal Window Product Reference Guide...
-
Page 84: Scale Error Reporting
Scale Error Reporting Scale diagnostics uses the Remote Scale Display and the Zero Status lamp to communicate specific scale failures. The following chart shows the Remote Display messages, the Scale Status lamp indica- tion, the problem that the scale is experiencing and what action should be taken. -
Page 85: Flowcharts
Flowcharts Flowcharts The problem isolation flowcharts on the following pages allow you to identify and troubleshoot problems with your system. Figure 41. Problem Isolation: Start For units using an AC/DC adapter, verify that... 1. AC power cord is connected to a functional AC outlet. 2. - Page 86 Figure 42. Problem Isolation: Selftest SELFTEST START Scan the Factory Does the Does the Does the Defaults bar code in 7-segment 7-segment 7-segment Section 6 to enable the display show display show display show default configuration file. Restart the unit. No interface selected (Null Interface).
- Page 87 Flowcharts Figure 43. Problem Isolation: Poor/No Reading Have you verified that all scan windows are clean and scratch-free? POOR/NO READING Before proceeding, verify that START bar code samples presented to scanner are of good quality and a symbology the scanner Enter Scanner Diagnostic Mode by can read.
- Page 88 Figure 44. Problem Isolation: No Transmit to POS NO TRANSMIT TO POS START Check the interface (I/F) Verify programmable cable connections. If parameters using the possible, retest the information and programming Does the system using a known- bar codes provided in Section scanner read DONE good I/F cable.
- Page 89 Flowcharts Figure 45. Problem Isolation: Scale If this is a new installation, SCALE START make sure any foam packing pieces have been removed from the scale cavity before proceeding. Lift off the platter View the Remote to verify, then set the platter Call Tech Support Display and/or the back into position.
- Page 90 Figure 46. Problem Isolation: Remote Display REMOTE DISPLAY Scanner-scale models that include a Remote Display when shipped START from the factory, are configured for use with the display. If you're unsure of the settings for your unit, contact Tech Support. Is the Use the programming bar unit configured...
- Page 91 Flowcharts Figure 47. Problem Isolation: EAS System NO EAS DEACTIVATION Before proceeding, verify the EAS Antenna and associated equipment START have been correctly installed (ref. Chapter 2). Ensure operator has been trained in proper EAS system use (ref. Chapter 3). Verify programmable If possible, retest the Check all EAS...
- Page 92 NOTES Magellan™ 8300/8400...
-
Page 93: Chapter 5. Calibration
Chapter 5 Calibration A number of situations require the scale to be calibrated. They are: • at initial installation of the scanner/scale • if the scale cannot be re-zeroed • if you change the weight measure from pounds to kilograms or vice-versa •... -
Page 94: Description Of Calibration Sequence
Description of Calibration Sequence The Calibration Sequence sets the scale to an accurate reference point for weighing. This process involves the use of a Field Standard Weight Set (31.5-pounds) for calibration in pounds, (18.5-kilo- grams) for Metric. Once calibration has been successfully com- pleted, the scanner/scale uses the certified weight as a reference for subsequent weighing activities. -
Page 95: Motion Test
Motion Test Motion Test This test verifies that the scale will not ‘zero’ when the weighing surface of the scanner/scale is in motion. 1. Verify that the Yellow LED is on and the Remote Display reads 0.00 pounds or 0.000 kilograms. 2. -
Page 96: Preparing The Scanner/Scale For Calibration
Preparing the Scanner/Scale for Calibration 1. Assure that the scanner/scale is stable, secure and properly installed. (Refer to Chapter 2, Site Preparation and Installation, for instructions on the proper installation of the scanner/ scale). 2. Power-up the scanner/scale. 3. Allow the unit to reach temperature equilibrium for at least one hour. - Page 97 Calibrating the Scale (Pounds & Kilograms) Figure 48. Calibration Switch Access Spider Calibration Switch 4. Press and release the Calibration Switch to place the scanner/ scale in Calibration Mode. (The scanner/scale will sound a a series of rapid beeps indicating it is in Calibration Mode.) If the motor was spinning when you initiated Calibration Mode, the motor will stop and the Yellow LED will begin flashing indicat- ing the scale is in Calibration Mode.
- Page 98 8. The Yellow LED will extinguish for approximately 10 seconds and, if one is present, the Remote Display will alternately dis- play until the scale is ready to pro- ceed. 9. If the calibration was successful, (the speaker sounds a single “...
-
Page 99: Calibration Verification (U.s. Pounds)
Calibration Verification (U.S. Pounds) Calibration Verification (U.S. Pounds) Once you have completed the calibration sequence, you may be required to perform these step-by-step verification procedures. National Institute of Standards and These procedures follow the Technology Handbook-44 guidelines for grocery scale installations. You may be required by state or local law to have these procedures performed by a certified technician or verified by a proper official. -
Page 100: Shift Test
Shift Test The Shift Test checks to ensure that items placed anywhere on the weighing surface of the scanner/scale are weighed properly. Refer to Figure 49 when performing this test. 1. Place and remove in succession, a ten-pound load on the cen- ter of each of the four quadrants (1, 2, 3, and 4 in Figure 5-2) of the scanner/scale’s weigh platter. -
Page 101: Increasing- Load Test (Phase 2)
Calibration Verification (U.S. Pounds) Increasing- Load Test (Phase 2) After completing the Shift Test, you must complete the Increasing Load Test using 20.0, 25.0 and 30.0 pounds of weight. The upper limit of the scale is configurable according to POS interface type and may not necessarily be set at 30 pounds, which is the stan- dard setting. -
Page 102: Decreasing-Load Test
Decreasing-Load Test This test ensures that the scanner/scale responds properly when a heavy object is followed by a significantly smaller object. 1. Place a 30.0-pound load on the scale and verify that the dis- play shows between 29.99 and 30.01 pounds. If the upper weight limit for your scale is not set at 30 pounds, begin by placing weight equaling your upper limit setting. -
Page 103: Calibration Verification (Kilograms)
Calibration Verification (Kilograms) Calibration Verification (Kilograms) Once you have completed the calibration sequence, you may be required to perform these step-by-step verification procedures. National Institute of Standards and These procedures follow the Technology Handbook-44 guidelines for grocery scale installations. You may be required by state or local law to have these procedures performed by a certified technician or verified by a proper official. -
Page 104: Shift Test (Metric)
9. Increase the weight on the scale to 7.50 kg on the center of the weighing surface and check that the display reads between 7.495 and 7.505 kg. 10. Remove the weights and verify that the display reads 0.000 kg. You have completed the Increasing-Load Test (Phase 1). -
Page 105: Increasing- Load Test (Phase 2)
Calibration Verification (Kilograms) Increasing- Load Test (Phase 2) After completing the Shift Test, you must complete the Increasing Load Test using 10.00, 12.50 and 15 kilograms of weight. The upper limit of the scale is configurable according to POS interface type and may not necessarily be set at 15 kilograms, which is the stan- dard setting. -
Page 106: Decreasing-Load Test
Decreasing-Load Test This test ensures that the scanner/scale responds properly when a heavy object is followed by a significantly smaller object. 1. Place weights that total 15.8 kilograms. If the upper weight limit for your scale is not set at 15 kilograms, begin by placing weight equaling your upper limit setting plus 0.8 kilograms. -
Page 107: Chapter 6. Programming
Chapter 6 Programming Introduction to Label Programming The programming bar code labels contained in this manual will allow you to customize and configure features and settings for your scanner (scanner/scale). To ensure full compatibility and proper function, use only the programming bar codes in this manual and other product-specific publications to program scanner features. -
Page 108: Integrating The Scanner With Your Host System
Integrating the Scanner With Your Host System Your scanner MUST be equipped with the correct hardware (inter- face board, cable, etc.) to properly communicate with your host sys- tem. Contact your dealer for information if you have questions about your scanner’s hardware compatibility. You may also want to contact the dealer or your system administra- tor if you have no record of how your scanner was pre-programmed at the factory. - Page 109 Integrating the Scanner With Your Host System Ensure that your planned modifications are compatible with the cur- rent interface. For example, baud rate selections are only valid in the RS-232 interface. The scanner will sound an error tone when scanning programming labels for features invalid to the current interface group.
-
Page 110: Programming Overview
The scanner can also accept programming via its auxilliary port using a handheld scanning device. Eligible handheld devices must have the ability to transmit Code 128 function codes such as the programming bar codes presented in this manual. Datalogic models ® ®... -
Page 111: What Is Programming Mode
Programming Overview What Is Programming Mode? Programming Mode is a state in which the scanner must be placed in order to accept commands via programming bar code labels. When programming using the bar code labels in this manual, the scanner is typically placed in Programming Mode by scanning the SWITCH label. -
Page 112: Programming Session
Programming Session A typical programming session is conducted as follows: 1. Scan the SWITCH bar code to place the scanner in Program- ming Mode. Depending upon its current programming, the scanner may emit a beep or beeps, indicating it has read the bar code and the scanner (top) green LED will flash on and off slowly while the scanner remains in Programming Mode. - Page 113 Programming Overview It is recommended that programming sessions be limited to one fea- ture at a time. Should you make a mistake in the programming sequence, it can be difficult to discover where an error has been made if several features are programmed at once. Additionally, it can be NOTE confusing to determine which features may or may not have been suc- cessfully set following such a session.
-
Page 114: Programming Sequence
Programming Sequence To modify a scanner feature (item), the programming bar codes contained in this manual must be scanned in a given sequence depending upon the feature being programmed (as shown in Table 3). There are three possible programming sequences: If the scanner’s interface type must be changed, always be sure that interface configuration is the FIRST item scanned during a program- ming session. - Page 115 Programming Overview Table 3. Programming Sequence ITEM TAG ITEM VALUE END/RESET ENABLE NEW FEATURE SWITCH SWITCH 3 4 5 ENABLE NEW FEATURE USING THE FOLLOWING SETTINGS... SWITCH SWITCH ONE BAR CODE CONTAINS SWITCH + ITEM TAG + ITEM VALUE + SWITCH Product Reference Guide...
-
Page 116: Led And Beeper Indicators
LED and Beeper Indicators The scanner provides a set of indicators that verify/announce the various scanner functions. If You Make a Mistake... If, during a programming session, you find that you are unsure of the scanner’s settings or wish to reset the scanner’s configuration, use the Return to Factory Settings label below to return the scan- ner’s configuration to the factory settings. -
Page 117: Test Mode
LED and Beeper Indicators Test Mode Use this feature to place the scanner into a testing, or “demo” mode. This special mode disables the scanner interface, meaning that bar code data is not sent out to the host via the scanner interface. This allows the bar code to be scanned continuously without requiring a response from the POS terminal. -
Page 118: General Scanner Features
General Scanner Features Scanner Button Options Allows configuration of the scanner (volume) button to different modes of operation. • Disable Scanner Button — Disables all button functions • Enable Standard Functions — Enables volume, tone, and reset. • Enable Reset Only — The button’s sole function will be to reset the scanner. - Page 119 General Scanner Features Scanner Button Options (continued) Remember to cover any unused bar codes on this and the facing page to ensure that the scanner reads only the bar code you intend to scan. SCANNER BUTTON OPTIONS = ENABLE STANDARD FUNCTIONS SCANNER BUTTON OPTIONS = ENABLE RESET ONLY Product Reference Guide...
-
Page 120: Double Read Timeout
Double Read Timeout The Double Read Timeout feature sets a time limit that determines how much time must pass before reading the same label again (e.g. two identical items in succession). To set the Double Read Timeout: 1. Scan the SWITCH bar code. 2. - Page 121 General Scanner Features Double Read Timeout (continued) Remember to cover any unused bar codes on this and the facing page to ensure that the scanner reads only the bar code you intend to scan. DOUBLE READ TIMEOUT = 800ms DOUBLE READ TIMEOUT = 1 SECOND Product Reference Guide...
-
Page 122: Laser Timeout
Laser Timeout The laser timeout feature sets the time for switching the visible laser diodes (VLDs) off if the scanner is idle. Using this feature can prolong the life of the VLDs. To set the Laser Timeout: 1. Scan the SWITCH bar code. 2. - Page 123 General Scanner Features Laser Timeout (continued) Remember to cover any unused bar codes on this and the facing page to ensure that the scanner reads only the bar code you intend to scan. LASER TIMEOUT = 10 MINUTES LASER TIMEOUT = 15 MINUTES Product Reference Guide...
-
Page 124: Motor Timeout
Motor Timeout The Motor Timeout feature sets the time for automatically switching the motor off when the scanner is not in use. Laser safety requires that the laser switch off before the motor. If you set the motor timeout shorter than the laser timeout, the motor and the laser will both shut off when the motor timeout expires. - Page 125 General Scanner Features Motor Timeout (continued) Remember to cover any unused bar codes on this and the facing page to ensure that the scanner reads only the bar code you intend to scan. MOTOR TIMEOUT = 10 MINUTES MOTOR TIMEOUT = 15 MINUTES Product Reference Guide...
- Page 126 Motor Timeout (continued) Remember to cover any unused bar codes on this and the facing page to ensure that the scanner reads only the bar code you intend to scan. MOTOR TIMEOUT = 30 MINUTES MOTOR TIMEOUT = 60 MINUTES Magellan™...
-
Page 127: Label Gone Timeout
General Scanner Features Label Gone Timeout Specifies the amount of time that data segments are stored by the software before being discarded if a label has not been successfully decoded during the current “label in volume session,” which is defined as the time between when the label gone time is first started until the label gone timer expires. - Page 128 Label Gone Timeout (continued) Remember to cover any unused bar codes on this and the facing page to ensure that the scanner reads only the bar code you intend to scan. LABEL GONE TIMEOUT = 160 mS LABEL GONE TIMEOUT = 250 mS Magellan™...
- Page 129 General Scanner Features Label Gone Timeout (continued) Remember to cover any unused bar codes on this and the facing page to ensure that the scanner reads only the bar code you intend to scan. LABEL GONE TIMEOUT = 500 mS LABEL GONE TIMEOUT = 1 Second Product Reference Guide...
-
Page 130: Auxiliary Port Mode
(only one option can be active at a time). • Disabled — Port is inactive ® • External Handheld Input — Supports Datalogic handheld scanners (QuickScan 1000, QuickScan 6000, PowerScan) as ® well as other models such as the Symbol HotShot. Call your dealer for more information about supported devices. - Page 131 General Scanner Features Auxiliary Port Mode (continued) Remember to cover any unused bar codes on this and the facing page to ensure that the scanner reads only the bar code you intend to scan. AUXILIARY PORT MODE = EXTERNAL HANDHELD INPUT AUXILIARY PORT MODE = PIR/CT Product Reference Guide...
-
Page 132: Auxiliary Port Baud Rate
Auxiliary Port Baud Rate Specifies the baud rate of the auxillary port when operating in PIR/ CT mode. PIR/CT is a value-added feature which may not have been activated on your model. NOTE To specify the Auxiliary Port Baud Rate: 1. - Page 133 General Scanner Features Auxiliary Port Baud Rate (continued) Remember to cover any unused bar codes on this and the facing page to ensure that the scanner reads only the bar code you intend to scan. RS-232 BAUD RATE = 4800 RS-232 BAUD RATE = 9600 Product Reference Guide...
- Page 134 Auxiliary Port Baud Rate (continued) Remember to cover any unused bar codes on this and the facing page to ensure that the scanner reads only the bar code you intend to scan. RS-232 BAUD RATE = 19200 RS-232 BAUD RATE = 38400 Magellan™...
- Page 135 General Scanner Features Auxiliary Port Baud Rate (continued) Remember to cover any unused bar codes on this and the facing page to ensure that the scanner reads only the bar code you intend to scan. RS-232 BAUD RATE = 57600 RS-232 BAUD RATE = 115200 Product Reference Guide...
-
Page 136: Laser Failure Mode
Laser Failure Mode This configuration item selects whether the scanner should con- tinue operating if only one laser is functional. (The scanner has two lasers: One for the horizontal window, and one for the vertical win- dow.) Options for this feature are: •... -
Page 137: Productivity Index Reporting (Pir)/Cashier Training (Ct)
General Scanner Features Productivity Index Reporting (PIR)/Cashier Training (CT) When PIR/CT is enabled, label quality data is appended to decoded data before being presented to the POS. The PIR feature allows the scanner to provide information to an external computer indicating how easy the label was to read. -
Page 138: Indication Features
Indication Features Green LED Idle State This feature specifies the state of the green scanner LED when the scanner is idle and ready to read a label. Options are: • • On dim To set the LED Idle State: 1. Scan your selection from the bar codes below. You’ll need to cover any unused bar codes on this and the facing page to ensure that the scanner reads only the bar code you intend to scan. -
Page 139: Power-Up Beep Control
Indication Features Power-up Beep Control Specifies the type of audible indication that is made when entering scanner-active mode on power-up. Choices are: • No beep • One beep • Three beeps To set the Power-up Beep: 1. Scan the SWITCH bar code. 2. -
Page 140: Good Read Beep Control
Good Read Beep Control This feature enables/disables scanner beep upon successfully decoding of a label. To set this feature: 1. Scan the SWITCH bar code. 2. Scan your selection from the two bar codes below. You’ll need to cover any unused bar codes on this and the facing page to ensure that the scanner reads only the bar code you intend to scan. -
Page 141: Good Read Beep Frequency
Indication Features Good Read Beep Frequency Adjusts the scanner’s good read beep to sound at low, medium, or high frequency (controls the beeper’s pitch/tone). • Low = 660 Hz • Medium = 860 Hz • High = 1050 Hz To set the Good Read Beep Frequency: 1. - Page 142 Good Read Beep Frequency (continued) Remember to cover any unused bar codes on this and the facing page to ensure that the scanner reads only the bar code you intend to scan. GOOD READ BEEP FREQUENCY = MEDIUM GOOD READ BEEP FREQUENCY = HIGH Magellan™...
-
Page 143: Good Read Beep Length
Indication Features Good Read Beep Length Specifies the duration of a good read beep. To set the good read beep length: 1. Scan the SWITCH bar code. 2. Scan the bar code, SET GOOD READ BEEP LENGTH on page 131. You’ll need to cover any unused bar codes on this and the facing page to ensure that the scanner reads only the bar code you intend to scan. -
Page 144: Good Read Beep Volume
Good Read Beep Volume Selects the beeper volume upon a good read beep. There are five selectable volumes, with each volume increment adding approxi- mately five decibels to the previous level: • 0 = Lowest Volume • 1 = Medium-Low Volume •... - Page 145 Indication Features Good Read Beep Volume (continued) Remember to cover any unused bar codes on this and the facing page to ensure that the scanner reads only the bar code you intend to scan. GOOD READ BEEP VOLUME = MEDIUM LOW GOOD READ BEEP VOLUME = MEDIUM Product Reference Guide...
- Page 146 Good Read Beep Volume (continued) Remember to cover any unused bar codes on this and the facing page to ensure that the scanner reads only the bar code you intend to scan. GOOD READ BEEP VOLUME = HIGHEST Magellan™ 8300/8400...
-
Page 147: Good Read When To Indicate
Indication Features Good Read When to Indicate This feature specifies when the scanner will provide indication (beep and/or flash its green LED) upon successfully reading a bar code. • Good Read = Indicate after decode • Good Read = Indicate after transmit •... - Page 148 Good Read When to Indicate (continued) Remember to cover any unused bar codes on this and the facing page to ensure that the scanner reads only the bar code you intend to scan. GOOD READ = INDICATE AFTER TRANSMIT GOOD READ = INDICATE AFTER CTS GOES INACTIVE, THEN ACTIVE (RS-232 ONLY) Magellan™...
-
Page 149: Scale Features
Scale Features Scale Features Scale Enable Use this feature to enable or disable scale operation. Recalibration/recertification may be required when adding scale functionality. Consult your local Weights and Measures authority. If this feature is enabled the scanner will expect that it is to function NOTE as a scanner-scale, and will indicate an error if it is not a scale- equipped unit. -
Page 150: Scale Enforced Zero Return
Scale Enforced Zero Return This feature enables/disables the enforced zero return of the scale. Three settings are available for this feature: • Disable • Scale Must Return to Zero Weight Within Two Minutes — Scale will require re-zeroing if a non-zero weight is left on for more than two minutes or if the scale is below zero. - Page 151 Scale Features Scale Enforced Zero Return (continued) Remember to cover any unused bar codes on this and the facing page to ensure that the scanner reads only the bar code you intend to scan. SCALE ENFORCED ZERO RETURN = NON-ZERO FOR 2 MINUTES OR BELOW ZERO SCALE ENFORCED ZERO RETURN = NON-ZERO FOR 2 MINUTES OR BELOW ZERO OR NO ZERO BETWEEN WEIGHTS Product Reference Guide...
- Page 152 Scale Enforced Zero Return (continued) Remember to cover any unused bar codes on this and the facing page to ensure that the scanner reads only the bar code you intend to scan. SCALE ENFORCED ZERO RETURN = NON-ZERO FOR 2 MINUTES Magellan™...
-
Page 153: Scale Interface Type
Scale Features Scale Interface Type Use this feature to select the scale interface type. Choices are: • No Scale Interface • RS-232 — SASI • RS-232 — ICL To set the Scale Interface Type: 1. Scan the SWITCH bar code. 2. - Page 154 Scale Interface Type (continued) Remember to cover any unused bar codes on this and the facing page to ensure that the scanner reads only the bar code you intend to scan. SCALE INTERFACE TYPE = RS-232 — ICL Magellan™ 8300/8400...
-
Page 155: Scale Calibration Notification
Scale Features Scale Calibration Notification When enabled, this feature allows the host to be notified of a cali- bration event. To set this feature: 1. Scan the SWITCH bar code. 2. Scan your selection from the two bar codes below. You’ll need to cover any unused bar codes on this and the facing page to ensure that the scanner reads only the bar code you intend to scan. -
Page 156: Scale Intercharacter Delay
Scale Intercharacter Delay Sets the delay between the end of one character and the beginning of the next, in 10 millisecond increments. To specify the intercharacter delay: 1. Scan the SWITCH bar code. 2. Scan the bar code below, SET KEYBOARD WEDGE INTERCHAR- ACTER DELAY on page 252. -
Page 157: Remote Display - Enable/Disable
Scale Features Remote Display — Enable/Disable The scanner-scale can be configured to operate with or without a Remote Display. Recalibration/recertification may be required when adding a Remote Display. Consult your local Weights and Measures authority. NOTE If this feature is enabled the scanner-scale will expect that it is con- nected to a Remote Display, and will indicate an error if one is not. -
Page 158: Eas Features
EAS Features EAS Active State Specifies the active state polarity of EAS (Electronic Article Survel- lance); the inactive state is its opposite polarity. EAS output goes active during the good read indication of a bar code, allowing the EAS device to deactivate a tag on the product. To set the EAS Active State: 1. -
Page 159: Eas Timeout
EAS Features EAS Timeout Specifies the amount of time that an EAS (Electronic Article Survel- lance) signal is held in its active state for a good read indication. To set the EAS Timeout: 1. Scan the SWITCH bar code. 2. Scan the bar code, SET EAS TIMEOUT on page 147 below. You’ll need to cover any unused bar codes on this and the fac- ing page to ensure that the scanner reads only the bar code you intend to scan. -
Page 160: Interface Related Features
Interface Related Features Interface Type Specifies the current scanner interface. Selections are: I/F I.D. I/F I.D. INTERFACE (I/F) INTERFACE (I/F) TYPE TYPE NUMBER NUMBER RS-232 Standard Keyboard Wedge A RS-232 Wincor-Nix- Keyboard Wedge B dorf RS-232 Single Cable Keyboard Wedge C OEM USB Keyboard Wedge D IBM Port 17... - Page 161 Interface Related Features Interface Type (continued) A new scanner may have been shipped from the factory with a Null Interface (no interface type selected) to ensure system compatibility at installation. In this case, the correct Interface Type programming bar code must be scanned first before the scanner can be used with a POS NOTE system.
- Page 162 RS-232 Interface Selection Remember to cover any unused bar codes on this and the facing page to ensure that the scanner reads only the bar code you intend to scan. Great care should be taken to select the correct interface type, since you can cause damage to the scanner and/or POS terminal by attempting to change to an incompatible interface.
- Page 163 Interface Related Features RS-232 Wincor-Nixdorf Interface Selection Remember to cover any unused bar codes on this and the facing page to ensure that the scanner reads only the bar code you intend to scan. Great care should be taken to select the correct interface type, since you can cause damage to the scanner and/or POS terminal by attempting to change to an incompatible interface.
- Page 164 RS-232 Single Cable Interface Selection Remember to cover any unused bar codes on this and the facing page to ensure that the scanner reads only the bar code you intend to scan. Great care should be taken to select the correct interface type, since you can cause damage to the scanner and/or POS terminal by attempting to change to an incompatible interface.
- Page 165 Interface Related Features OEM USB Interface Selection Remember to cover any unused bar codes on this and the facing page to ensure that the scanner reads only the bar code you intend to scan. Great care should be taken to select the correct interface type, since you can cause damage to the scanner and/or POS terminal by attempt- ing to change to an incompatible interface.
- Page 166 IBM Port 17 Interface Selection Remember to cover any unused bar codes on this and the facing page to ensure that the scanner reads only the bar code you intend to scan. Great care should be taken to select the correct interface type, since you can cause damage to the scanner and/or POS terminal by attempting to change to an incompatible interface.
- Page 167 Interface Related Features IBM Port 5B Interface Selection Remember to cover any unused bar codes on this and the facing page to ensure that the scanner reads only the bar code you intend to scan. Great care should be taken to select the correct interface type, since you can cause damage to the scanner and/or POS terminal by attempting to change to an incompatible interface.
- Page 168 IBM Port 9B Interface Selection Remember to cover any unused bar codes on this and the facing page to ensure that the scanner reads only the bar code you intend to scan. Great care should be taken to select the correct interface type, since you can cause damage to the scanner and/or POS terminal by attempting to change to an incompatible interface.
- Page 169 Interface Related Features USB Keyboard Interface Selection Remember to cover any unused bar codes on this and the facing page to ensure that the scanner reads only the bar code you intend to scan. Great care should be taken to select the correct interface type, since you can cause damage to the scanner and/or POS terminal by attempting to change to an incompatible interface.
- Page 170 Keyboard Wedge A Interface Selection Remember to cover any unused bar codes on this and the facing page to ensure that the scanner reads only the bar code you intend to scan. Great care should be taken to select the correct interface type, since you can cause damage to the scanner and/or POS terminal by attempting to change to an incompatible interface.
- Page 171 Interface Related Features Keyboard Wedge B Interface Selection Remember to cover any unused bar codes on this and the facing page to ensure that the scanner reads only the bar code you intend to scan. Great care should be taken to select the correct interface type, since you can cause damage to the scanner and/or POS terminal by attempting to change to an incompatible interface.
- Page 172 Keyboard Wedge C Interface Selection Remember to cover any unused bar codes on this and the facing page to ensure that the scanner reads only the bar code you intend to scan. Great care should be taken to select the correct interface type, since you can cause damage to the scanner and/or POS terminal by attempting to change to an incompatible interface.
- Page 173 Interface Related Features Keyboard Wedge D Interface Selection Remember to cover any unused bar codes on this and the facing page to ensure that the scanner reads only the bar code you intend to scan. Great care should be taken to select the correct interface type, since you can cause damage to the scanner and/or POS terminal by attempting to change to an incompatible interface.
- Page 174 Keyboard Wedge E Interface Selection Remember to cover any unused bar codes on this and the facing page to ensure that the scanner reads only the bar code you intend to scan. Great care should be taken to select the correct interface type, since you can cause damage to the scanner and/or POS terminal by attempting to change to an incompatible interface.
- Page 175 Interface Related Features Keyboard Wedge F Interface Selection Remember to cover any unused bar codes on this and the facing page to ensure that the scanner reads only the bar code you intend to scan. Great care should be taken to select the correct interface type, since you can cause damage to the scanner and/or POS terminal by attempting to change to an incompatible interface.
- Page 176 Keyboard Wedge G Interface Selection Remember to cover any unused bar codes on this and the facing page to ensure that the scanner reads only the bar code you intend to scan. Great care should be taken to select the correct interface type, since you can cause damage to the scanner and/or POS terminal by attempting to change to an incompatible interface.
- Page 177 Interface Related Features Keyboard Wedge H Interface Selection Remember to cover any unused bar codes on this and the facing page to ensure that the scanner reads only the bar code you intend to scan. Great care should be taken to select the correct interface type, since you can cause damage to the scanner and/or POS terminal by attempting to change to an incompatible interface.
- Page 178 Keyboard Wedge I Interface Selection Remember to cover any unused bar codes on this and the facing page to ensure that the scanner reads only the bar code you intend to scan. Great care should be taken to select the correct interface type, since you can cause damage to the scanner and/or POS terminal by attempting to change to an incompatible interface.
- Page 179 Interface Related Features Keyboard Wedge J Interface Selection Remember to cover any unused bar codes on this and the facing page to ensure that the scanner reads only the bar code you intend to scan. Great care should be taken to select the correct interface type, since you can cause damage to the scanner and/or POS terminal by attempting to change to an incompatible interface.
- Page 180 Maximum Host-Transmitted Message Length Specifies the maximum number of data characters allowed in mes- sages transmitted to the host. To set the Maximum Host-Transmitted Message Length: 1. Scan the SWITCH bar code. 2. Scan the bar code, SET MAXIMUM HOST-TRANSMITTED MES- SAGE LENGTH on page 168 below.
-
Page 181: Number Of Host Transmission Buffers
Interface Related Features Number of Host Transmission Buffers Specifies the number of host transmission(s) that may be buffered. By buffering data from a bar code, the scanner can continue to read a new bar code while the old one is being transmitted to the host. Selecting BUFFERS = 1 means that the first bar code must be trans- mitted before a new one can be read. -
Page 182: Aim Id
AIM ID AIM label identifiers (as opposed to custom characters you select yourself as with label identifiers) can be included with scanned bar code data. AIM label identifiers consist of three characters as fol- lows: • A close brace character (ASCII ‘]’), followed by... •... - Page 183 Interface Related Features AIM ID (continued) Remember to cover any unused bar codes on this and the facing page to ensure that the scanner reads only the bar code you intend to scan. AIM ID: DISABLE AIM ID: ENABLE Product Reference Guide...
-
Page 184: Label Id Control
Label ID Control A Label ID is used to identify a barcode (symbology) type. See Appendix D, Default Settings, for a listing for common symbologies. It can be appended previous to or following the transmitted barcode data depending upon how this option is enabled. This feature pro- vides options for configuring custom Label IDs individually per symbology. - Page 185 Interface Related Features Label ID Control (continued) • Scan 4’ • Scan ‘0’ • Scan ‘0’ • Scan ‘0’ • Scan ‘0’ • Scan the Switch label Figure 52. Label ID Position Options SCANNER Prefix Label ID Aim ID Bar Code Data Label ID Suffix Remember to cover any unused bar codes on this and the facing...
- Page 186 Label ID Control (continued) Remember to cover any unused bar codes on this and the facing page to ensure that the scanner reads only the bar code you intend to scan. LABEL ID TRANSMISSION: AFTER BAR CODE DATA Magellan™ 8300/8400...
-
Page 187: Global Prefix
Interface Related Features Global Prefix This feature specifies the prefix that is added to beginning of label transmission. To specify the Global Prefix Character(s): 1. Scan the SWITCH bar code. 2. Scan the bar code, SET GLOBAL PREFIX on page 176 below. You’ll need to cover any unused bar codes to ensure the scan- ner reads only the bar code you intend to scan. - Page 188 Global Prefix (continued) Remember to cover any unused bar codes on this and the facing page to ensure that the scanner reads only the bar code you intend to scan. SET GLOBAL PREFIX TERMINATE SEQUENCE Magellan™ 8300/8400...
-
Page 189: Global Suffix
Interface Related Features Global Suffix This feature specifies the suffix that is added to end of a label transmission. Three standard options are available below. Contact your dealer for other alternate settings for this feature. • No Global Suffix • CR —... - Page 190 Global Suffix (continued) Remember to cover any unused bar codes on this and the facing page to ensure that the scanner reads only the bar code you intend to scan. GLOBAL SUFFIX = CR GLOBAL SUFFIX = CR LF Magellan™ 8300/8400...
-
Page 191: Case Conversion
Interface Related Features Case Conversion Changes the case of all alphabetic characters to upper or lower case. Choices are: • No case conversion • Upper case • Lower case To configure this feature: 1. Scan the SWITCH bar code. 2. Scan your selection from the case conversion bar codes below. You’ll need to cover any unused bar codes on this and the fac- ing page to ensure that the scanner reads only the bar code you intend to scan. - Page 192 Case Conversion (continued) Remember to cover any unused bar codes on this and the facing page to ensure that the scanner reads only the bar code you intend to scan. CASE CONVERSION = UPPER CASE CASE CONVERSION = LOWER CASE Magellan™...
-
Page 193: Ibm Features
IBM Features IBM Features IBM Interface Options IBM interfaces offer specific control over interaction with certain devices. The OEM USB interface provides its own set of options. Refer to the feature, OEM USB Scanner Device Type on page 188 , in this chapter. NOTE Options for this feature are as follows: •... -
Page 194: Ibm Number Of Host Resets
IBM Number of Host Resets Specifies how many consecutive resets are processed before the scanner starts a five-second period during which a user is allowed to enter label-programming mode and configure the scanner. To set the number of host resets: 1. -
Page 195: Ibm Scale Address
IBM Features IBM Scale Address This feature applies to IBM Port 17 ONLY. NOTE Specifies IBM scale address for IBM Port 17. The following three addresses are available: • • • To set the IBM Scale Address: 1. Scan the SWITCH bar code. 2. - Page 196 IBM Scale Address (continued) Remember to cover any unused bar codes on this and the facing page to ensure that the scanner reads only the bar code you intend to scan. IBM SCALE ADDRESS = 6B IBM SCALE ADDRESS = 6E Magellan™...
-
Page 197: Ibm Transmit Labels In Code 39 Format
IBM Features IBM Transmit Labels in Code 39 Format This feature enables/disables scanner's ability to set a symbology identifier for a specified label to Code 39 before transmitting that label data to an IBM host. This applies to: Code 128, Code 93 and Codabar for IBM Port 5B;... -
Page 198: Ibm Label Slicing Control
IBM Label Slicing Control Enables/disables the slicing of IBM-46XX host transmission data into multiple pieces when a label is longer than the length specified by IBM Maximum Label Slice Length on page 187. Options are: • Disable Label Slicing — Send data to host in one piece. •... -
Page 199: Ibm Maximum Label Slice Length
IBM Features IBM Maximum Label Slice Length Specifies the maximum allowable length of host transmit data in each sliced frame. This setting only applies when IBM Label Slicing Control on page is enabled. NOTE 1. Scan the SWITCH bar code. 2. -
Page 200: Oem Usb Scanner Device Type
OEM USB Scanner Device Type The OEM USB protocol allows for the scanner to be identified as one of two different types of barcode scanners. Depending on what other scanners you may already have connected to a USB POS, you may need to change this setting to enable all scanners to communi- cate. -
Page 201: Features
RS-232 Features RS-232 Features RS-232 Baud Rate This feature selects the baud rate required for sending and receiv- ing data. Single cable interfaces are limited to Baud Rate selections up to 19200. They cannot communicate at Baud Rates of 38400 and up. NOTE To specify the RS-232 Baud Rate: 1. - Page 202 RS-232 Baud Rate (continued) Remember to cover any unused bar codes on this and the facing page to ensure that the scanner reads only the bar code you intend to scan. RS-232 BAUD RATE = 4800 RS-232 BAUD RATE = 9600 Magellan™...
- Page 203 RS-232 Features RS-232 Baud Rate (continued) Remember to cover any unused bar codes on this and the facing page to ensure that the scanner reads only the bar code you intend to scan. RS-232 BAUD RATE = 19200 RS-232 BAUD RATE = 38400 Product Reference Guide...
- Page 204 RS-232 Baud Rate (continued) Remember to cover any unused bar codes on this and the facing page to ensure that the scanner reads only the bar code you intend to scan. RS-232 BAUD RATE = 57600 RS-232 BAUD RATE = 115200 Magellan™...
-
Page 205: Number Of Data Bits
RS-232 Features RS-232 Number of Data Bits Specifies number of data bits required for sending and receiving data. 8 data bits with 2 stop bits and parity enabled is not a valid configura- tion. NOTE A setting of 7 data bits and no parity is invalid and will default to 8 data bits and no parity. -
Page 206: Number Of Stop Bits
RS-232 Number of Stop Bits Specifies number of stop bits required for sending and receiving data. 8 data bits with 2 stop bits and parity enabled is not a valid configura- tion. NOTE To set this feature: 1. Scan the SWITCH bar code. 2. -
Page 207: Parity
RS-232 Features RS-232 Parity Specifies parity required for sending and receiving data. 8 data bits with 2 stop bits and parity enabled is not a valid configura- tion. NOTE A setting of no parity and 7 data bits is invalid and will default to 8 data bits and no parity. - Page 208 RS-232 Parity (continued) Remember to cover any unused bar codes on this and the facing page to ensure that the scanner reads only the bar code you intend to scan. RS-232 PARITY = EVEN RS-232 PARITY = ODD Magellan™ 8300/8400...
-
Page 209: Hardware Control
RS-232 Features RS-232 Hardware Control Enables/disables use of the RS-232 CTS signal for flow control and/ or scan control. Options are: • Disable — The scanner transmits to the host regardless of any activity on the CTS line. • Enable CTS Flow Control — The CTS signal controls transmis- sion of data to the host. - Page 210 RS-232 Hardware Control (continued) Remember to cover any unused bar codes on this and the facing page to ensure that the scanner reads only the bar code you intend to scan. RS-232 HARDWARE CONTROL = ENABLE CTS FLOW CONTROL RS-232 HARDWARE CONTROL = ENABLE CTS SCAN CONTROL Magellan™...
- Page 211 RS-232 Features RS-232 Hardware Control (continued) Remember to cover any unused bar codes on this and the facing page to ensure that the scanner reads only the bar code you intend to scan. RS-232 HARDWARE CONTROL = ENABLE MGL SL CTS SCAN CONTROL Product Reference Guide...
-
Page 212: Intercharacter Delay
RS-232 Intercharacter Delay Specifies delay between the end of one character and the beginning of the next in 10-millisecond increments. To set the RS-232 Intercharacter Delay: 1. Scan the SWITCH bar code. 2. Scan the bar code below, SET RS-232 INTERCHARACTER DELAY on page 200. -
Page 213: Software Flow Control
RS-232 Features RS-232 Software Flow Control Enables/disables RS-232 Flow Control using XON/ XOFF characters. This item will be ignored when the feature, RS-232 NAK Character on page 215 , is enabled NOTE To set this feature: 1. Scan the SWITCH bar code. 2. -
Page 214: Host Echo
RS-232 Host Echo When enabled, this feature passes all data through the scanner to the host as it comes in. This feature is used for applications where “daisy chaining” of RS-232 devices onto the same cable is neces- sary. If, for example, one of the devices in the chain is a terminal where someone is entering data while another person is simultane- ously scanning a bar code requiring transmission to the host, the scanner will wait for the RS-232 channel to be quiet for a specified... -
Page 215: Host Echo Quiet Interval
RS-232 Features RS-232 Host Echo Quiet Interval This setting specifies the time interval of RS-232 channel inactivity which must transpire before the scanner will break the host echo loop to transmit the bar code data that has just been scanned to the host. -
Page 216: Ignore Host Commands
RS-232 Ignore Host Commands When set to ignore host commands, the scanner will ignore all host commands except for the minimum set necessary to keep the inter- face active, transmit labels, and transmit scale information. For normal operation of the interface, disable this feature. To set this feature: 1. -
Page 217: Ttl
RS-232 Features RS-232 TTL Specifies whether RS-232 interface provides TTL levels on the out- put pins TxD and RTS. Choices are: • Normal RS-232 levels • TTL levels To set this feature: 1. Scan the SWITCH bar code. 2. Scan the bar code below which represents the desired setting for this feature. -
Page 218: Ttl Invert
RS-232 TTL Invert Enables/disables inversion of TTL. To set this feature: 1. Scan the SWITCH bar code. 2. Scan the bar code below which represents the desired setting for this feature. You’ll need to cover any unused bar codes on this and the facing page to ensure that the scanner reads only the bar code you intend to scan. -
Page 219: Icl Dc1 Character Delay Enable
RS-232 Features RS-232 ICL DC1 Character Delay Enable Enables/disables the ability of the scanner to delay a DC1 response for 40 milliseconds. To set this feature: 1. Scan the SWITCH bar code. 2. Scan the bar code below which represents the desired setting for this feature. -
Page 220: Team Pos Icl Scale
RS-232 Team POS ICL Scale Enables/disables the ability of the scanner to enter TEAM POS ICL Scale mode. To set this feature: 1. Scan the SWITCH bar code. 2. Scan the bar code below which represents the desired setting for this feature. You’ll need to cover any unused bar codes on this and the facing page to ensure that the scanner reads only the bar code you intend to scan. -
Page 221: Beep On Ascii Bel
RS-232 Features RS-232 Beep on ASCII BEL Enables/disables ability of scanner to beep (sound a good read tone) on receiving an ASCII BEL (07 hex). • Disable • Enable To enable/disable this feature: 1. Scan the SWITCH bar code. 2. Scan either the enable or disable bar code below. You’ll need to cover any unused bar codes on this and the facing page to ensure that the scanner reads only the bar code you intend to scan. -
Page 222: Beep After Weigh
RS-232 Beep After Weigh Enables/disables the ability of the scanner to beep after weight data is transmitted to the host. Scale interfaces that support this item are: RS-232 ICL, RS-232 SASI, and RS-232 Single Cable. To enable/disable the Beep After Weigh feature: 1. -
Page 223: Beep On Not On File
RS-232 Features RS-232 Beep on Not on File Select for the host to beep (or not) when a not-on-file condition is detected by the host. This feature is also applicable to single cable RS-232. RS-232 BEEP ON NOT ON FILE = DISABLE RS-232 BEEP ON NOT ON FILE = ENABLE Product Reference Guide... -
Page 224: Ack Nak Enable
RS-232 ACK NAK Enable This enables/disables the ability of the scanner to support the RS- 232 ACK/NAK protocol. When configured, the scanner and/or host sends an “ACK” when it receives data properly, and sends “NAK” when the data is in error. Selections for this option are: •... - Page 225 RS-232 Features RS-232 ACK NAK Enable (continued) Remember to cover any unused bar codes on this and the facing page to ensure that the scanner reads only the bar code you intend to scan. RS-232 ACK/NAK = HOST ACKNOWLEDGEMENT RS-232 ACK/NAK = LABEL & HOST Product Reference Guide...
-
Page 226: Ack Character
RS-232 ACK Character This feature specifies which ASCII character will be used as an ACK character. DO NOT set this feature to use previously defined characters such as XON, XOFF or host commands as this will conflict with normal opera- tion of these characters. -
Page 227: Nak Character
RS-232 Features RS-232 NAK Character This feature specifies which ASCII character will be used as a NAK character. DO NOT set this feature to use previously defined characters such as XON, XOFF or host commands as this will conflict with normal opera- tion of these characters. -
Page 228: Retry On Ack Nak Timeout
RS-232 Retry on ACK NAK Timeout This option specifies the action scanner performs on expiration of the RS-232 ACK NAK Timeout Value on page 217. To set this feature: 1. Scan the SWITCH bar code. 2. Scan either the enable or disable bar code below. You’ll need to cover any unused bar codes on this and the facing page to ensure that the scanner reads only the bar code you intend to scan. -
Page 229: Ack Nak Timeout Value
RS-232 Features RS-232 ACK NAK Timeout Value This item specifies the time the scanner will wait for an ACK charac- ter from the host following a label transmission. • 0 = Infinite timeout • 1 - 75 = Timeout in 200-millisecond increments To set the ACK NAK Timeout Value: 1. -
Page 230: Ack Nak Retry Count
RS-232 ACK NAK Retry Count This feature sets the number of times for the scanner to retry a label transmission under a retry condition. To set the RS-232 ACK NAK Retry Count: 1. Scan the SWITCH bar code. 2. Scan the bar code, SET RS-232 ACK NAK RETRY COUNT on page 218 below. -
Page 231: Ack Nak Error Handling
RS-232 Features RS-232 ACK NAK Error Handling This item specifies the method the scanner will use to handle errors detected while waiting to receive the ACK character from the host. Errors include unrecognized host commands and communication errors such as parity or framing errors. •... - Page 232 RS-232 ACK NAK Error Handling (continued) Remember to cover any unused bar codes on this and the facing page to ensure that the scanner reads only the bar code you intend to scan. RS-232 ACK NAK ERROR HANDLING = ASSUME ACK RS-232 ACK NAK ERROR HANDLING = ASSUME NAK Magellan™...
-
Page 233: Indicate Transmission Failure
RS-232 Features RS-232 Indicate Transmission Failure Enables/disables an audible error indication upon a transmission failure. RS-232 INDICATE TRANSMISSION FAILURE = DISABLE RS-232 INDICATE TRANSMISSION FAILURE = ENABLE Product Reference Guide... -
Page 234: Single Cable Rs-232 Options
Single Cable RS-232 Options The RS-232 Single Cable interface shares some configuration options with other RS-232 interfaces. Rather than repeat them in this chapter as Single Cable options, please find them referenced as follows: • “RS-232 Baud Rate” on page 189 •... -
Page 235: Single Cable Rs-232 Scanner Only Protocol
Single Cable RS-232 Options Single Cable RS-232 Scanner Only Protocol This sets the type of interface protocol that will be used in Single Cable RS-232. Options are: • Scanner/scale RS-232 protocol • Scanner only RS-232 protocol To set this feature: 1. -
Page 236: Single Cable Rs-232 Stale Weight Timeout
Single Cable RS-232 Stale Weight Timeout Specifies the amount of time (in 10 msec increments) that scale data is presented to the host before being discarded. To set the Timeout: 1. Scan the SWITCH bar code. 2. Scan your selection from the bar codes below. You’ll need to cover any unused bar codes on this and the facing page to ensure that the scanner reads only the bar code you intend to scan. - Page 237 Single Cable RS-232 Options Single Cable RS-232 Stale Weight Timeout (continued) Remember to cover any unused bar codes on this and the facing page to ensure that the scanner reads only the bar code you intend to scan. STALE WEIGHT TIMEOUT = 250 msec STALE WEIGHT TIMEOUT = 330 msec Product Reference Guide...
-
Page 238: Single Cable Rs-232 Scale - Transmit Weight Digits
Single Cable RS-232 Scale — Transmit Weight Digits Specifies whether the scale transmits weight data as five digits or as four digits. To set this feature: 1. Scan the SWITCH bar code. 2. Scan the bar code below representing the desired option. You’ll need to cover any unused bar codes on this and the fac- ing page to ensure that the scanner reads only the bar code you intend to scan. -
Page 239: Single Cable Manufacturer Extensions
Single Cable RS-232 Options Single Cable Manufacturer Extensions Enables/Disables manufacturer extensions to the Single Cable RS- 232 interface. These extensions communicate scale calibration information to the host. To set this feature: 1. Scan the SWITCH bar code. 2. Scan either the enable or disable bar code below. You’ll need to cover any unused bar codes on this and the facing page to ensure that the scanner reads only the bar code you intend to scan. -
Page 240: Single Cable Pacesetter Plus Enable
Single Cable Pacesetter Plus Enable Enables/disables the scanner’s ability to send Pacesetter Plus infor- mation as trailers to UPC/EAN label data. To set this feature: 1. Scan the SWITCH bar code. 2. Scan either the enable or disable bar code below. You’ll need to cover any unused bar codes on this and the facing page to ensure that the scanner reads only the bar code you intend to scan. -
Page 241: Single Cable Rs-232 Rts Cts Selection
Single Cable RS-232 Options Single Cable RS-232 RTS CTS Selection Specifies how RTS and CTS are used to control the data flow. RTS is controlled by the Scanner and can be continuously held high/low, or can be asserted during label transmission. The scanner looks at CTS, as the configuration values state, to determine when to send label data. - Page 242 Single Cable RS-232 RTS CTS Selection (continued) Remember to cover any unused bar codes on this and the facing page to ensure that the scanner reads only the bar code you intend to scan. RTS CTS SELECTION = OPTION 2 RTS CTS SELECTION = OPTION 3 Magellan™...
- Page 243 Single Cable RS-232 Options Single Cable RS-232 RTS CTS Selection (continued) Remember to cover any unused bar codes on this and the facing page to ensure that the scanner reads only the bar code you intend to scan. RTS CTS SELECTION = OPTION 4 RTS CTS SELECTION = OPTION 5 Product Reference Guide...
-
Page 244: Single Cable Rs-232 Use Bcc
Single Cable RS-232 Use BCC Enables/disables the ability of the scanner to use BCC. To set this feature: 1. Scan the SWITCH bar code. 2. Scan either the enable or disable bar code below. You’ll need to cover any unused bar codes on this and the facing page to ensure that the scanner reads only the bar code you intend to scan. -
Page 245: Single Cable Rs-232 Use Ack/Nak
Single Cable RS-232 Options Single Cable RS-232 Use ACK/NAK Enables/disables the ability of the scanner to use ACK/NAK. To set this feature: 1. Scan the SWITCH bar code. 2. Scan either the enable or disable bar code below. You’ll need to cover any unused bar codes on this and the facing page to ensure that the scanner reads only the bar code you intend to scan. -
Page 246: Single Cable Rs-232 Use Stx
Single Cable RS-232 Use STX Enables/disables the ability of the scanner to use STX. To set this feature: 1. Scan the SWITCH bar code. 2. Scan either the enable or disable bar code below. You’ll need to cover any unused bar codes on this and the facing page to ensure that the scanner reads only the bar code you intend to scan. -
Page 247: Set Single Cable Rs-232 Stx Character
Single Cable RS-232 Options Set Single Cable RS-232 STX Character This feature selects the STX character. To specify the STX Character: 1. Scan the SWITCH bar code. 2. Scan the bar code, SET SINGLE CABLE RS-232 STX CHARACTER on page 235 below. You’ll need to cover any unused bar codes on this and the facing page to ensure the scanner reads only the bar code you intend to scan. -
Page 248: Set Single Cable Rs-232 Etx Character
Set Single Cable RS-232 ETX Character Allows selection of the ETX character. To specify the ETX Character: 1. Scan the SWITCH bar code. 2. Scan the bar code, SET SINGLE CABLE RS-232 ETX CHARACTER on page 236 below. You’ll need to cover any unused bar codes on this and the facing page to ensure the scanner reads only the bar code you intend to scan. -
Page 249: Keyboard Wedge/Usb Keyboard Features
Keyboard Wedge/USB Keyboard Features Keyboard Wedge/USB Keyboard Features Features listed in this section apply to both the Keyboard Wedge and USB Keyboard interfaces unless otherwise noted. Keyboard Interface — Keyboard Layout This feature specifies the country/language to be supported by the keyboard. - Page 250 Keyboard Interface — Keyboard Layout (continued) Remember to cover any unused bar codes on this and the facing page to ensure that the scanner reads only the bar code you intend to scan. ³ 0 3 0 2 0 2 KEYBOARD LAYOUT = BRITAIN KEYBOARD LAYOUT = DENMARK Magellan™...
- Page 251 Keyboard Wedge/USB Keyboard Features Keyboard Interface — Keyboard Layout (continued) Remember to cover any unused bar codes on this and the facing page to ensure that the scanner reads only the bar code you intend to scan. KEYBOARD LAYOUT = FRANCE KEYBOARD LAYOUT = GERMANY Product Reference Guide...
- Page 252 Keyboard Interface — Keyboard Layout (continued) Remember to cover any unused bar codes on this and the facing page to ensure that the scanner reads only the bar code you intend to scan. KEYBOARD LAYOUT = ITALY KEYBOARD LAYOUT = NORWAY Magellan™...
- Page 253 Keyboard Wedge/USB Keyboard Features Keyboard Interface — Keyboard Layout (continued) Remember to cover any unused bar codes on this and the facing page to ensure that the scanner reads only the bar code you intend to scan. KEYBOARD LAYOUT = PORTUGAL KEYBOARD LAYOUT = SPAIN Product Reference Guide...
- Page 254 Keyboard Interface — Keyboard Layout (continued) Remember to cover any unused bar codes on this and the facing page to ensure that the scanner reads only the bar code you intend to scan. KEYBOARD LAYOUT = SWEDEN KEYBOARD LAYOUT = SWITZERLAND Magellan™...
- Page 255 Keyboard Wedge/USB Keyboard Features Keyboard Interface — Keyboard Layout (continued) Remember to cover any unused bar codes on this and the facing page to ensure that the scanner reads only the bar code you intend to scan. KEYBOARD LAYOUT = JAPANESE 106 KEY KEYBOARD LAYOUT = HUNGARY Product Reference Guide...
- Page 256 Keyboard Interface — Keyboard Layout (continued) Remember to cover any unused bar codes on this and the facing page to ensure that the scanner reads only the bar code you intend to scan. KEYBOARD LAYOUT = CZECH KEYBOARD LAYOUT = SLOVAKIA Magellan™...
- Page 257 Keyboard Wedge/USB Keyboard Features Keyboard Interface — Keyboard Layout (continued) Remember to cover any unused bar codes on this and the facing page to ensure that the scanner reads only the bar code you intend to scan. KEYBOARD LAYOUT = ROMANIA KEYBOARD LAYOUT = CROATIA Product Reference Guide...
-
Page 258: Keyboard Interface Quiet Interval
Keyboard Interface — Keyboard Layout (continued) Remember to cover any unused bar codes on this and the facing page to ensure that the scanner reads only the bar code you intend to scan. KEYBOARD LAYOUT = POLAND Keyboard Interface Quiet Interval Specifies amount of time to look for keyboard activity before scan- ner breaks keyboard connection in order to transmit data to host. -
Page 259: Keyboard Interface Caps Lock State
Keyboard Wedge/USB Keyboard Features Keyboard Interface Caps Lock State Specifies the format in which the scanner sends character data.. Choices are: • CAPS LOCK OFF — send character data in normal format. • CAPS LOCK ON — send character data in reverse case. •... - Page 260 Keyboard Interface Caps Lock State (continued) Remember to cover any unused bar codes on this and the facing page to ensure that the scanner reads only the bar code you intend to scan. CAPS LOCK STATE = SHIFT LOCK ON CAPS LOCK STATE = CAPS LOCK COMPENSATION MODE Magellan™...
-
Page 261: Keyboard Interface - Keyboard Simulation
Keyboard Wedge/USB Keyboard Features Keyboard Interface — Keyboard Simulation Enables/disables ability of scanner to perform host communications normally performed by attached keyboard. This feature does not apply to the USB Keyboard interface. NOTE All PCs check the keyboard status during the power-on Selftest. It is recommended that you enable this function if you are working with- out a keyboard installation. -
Page 262: Keyboard Interface - Control Characters
Keyboard Interface — Control Characters Specifies how the scanner transmits ASCII control characters to the host. This feature does not apply to the USB Keyboard interface. NOTE Choices are: • Disable Control Characters • Enable transmission of control characters to host •... - Page 263 Keyboard Wedge/USB Keyboard Features Keyboard Interface — Control Characters (continued) Remember to cover any unused bar codes on this and the facing page to ensure that the scanner reads only the bar code you intend to scan. CONTROL CHARACTERS = ENABLE TRANSMISSION OF CTL CHARACTERS CONTROL CHARACTERS = ENABLE FUNCTION KEY MAPPING Product Reference Guide...
-
Page 264: Keyboard Interface - Intercharacter Delay
Keyboard Interface — Intercharacter Delay Sets the delay between the end of one character and the beginning of the next, in 10 millisecond increments. To specify the intercharacter delay: 1. Scan the SWITCH bar code. 2. Scan the bar code below, SET KEYBOARD WEDGE INTERCHAR- ACTER DELAY on page 252. -
Page 265: Symbology Programming
Symbology Programming Symbology Programming If the scanner’s interface type must be changed, always be sure that interface configuration is the FIRST item scanned during a program- ming session. (Selecting an interface type resets ALL other configu- ration items — including symbology programming — to the factory NOTE default for that interface type.) Coupon Control... - Page 266 Coupon Control (continued) Remember to cover any unused bar codes on this and the facing page to ensure that the scanner reads only the bar code you intend to scan. COUPON CONTROL = ENABLE UPC/EAN COUPON DECODING COUPON CONTROL = ENABLE DATABAR COUPON DECODING Magellan™...
-
Page 267: Upc-A Enable
UPC-A Enable UPC-A Enable Enables/disables the ability of the scanner to decode UPC-A labels. To set this feature: 1. Scan the SWITCH bar code. 2. Scan either the enable or disable bar code below. You’ll need to cover any unused bar codes on this and the facing page to ensure that the scanner reads only the bar code you intend to scan. -
Page 268: Upc-A Number System Character Transmission
UPC-A Number System Character Transmission Enables/disables transmission of a UPC-A number system charac- ter. This feature MUST be enabled for IBM interfaces for proper function. NOTE To set this feature: 1. Scan the SWITCH bar code. 2. Scan either the enable or disable bar code below. You’ll need to cover any unused bar codes on this and the facing page to ensure that the scanner reads only the bar code you intend to scan. -
Page 269: Upc-A Check Character Transmission
UPC-A Enable UPC-A Check Character Transmission Enables/disables transmission of a UPC-A check character. To set this feature: 1. Scan the SWITCH bar code. 2. Scan either the enable or disable bar code below. You’ll need to cover any unused bar codes on this and the facing page to ensure that the scanner reads only the bar code you intend to scan. -
Page 270: Expand Upc-A To Ean-13
Expand UPC-A to EAN-13 Enables/disables expansion of UPC-A labels to EAN/JAN-13. To set this feature: 1. Scan the SWITCH bar code. 2. Scan either the enable or disable bar code below. You’ll need to cover any unused bar codes on this and the facing page to ensure that the scanner reads only the bar code you intend to scan. -
Page 271: Upc-A Label Id
UPC-A Enable UPC-A Label ID This feature specifies a UPC-A label ID to be added to bar code data. The programming feature, Label ID Control, designates whether the Label ID is transmitted as a prefix or suffix or if Label ID is disabled. NOTE To set this feature: 1. -
Page 272: Upc-A 2-Digit Supplemental Label Id
UPC-A 2-Digit Supplemental Label ID This feature specifies a UPC-A 2-Digit Supplemental label ID to be added to bar code data. The programming feature, Label ID Control, designates whether the Label ID is transmitted as a prefix or suffix or if Label ID is disabled. NOTE To set this feature: 1. -
Page 273: Upc-A 5-Digit Supplemental Label Id
UPC-A Enable UPC-A 5-Digit Supplemental Label ID This feature specifies a UPC-A 5-Digit Supplemental label ID to be added to bar code data. The programming feature, Label ID Control, designates whether the Label ID is transmitted as a prefix or suffix or if Label ID is disabled. NOTE To set this feature: 1. -
Page 274: Upc-A 128 Supplemental Label Id
UPC-A 128 Supplemental Label ID This feature specifies a UPC-A 128 Supplemental label ID to be added to bar code data. The programming feature, Label ID Control, designates whether the Label ID is transmitted as a prefix or suffix or if Label ID is disabled. NOTE To set this feature: 1. -
Page 275: Upc-A Minimum Reads
UPC-A Enable UPC-A Minimum Reads Specifies the minimum number of consecutive times a UPC-A label must be decoded before it is accepted as a good read. To set this feature: 1. Scan the SWITCH bar code. 2. Scan the bar code representing the desired option below or on the following pages. - Page 276 UPC-A Minimum Reads (continued) Remember to cover any unused bar codes on this and the facing page to ensure that the scanner reads only the bar code you intend to scan. UPC-A MINIMUM READS = 3 UPC-A MINIMUM READS = 4 Magellan™...
-
Page 277: Upc-E Enable
UPC-E Enable UPC-E Enable Enables/disables the ability of the scanner to decode UPC-E labels. To set this feature: 1. Scan the SWITCH bar code. 2. Scan either the enable or disable bar code below. You’ll need to cover any unused bar codes on this and the facing page to ensure that the scanner reads only the bar code you intend to scan. -
Page 278: Upc-E Number System Character Transmission
UPC-E Number System Character Transmission Enables/disables transmission of a UPC-E number system character. To set this feature: 1. Scan the SWITCH bar code. 2. Scan either the enable or disable bar code below. You’ll need to cover any unused bar codes on this and the facing page to ensure that the scanner reads only the bar code you intend to scan. -
Page 279: Upc-E Check Character Transmission
UPC-E Enable UPC-E Check Character Transmission Enables/disables transmission of a UPC-E check character. To set this feature: 1. Scan the SWITCH bar code. 2. Scan either the enable or disable bar code below. You’ll need to cover any unused bar codes on this and the facing page to ensure that the scanner reads only the bar code you intend to scan. -
Page 280: Expand Upc-E To Upc-A
Expand UPC-E to UPC-A Enables/disables expansion of UPC-E labels to UPC-A. To set this feature: 1. Scan the SWITCH bar code. 2. Scan either the enable or disable bar code below. You’ll need to cover any unused bar codes on this and the facing page to ensure that the scanner reads only the bar code you intend to scan. -
Page 281: Expand Upc-E To Ean-13
UPC-E Enable Expand UPC-E to EAN-13 Enables/disables expansion of UPC-E labels to EAN/JAN-13. To set this feature: 1. Scan the SWITCH bar code. 2. Scan either the enable or disable bar code below. You’ll need to cover any unused bar codes on this and the facing page to ensure that the scanner reads only the bar code you intend to scan. -
Page 282: Upc-E Label Id
UPC-E Label ID This feature specifies a UPC-E label ID to be added to bar code data. The programming feature, Label ID Control, designates whether the Label ID is transmitted as a prefix or suffix or if Label ID is disabled. NOTE To set this feature: 1. -
Page 283: Upc-E 2-Digit Supplemental Label Id
UPC-E Enable UPC-E 2-Digit Supplemental Label ID This feature specifies a UPC-E 2-Digit Supplemental label ID to be added to bar code data. The programming feature, Label ID Control, designates whether the Label ID is transmitted as a prefix or suffix or if Label ID is disabled. NOTE To set this feature: 1. -
Page 284: Upc-E 5-Digit Supplemental Label Id
UPC-E 5-Digit Supplemental Label ID This feature specifies a UPC-E 5-Digit Supplemental label ID to be added to bar code data. The programming feature, Label ID Control, designates whether the Label ID is transmitted as a prefix or suffix or if Label ID is disabled. NOTE To set this feature: 1. -
Page 285: Upc-E 128 Supplemental Label Id
UPC-E Enable UPC-E 128 Supplemental Label ID This feature specifies a UPC-E 128 Supplemental label ID to be added to bar code data. The programming feature, Label ID Control, designates whether the Label ID is transmitted as a prefix or suffix or if Label ID is disabled. NOTE To set this feature: 1. -
Page 286: Upc-E Minimum Reads
UPC-E Minimum Reads Specifies the minimum number of consecutive times a UPC-E label must be decoded before it is accepted as a good read. To set this feature: 1. Scan the SWITCH bar code. 2. Scan the bar code representing the desired option below or on the following pages. - Page 287 UPC-E Enable UPC-E Minimum Reads (continued) Remember to cover any unused bar codes on this and the facing page to ensure that the scanner reads only the bar code you intend to scan. UPC-E MINIMUM READS = 3 UPC-E MINIMUM READS = 4 Product Reference Guide...
-
Page 288: Enable
EAN-13 Enable Enables/disables the ability of the scanner to decode EAN/JAN-13 labels. To set this feature: 1. Scan the SWITCH bar code. 2. Scan either the enable or disable bar code below. You’ll need to cover any unused bar codes on this and the facing page to ensure that the scanner reads only the bar code you intend to scan. -
Page 289: First Character Transmission
EAN-13 Enable EAN-13 First Character Transmission Enables/disables transmission of EAN/JAN-13 first character. To set this feature: 1. Scan the SWITCH bar code. 2. Scan either the enable or disable bar code below. You’ll need to cover any unused bar codes on this and the facing page to ensure that the scanner reads only the bar code you intend to scan. -
Page 290: Check Character Transmission
EAN-13 Check Character Transmission Enables/disables transmission of an EAN/JAN-13 check character. To set this feature: 1. Scan the SWITCH bar code. 2. Scan either the enable or disable bar code below. You’ll need to cover any unused bar codes on this and the facing page to ensure that the scanner reads only the bar code you intend to scan. -
Page 291: Isbn Conversion Enable
EAN-13 Enable EAN-13 ISBN Conversion Enable Enables/disables conversion of EAN/JAN-13 labels starting with 978 to Bookland ISBN labels. If any add-on information is present on the label prior to the conver- sion to ISBN, the add-on data will be discarded. Only the base label will be converted. -
Page 292: Ean 13 Label Id
EAN 13 Label ID This feature specifies an EAN 13 label ID to be added to bar code data. To set this feature: The programming feature, Label ID Control, designates whether the Label ID is transmitted as a prefix or suffix or if Label ID is disabled. NOTE To set this feature: 1. -
Page 293: 2-Digit Supplemental Label Id
EAN-13 Enable EAN-13 2-Digit Supplemental Label ID This feature specifies an EAN-13 2-Digit Supplemental label ID to be added to bar code data. The programming feature, Label ID Control, designates whether the Label ID is transmitted as a prefix or suffix or if Label ID is disabled. NOTE To set this feature: 1. -
Page 294: 5-Digit Supplemental Label Id
EAN-13 5-Digit Supplemental Label ID This feature specifies an EAN-13 5-Digit Supplemental label ID to be added to bar code data. The programming feature, Label ID Control, designates whether the Label ID is transmitted as a prefix or suffix or if Label ID is disabled. NOTE To set this feature: 1. -
Page 295: 128 Supplemental Label Id
EAN-13 Enable EAN-13 128 Supplemental Label ID This feature specifies an EAN-13 128 Supplemental label ID to be added to bar code data. The programming feature, Label ID Control, designates whether the Label ID is transmitted as a prefix or suffix or if Label ID is disabled. NOTE To set this feature: 1. -
Page 296: Minimum Reads
EAN-13 Minimum Reads Specifies the minimum number of consecutive times an EAN-13 label must be decoded before it is accepted as a good read. To set this feature: 1. Scan the SWITCH bar code. 2. Scan the bar code representing the desired option below or on the following pages. - Page 297 EAN-13 Enable EAN-13 Minimum Reads (continued) Remember to cover any unused bar codes on this and the facing page to ensure that the scanner reads only the bar code you intend to scan. EAN-13 MINIMUM READS = 3 EAN-13 MINIMUM READS = 4 Product Reference Guide...
-
Page 298: Bookland Label Id
Bookland Label ID This feature specifies a Bookland label ID to be added to bar code data. The programming feature, Label ID Control, designates whether the Label ID is transmitted as a prefix or suffix or if Label ID is disabled. NOTE To set this feature: 1. -
Page 299: Enable
EAN-8 Enable EAN-8 Enable Enables/disables the ability of the scanner to decode EAN/JAN-8 labels. To set this feature: 1. Scan the SWITCH bar code. 2. Scan either the enable or disable bar code below. You’ll need to cover any unused bar codes on this and the facing page to ensure that the scanner reads only the bar code you intend to scan. -
Page 300: Check Character Transmission
EAN-8 Check Character Transmission Enables/disables transmission of an EAN/JAN-8 check character. To set this feature: 1. Scan the SWITCH bar code. 2. Scan either the enable or disable bar code below. You’ll need to cover any unused bar codes on this and the facing page to ensure that the scanner reads only the bar code you intend to scan. -
Page 301: Expand Ean-8 To Ean-13
EAN-8 Enable Expand EAN-8 to EAN-13 Enables/disables expansion of EAN/JAN-8 labels to EAN/JAN-13. To set this feature: 1. Scan the SWITCH bar code. 2. Scan either the enable or disable bar code below. You’ll need to cover any unused bar codes on this and the facing page to ensure that the scanner reads only the bar code you intend to scan. -
Page 302: Ean-8/Jan-8 Guard Insertion
EAN-8/JAN-8 Guard Insertion Enables/Disables the ability of the scanner to insert a guard pattern into an otherwise complete EAN-8 segment it has received. To set this feature: 1. Scan the SWITCH bar code. 2. Scan either the enable or disable bar code below. You’ll need to cover any unused bar codes on this and the facing page to ensure that the scanner reads only the bar code you intend to scan. -
Page 303: Ean-8/Jan-8 Guard Substitution
EAN-8 Enable EAN-8/JAN-8 Guard Substitution Enables/disables the ability of the scanner to substitute a guard pattern for even-parity 6 when an EAN-8/JAN-8 label is presented. To set this feature: 1. Scan the SWITCH bar code. 2. Scan either the enable or disable bar code below. You’ll need to cover any unused bar codes on this and the facing page to ensure that the scanner reads only the bar code you intend to scan. -
Page 304: Ean-8/Jan-8 Both Guards Substitution
EAN-8/JAN-8 Both Guards Substitution Enables/disables the ability of the scanner to find an EAN/JAN8 guard pattern in cases where the EAN/JAN8 margin makes the guard look like a character. To set this feature: 1. Scan the SWITCH bar code. 2. Scan either the enable or disable bar code below. You’ll need to cover any unused bar codes on this and the facing page to ensure that the scanner reads only the bar code you intend to scan. -
Page 305: Stitch Exact Label Halves
EAN-8 Enable EAN-8 Stitch Exact Label Halves When enabled, this allows the scanner the ability to stitch exact EAN-8 label haves with no overlapping characters. To set this feature: 1. Scan the SWITCH bar code. 2. Scan either the enable or disable bar code below. You’ll need to cover any unused bar codes on this and the facing page to ensure that the scanner reads only the bar code you intend to scan. -
Page 306: Stitch Unlike Label Halves
EAN-8 Stitch Unlike Label Halves When enabled, this allows the scanner the ability to stitch two EAN- 8 label halves together that may contain differing characters. To set this feature: 1. Scan the SWITCH bar code. 2. Scan either the enable or disable bar code below. You’ll need to cover any unused bar codes on this and the facing page to ensure that the scanner reads only the bar code you intend to scan. -
Page 307: Ean 8 Label Id
EAN-8 Enable EAN 8 Label ID This feature specifies an EAN 8 label ID to be added to bar code data. To set this feature: The programming feature, Label ID Control, designates whether the Label ID is transmitted as a prefix or suffix or if Label ID is disabled. NOTE To set this feature: 1. -
Page 308: 2-Digit Supplemental Label Id
EAN-8 2-Digit Supplemental Label ID This feature specifies an EAN-8 2-Digit Supplemental label ID to be added to bar code data. The programming feature, Label ID Control, designates whether the Label ID is transmitted as a prefix or suffix or if Label ID is disabled. NOTE To set this feature: 1. -
Page 309: 5-Digit Supplemental Label Id
EAN-8 Enable EAN-8 5-Digit Supplemental Label ID This feature specifies an EAN-8 5-Digit Supplemental label ID to be added to bar code data. The programming feature, Label ID Control, designates whether the Label ID is transmitted as a prefix or suffix or if Label ID is disabled. NOTE To set this feature: 1. -
Page 310: 128 Supplemental Label Id
EAN-8 128 Supplemental Label ID This feature specifies an EAN-8 128 Supplemental label ID to be added to bar code data. The programming feature, Label ID Control, designates whether the Label ID is transmitted as a prefix or suffix or if Label ID is disabled. NOTE To set this feature: 1. -
Page 311: Decoding Levels
EAN-8 Enable EAN-8 Decoding Levels Decoding levels allow the decoder to be set to perform at one of four selectable levels: • Very Conservative — Slower scan time, virtually eleminates misreads. The most secure setting. • Slightly More Aggressive — Faster scanning, more aggressive, yet minimizes misreads. - Page 312 EAN-8 Decoding Levels (continued) Remember to cover any unused bar codes on this and the facing page to ensure that the scanner reads only the bar code you intend to scan. EAN-8 DECODING LEVELS = VERY CONSERVATIVE EAN-8 DECODING LEVELS = SLIGHTLY MORE AGGRESSIVE Magellan™...
- Page 313 EAN-8 Enable EAN-8 Decoding Levels (continued) Remember to cover any unused bar codes on this and the facing page to ensure that the scanner reads only the bar code you intend to scan. EAN-8 DECODING LEVELS = MODERATELY AGGRESSIVE EAN-8 DECODING LEVELS = VERY AGGRESSIVE Product Reference Guide...
-
Page 314: Minimum Reads
EAN-8 Minimum Reads Specifies the minimum number of consecutive times an EAN-8 label must be decoded before it is accepted as a good read. To set this feature: 1. Scan the SWITCH bar code. 2. Scan the bar code representing the desired option below or on the following pages. - Page 315 EAN-8 Enable EAN-8 Minimum Reads (continued) Remember to cover any unused bar codes on this and the facing page to ensure that the scanner reads only the bar code you intend to scan. EAN-8 MINIMUM READS = 3 EAN-8 MINIMUM READS = 4 Product Reference Guide...
-
Page 316: Minimum Segment Length
EAN-8 Minimum Segment Length Specifies the minimum number of characters necessary in an EAN- 8/JAN-8 label segment in order for the scanner to accept a label for decoding. Selectable from 5 to 15 characters. To set this feature: 1. Scan the SWITCH bar code. 2. - Page 317 EAN-8 Enable EAN-8 Minimum Segment Length (continued) Remember to cover any unused bar codes on this and the facing page to ensure that the scanner reads only the bar code you intend to scan. EAN-8 MINIMUM SEGMENT LENGTH = 7 CHARACTERS EAN-8 MINIMUM SEGMENT LENGTH = 8 CHARACTERS Product Reference Guide...
- Page 318 EAN-8 Minimum Segment Length (continued) Remember to cover any unused bar codes on this and the facing page to ensure that the scanner reads only the bar code you intend to scan. EAN-8 MINIMUM SEGMENT LENGTH = 9 CHARACTERS EAN-8 MINIMUM SEGMENT LENGTH = 10 CHARACTERS Magellan™...
- Page 319 EAN-8 Enable EAN-8 Minimum Segment Length (continued) Remember to cover any unused bar codes on this and the facing page to ensure that the scanner reads only the bar code you intend to scan. EAN-8 MINIMUM SEGMENT LENGTH = 11 CHARACTERS EAN-8 MINIMUM SEGMENT LENGTH = 12 CHARACTERS Product Reference Guide...
- Page 320 EAN-8 Minimum Segment Length (continued) Remember to cover any unused bar codes on this and the facing page to ensure that the scanner reads only the bar code you intend to scan. EAN-8 MINIMUM SEGMENT LENGTH = 13 CHARACTERS EAN-8 MINIMUM SEGMENT LENGTH = 14 CHARACTERS Magellan™...
- Page 321 EAN-8 Enable EAN-8 Minimum Segment Length (continued) Remember to cover any unused bar codes on this and the facing page to ensure that the scanner reads only the bar code you intend to scan. EAN-8 MINIMUM SEGMENT LENGTH = 15 CHARACTERS Product Reference Guide...
-
Page 322: Other Upc/Ean Options
Other UPC/EAN Options The following pages contain other selectable features for UPC/EAN symbologies: • Price Weight Check on page 311 • In-Store Label Minimum Reads on page 314 • Enable EAN Two Label on page 316 • EAN Two Label Minimum Reads on page 322 •... -
Page 323: Price Weight Check
Other UPC/EAN Options Price Weight Check Enables/disables calculation and verification of price/weight check digits. Applies to all UPC-A and EAN/JAN-13 labels with eligible Number System/First Character digits. Options are: • Disable • 4-digit price/weight • 5-digit price/weight • 4-digit European price/weight •... - Page 324 Price Weight Check (continued) Remember to cover any unused bar codes on this and the facing page to ensure that the scanner reads only the bar code you intend to scan. PRICE WEIGHT CHECK = 4-DIGIT PRICE/WEIGHT PRICE WEIGHT CHECK = 5-DIGIT PRICE/WEIGHT Magellan™...
- Page 325 Other UPC/EAN Options Price Weight Check (continued) Remember to cover any unused bar codes on this and the facing page to ensure that the scanner reads only the bar code you intend to scan. PRICE WEIGHT CHECK = 4-DIGIT EUROPEAN PRICE/WEIGHT PRICE WEIGHT CHECK = 5-DIGIT EUROPEAN PRICE/WEIGHT Product Reference Guide...
-
Page 326: In-Store Label Minimum Reads
In-Store Label Minimum Reads Specifies the minimum number of consecutive times an In-Store label must be decoded before it is accepted as a good read. To set this feature: 1. Scan the SWITCH bar code. 2. Scan the bar code representing the desired option below or on the following pages. - Page 327 Other UPC/EAN Options In-Store Label Minimum Reads (continued) Remember to cover any unused bar codes on this and the facing page to ensure that the scanner reads only the bar code you intend to scan. IN-STORE MINIMUM READS = 3 IN-STORE MINIMUM READS = 4 Product Reference Guide...
-
Page 328: Enable Ean Two Label
Enable EAN Two Label Enables/disables the ability of the scanner to decode EAN two-label pairs. To set this feature: 1. Scan the SWITCH bar code. 2. Scan either the enable or disable bar code below. You’ll need to cover any unused bar codes on this and the facing page to ensure that the scanner reads only the bar code you intend to scan. -
Page 329: Ean Two Label Combined Transmission
Other UPC/EAN Options EAN Two Label Combined Transmission Enables/disables the transmitting of an EAN two label pair as one label. To set this feature: 1. Scan the SWITCH bar code. 2. Scan either the enable or disable bar code below. You’ll need to cover any unused bar codes on this and the facing page to ensure that the scanner reads only the bar code you intend to scan. -
Page 330: Upc/Ean Guard Insertion
UPC/EAN Guard Insertion Enables/Disables the ability of the scanner to insert either a missing leading or trailing guard on an otherwise complete UPC-A/EAN-13 segment it has received. To set this feature: 1. Scan the SWITCH bar code. 2. Scan either the enable or disable bar code below. You’ll need to cover any unused bar codes on this and the facing page to ensure that the scanner reads only the bar code you intend to scan. -
Page 331: Upc/Ean Stitch Exact Label Halves
Other UPC/EAN Options UPC/EAN Stitch Exact Label Halves When enabled, this allows the scanner the ability to stitch exact UPC-A / EAN-13 label haves with no overlapping characters. To set this feature: 1. Scan the SWITCH bar code. 2. Scan either the enable or disable bar code below. You’ll need to cover any unused bar codes on this and the facing page to ensure that the scanner reads only the bar code you intend to scan. -
Page 332: Upc/Ean Stitch Unlike Label Halves
UPC/EAN Stitch Unlike Label Halves When enabled, this allows the scanner the ability to stitch two UPC- A / EAN-13 label halves together that may contain differing charac- ters. To set this feature: 1. Scan the SWITCH bar code. 2. Scan either the enable or disable bar code below. You’ll need to cover any unused bar codes on this and the facing page to ensure that the scanner reads only the bar code you intend to scan. -
Page 333: Upc/Ean Character Reconstruction
Other UPC/EAN Options UPC/EAN Character Reconstruction Enables/Disables character reconstruction on UPC/EAN labels. To set this feature: 1. Scan the SWITCH bar code. 2. Scan either the enable or disable bar code below. You’ll need to cover any unused bar codes on this and the facing page to ensure that the scanner reads only the bar code you intend to scan. -
Page 334: Ean Two Label Minimum Reads
EAN Two Label Minimum Reads Specifies the minimum number of consecutive times an EAN Two Label bar code must be decoded before it is accepted as a good read. To set this feature: 1. Scan the SWITCH bar code. 2. Scan the bar code representing the desired option below or on the following pages. - Page 335 Other UPC/EAN Options EAN Two Label Minimum Reads (continued) Remember to cover any unused bar codes on this and the facing page to ensure that the scanner reads only the bar code you intend to scan. EAN TWO LABEL MINIMUM READS = 3 EAN TWO LABEL MINIMUM READS = 4 Product Reference Guide...
-
Page 336: Upc/Ean Correlation
UPC/EAN Correlation This feature enables/disables character correlation for UPC/EAN. To set this feature: 1. Scan the SWITCH bar code. 2. Scan your selection from the bar codes below. You’ll need to cover any unused bar codes on this and the facing page to ensure that the scanner reads only the bar code you intend to scan. -
Page 337: Upc/Ean Minimum Segment Length
Other UPC/EAN Options UPC/EAN Minimum Segment Length Specifies the minimum number of characters necessary in a UPC/ EAN/JAN label segment in order for the scanner to accept a label for decoding. Selectable from 5 to 15 characters. To set this feature: 1. - Page 338 UPC/EAN Minimum Segment Length (continued) Remember to cover any unused bar codes on this and the facing page to ensure that the scanner reads only the bar code you intend to scan. UPC/EAN MINIMUM SEGMENT LENGTH = 7 CHARACTERS UPC/EAN MINIMUM SEGMENT LENGTH = 8 CHARACTERS Magellan™...
- Page 339 Other UPC/EAN Options UPC/EAN Minimum Segment Length (continued) Remember to cover any unused bar codes on this and the facing page to ensure that the scanner reads only the bar code you intend to scan. UPC/EAN MINIMUM SEGMENT LENGTH = 9 CHARACTERS UPC/EAN MINIMUM SEGMENT LENGTH = 10 CHARACTERS Product Reference Guide...
- Page 340 UPC/EAN Minimum Segment Length (continued) Remember to cover any unused bar codes on this and the facing page to ensure that the scanner reads only the bar code you intend to scan. UPC/EAN MINIMUM SEGMENT LENGTH = 11 CHARACTERS UPC/EAN MINIMUM SEGMENT LENGTH = 12 CHARACTERS Magellan™...
- Page 341 Other UPC/EAN Options UPC/EAN Minimum Segment Length (continued) Remember to cover any unused bar codes on this and the facing page to ensure that the scanner reads only the bar code you intend to scan. UPC/EAN MINIMUM SEGMENT LENGTH = 13 CHARACTERS UPC/EAN MINIMUM SEGMENT LENGTH = 14 CHARACTERS Product Reference Guide...
- Page 342 UPC/EAN Minimum Segment Length (continued) Remember to cover any unused bar codes on this and the facing page to ensure that the scanner reads only the bar code you intend to scan. UPC/EAN MINIMUM SEGMENT LENGTH = 15 CHARACTERS Magellan™ 8300/8400...
-
Page 343: Addons
Other UPC/EAN Options Addons Add-ons (or supplemental characters) are commonly added to the end of UPC/EAN bar codes. The scanner will read the add-ons if they are enabled and in the field of view. Three add-on types are supported: 2-digit, 5-digit and Code 128 add-ons. Supported options are: This option directs the scanner to ignore add-on portion of None —... - Page 344 Addons (continued) Remember to cover any unused bar codes on this and the facing page to ensure that the scanner reads only the bar code you intend to scan. OPTIONAL 2-DIGIT ADD-ONS = DISABLE OPTIONAL 2-DIGIT ADD-ONS = ENABLE Magellan™ 8300/8400...
- Page 345 Other UPC/EAN Options Addons (continued) Remember to cover any unused bar codes on this and the facing page to ensure that the scanner reads only the bar code you intend to scan. OPTIONAL 5-DIGIT ADD-ONS = DISABLE OPTIONAL 5-DIGIT ADD-ONS = ENABLE Product Reference Guide...
- Page 346 Addons (continued) Remember to cover any unused bar codes on this and the facing page to ensure that the scanner reads only the bar code you intend to scan. OPTIONAL CODE 128 ADD-ONS = DISABLE OPTIONAL CODE 128 ADD-ONS = ENABLE Magellan™...
-
Page 347: Addon Timer
Other UPC/EAN Options Addon Timer When addons have been selected as optional, this feature sets the duration of time that the scanner can unsuccessfully look for an addon before proceeding to read a bar code. Timer duration is specified in 10ms increments. To set the Addon Timer: 1. -
Page 348: 2-Digit Add-Ons Minimum Reads
2-Digit Add-ons Minimum Reads Specifies the minimum number of times a 2-digit addon must be read before it is marked as valid and then combined with a base label. To set this feature: 1. Scan the SWITCH bar code. 2. Scan the bar code representing the desired option below or on the following pages. - Page 349 Other UPC/EAN Options 2-Digit Add-ons Minimum Reads (continued) Remember to cover any unused bar codes on this and the facing page to ensure that the scanner reads only the bar code you intend to scan. 2-DIGIT ADD-ONS MINIMUM READS = 4 Product Reference Guide...
-
Page 350: 5-Digit Add-Ons Minimum Reads
5-Digit Add-ons Minimum Reads Specifies the minimum number of times a 5-digit addon must be read before it is marked as valid and then combined with a base label. To set this feature: 1. Scan the SWITCH bar code. 2. Scan the bar code representing the desired option below or on the following pages. - Page 351 Other UPC/EAN Options 5-Digit Add-ons Minimum Reads (continued) Remember to cover any unused bar codes on this and the facing page to ensure that the scanner reads only the bar code you intend to scan. 5-DIGIT ADD-ONS MINIMUM READS = 3 5-DIGIT ADD-ONS MINIMUM READS = 4 Product Reference Guide...
-
Page 352: Code 128 Add-Ons Minimum Reads
Code 128 Add-ons Minimum Reads Specifies the minimum number of times a Code 128 addon must be read before it is marked as valid and then combined with a base label. To set this feature: 1. Scan the SWITCH bar code. 2. - Page 353 Other UPC/EAN Options Code 128 Add-ons Minimum Reads (continued) Remember to cover any unused bar codes on this and the facing page to ensure that the scanner reads only the bar code you intend to scan. CODE 128 ADD-ONS MINIMUM READS = 3 CODE 128 ADD-ONS MINIMUM READS = 4 Product Reference Guide...
-
Page 354: Gtin Enable
GTIN Enable Enables/Disables the ability to convert UPCE, UPCA, EAN8, and EAN13 labels into the GTIN 14-character format. If add-on information is present on the base label prior to the conversion taking place, the add-on information will be appended to the converted GTIN bar code. -
Page 355: Gtin Label Id
GTIN Enable GTIN Label ID This feature specifies a GTIN label ID to be added to bar code data when GTIN conversion is enabled. The programming feature, Label ID Control, designates whether the Label ID is transmitted as a prefix or suffix or if Label ID is disabled. NOTE To set this feature: 1. -
Page 356: Gtin 2-Digit Supplemental Label Id
GTIN 2-Digit Supplemental Label ID This feature specifies a GTIN label ID to be added to bar code data when GTIN conversion is enabled and 2-digit supplemental addon bar code labels are converted. The programming feature, Label ID Control, designates whether the Label ID is transmitted as a prefix or suffix or if Label ID is disabled. -
Page 357: Gtin 5-Digit Supplemental Label Id
GTIN Enable GTIN 5-Digit Supplemental Label ID This feature specifies a GTIN label ID to be added to bar code data when GTIN conversion is enabled and 5-digit supplemental addon bar code labels are converted. The programming feature, Label ID Control, designates whether the Label ID is transmitted as a prefix or suffix or if Label ID is disabled. -
Page 358: Gtin Code 128 Supplemental Label Id
GTIN Code 128 Supplemental Label ID This feature specifies a GTIN label ID to be added to bar code data when GTIN conversion is enabled and Code 128 supplemental addon bar code labels are converted The programming feature, Label ID Control, designates whether the Label ID is transmitted as a prefix or suffix or if Label ID is disabled. -
Page 359: Databar Omnidirectional Enable
DataBar Omnidirectional Enable DataBar Omnidirectional Enable Enables/disables the ability of the scanner to decode DataBar Omnidirectional labels. This value-added feature is a factory-programmed option. Contact your dealer for information about upgrading your system to include this advanced capability. NOTE To set this feature: 1. -
Page 360: Databar Omnidirectional/Ean-128 Emulation
DataBar Omnidirectional/EAN-128 Emulation Enables/disables the ability of DataBar Omnidirectional to be trans- mitted as EAN-128. To set this feature: 1. Scan the SWITCH bar code. 2. Scan either the enable or disable bar code below. You’ll need to cover any unused bar codes on this and the facing page to ensure that the scanner reads only the bar code you intend to scan. -
Page 361: Databar Omnidirectional Label Id
DataBar Omnidirectional Enable DataBar Omnidirectional Label ID This feature specifies an DataBar Omnidirectional label ID to be added to bar code data. To set this feature: The programming feature, Label ID Control, designates whether the Label ID is transmitted as a prefix or suffix or if Label ID is disabled. NOTE To set this feature: 1. -
Page 362: Databar Omnidirectional Minimum Reads
DataBar Omnidirectional Minimum Reads Specifies the minimum number of consecutive times an DataBar Omnidirectional label must be decoded before it is accepted as a good read. To set this feature: 1. Scan the SWITCH bar code. 2. Scan the bar code representing the desired option below or on the following pages. - Page 363 DataBar Omnidirectional Enable DataBar Omnidirectional Minimum Reads (continued) Remember to cover any unused bar codes on this and the facing page to ensure that the scanner reads only the bar code you intend to scan. DataBar Omnidirectional MINIMUM READS = 3 DataBar Omnidirectional MINIMUM READS = 4 Product Reference Guide...
-
Page 364: Databar Expanded Enable
DataBar Expanded Enable Enables/disables the ability of the scanner to decode DataBar Expanded labels. This value-added feature is a factory-programmed option. Contact your dealer for information about upgrading your system to include this advanced capability. NOTE To set this feature: 1. -
Page 365: Databar Expanded Ean-128 Emulation
DataBar Expanded Enable DataBar Expanded EAN-128 Emulation Enables/disables EAN-128 emulation for DataBar Expanded. To set this feature: 1. Scan the SWITCH bar code. 2. Scan either the enable or disable bar code below. You’ll need to cover any unused bar codes on this and the facing page to ensure that the scanner reads only the bar code you intend to scan. -
Page 366: Databar Expanded Label Id
DataBar Expanded Label ID This feature specifies an DataBar Expanded label ID to be added to bar code data. The programming feature, Label ID Control, designates whether the Label ID is transmitted as a prefix or suffix or if Label ID is disabled. NOTE To set this feature: 1. -
Page 367: Databar Expanded Length Control
DataBar Expanded Enable DataBar Expanded Length Control This feature specifies either variable-length or fixed-length decod- ing for DataBar Expanded. To set this feature: 1. Scan the SWITCH bar code. 2. Scan your selection from the bar codes below. You’ll need to cover any unused bar codes on this and the facing page to ensure that the scanner reads only the bar code you intend to scan. -
Page 368: Databar Expanded Length 1
DataBar Expanded Length 1 Length 1 is the minimum label length if in variable length mode, or the first fixed length if in fixed length mode (see DataBar Expanded Length Control on page 355 ) . Length includes the barcode’s check and data characters. -
Page 369: Databar Expanded Length 2
DataBar Expanded Enable DataBar Expanded Length 2 Length 2 is the maximum label length if in variable length mode, or the second fixed length if in fixed length mode (see DataBar Expanded Length Control on page 355 ) . Length includes the bar- code’s check and data characters. -
Page 370: Databar Expanded Minimum Reads
DataBar Expanded Minimum Reads Specifies the minimum number of consecutive times an DataBar Expanded label must be decoded before it is accepted as a good read. To set this feature: 1. Scan the SWITCH bar code. 2. Scan the bar code representing the desired option below or on the following pages. - Page 371 DataBar Expanded Enable DataBar Expanded Minimum Reads (continued) Remember to cover any unused bar codes on this and the facing page to ensure that the scanner reads only the bar code you intend to scan. DataBar Expanded MINIMUM READS = 3 DataBar Expanded MINIMUM READS = 4 Product Reference Guide...
-
Page 372: Code 39 Enable
Code 39 Enable Enables/disables the ability of the scanner to decode Code 39 labels. To set this feature: 1. Scan the SWITCH bar code. 2. Scan either the enable or disable bar code below. You’ll need to cover any unused bar codes on this and the facing page to ensure that the scanner reads only the bar code you intend to scan. -
Page 373: Code 39 Start Stop Character Transmission
Code 39 Enable Code 39 Start Stop Character Transmission Enables/disables transmission of Code 39 start and stop characters. This feature applies only when Code 39 Check Character Calculation on page 362 is enabled. NOTE To set this feature: 1. Scan the SWITCH bar code. 2. -
Page 374: Code 39 Check Character Calculation
Code 39 Check Character Calculation Enables/disables calculation and verification of an optional Code 39 check character. When disabled, any check character in label is treated as a data character. If check calculation is disabled, the risk is increased that a misread can occur. -
Page 375: Code 39 Check Character Transmission
Code 39 Enable Code 39 Check Character Transmission Enables/disables transmission of optional Code 39 check character. To set this feature: 1. Scan the SWITCH bar code. 2. Scan either the enable or disable bar code below. You’ll need to cover any unused bar codes on this and the facing page to ensure that the scanner reads only the bar code you intend to scan. -
Page 376: Code 39 Full Ascii
Code 39 Full ASCII Enables/disables the ability of the scanner to translate to Code 39 full ASCII labels. To set this feature: 1. Scan the SWITCH bar code. 2. Scan either the enable or disable bar code below. You’ll need to cover any unused bar codes on this and the facing page to ensure that the scanner reads only the bar code you intend to scan. -
Page 377: Code 39 Label Id
Code 39 Enable Code 39 Label ID This feature specifies a Code 39 label ID to be added to bar code data. The programming feature, Label ID Control, designates whether the Label ID is transmitted as a prefix or suffix or if Label ID is disabled. NOTE To set this feature: 1. -
Page 378: Code 39 Require Quiet Zones
Code 39 Require Quiet Zones When enabled, this feature requires that quiet zones (margins) be present for Code 39 labels. When disabled, quiet zones are optional. To set this feature: 1. Scan the SWITCH bar code. 2. Scan either the enable or disable bar code below. You’ll need to cover any unused bar codes on this and the facing page to ensure that the scanner reads only the bar code you intend to scan. -
Page 379: Code 39 Length Control
Code 39 Enable Code 39 Length Control This feature specifies whether variable-length or fixed-length decoding will be set for Code 39. To set this feature: 1. Scan the SWITCH bar code. 2. Scan your selection from the bar codes below. You’ll need to cover any unused bar codes on this and the facing page to ensure that the scanner reads only the bar code you intend to scan. -
Page 380: Code 39 Length 1
Code 39 Length 1 Length 1 is the minimum label length if in variable length mode, or the first fixed length if in fixed length mode (see Code 39 Length Control on page 367 ) . Length includes the barcode’s check and data characters. -
Page 381: Code 39 Length 2
Code 39 Enable Code 39 Length 2 Length 2 is the maximum label length if in variable length mode, or the second fixed length if in fixed length mode (see Code 39 Length Control on page 367 ) . Length includes the barcode’s check and data characters. -
Page 382: Code 39 Correlation
Code 39 Correlation This feature enables/disables character correlation for Code 39. To set this feature: 1. Scan the SWITCH bar code. 2. Scan your selection from the bar codes below. You’ll need to cover any unused bar codes on this and the facing page to ensure that the scanner reads only the bar code you intend to scan. -
Page 383: Code 39 Stitching
Code 39 Enable Code 39 Stitching Enables/disables stitching for Code 39 labels. When parts of a Code 39 bar code are presented to the scanner with this feature enabled, the bar code parts will be assembled by the scanner’s software, and the data will be decoded if all bar code proofing requirements are met. -
Page 384: Code 39 Minimum Reads
Code 39 Minimum Reads Specifies the minimum number of consecutive times a Code 39 label must be decoded before it is accepted as a good read. To set this feature: 1. Scan the SWITCH bar code. 2. Scan the bar code representing the desired option below or on the following pages. - Page 385 Code 39 Enable Code 39 Minimum Reads (continued) Remember to cover any unused bar codes on this and the facing page to ensure that the scanner reads only the bar code you intend to scan. CODE 39 MINIMUM READS = 3 CODE 39 MINIMUM READS = 4 Product Reference Guide...
-
Page 386: Pharmacode 39 Enable
Pharmacode 39 Enable Enables/disables the ability of the scanner to decode Italian Phar- macode 39 labels. To set this feature: 1. Scan the SWITCH bar code. 2. Scan either the enable or disable bar code below. You’ll need to cover any unused bar codes on this and the facing page to ensure that the scanner reads only the bar code you intend to scan. -
Page 387: Pharmacode 39 Start Stop Character Transmission
Pharmacode 39 Enable Pharmacode 39 Start Stop Character Transmission Enables/ disables transmission of start and stop characters for Pharmacode 39. To set this feature: 1. Scan the SWITCH bar code. 2. Scan either the enable or disable bar code below. You’ll need to cover any unused bar codes on this and the facing page to ensure that the scanner reads only the bar code you intend to scan. -
Page 388: Pharmacode 39 Check Character Transmission
Pharmacode 39 Check Character Transmission Enables/disables transmission of Pharmacode 39 check character. To set this feature: 1. Scan the SWITCH bar code. 2. Scan either the enable or disable bar code below. You’ll need to cover any unused bar codes on this and the facing page to ensure that the scanner reads only the bar code you intend to scan. -
Page 389: Pharmacode 39 Label Id
Pharmacode 39 Enable Pharmacode 39 Label ID This feature specifies a Pharmacode 39 label ID to be added to bar code data. The programming feature, Label ID Control, designates whether the Label ID is transmitted as a prefix or suffix or if Label ID is disabled. NOTE To set this feature: 1. -
Page 390: Code 128 Enable
Code 128 Enable Enables/disables the ability of the scanner to decode Code 128 labels. To set this feature: 1. Scan the SWITCH bar code. 2. Scan either the enable or disable bar code below. You’ll need to cover any unused bar codes on this and the facing page to ensure that the scanner reads only the bar code you intend to scan. -
Page 391: Code 128 Transmit Function Characters
Code 128 Enable Code 128 Transmit Function Characters Enables/disables transmission of Code 128 function characters 1, 2, 3, and 4. Disabled is the recommended setting for all interfaces. NOTE To set this feature: 1. Scan the SWITCH bar code. 2. Scan either the enable or disable bar code below. You’ll need to cover any unused bar codes on this and the facing page to ensure that the scanner reads only the bar code you intend to scan. -
Page 392: Convert Code 128 To Code 39
Convert Code 128 to Code 39 Enables/disables conversion of Code 128 labels to Code 39. To set this feature: 1. Scan the SWITCH bar code. 2. Scan either the enable or disable bar code below. You’ll need to cover any unused bar codes on this and the facing page to ensure that the scanner reads only the bar code you intend to scan. -
Page 393: Code 128 Label Id
Code 128 Enable Code 128 Label ID This feature specifies a Code 128 label ID to be added to bar code data.. The programming feature, Label ID Control, designates whether the Label ID is transmitted as a prefix or suffix or if Label ID is disabled. NOTE To set this feature: 1. -
Page 394: Code 128 Length Control
Code 128 Length Control This feature specifies whether variable-length or fixed-length decoding will be set for Code 128. To set this feature: 1. Scan the SWITCH bar code. 2. Scan your selection from the bar codes below. You’ll need to cover any unused bar codes on this and the facing page to ensure that the scanner reads only the bar code you intend to scan. -
Page 395: Code 128 Length 1
Code 128 Enable Code 128 Length 1 Length 1 is the minimum label length if in variable length mode, or the first fixed length if in fixed length mode (see Code 128 Length Control on page 382 ) . Length includes the barcode’s check and data characters. -
Page 396: Code 128 Length 2
Code 128 Length 2 Length 2 is the maximum label length if in variable length mode, or the second fixed length if in fixed length mode (see Code 128 Length Control on page 382 ) . Length includes the barcode’s check and data characters. -
Page 397: Code 128 Correlation
Code 128 Enable Code 128 Correlation This feature enables/disables character correlation for Code 128. To set this feature: 1. Scan the SWITCH bar code. 2. Scan your selection from the bar codes below. You’ll need to cover any unused bar codes on this and the facing page to ensure that the scanner reads only the bar code you intend to scan. -
Page 398: Code 128 Stitching
Code 128 Stitching Enables/disables stitching for Code 128 labels. When parts of a Code 128 bar code are presented to the scanner with this feature enabled, the bar code parts will be assembled by the scanner’s soft- ware, and the data will be decoded if all bar code proofing require- ments are met. -
Page 399: Code 128 Minimum Reads
Code 128 Enable Code 128 Minimum Reads Specifies the minimum number of consecutive times a Code 128 label must be decoded before it is accepted as a good read. To set this feature: 1. Scan the SWITCH bar code. 2. Scan the bar code representing the desired option below or on the following pages. - Page 400 Code 128 Minimum Reads (continued) Remember to cover any unused bar codes on this and the facing page to ensure that the scanner reads only the bar code you intend to scan. CODE 128 MINIMUM READS = 3 CODE 128 MINIMUM READS = 4 Magellan™...
-
Page 401: Enable
EAN-128 Enable EAN-128 Enable Enables/disables the ability of the scanner to decode EAN-128 labels. When disabled, EAN128 labels are transmitted in Code128 data format. When enabled, EAN128 labels are transmitted in EAN128 data format To set this feature: 1. Scan the SWITCH bar code. 2. -
Page 402: Label Id
EAN-128 Label ID This feature specifies an EAN-128 label ID to be added to bar code data.. The programming feature, Label ID Control, designates whether the Label ID is transmitted as a prefix or suffix or if Label ID is disabled. NOTE To set this feature: 1. -
Page 403: Interleaved 2 Of 5 (I 2 Of 5) Enable
Interleaved 2 of 5 (I 2 of 5) Enable Interleaved 2 of 5 (I 2 of 5) Enable Enables/disables the ability of the scanner to decode Interleaved 2 of 5 labels. To set this feature: 1. Scan the SWITCH bar code. 2. -
Page 404: I 2 Of 5 Check Character Calculation
I 2 of 5 Check Character Calculation Enables/disables calculation and verification of an optional Inter- leaved 2 of 5 check character. If check character calculation is disabled, the risk is increased that a misread can occur. When disabled, any check characters in a bar code are treated as data characters. -
Page 405: I 2 Of 5 Check Character Transmission
Interleaved 2 of 5 (I 2 of 5) Enable I 2 of 5 Check Character Transmission Enables/disables transmission of an optional Interleaved 2 of 5 check character. This feature applies only when I 2 of 5 Check Character Calculation on page 392 is enabled. -
Page 406: I 2 Of 5 Label Id
I 2 of 5 Label ID This feature specifies an I 2 of 5 label ID to be added to bar code data.. The programming feature, Label ID Control, designates whether the Label ID is transmitted as a prefix or suffix or if Label ID is disabled. NOTE To set this feature: 1. -
Page 407: I 2 Of 5 Length Control
Interleaved 2 of 5 (I 2 of 5) Enable I 2 of 5 Length Control This feature specifies whether variable-length or fixed-length decoding will be set for I 2 of 5. To set this feature: 1. Scan the SWITCH bar code. 2. -
Page 408: I 2 Of 5 Length 1
I 2 of 5 Length 1 Length 1 is the minimum label length if in variable length mode, or the first fixed length if in fixed length mode (see I 2 of 5 Length Control on page 395 ) . Length includes the barcode’s check and data characters. -
Page 409: I 2 Of 5 Length 2
Interleaved 2 of 5 (I 2 of 5) Enable I 2 of 5 Length 2 Length 2 is the maximum label length if in variable length mode, or the second fixed length if in fixed length mode (see I 2 of 5 Length Control on page 395 ) . -
Page 410: I 2 Of 5 Correlation
I 2 of 5 Correlation This feature enables/disables character correlation for I 2 of 5. To set this feature: 1. Scan the SWITCH bar code. 2. Scan your selection from the bar codes below. You’ll need to cover any unused bar codes on this and the facing page to ensure that the scanner reads only the bar code you intend to scan. -
Page 411: I 2 Of 5 Stitching
Interleaved 2 of 5 (I 2 of 5) Enable I 2 of 5 Stitching Enables/disables stitching for I 2 of 5 labels. When parts of an I 2 of 5 bar code are presented to the scanner with this feature enabled, the bar code parts will be assembled by the scanner’s software, and the data will be decoded if all bar code proofing requirements are met. -
Page 412: I 2 Of 5 Minimum Reads
I 2 of 5 Minimum Reads Specifies the minimum number of consecutive times an I 2 of 5 label must be decoded before it is accepted as a good read. To set this feature: 1. Scan the SWITCH bar code. 2. - Page 413 Interleaved 2 of 5 (I 2 of 5) Enable I 2 of 5 Minimum Reads (continued) Remember to cover any unused bar codes on this and the facing page to ensure that the scanner reads only the bar code you intend to scan.
-
Page 414: Standard 2 Of 5 (Std 2 Of 5) Enable
Standard 2 of 5 (Std 2 of 5) Enable Enables/disables the ability of the scanner to decode Standard 2 of 5 labels. To set this feature: 1. Scan the SWITCH bar code. 2. Scan either the enable or disable bar code below. You’ll need to cover any unused bar codes on this and the facing page to ensure that the scanner reads only the bar code you intend to scan. -
Page 415: Standard 2 Of 5 Check Character Calculation
Standard 2 of 5 (Std 2 of 5) Enable Standard 2 of 5 Check Character Calculation Enables/disables calculation and verification of an optional Stan- dard 2 of 5 check character. If check character calculation is disabled, the risk is increased that a misread can occur. -
Page 416: Standard 2 Of 5 Check Character Transmission
Standard 2 of 5 Check Character Transmission Enables/disables transmission of an optional Standard 2 of 5 check character. This feature applies only when Standard 2 of 5 Check Character Cal- culation on page 403 is enabled. NOTE To set this feature: 1. -
Page 417: Standard 2 Of 5 Label Id
Standard 2 of 5 (Std 2 of 5) Enable Standard 2 of 5 Label ID This feature specifies a Standard 2 of 5 label ID to be added to bar code data.. The programming feature, Label ID Control, designates whether the Label ID is transmitted as a prefix or suffix or if Label ID is disabled. -
Page 418: Standard 2 Of 5 Length Control
Standard 2 of 5 Length Control This feature specifies whether variable-length or fixed-length decoding will be set for Standard 2 of 5. To set this feature: 1. Scan the SWITCH bar code. 2. Scan your selection from the bar codes below. You’ll need to cover any unused bar codes on this and the facing page to ensure that the scanner reads only the bar code you intend to scan. -
Page 419: Standard 2 Of 5 Length 1
Standard 2 of 5 (Std 2 of 5) Enable Standard 2 of 5 Length 1 Length 1 is the minimum label length if in variable length mode, or the first fixed length if in fixed length mode (see Standard 2 of 5 Length Control on page 406 ) . -
Page 420: Standard 2 Of 5 Length 2
Standard 2 of 5 Length 2 Length 2 is the maximum label length if in variable length mode, or the second fixed length if in fixed length mode (see Standard 2 of 5 Length Control on page 406 ) . Length includes the barcode’s check and data characters. -
Page 421: Standard 2 Of 5 Correlation
Standard 2 of 5 (Std 2 of 5) Enable Standard 2 of 5 Correlation This feature enables/disables character correlation for Standard 2 of 5. To set this feature: 1. Scan the SWITCH bar code. 2. Scan your selection from the bar codes below. You’ll need to cover any unused bar codes on this and the facing page to ensure that the scanner reads only the bar code you intend to scan. -
Page 422: Standard 2 Of 5 Stitching
Standard 2 of 5 Stitching Enables/disables stitching for Standard 2 of 5 labels. When parts of a Standard 2 of 5 bar code are presented to the scanner with this feature enabled, the bar code parts will be assembled by the scan- ner’s software, and the data will be decoded if all bar code proofing requirements are met. -
Page 423: Standard 2 Of 5 Minimum Reads
Standard 2 of 5 (Std 2 of 5) Enable Standard 2 of 5 Minimum Reads Specifies the minimum number of consecutive times a Standard 2 of 5 label must be decoded before it is accepted as a good read. To set this feature: 1. - Page 424 Standard 2 of 5 Minimum Reads (continued) Remember to cover any unused bar codes on this and the facing page to ensure that the scanner reads only the bar code you intend to scan. STANDARD 2 of 5 MINIMUM READS = 3 STANDARD 2 of 5 MINIMUM READS = 4 Magellan™...
-
Page 425: Codabar Enable
Codabar Enable Codabar Enable Enables/disables the ability of the scanner to decode Codabar labels. To set this feature: 1. Scan the SWITCH bar code. 2. Scan either the enable or disable bar code below. You’ll need to cover any unused bar codes on this and the facing page to ensure that the scanner reads only the bar code you intend to scan. -
Page 426: Codabar Start Stop Character Transmission
Codabar Start Stop Character Transmission Enables/disables transmission of Codabar start and stop characters. To set this feature: 1. Scan the SWITCH bar code. 2. Scan either the enable or disable bar code below. You’ll need to cover any unused bar codes on this and the facing page to ensure that the scanner reads only the bar code you intend to scan. -
Page 427: Codabar Start Stop Character Set
Codabar Enable Codabar Start Stop Character Set This feature selects the format of transmitted Codabar start/stop characters. Options are: • ABCD/TN* E • ABCD/ABCD • abcd/tn* e • abcd/abcd To set this feature: 1. Scan the SWITCH bar code. 2. Scan the bar code below or from the following page represent- ing the desired option. - Page 428 Codabar Start Stop Character Set (continued) Remember to cover any unused bar codes on this and the facing page to ensure that the scanner reads only the bar code you intend to scan. CODABAR START STOP CHARACTER = abcd/tn* e CODABAR START STOP CHARACTER = abcd/abcd Magellan™...
-
Page 429: Codabar Start Stop Character Match
Codabar Enable Codabar Start Stop Character Match Enables/disables the requirement that start and stop characters match. To set this feature: 1. Scan the SWITCH bar code. 2. Scan either the enable or disable bar code below. You’ll need to cover any unused bar codes on this and the facing page to ensure that the scanner reads only the bar code you intend to scan. -
Page 430: Codabar Check Character Calculation
Codabar Check Character Calculation Enables/disables calculation and verification of an optional Codabar check character. If check character calculation is disabled, the risk is increased that a misread can occur. When disabled, any check characters in a bar code are treated as data characters. NOTE To set this feature: 1. -
Page 431: Codabar Check Character Transmission
Codabar Enable Codabar Check Character Transmission Enables/disables transmission of an optional Codabar check char- acter. Applies only when Codabar Check Character Calculation on page is enabled. NOTE To set this feature: 1. Scan the SWITCH bar code. 2. Scan either the enable or disable bar code below. You’ll need to cover any unused bar codes on this and the facing page to ensure that the scanner reads only the bar code you intend to scan. -
Page 432: Codabar Label Id
Codabar Label ID This feature specifies a Codabar label ID to e added to bar code data. The programming feature, Label ID Control, designates whether the Label ID is transmitted as a prefix or suffix or if Label ID is disabled. NOTE To set this feature: 1. -
Page 433: Codabar Require Quiet Zones
Codabar Enable Codabar Require Quiet Zones When enabled, this feature requires that quiet zones (margins) be present for Codabar labels. When disabled, quiet zones are optional. To set this feature: 1. Scan the SWITCH bar code. 2. Scan either the enable or disable bar code below. You’ll need to cover any unused bar codes on this and the facing page to ensure that the scanner reads only the bar code you intend to scan. -
Page 434: Codabar Length Control
Codabar Length Control This feature specifies whether variable-length or fixed-length decoding will be set for Codabar. To set this feature: 1. Scan the SWITCH bar code. 2. Scan your selection from the bar codes below. You’ll need to cover any unused bar codes on this and the facing page to ensure that the scanner reads only the bar code you intend to scan. -
Page 435: Codabar Length 1
Codabar Enable Codabar Length 1 Length 1 is the minimum label length if in variable length mode, or the first fixed length if in fixed length mode (see Codabar Length Control on page 422 ) . Length includes the barcode’s check and data characters. -
Page 436: Codabar Length 2
Codabar Length 2 Length 2 is the maximum label length if in variable length mode, or the second fixed length if in fixed length mode (see Codabar Length Control on page 422 ) . Length includes the barcode’s check and data characters. -
Page 437: Codabar Correlation
Codabar Enable Codabar Correlation This feature enables/disables character correlation for Codabar. To set this feature: 1. Scan the SWITCH bar code. 2. Scan your selection from the bar codes below. You’ll need to cover any unused bar codes on this and the facing page to ensure that the scanner reads only the bar code you intend to scan. -
Page 438: Codabar Stitching
Codabar Stitching Enables/disables stitching for Codabar labels. When parts of a Cod- abar bar code are presented to the scanner with this feature enabled, the bar code parts will be assembled by the scanner’s soft- ware, and the data will be decoded if all bar code proofing require- ments are met. -
Page 439: Codabar Minimum Reads
Codabar Enable Codabar Minimum Reads Specifies the minimum number of consecutive times a Codabar label must be decoded before it is accepted as a good read. To set this feature: 1. Scan the SWITCH bar code. 2. Scan the bar code representing the desired option below or on the following pages. - Page 440 Codabar Minimum Reads (continued) Remember to cover any unused bar codes on this and the facing page to ensure that the scanner reads only the bar code you intend to scan. CODABAR MINIMUM READS = 3 CODABAR MINIMUM READS = 4 Magellan™...
-
Page 441: Code 93 Enable
Code 93 Enable Code 93 Enable Enables/disables the ability of the scanner to decode Code 93 labels. To set this feature: 1. Scan the SWITCH bar code. 2. Scan either the enable or disable bar code below. You’ll need to cover any unused bar codes on this and the facing page to ensure that the scanner reads only the bar code you intend to scan. -
Page 442: Code 93 Label Id
Code 93 Label ID This feature specifies a Code 93 label ID to be added to bar code data.. The programming feature, Label ID Control, designates whether the Label ID is transmitted as a prefix or suffix or if Label ID is disabled. NOTE To set this feature: 1. -
Page 443: Code 93 Length Control
Code 93 Enable Code 93 Length Control This feature specifies whether variable-length or fixed-length decoding will be set for Code 93. To set this feature: 1. Scan the SWITCH bar code. 2. Scan your selection from the bar codes below. You’ll need to cover any unused bar codes on this and the facing page to ensure that the scanner reads only the bar code you intend to scan. -
Page 444: Code 93 Length 1
Code 93 Length 1 Length 1 is the minimum label length if in variable length mode, or the first fixed length if in fixed length mode (see Code 93 Length Control on page 431 ) . Length includes the barcode’s check and data characters. -
Page 445: Code 93 Length 2
Code 93 Enable Code 93 Length 2 Length 2 is the maximum label length if in variable length mode, or the second fixed length if in fixed length mode (see Code 93 Length Control on page 431 ) . Length includes the barcode’s check and data characters. -
Page 446: Code 93 Correlation
Code 93 Correlation This feature enables/disables character correlation for Code 93. To set this feature: 1. Scan the SWITCH bar code. 2. Scan your selection from the bar codes below. You’ll need to cover any unused bar codes on this and the facing page to ensure that the scanner reads only the bar code you intend to scan. -
Page 447: Code 93 Stitching
Code 93 Enable Code 93 Stitching Enables/disables stitching for Code 93 labels. When parts of a Code 93 bar code are presented to the scanner with this feature enabled, the bar code parts will be assembled by the scanner’s software, and the data will be decoded if all bar code proofing requirements are met. -
Page 448: Code 93 Minimum Reads
Code 93 Minimum Reads Specifies the minimum number of consecutive times a Code 93 label must be decoded before it is accepted as a good read. To set this feature: 1. Scan the SWITCH bar code. 2. Scan the bar code representing the desired option below or on the following pages. - Page 449 Code 93 Enable Code 93 Minimum Reads (continued) Remember to cover any unused bar codes on this and the facing page to ensure that the scanner reads only the bar code you intend to scan. CODE 93 MINIMUM READS = 3 CODE 93 MINIMUM READS = 4 Product Reference Guide...
-
Page 450: Msi/Plessey Enable
MSI/Plessey Enable Enables/disables the ability of the scanner to decode MSI/Plessey labels. To set this feature: 1. Scan the SWITCH bar code. 2. Scan either the enable or disable bar code below. You’ll need to cover any unused bar codes on this and the facing page to ensure that the scanner reads only the bar code you intend to scan. -
Page 451: Msi/Plessey Check Character Calculation
MSI/Plessey Enable MSI/Plessey Check Character Calculation Enables/disables calculation and verification of optional MSI/Plessey check characters. If check character calculation is disabled, the risk is increased that a misread can occur. When disabled, any check characters in a bar code are treated as data characters. NOTE To set this feature: 1. -
Page 452: Msi/Plessey Number Of Check Characters
MSI/Plessey Number of Check Characters Specifies number of MSI/Plessey check characters to be calculated and verified. Check characters are always modulus 10. NOTE To set this feature: 1. Scan the SWITCH bar code. 2. Scan the bar code below representing the desired number of MSI/Plessey check characters to be calculated and verified. -
Page 453: Msi/Plessey Check Character Transmission
MSI/Plessey Enable MSI/Plessey Check Character Transmission Enables/disables transmission of optional MSI/Plessey check char- acters. This feature applies only when MSI/Plessey Check Character Calcu- lation on page 439 is enabled. NOTE To set this feature: 1. Scan the SWITCH bar code. 2. -
Page 454: Msi/Plessey Label Id
MSI/Plessey Label ID This feature specifies an MSI/Plessey label ID to be added to bar code data. The programming feature, Label ID Control, designates whether the Label ID is transmitted as a prefix or suffix or if Label ID is disabled. NOTE To set this feature: 1. -
Page 455: Msi/Plessey Length Control
MSI/Plessey Enable MSI/Plessey Length Control This feature specifies whether variable-length or fixed-length decoding will be set for MSI/Plessey. To set this feature: 1. Scan the SWITCH bar code. 2. Scan your selection from the bar codes below. You’ll need to cover any unused bar codes on this and the facing page to ensure that the scanner reads only the bar code you intend to scan. -
Page 456: Msi/Plessey Length 1
MSI/Plessey Length 1 Length 1 is the minimum label length if in variable length mode, or the first fixed length if in fixed length mode (see MSI/Plessey Length Control on page 443 ) . Length includes the barcode’s check and data characters. To set this feature: 1. -
Page 457: Msi/Plessey Length 2
MSI/Plessey Enable MSI/Plessey Length 2 Length 2 is the maximum label length if in variable length mode, or the second fixed length if in fixed length mode (see Code 93 Length Control on page 431 ) . Length includes the barcode’s check and data characters. -
Page 458: Msi/Plessey Correlation
MSI/Plessey Correlation This feature enables/disables character correlation for MSI/Plessey. To set this feature: 1. Scan the SWITCH bar code. 2. Scan your selection from the bar codes below. You’ll need to cover any unused bar codes on this and the facing page to ensure that the scanner reads only the bar code you intend to scan. -
Page 459: Msi/Plessey Stitching
MSI/Plessey Enable MSI/Plessey Stitching Enables/disables stitching for MSI/Plessey labels. When parts of an MSI/Plessey bar code are presented to the scanner with this feature enabled, the bar code parts will be assembled by the scanner’s soft- ware, and the data will be decoded if all bar code proofing require- ments are met. -
Page 460: Msi/Plessey Minimum Reads
MSI/Plessey Minimum Reads Specifies the minimum number of consecutive times an MSI/Plessey label must be decoded before it is accepted as a good read. To set this feature: 1. Scan the SWITCH bar code. 2. Scan the bar code representing the desired option below or on the following pages. - Page 461 MSI/Plessey Enable MSI/Plessey Minimum Reads (continued) Remember to cover any unused bar codes on this and the facing page to ensure that the scanner reads only the bar code you intend to scan. MSI/PLESSEY MINIMUM READS = 3 MSI/PLESSEY MINIMUM READS = 4 Product Reference Guide...
- Page 462 NOTES Magellan™ 8300/8400...
-
Page 463: Appendix A. Led/Beeper Indications & Controls
Appendix A LED/Beeper Indications & Controls Figure 53 shows the operator’s controls and indicators. The descriptions following identify the use or function of each compo- nent. Figure 53. Scanner and Scale Controls Scanner LED Indicator Volume/Tone Button Scale Zero Button & LED Speaker (Beeper) Port... -
Page 464: Led And Beeper Indications
LED and Beeper Indications Scanner and Scale LEDs The Scanner LED indicates scanner status, and the Scale LED (which is in combination with the Scale push button) is primarily used to show scale status (see Table 4). Table 4. Scanner and Scale LED Indications DURATION COMMENT INDICATION... - Page 465 Controls and Indicators DURATION COMMENT INDICATION Serves notice that a fatal FRU failure Audible low tone 1 second. Error Field has been detected. Consult " Alternating Scanner/Scale Codes" on page 69 Replaceable for more details. If a (Green/Yellow) LEDs flash Unit (FRU) low tone is heard, but continuous flash- continuously.
-
Page 466: Volume/Tone Push Button
Volume/Tone Push Button The Volume/Tone Push Button also performs multiple functions depending upon the duration of time it is pressed: The Volume/Tone Push Button must be configured to enable standard functions, or the features described will not apply. Reference Chapter 6, Scanner Button Options for programming details. - Page 467 Controls and Indicators PRESS FUNCTION COMMENT DURATION This mode allows system support personnel to troubleshoot problems with the scanner. Upon entering Scanner Diagnostic Mode, view the 7-segment display to view Inter- face Type, Bootloader Version Number, Scanner Diagnostics 4 Seconds Application Version Number and Configura- Mode tion File Number.
-
Page 468: Scale Zero Push Button
Scale Zero Push Button The Scale Zero Push Button is used for multiple functions as listed. The Scale Zero Push Button has no function in a “scanner only” model. The button must be configured to enable standard functions, or Scale Diagnostics will not be an available feature. -
Page 469: Calibration Switch
Controls and Indicators Calibration Switch This switch initiates the scale’s calibration routine. A certified weight set is needed to perform the scale calibration steps detailed in Chapter 5, Calibration. This switch is not included in scanners without scale modules. Calibration Switch Seal This seal allows you to secure the Calibration Switch access cover and restrict access to the Calibration Switch. - Page 470 NOTES Magellan™ 8300/8400...
-
Page 471: Appendix B Cable Information
Appendix B Cable Information Introduction The following pages contain pinout information, enabling you to create standard interface cables for use in interconnecting the scan- ner, scale, external handheld scanner, and POS terminal. General Specifications Wire Requirements • Cable length should not exceed 15 feet. •... -
Page 472: Cable Pinout
RS-232 Cable Pinout Scanner Connector Hardware RJ45, 10 Position Cable Pinout PIN # FUNCTION DESCRIPTION No Connection CTS in Clear To Send (input) No Connection Request To Send (output) RTS out Receive Data (Input) RxD in Transmit Data (output) TxD out No Connection No Connection Signal Ground... -
Page 473: Scale
RS-232 Cable Pinout Scale Connector Hardware RJ45, 10 Position Cable Pinout PIN # FUNCTION DESCRIPTION +5V pullup +5V pullup Clear To Send (input) CTS IN No Connection Request To Send (output) RTS OUT Receive Data (Input) RxD IN Transmit Data (output) TxD OUT No Connection No Connection... -
Page 474: Ibm Cable Pinout
IBM Cable Pinout Scanner and Scale Connector Hardware RJ45, 10 Position Cable Pinout PIN # FUNCTION DESCRIPTION No Connection No Connection No Connection Line B LINEB No Connection Line A LINEA No Connection No Connection Signal Ground No Connection Magellan™ 8300/8400... -
Page 475: Oem Usb Cable Pinout
OEM USB Cable Pinout OEM USB Cable Pinout Scanner and Scale Connector Hardware RJ45, 10 Position Cable Pinout PIN # FUNCTION DESCRIPTION No Connection No Connection USB VBUS VBUS USB D- USB D- No Connection USB D+ USB D+ No Connection No Connection Signal Ground No Connection... -
Page 476: Auxiliary Port
Auxiliary Port External Handheld Input Connector Hardware RJ45, 10 Position Cable Pinout PIN # FUNCTION DESCRIPTION +5V pullup +5V pullup CTS in Clear To Send (input) No Connection - Reserved Request To Send (output) RTS out Receive Data (Input) RxD in Transmit Data (output) TxD out No Connection... -
Page 477: Power Cable
Power Cable Power Cable Connector Hardware 3 pin Molex Cable Pinout PIN # FUNCTION DESCRIPTION EARTH GND Earth Ground SIGNAL GND Signal Ground +12V IN +12V in Product Reference Guide... -
Page 478: Remote Display
Remote Display Connector Hardware 4 pin SDL Cable Pinout PIN # FUNCTION DESCRIPTION +12V out +12V OUT LINE A Display LINE_A_DSPLY LINE B Display LINE_B_DSPLY Ground Magellan™ 8300/8400... -
Page 479: Eas Comm Port (Sensormatic Systems Only)
® EAS Comm Port (Sensormatic systems ONLY) EAS Comm Port (Sensormatic ® systems ONLY) EAS Deactivator Control Box Connection Connector Hardware Cable Pinout PIN # FUNCTION DESCRIPTION +5V Out +5V Out When configured, signifies good External Read Indica- read Intended to drive an external ampli- fier that drives and external Audio Out speaker. - Page 480 NOTES Magellan™ 8300/8400...
-
Page 481: Appendix C Keypad
Appendix C Keypad Use the bar codes in this appendix to enter numbers and characters as you would select digits/characters from a keypad. Scan your selection from the bar codes below. You’ll need to cover any unused bar codes on this and the facing page to ensure that the scanner reads only the bar code you intend to scan. - Page 482 Use the bar codes in this appendix to enter numbers and characters as you would select digits/characters from a keypad. Scan your selection from the bar codes below. You’ll need to cover any unused bar codes on this and the facing page to ensure that the scanner reads only the bar code you intend to scan.
- Page 483 Use the bar codes in this appendix to enter numbers and characters as you would select digits/characters from a keypad. Scan your selection from the bar codes below. You’ll need to cover any unused bar codes on this and the facing page to ensure that the scanner reads only the bar code you intend to scan.
- Page 484 Use the bar codes in this appendix to enter numbers and characters as you would select digits/characters from a keypad. Scan your selection from the bar codes below. You’ll need to cover any unused bar codes on this and the facing page to ensure that the scanner reads only the bar code you intend to scan.
- Page 485 Use the bar codes in this appendix to enter numbers and characters as you would select digits/characters from a keypad. Scan your selection from the bar codes below. You’ll need to cover any unused bar codes on this and the facing page to ensure that the scanner reads only the bar code you intend to scan.
- Page 486 Use the bar codes in this appendix to enter numbers and characters as you would select digits/characters from a keypad. Scan your selection from the bar codes below. You’ll need to cover any unused bar codes on this and the facing page to ensure that the scanner reads only the bar code you intend to scan.
- Page 487 Use the bar codes in this appendix to enter numbers and characters as you would select digits/characters from a keypad. Scan your selection from the bar codes below. You’ll need to cover any unused bar codes on this and the facing page to ensure that the scanner reads only the bar code you intend to scan.
- Page 488 Use the bar codes in this appendix to enter numbers and characters as you would select digits/characters from a keypad. Scan your selection from the bar codes below. You’ll need to cover any unused bar codes on this and the facing page to ensure that the scanner reads only the bar code you intend to scan.
-
Page 489: Appendix D Host Commands
Appendix D Host Commands Accepting Commands from an RS-232 Scanner Host The scanner responds to the following RS-232 commands: COMMAND ASCII COMMENT Enable Scanner 0x45 Disable Scanner 0x44 Reset Scanner 0x52 Not On File Indication 0x46 Long series of beeps Beep Good Read Tone 0x42 Beeps if Good Read Beep is enabled... - Page 490 NOTES Magellan™ 8300/8400...
-
Page 491: Appendix E. Keyboard Function Key Mappings
Appendix E Keyboard Function Key Mappings Keyboard Model Cross Reference Table summarizes the keyboard models, their defined protocol, scancode set, and some unique features. The remaining tables in this chapter provide the function key maps associated with each of the scancode sets. Product Reference Guide... - Page 492 Table 5. Keyboard Model Cross Reference Trans- Function Scancode Model Type I/F ID mission Key Map Country Protocol Support Mode PC/XT Foreign ALT Wedge A PC/XT Scan Set 1 Mode PS/2 25-286; PS/2 30-286; Wedge B AT/PS2 Scan Set 2 PS/2 50, 50Z;...
- Page 493 Keyboard Model Cross Reference Table 6. Scanset 1 Function Key Map ASCII ASCII code Scancode (hex) ALT right Make E0h 38h ALT right Break E0h B8h ALT left Make ALT left Break CTRL left Make CTRL left Break CTRL right Make E0h 1Dh CTRL right Break E0h 9Dh...
- Page 494 Table 7. Scanset 2 Function Key Map ASCII ASCII code Scancode (hex) ALT right Make E0h 11h ALT right Break E0h F0h 11h ALT left Make ALT left Break F0h 11h CTRL left Make CTRL left Break F0h 14h CTRL right Make E0h 14h CTRL right Break E0h F0h 14h...
- Page 495 Keyboard Model Cross Reference Table Scanset 3, 102-Key Function Key Map ASCII (hex) ASCII code Scancode ALT right Make ALT right Break F0h 39h ALT left Make ALT left Break F0h 19h CTRL left Make CTRL left Break F0h 11h CTRL right Make CTRL right Break F0h 58h...
- Page 496 Table 9. Scanset 3 122-Key Function Key Map ASCII ASCII code Scancode (hex) ALT Right Make ALT Right Break F0h 39h ALT left Make ALT left Break F0h 19h CTRL left (RESET) Make only CTRL left (RESET) Make/Break 11h F0h 11h ONLINE Enter Make only ONLINE Enter Make/Break 58h F0h 58h...
- Page 497 Keyboard Model Cross Reference Table 10. Japanese DOS Function Key Map ASCII value ASCII code Scancode ALT right Make ALT right Break ALT left Make ALT left Break CTRL left Make CTRL left Break CTRL right Make CTRL right Break TAB right RIGHT arrow (inner key- pad)
- Page 498 Table 11. NEC 9801-Key Function Key Map ASCII value ASCII code Scancode unused CAPS LOCK ON (make) CAPS LOCK OFF (break) CTRL left Make CTRL left Break CTRL-C TAB right RIGHT arrow (inner key- pad) TAB left 0Fh + S DELETE INSERT (inner keypad) KATAKANA LOCK ON...
- Page 499 Keyboard Model Cross Reference Table 12. USB Keyboard Function Key Usage Map ASCII Key Value Usage Name ALT right Make ALT right Break GUI right Make GUI right Break CTRL right Make CTRL right Break TAB right RIGHT arrow (inner key- pad) TAB left Enter (right keypad)
- Page 500 NOTES Magellan™ 8300/8400...
-
Page 501: Appendix F. Factory Defaults
Appendix F Factory Defaults The following table provides a listing of the most common factory settings for the interfaces shown. Table 13. Factory Default Settings RS-232 Wincor- Keybd. RS-232 Single Nixdorf Wedge Cable Scanner Button Enable Enable Enable Enable Enable Enable Options on page Functions... - Page 502 RS-232 Wincor- Keybd. RS-232 Single Nixdorf Wedge Cable Productivity Index Reporting (PIR)/ Disable Disable Disable Disable Disable Disable Cashier Training (CT) on page 125 Green LED Idle On dim On dim On dim On dim On dim On dim State on page 126 Power-up Beep Control on page 1 beep...
- Page 503 RS-232 Wincor- Keybd. RS-232 Single Nixdorf Wedge Cable Scale Interface RS-232 RS-232 Type on page 141 SASI SASI Scale Calibration Notification on Disable Disable Disable Disable Disable page 143 Scale Intercharac- ter Delay on page No delay No delay Remote Display — Enable/Disable on Enable Enable...
- Page 504 RS-232 Wincor- Keybd. RS-232 Single Nixdorf Wedge Cable Global Suffix on 0D00 0D00 0D00 00 ("") page 177 (<CR>) (<CR>) (<CR>) Case Conversion No con- No con- No con- No con- No con- No con- on page 179 version version version version version...
- Page 505 RS-232 Wincor- Keybd. RS-232 Single Nixdorf Wedge Cable RS-232 Number of Stop Bits on page 1 stop bit 1 stop bit 1 stop bit RS-232 Parity on None page 195 RS-232 Hardware Enable Control on page Disable CTS flow RS-232 Interchar- acter Delay on None None...
- Page 506 RS-232 Wincor- Keybd. RS-232 Single Nixdorf Wedge Cable RS-232 Team POS ICL Scale on page Disable Disable RS-232 Beep on ASCII BEL on page Disable Disable RS-232 Beep After Weigh on page Disable Disable Disable RS-232 Beep on Not on File on Enable Enable Enable...
- Page 507 RS-232 Wincor- Keybd. RS-232 Single Nixdorf Wedge Cable RS-232 ACK NAK Ignore Ignore Error Handling on errors errors page 219 Single Cable RS- 232 Scanner Only Scanner- Protocol on page scale Single Cable RS- 232 Stale Weight 330 msec Timeout on page Single Cable RS- 232 Scale —...
- Page 508 RS-232 Wincor- Keybd. RS-232 Single Nixdorf Wedge Cable Single Cable RS- 232 Use ACK/NAK Disable on page 233 Single Cable RS- 232 Use STX on Enable page 234 Set Single Cable RS-232 STX Char- acter on page 235 Set Single Cable RS-232 ETX Char- Enable acter on page 236...
- Page 509 RS-232 Wincor- Keybd. RS-232 Single Nixdorf Wedge Cable Keyboard Interface — Intercharacter 10 msec Delay on page 252 Coupon Control Disable Disable Disable Disable Disable Disable on page 253 UPC-A Enable on Enable Enable Enable Enable Enable Enable page 255 UPC-A Number System Character Enable...
- Page 510 RS-232 Wincor- Keybd. RS-232 Single Nixdorf Wedge Cable UPC-A 128 Sup- plemental Label ID on page 262 UPC-A Minimum Reads on page UPC-E Enable on Enable Enable Enable Enable Enable Enable page 265 UPC-E Number System Character Enable Enable Enable Enable Enable Enable...
- Page 511 RS-232 Wincor- Keybd. RS-232 Single Nixdorf Wedge Cable UPC-E 5-Digit Supplemental Label ID on page UPC-E 128 Sup- plemental Label ID on page 273 UPC-E Minimum Reads on page EAN-13 Enable on Enable Enable Enable Enable Enable Enable page 276 EAN-13 First Character Trans- Enable...
- Page 512 RS-232 Wincor- Keybd. RS-232 Single Nixdorf Wedge Cable EAN-13 5-Digit Supplemental Label ID on page EAN-13 Minimum Reads on page EAN-13 128 Sup- plemental Label ID on page 283 Bookland Label ID on page 286 EAN-8 Enable on Enable Enable Enable Enable Enable...
- Page 513 RS-232 Wincor- Keybd. RS-232 Single Nixdorf Wedge Cable EAN-8 Stitch Exact Label Halves on Disable Disable Disable Disable Disable Disable page 293 EAN-8 Stitch Unlike Label Disable Disable Disable Disable Disable Disable Halves on page EAN 8 Label ID on page 295 EAN-8 2-Digit Supplemental...
- Page 514 RS-232 Wincor- Keybd. RS-232 Single Nixdorf Wedge Cable Price Weight Check on page Disable Disable Disable Disable Disable Disable In-Store Label Minimum Reads on page 314 Enable EAN Two Disable Disable Disable Disable Disable Disable Label on page 316 EAN Two Label Combined Trans- Disable Disable...
- Page 515 RS-232 Wincor- Keybd. RS-232 Single Nixdorf Wedge Cable UPC/EAN Correla- Disable Disable Disable Disable Disable Disable tion on page 324 2-Digit Add-ons Minimum Reads on page 336 5-Digit Add-ons Minimum Reads on page 338 Code 128 Add- ons Minimum Reads on page UPC/EAN Mini- mum Segment Length on page...
- Page 516 RS-232 Wincor- Keybd. RS-232 Single Nixdorf Wedge Cable DataBar Omnidi- rectional Enable Disable Disable Disable Disable Disable Disable on page 347 DataBar Omnidi- rectional/EAN- Disable Disable Disable Disable Disable Disable 128 Emulation on page 348 DataBar Omnidi- rectional Label ID on page 349 DataBar Omnidi- rectional Mini-...
- Page 517 RS-232 Wincor- Keybd. RS-232 Single Nixdorf Wedge Cable DataBar Expanded Length 2 on page DataBar Expanded Minimum Reads on page 358 Code 39 Enable on Enable Disable Enable Enable Enable Enable page 360 Code 39 Start Stop Character Trans- Disable Disable Disable Disable...
- Page 518 RS-232 Wincor- Keybd. RS-232 Single Nixdorf Wedge Cable Code 39 Length 1 on page 368 Code 39 Length 2 on page 369 Code 39 Correla- Disable Disable Disable Disable Disable Disable tion on page 370 Code 39 Stitching Enable Enable Enable Enable Enable...
- Page 519 RS-232 Wincor- Keybd. RS-232 Single Nixdorf Wedge Cable Code 128 Trans- mit Function Disable Disable Disable Disable Disable Disable Characters on page 379 Convert Code 128 to Code 39 on Disable Disable Disable Disable Disable Disable page 380 Code 128 Label ID on page 381 Code 128 Length Control on page...
- Page 520 RS-232 Wincor- Keybd. RS-232 Single Nixdorf Wedge Cable Interleaved 2 of 5 (I 2 of 5) Enable on Disable Disable Disable Disable Disable Disable page 391 I 2 of 5 Check Character Calcula- Disable Disable Disable Disable Disable Disable tion on page 392 I 2 of 5 Check Character Trans- Enable...
- Page 521 RS-232 Wincor- Keybd. RS-232 Single Nixdorf Wedge Cable Standard 2 of 5 Check Character Disable Disable Disable Disable Disable Disable Calculation on page 403 Standard 2 of 5 Check Character Enable Enable Enable Enable Enable Enable Transmission on page 404 Standard 2 of 5 Label ID on page Standard 2 of 5...
- Page 522 RS-232 Wincor- Keybd. RS-232 Single Nixdorf Wedge Cable Codabar Enable on Disable Disable Disable Disable Disable Disable page 413 Codabar Start Stop Character Trans- Disable Enable Disable Disable Disable Disable mission on page Codabar Start Stop abcd/ abcd/ abcd/ abcd/ abcd/ abcd/ Character Set on...
- Page 523 RS-232 Wincor- Keybd. RS-232 Single Nixdorf Wedge Cable Codabar Length 2 on page 424 Codabar Correla- Disable Disable Disable Disable Disable Disable tion on page 425 Codabar Stitching Disable Disable Disable Disable Disable Disable on page 426 Codabar Mini- mum Reads on page 427 Code 93 Enable on Disable...
- Page 524 RS-232 Wincor- Keybd. RS-232 Single Nixdorf Wedge Cable MSI/Plessey Enable on page Disable Disable Disable Disable MSI/Plessey Check Character Calcula- Enable Enable Enable Enable tion on page 439 MSI/Plessey Num- ber of Check 1 check 1 check 1 check 1 check Characters on char char...
- Page 525 RS-232 Wincor- Keybd. RS-232 Single Nixdorf Wedge Cable MSI/Plessey Stitching on page Disable Disable Disable Disable MSI/Plessey Mini- mum Reads on page 448 Product Reference Guide...
- Page 526 NOTES Magellan™ 8300/8400...
-
Page 527: Appendix G. Handheld Data Format Requirements
Maximum label lengths will be enforced for label validation (i.e. labels longer than the maximum label size will not be val- idated). • Standard Datalogic formats generally use a single prefix char- acter. The specific formats are provided below. Product Reference Guide... -
Page 528: Datalogic Handheld Data Format Requirements
Datalogic Handheld Data Format Requirements The following sections describe label transmission formats that are typically observed in factory configurations of Datalogic handheld scanners. DataBar Omnidirectional • Prefix must be ASCII characters ‘R4’ • Check character must be included in label •... - Page 529 UPC-A with Code 128 Supplemental • System number must be included in label data. • Check digit must be included in label data and is assumed to be correct. • Supplemental data is appended to base label. • Prefix must be an ASCII character 'A' - total length including prefix must be greater or equal to 19 Code 128 Supplemental codes are variable length having a minimum of 2 data charac- ters).
- Page 530 UPC-E with Code 128 Supplemental • System number must be included in label data. • Check digit must be included in label data and is assumed to be correct. • Supplemental data is appended to base label. • Prefix must be an ASCII character 'E' - total length including prefix must be greater or equal to 15 (code 128 Supplemental codes are variable length having a minimum of 2 data charac- ters).
- Page 531 EAN-8 with Code 128 Supplemental • Check digit must be included in label data and is assumed to be correct. • Supplemental data is appended to base label. • Prefix must be an ASCII characters 'FF' - total length including prefix must be greater than 16 (code 128 Supplemental codes are variable length having a minimum of 2 data characters).
- Page 532 • Characters immediately following base label must be of the form '8100', '8101' or '8102' • Example: 'F11012345678918100000951' Code 39 • Check character must be included in label data. • Label length including start, stop and check characters and excluding prefix character must meet requirements imposed by the main scanner's fixed or variable label length control for this symbology type.
- Page 533 Standard 2 of 5 • Check character must be included in label data. • Label length including check characters and excluding prefix characters must meet requirements imposed by the main scanner's fixed or variable label length control for this sym- bology type.
- Page 534 MSI/Plessey • Check character must be included in label data. • Label length including check character and excluding prefix character must meet requirements imposed by the main scan- ner's fixed or variable label length control for this symbology type. • Prefix must be an ASCII character '@'.
-
Page 535: Aim Formats
AIM Formats AIM specifies a 3-character string that is attached as a prefix to the label data for transmission. Because AIM specifies one identifier for UPC-A, UPC-E and EAN-13 labels, UPC-A, UPC-E and EAN-13 will be received from the handheld and transmitted to the POS by the scanner as EAN-13. - Page 536 EAN-8 • Check digit must be included in label data and is assumed to be correct. • Prefix must be ASCII characters ']E4' - total length including prefix must be 11. • Example: ']E400210126'. 2-Digit Supplemental • Supplemental data is appended to any EAN base label. •...
- Page 537 5-Digit Supplemental • Supplemental data is appended to any EAN base label. • Prefix must be ASCII characters ']E2'. • Length of supplemental data including prefix must be 8. Total required length is 24 for EAN-13 and 19 for EAN-8. •...
- Page 538 Codabar • Check character must be included in label data. • Label length including check character and excluding prefix characters must meet requirements imposed by the main scanner's fixed or variable label length control for this sym- bology type. • Prefix must be ASCII characters ']F0'.
- Page 539 DataBar Expanded • Prefix must be ASCII characters ']e0'. • Label length excluding prefix characters must be at least 1 character. Maximum length is the maximum label size sup- ported by the scanner. • Example: ']e001900123456789083103001750'. I 2 of 5 •...
- Page 540 NOTES Magellan™ 8300/8400...
-
Page 541: Ascii Character Set
ASCII Character Set The table on this page shows ASCII characters and their cor- responding Hex Values. The Hex Values in this table are needed for setting symbology-specific label identifiers, as well as enabling custom prefix and suffix characters. ASCII ASCII ASCII ASCII... - Page 542 • Copying or altering of this document is prohibited without express written consent from Datalogic S.p.A. • Datalogic and the Datalogic logo are registered trademarks of Datalogic S.p.A. in many countries, including the U.S. and the E.U. www.datalogic.com Datalogic ADC, Inc.