
Related Manuals for Spirit CT900


Summary of Contents for Spirit CT900
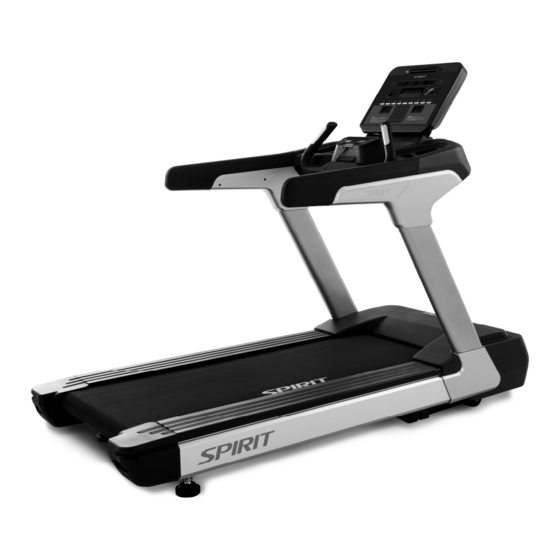
- Page 1 CT900 T readmill OWNER’S MANUAL Please carefully read this entire manual before operating your new treadmill.
-
Page 2: Table Of Contents
TABLE OF CONTENTS Important Safety Instructions……………………………………………………………………… 2 Important Electrical Information…………………………………………………………………… 4 Important Operation Instructions………………………………………………………………….. 5 Assembly instructions………………………………………………………………………………. 6 Console Operation…………………………………………………………………......13 Using a Heart Rate Transmitter…………………………………………………………………… 26 General Maintenance……………………………………………………………………………..27 Troubleshooting..……………………………………………………………………………..29 Exploded View Diagram and Parts List………………………………………………..………….. 30 ATTENTION This treadmill is intended for residential use only and is warranted for this application. Any other application voids this warranty in its entirety. -
Page 3: Important Safety Instructions
IMPORTANT SAFETY INSTRUCTIONS WARNING - Read all instructions before using this appliance. DANGER - To reduce the risk of electric shock disconnect your treadmill from the electrical outlet prior to cleaning and/or service work. WARNING - To reduce the risk of burns, fire, electric shock, or injury to persons, install the treadmill on a flat level surface with access to a 230-volt,20-amp grounded outlet. - Page 4 “WARNING! Heart rate monitoring systems may be inaccurate. Over exercising may result in serious injury or death. If you feel faint stop exercising immediately”. Suitable information about replacement parts that could affect the safe use of the treadmill The following statement: “Noise emission under load is higher than without load.“ If applicable, the value of the A-weighted emission sound pressure level at the trainer’s ear Don't change any component by yourself, it maybe got injured or destroyed the treadmill.
-
Page 5: Important Electrical Information
IMPORTANT ELECTRICAL INSTRUCTIONS WARNING! NEVER use a RCD - Residual Current Device (U.S. ver.= GFCI) - wall outlet with this treadmill. As with any appliance with a large motor, the RCD/GFCI will trip often. Route the power mains cord away from any moving part of the treadmill including the elevation mechanism and transport wheels. -
Page 6: Important Operation Instructions
IMPORTANT OPERATION INSTRUCTIONS NEVER operate this treadmill without reading and completely understanding the results of any operational change you request from the computer. Understand that changes in speed and incline do not occur immediately. Set your desired speed on the computer console and release the adjustment key. The computer will obey the command gradually. -
Page 7: Assembly Instructions
ASSEMBLY INSTRUCTIONS UNPACKING 1. Cut the straps and open box. 2. Locate the hardware package. The hardware is separated into four steps. Remove the tools first. Remove the hardware for each step as needed to avoid confusion. The numbers in the instructions that are in parenthesis (#) are the item number from the assembly drawing for reference. ASSEMBLY TOOLS -OK #112. - Page 8 STEP1 #79 - Ø10 × 2T #65 - M10 × 60mm Spring Washer Socket Head Cap Bolt (10pcs) (10pcs) STEP2 #74 - Ø3/8" × 25 × 3T Flat #79 - Ø10 × 2T #63 - M10 × 35mm Socket Washer Spring Washer Head Cap Bolt (6pcs)
- Page 9 STEP 1 1. Loosen the 8 screws holding the MOTOR COVER (37) in place and remove the cover. 2. Uncoil wiring harness and run wires through the RIGHT UPRIGHT (7). 3. Use 5 BOLTS (65) and 5 LOCK WASHERS (79) to attach the RIGHT UPRIGHT (7) to the MAIN FRAME (1).
- Page 10 STEP 2 1. Install MAIN PANEL (3) onto the uprights using 6 BOLTS (63), 6 LOCK WASHERS (79) and 6 FLAT WASHERS (74). 2. Run the wiring harness through the MAIN PANEL (3) as shown in the illustration. 3. Tighten all bolts and washers on both uprights (7 and 8) from previous step.
- Page 11 STEP 3 1. Wires should be away from the console mounting bracket. 2. Install the CONSOLE (54) using 4 BOLTS (68). 3. Connect wiring harness to CONSOLE (54). 4. Attach CONSOLE BRACKET COVER (49) to MAIN PANEL using 4 BOLTS (68). -10-...
- Page 12 STEP 4 1. Attach LEFT OUTER HANDRAIL COVER (48) to MAIN PANEL using 2 SCREWS (83) and 2 FLAT WASHERS (75). -11-...
- Page 13 STEP 4 2. Attach LEFT INNER HANDRAIL COVER (47) to MAIN PANEL using 5 SCREWS (83). 3. Attach LEFT LOWER UPRIGHT COVER (40) to MAIN FRAME (1) using 2 SCREWS (83), 2 FLAT WASHERS (75), and 1 long SCREW (69). 4.
-
Page 14: Console Operation
CONSOLE OPERATION Integrated adjustable fan for workout comfort Premium, Ultra-bright blue LED display Easy to read LED heart rate graph Lap counter Large LED matrix window Tablet friendly reading rack holder Accessory trays for secure placement of Ergonomically Water bottles, keys, friendly hand grips smartphones, etc. -
Page 15: Quick Start
Grip Pulse signal. You may use the Grip Pulse feature while in Heart Rate Control. The CT900 will also pick up wireless heart rate transmitters that are Polar compatible, including coded transmissions. -
Page 16: Programmable Features
PROGRAMMABLE FEATURES The Spirit Fitness CT900 offers a variety of exercise program options to choose from: Manual, Four Preset Programs (Hill, Fat Burn, Cardio, Interval), 5K Run, Heart Rate Control, High Intensity Interval Training (HIIT), and Nine Fitness Testing Protocols: Gerkin, WFI, Army (pft), Navy (prt), Air Force (prt), Marines (pft), Law Enforcement (peb), U.S. - Page 17 PRESET PROGRAMS SPEED/INCLINE SETTINGS The preset program Speed and Incline levels are shown in the chart below. The Speed numbers shown in the chart indicate a percentage of the top speed of the program. For instance, the first Speed setting for P1 (Program 1, Hill) shows the number 20. This means that this segment of the program will have a speed that is 20% of the top speed for the program (The user sets the top speed in the procedure above).
-
Page 18: Air Force
5K RUN This program automatically sets a 5K distance as your goal. The track display will show one loop that is the equivalent of 5 kilometers and the Distance window will also show 5K to start. When the program begins the Distance will count down; once it reaches zero the program ends. *Please note that the Speed readout is in MPH if the console is not set to Metric. - Page 19 NAVY A timed 1.5 mile/ 2.4 kph run. You control the speed manually. Maximum time allowed to pass the test: For more detailed information, visit: http://bit.ly/SF-Navy MARINES A timed 3 mile/ 4.8 kph run. You control the speedmanually. Maximum time allowed to pass the test: For more detailed information, visit: http://bit.ly/SF-Marines COAST GUARD A timed 1.5 mile/ 2.4kph run.
- Page 20 GERKIN The Gerkin protocol, also known as the fireman’s protocol, is a sub-max Vo2 (volume of oxygen) test. The test will increase speed and elevation alternately until you reach 85% of your Max heart rate. The time it takes for you to reach 85% determines the test score (VO2max) as shown in the chart below. Stage Time Speed...
- Page 21 The WFI test is a modified Gerkin protocol. The actual test is the same as the Gerkin chart above, but the score is calculated differently. Before the Gerkin/ WFI Test: 1. Make sure you are in good health; check with your physician before performing any exercise if you are over the age of 35 or persons with pre-existing health conditions.
- Page 22 WHAT YOUR SCORE MEANS VO2max Chart for males and very fit females 18-25 26-35 36-45 46-55 56-65 years years years years years years excellent >60 >56 >51 >45 >41 >37 good 52-60 49-56 43-51 39-45 36-41 33-37 above average 47-51 43-48 39-42 35-38...
-
Page 23: Heart Rate Program
CHESTER TREADMILL TEST This test has two modes: CTT Performance and CTT Prediction (of Aerobic Capacity). CTT PERFORMANCE CTT Performance is a 12-minute graded, treadmill walk test with a fixed speed of 6.2km/hr designed to assess whether or not the subject can achieve the minimum recommended standard for aerobic capacity, namely 42mlsO2/kg/min. -
Page 24: Safety Tether Cord
6. Now Message Window is showing ADJUST BODY WEIGHT THEN PRESS ENTER with Incline Window blinking. Use Up/Down keys or numeric keys to adjust. After the weight is set, press Enter button again. 7. Now Message Window is showing ADJUST HEART RATE THEN PRESS ENTER with Speed Window blinking. -
Page 25: Heart Rate Training
HEART RATE TRAINING The old motto, “no pain, no gain”, is a myth that has been overpowered by the benefits of exercising comfortably. A great deal of this success has been promoted by the use of heart rate monitors. With the proper use of a heart rate monitor, many people find that their choice of exercise intensity is either too high or too low and exercise is much more enjoyable by maintaining their heart rate in the desired benefit range. -
Page 26: Rate Of Perceived Exertion
RATE OF PERCEIVED EXERTION Heart rate is important but listening to your body also has a lot of advantages. There are more variables involved in how hard you should workout than just heart rate. Your stress level, physical health, emotional health, temperature, humidity, the time of day, the last time you ate and what you ate, all contribute to the intensity at which you should workout. -
Page 27: Using A Heart Rate Transmitter
USING A HEART RATE TRANSMITTER (OPTIONAL) How to wear your wireless chest strap transmitter: Attach the transmitter to the elastic strap using the locking parts. Adjust the strap as tightly as possible as long as the strap is not too tight to remain comfortable. -
Page 28: General Maintenance
GENERAL MAINTENANCE Belt and Bed - Your treadmill uses a very high-efficient low-friction bed. Performance is maximized when the bed is kept as clean as possible. Use a soft, damp cloth or paper towel to wipe the edge of the belt and the area between the belt edge and frame. Also reach as far as practical directly under the belt edge. - Page 29 Adjustments will become less of a maintenance concern as the belt is used. Proper belt tracking is an owner responsibility common with all treadmills. ATTENTION: DAMAGE TO THE RUNNING BELT RESULTING FROM IMPROPER TRACKING / TENSION ADJUSTMENTS IS NOT COVERED UNDER THE SPIRIT WARRANTY. Unplug treadmill before performing any maintenance. -28-...
-
Page 30: Troubleshooting
TROUBLESHOOTING Before contacting your dealer for aid, please review the following information. It may save you both time and expense. This list includes common problems that may not be covered under the treadmill’s warranty. PROBLEM SOLUTION/CAUSE Display does not light 1) Tether cord not in position. -
Page 31: Exploded View Diagram And Parts List
EXPLODED VIEW DIAGRAM -30-... -
Page 32: Parts List
PARTS LIST Part Number Part Description Qty per unit Main Frame Incline Bracket Instrumentation tube Handpulse Assembly Seat Handle Bar (R) Seat Handle Bar (L) Right Upright Left Upright Idler Wheel Assembly AC Motor Front Roller W/Pulley Rear Roller Incline Motor Running Deck Running Belt Bushing... - Page 33 Part Number Part Description Qty per unit Beverage Holder Cover(Bottom) Handlebar Cover Inner(R) Handlebar Cover Outer(R) Handlebar Cover Inner(L) Handlebar Cover Outer(L) LED Console Chin Cover M3 × 5m/m_Phillips Head Screw Safety Key Rear Shroud Rail Pad Console Assembly 30m/m_Handpulse Assembly 450m/m_Connecting Wire(Black) On/Off Switch Top Motor Cover Plate...
- Page 34 Part Number Part Description Qty per unit M5 × 5T_Nyloc Nut M5 × 12m/m_Phillips Head Screw Ø10 × Ø24 × 2T_Nylon Washer M8 × 6T_Luck Nut Rod End Sleeve 450m/m_Connecting Wire(White) 300m/m_Ground Wire 800m/m_Handpulse Wire(SMP3) 800m/m_Handpulse Wire(SMR4) 500m/m_Connecting Wire 350m/m_Conneting Wire(XHP-7) 350m/m_Conneting Wire(XHP-8) 2300m/m_Computer Cable monitor module...