Table of Contents
Advertisement
Advertisement
Table of Contents

Related Manuals for Pentax PocketJet 3


Summary of Contents for Pentax PocketJet 3
- Page 1 Printer User’s Guide The Future of Portable Printing . . . Today!
- Page 2 Symbian OS is a trademark of Symbian Ltd. PALM and PALM OS are trademarks of Palm, Inc. PENTAX and PocketJet are registered trademarks of Pentax Imaging Company PSION is a trademark of Psion PLC. RBRC is a trademark of the Rechargeable Battery Recycling Corporation.
-
Page 3: Table Of Contents
Contents Safety Information...v Printer Features... vii Warranty Information ... viii Chapter 1 Setting Up the Printer Unpacking the Printer ...1 Connecting to an AC Outlet...2 Connecting to a DC Supply ...3 Using the Operation Panel ...4 Main Switch Functions ...4 Power ON ...4... - Page 4 Chapter 3 Tips on Using Paper Inserting Paper...35 Use Pentax Quality Paper ...36 Usage and Handling Instructions...36 Clearing a Paper Jam ...37 Method 1...37 Method 2...37 Chapter 4 Maintaining the Printer Cleaning the Print Head...39 Cleaning the Platen Roller ...41 Cleaning the Printer’s Exterior ...43...
-
Page 5: Safety Information
AC adapter supplied with the printer. The AC adapter allows you to connect to worldwide (100-240 volt) power outlets. The power cord supplied with the PocketJet 3 / 3 Plus AC adapter is designed to fit many 115 volt outlets and is shown below. - Page 6 NiMH battery packs into the trash or municipal waste stream, which is illegal in some areas. Pentax payments to RBRC makes it easy for you to drop the spent battery pack at local retailers of replacement NiMH batteries or at authorized Pentax product service centers.
-
Page 7: Printer Features
• Interface via USB cable or built-in wireless infrared. For both PocketJet 3 and 3 Plus models, a 3-foot (1 meter) USB cable is supplied. The printers may also be used with IrDA capable hosts. -
Page 8: Warranty Information
Pentax provides, free of charge, a one-year limited warranty for your new PocketJet printer. For one year from the date of original purchase, Pentax will repair or replace a failed unit with a new or rebuilt unit when it is returned postpaid to an authorized Pentax service center. A return material authorization number (RMA) and proof of purchase are required—in the United States and Canada call Pentax Customer... -
Page 9: Chapter 1 Setting Up The Printer Unpacking The Printer
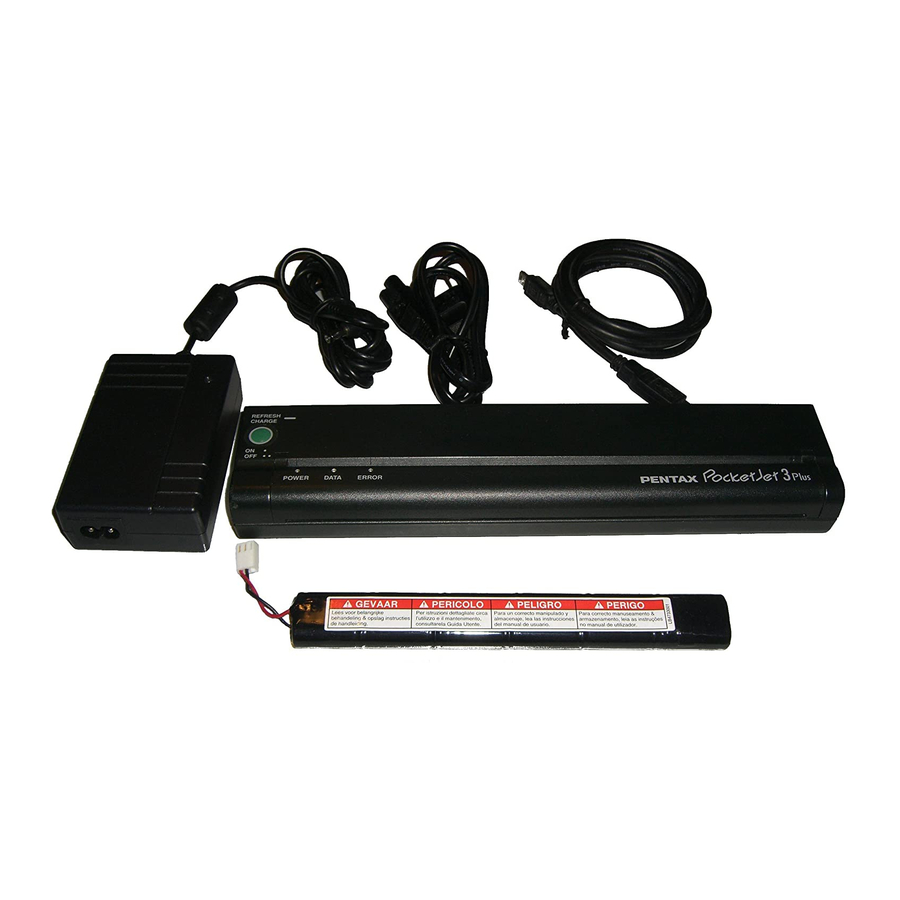
Unpacking the Printer Read and follow any instructions on any Read Me First sheet that may be included in your kit. A typical printer kit contains the items shown in Figure 1. FIGURE 1. The contents of your printer kit Page 1... -
Page 10: Connecting To An Ac Outlet
AC power outlets in the U.S.A., Canada, and some Central and South American countries. A plug adapter may be necessary for AC power in other countries or you can contact your local reseller or Pentax for further assistance. Page 2... -
Page 11: Connecting To A Dc Supply
3. Turn on the vehicle power, then turn on the PocketJet. FIGURE 3. Connecting the printer to DC power The PocketJet printer works from DC sources from 10V to 17V. Operation below 14 volts may slow printing somewhat. Page 3... -
Page 12: Using The Operation Panel
(or eject) paper. In order to assure that printing is complete before permitting a form feed, manual form feeds cannot be performed for five seconds after the printer has received any data. The button must then be held down for 1-1/2 seconds to start the form feed. -
Page 13: Program Mode
• POWER light is blinking green: Battery is charging. • DATA light is steady green: Unprinted data is in the printer buffer or a command has been received from the computer. • DATA light is blinking green: Printer is receiving data. - Page 14 Notes: Page 6...
-
Page 15: Chapter 2 Using The Printer Printing Solutions
* These operating systems do not support printing without the addition of a printing applet. Trial versions of the printing applet are supplied on the driver CD and on the Pentax website. Contact the applet provider to purchase the one you want after the trial period. PocketPC 200 and higher systems may use the WinCE driver if using application software that is enabled to use it. -
Page 16: Driver Installation
A CD with drivers and installation information is provided with your PocketJet kit. The newest information and drivers are available from the Pentax web site, www.pentaxtech.com by selecting “Technical Support.” The supplied driver CD and the website both list the latest driver version numbers. -
Page 17: Configuration Utility
Browse the CD to locate the “Setup” or “Install” program for your operating system, then double click on the “.exe” program icon and follow the on-screen instructions. If the installation does not proceed as explained above, contact Pentax Customer Service. Configuration Utility... -
Page 18: Using The Configuration Program
Connect the supplied USB cable between the printer and host computer, or align the computer and printer Infrared ports. • From the Start Menu, select Programs, select Pentax PocketJet 3, and then select “PocketJet 3 (or 3plus) Configuration” The application will load and will appear as follows: FIGURE 5. - Page 19 When external power is applied to the printer, there are three possible actions that the printer may take. If Auto-On is set to ‘Disabled’, the printer will place itself in a “sleep” state where minimal power is used. The printer’s internal processor is kept alive, but no LEDs are lit and no printing is possible.
- Page 20 Pre-Feed: When the printer is powered on and paper is found in the infeed area, the printer will normally advance the paper a short distance. This is the default ‘Enabled’ operation of the printer. However, roll paper users who leave paper loaded while...
- Page 21 14” or until the Paper Sensor detects that no paper remains in the input of the printer. Note that either the end of a cut sheet, or the black mark printed on the back of certain roll and perforated paper will be detected as the end of a page.
-
Page 22: Bottom Margin
about 0.27” and 0.06”, respectively. Printable width is set to 8.16” with 0.17” margins on either side. ‘A4’ size assumes an 8.27 x 11.7” (210 x 297mm) in page, and sets a total printable height of 11.36” (299.4mm), and top and bottom margins of about 0.27”... -
Page 23: Left Margin
Left Margin: This setting can modify the left margin when the ‘Custom’ ‘Page Size’ is selected. You may choose to avoid any changes by selecting ‘Use Paper Size’ which will assume you wish to use the full 8” available print width. You may also choose to set a number of columns of unprinted left margin. -
Page 24: Right Margin
Right Margin: This setting can modify the right margin when the ‘Custom’ ‘Page Size’ is selected. You may choose to avoid any changes by selecting ‘Use Paper Size’ which will assume you wish to use the full 8” available print width. You may also choose to set a number of columns of unprinted right margin. - Page 25 For example, if your current ‘Text Line Spacing’ is set to 6 lines per inch, you must specify at least ‘6’ lines of form length.
- Page 26 For example, the letter ‘i’ will occupy less horizontal space than the letter ‘w’. The value supplied here will, as noted above, affect the actual width of margin settings. Extended Chars: This command determines what the printer’s ESC/P® emulation does when ASCII characters with values of between Page 18...
- Page 27 ASCII characters 10 and 13. These are the ‘line feed’ (LF) and ‘carriage return’ (CR) characters. The “LF” causes the printer to move down to the next print line, and the “CR” causes the printer to move back to the left margin position. In most cases, these are sent at the ends of lines to position the printer for the next line of text.
-
Page 28: Printer Commands
Main Switch (see page 48). Clicking on ‘Test Page’ will print a page showing the current printer configuration and image quality verification graphics. Pentax PocketJet3 Firmware Version 01.01 AUTO POWER ON PAGE LENGTH PAGE SIZE... - Page 29 Save Config: Clicking on this button will save the configuration as you see it to the file \PJ3Default.cfg and then send this configuration information to the printer. Be sure that all of the settings are adjusted to your liking. Close: Closes this application without sending data to the printer and without saving the current settings.
- Page 30 • Select Printer – Displays the currently available print queues for your printer, along with the port name, to make it easier to select the proper printer in case you have more than one print queue available. This will also modify the Printer selected on the main dialog.
-
Page 31: Connecting To Your Computer
USB cable. 1. Make sure your printer is off before installing the interface cable. 2. Take the printer end of the cable and hold it so the notched metal surface is facing up. 3. Insert the printer end of the cable into the interface connector on the side of the printer. -
Page 32: Via Infrared (Irda)
Pentax Driver CD into the <CD Drive>:\<Printer>\Win9xME folder. Follow the on-screen instructions to complete the wizard installation. Via Infrared (IrDA) If a USB cable is not connected to the PocketJet printer when it is turned on, the infrared connection is automatically enabled. Make sure your computer is set properly to send data via its infrared port, make sure the two infrared ports are aligned, and proceed to print. -
Page 33: Printing
2. Turn the printer on by pressing the main switch once quickly. The POWER indicator lights up. See Figure 8. 3. Insert a sheet of Pentax Quality Paper into the paper input slot. Place the print side of the paper away from you, so that it faces the rear of the printer. -
Page 34: Turning The Printer Off
The green DATA indicator light blinks to indicate that the printer is receiving data from your computer. NOTE: If you have inserted paper into the input slot and the green DATA light stays on (without blinking), the printer has received insufficient data to print an entire page. Press and hold the green Power button to eject the page. -
Page 35: Accessing Advanced Software Features Through Windows
- No Feed Mode Extra Feed - this option is used in conjunction with the No Feed Mode to eject paper by setting the number of lines to be ejected (at 200-dpi for PocketJet 3 or 300-dpi for PocketJet 3 Plus) after the end of a document. -
Page 36: Windows Ce
1) Serial Handshake – Not used at this time. 2) Port Buffer Size – Controls the largest block of data sent to the printer port at one time. Set this to the largest value that works reliably on your CE device (larger=faster). -
Page 37: Non-Perforated Roll Paper Usage
For example, 200 lines equal 1 inch. On a PocketJet 3, this allows paper advancement from the print head area inside the printer to a position outside the printer. This provides for a “tear-off”... -
Page 38: Perforated Roll Paper Usage
D. Multipage Documents with “tear off” for EACH page Note: This feature is only available with Win 9x/Me and has recently been added to the Win2k/XP driver (check the Pentax website for the latest driver). Select “Prompt” for Win 9x or “Roll Paper Pause” for Win 2k/XP for Paper Source on the “Paper”... -
Page 39: Installing The Battery
Installing the Battery 1. Open the printer’s battery cover by pressing the cover latch. Push the cover away from the AC adapter receptacle. See Figure 10. FIGURE 10. Opening the Battery Cover 2. Swing the cover open and remove it. - Page 40 4. Grasp the battery removal ribbon, which is attached to the inside of the battery compartment. See Figure 12. CAUTION: If you forget to hold on to the ribbon, you may accidentally insert the battery on top of it. Then you won’t be able to remove the battery by pulling the ribbon.
-
Page 41: Removing The Battery
Removing the Battery 1. Open the printer’s battery cover by pressing the cover latch. Swing the cover open and remove it. 2. Pull out on the battery removal ribbon as shown in Figure 13 until the battery starts to tilt out of its compartment. -
Page 42: Charging The Battery
20 mA to trickle charge the battery. Stopping the Charge Process If you want to stop the printer while it is in Charge mode, press the main switch twice quickly. Tips on Using the Battery Darker prints discharge the battery faster than lighter prints do. -
Page 43: Chapter 3 Tips On Using Paper Inserting Paper
See Figures 15 and 16, pages 37 and 38. Pull the paper out, close the cover, and reinsert paper. • If the printer does start to print, wait for the page to be printed and then reprint that page if necessary. -
Page 44: Use Pentax Quality Paper
Use Pentax Quality Paper Pentax guarantees optimum compatibility with your PocketJet printer when you use Pentax Quality Paper. This paper is a thermal paper, which eliminates the use of toner, ribbons or ink. It has been specifically designed and tested for optimal support for the PocketJet printer family. -
Page 45: Clearing A Paper Jam
This can be repeated as many times as necessary. If this does not move the jammed paper out of the printer, use Method 2 below. - Page 46 2. Gently pull the paper out of the printer. Pulling in either direction is acceptable. See Figure 16. FIGURE 16. Pulling jammed paper out of the printer 3. Close the release cover. 4. Reinsert a new sheet of paper in the printer and restart the job.
-
Page 47: Chapter 4 Maintaining The Printer
17. The printer pulls the cleaning cloth through. 5. The roller movement will stop automatically after about 60 seconds, and the printer returns to an idle state. If you press the main switch before 60 seconds has elapsed, this will toggle the feed motor on and off. Pressing the main switch twice quickly will shut off the printer. -
Page 48: Inserting The Cleaning Cloth
NOTE: Don’t throw the cleaning cloth away after you clean the print head. It should last for the life of the printer. Keep the cleaning cloth with your printer supplies and use it whenever you need to clean the print head. -
Page 49: Cleaning The Platen Roller
Cleaning the Platen Roller Dirt and debris on the platen roller can make the roller feed paper into the printer at an angle, degrade the quality of the printed image, or both. 1. Make sure the printer is powered on without paper loaded. - Page 50 Don’t throw the cleaning cloth away after you clean the platen roller. It should last for the life of the printer. Keep the cleaning cloth with your printer supplies and use it whenever you need to clean the platen roller or the print head.
-
Page 51: Cleaning The Printer's Exterior
Cleaning the Printer’s Exterior Should the outside of the printer become dirty, clean it using a soft cloth moistened with water. If necessary, add a very small amount of a mild soap such as a liquid dishwashing detergent. CAUTION: Avoid saturating the cloth. Do not allow water to get inside the printer. - Page 52 Notes: Page 44...
-
Page 53: Chapter 5 Reference
Chapter 5 - Reference Indicator Lights The indicator lights tell you about the current status of the printer. Indicator Light Table POWER DATA Solid ERROR External power in use Battery in use, > 14.0 Volts Battery in use, > 13.1 Volts Battery in use, >... -
Page 54: Indicator Light Warnings
Indicator Light Warnings The POWER indicator light does not light The printer is receiving no power. If you are using the AC adapter, make sure it is connected properly. See page 2, “Connecting to an AC Outlet.” Make sure the AC power outlet is “live.” If you are using a DC adapter, make sure power is connected and that the fuse is good. - Page 55 Time-Out When Charging The printer believes that too much time was required to bring the battery up to a normal charge voltage. A maximum of 150 minutes is allowed for the charging cycle. This is an indication that the battery should be replaced.
-
Page 56: Self-Test Feature
“Service Mode”. The red DATA light will illuminate. 3. Insert a piece of Pentax Quality paper in the printer. The test page will print automatically. After the print is complete, the printer will return to an idle state. -
Page 57: Chapter 6 Troubleshooting Overview
Look through the troubleshooting tips in this chapter for help correcting the problem. If none of these suggestions works: • If you are in the U.S., call Pentax Technical Support at 1-800-543- 6144 (extension 1820) from 8 AM to 5 PM Mountain Time, Monday through Friday. -
Page 58: Paper Problems
Paper moves through the printer, but nothing appears on the paper Make sure you are using Pentax Quality paper and that you are loading it properly with the print side away from you. See page 35, “Inserting Paper.” Also, check the Print Density setting using the “Advanced Software Features,”... - Page 59 Make sure the release cover was not left open during printing. If it is open, close it completely. Make sure the paper is not slipping in the printer. If it is, make sure the print head and platen roller are clean. See Chapter 4, “Maintaining the Printer.”...
-
Page 60: The Top Margin Is Incorrect
Make sure the software application or the printer driver has been set to print the same size paper that you are loading into the printer. If the application or printer driver has been set to print a different width paper, the image will not print in the proper horizontal position. -
Page 61: Pages Don't Print
If you have already inserted paper in the printer, take the paper out and re-insert it to make sure the printer knows paper is ready. If that doesn’t work, you may need to turn the printer off, turn it back on, and restart the print job. -
Page 62: Windows Ce-Related Problems
Make sure the printer driver is not inadvertently set to “No Feed Mode.” You may advance the paper position by pressing and holding the main switch while paper is loaded. The printer ejects a partially printed page, and the green DATA indicator light remains lit or blinking Make sure the Paper Size selection is correct using the application’s... -
Page 63: Chapter 7 Technical Information Specifications
Weight: 1.12 lb. (513 g) including battery Direct thermal printing PocketJet 3 - 203 (H) by 200 (V) dpi PocketJet 3 Plus – 300 (H) by 300 (V) dpi 11 levels – 0 (lightest) to 10 (darkest) (Adjustable by both driver and Configuration Utility) -
Page 64: Interfaces
(text portions only). Operating: 41º to 95 F (-10º to 35º C) Note: Operation at low temperatures may slow the printer or cause it not to print at all. Storage: 5º to 122º F (-15º to +50º C) Operating: 30-80% RH, non-condensing... -
Page 65: Regulatory
Battery Charging Circuit Regulatory Safety (Power Supply) Standby: “Sleep” (externally powered, printer powered off): 20mA @ 14.4VDC (approx 1.15W). NiMH, 14.4 VDC, 360mAH Over 100 pages per full 100% charge, tested at 68 degrees F (20 degrees C) with 5% density per page. - Page 66 For PocketJet 3 units sold in the U.S.A., the following document applies. Page 58...
- Page 67 For PocketJet 3 units sold in the Europe, the following document applies. Page 59...
- Page 68 For PocketJet 3 Plus units sold in the U.S.A., the following document applies. Page 60...
- Page 69 For PocketJet 3 Plus units sold in the Europe, the following document applies. Page 61...
- Page 70 For PocketJet 3 Power Supply units sold in the U.S.A., the following document applies. Page 62...
- Page 71 For PocketJet 3 Power Supply units sold in the Europe, the following document applies. Page 63...
-
Page 72: Radio & Television Interference
The use of a shielded cable is required to comply with Class B limits of FCC rules. Any changes or modifications not expressly approved by Pentax could void the user’s authority to operate this equipment. You may purchase a booklet prepared by the FCC entitled “Interference Handbook,”... -
Page 73: Canadian Regulations
Bescheinigung des Herstellers/Importeurs Hiermit wird bescheinigt, dab der/die/das ..PENTAX Thermodrucker PT-A4202 (‘PocketJet 200’) ... PENTAX Thermodrucker PT-A4303 (‘PocketJet II’) .. - Page 74 Notes: Page 66...
-
Page 75: Chapter 8 Ordering Information
For the name of the closest dealer, call the following numbers: • If you are in the U.S., call Pentax at 1-800-543-6144 from 8 a.m. to 5 p.m. Mountain Time, Monday through Friday, and ask for Mobility Products Sales. - Page 76 • If you are outside the U.S., contact the dealer where you purchased your printer for information about ordering supplies, accessories and replacement parts. Notes: Page 68...
-
Page 77: Index
Cleaning Mode 21, 39, 41 Cleaning Cloth 39-43, 67 Platen Roller 41, 42, 50, 51 Print Head 39-42, 51 Printer’s Exterior 43 Clearing a Paper Jam 37, 50 Configuration Options 10-19 Configuration Utility 9 Connecting to a DC Supply 3... - Page 78 DC Adapter 25, 46 DC Supply 3, 26 Declarations of Conformity 57-63 Density Modes 27 Direct Thermal Technology vii, 55 Drivers, Printer/Software vii, 7-9, 29 Driver CD viii, 7, 8, 24, 27 Driver Installation 8 Errors 48 Indicator Light Table 45,46...
- Page 79 Paper Inserting 35, 50-52 Jam, Clearing 37, 38 Problems 50 Pentax Quality viii, 25, 36, 48, 50, 51, 67 Sizes 13, 14, 28, 30, 55 Tips on Using 35 Perforated Roll Paper 12, 13, 22, 28, 30, 56, 67 PDA 7, 8...
- Page 80 Test Page 20 Tips on Using Paper 35 Tips on Using the Battery 34 Troubleshooting 49 Turning the Printer ON 25 Turning the Printer OFF 27 Unpacking the Printer 1 USB Cable 8, 10, 23, 24, 47, 56, 67 Use Recommendations v...
- Page 81 Variable Length Forms 29 Vehicle Mounts 67 Vehicle Power vii, 3 Warranty Information viii Warranty Registration viii, 7 Windows 2000 7, 27-30 Windows 3.1 29, 52 Windows 95 7, 23, 24, 27, 29 Windows 98 23 Windows CE 7, 27, 28 Windows CE-related Problems 54 Windows XP 7, 27-30 Page 73...
- Page 82 PENTAX Imaging Company 600 12 Street, Suite 300 Golden, CO 80401 USA 303-460-1600 Fax: 303-460-1628 E-mail: info@pentaxtech.com Internet: www.pentaxtech.com Pentax Technologies Europe, nv Weiveldlaan 3-5 1930 Zaventem (Belgium) Tel: +32.2.306.1190 Fax: +32.2.306.1199 E-mail: info.europe@pentaxtech.be Technical Support In US: 1-800-453-6144, ext. 1820 8 a.m.