Table of Contents
Advertisement
Advertisement
Table of Contents

Related Manuals for Philips AVENT SCD620


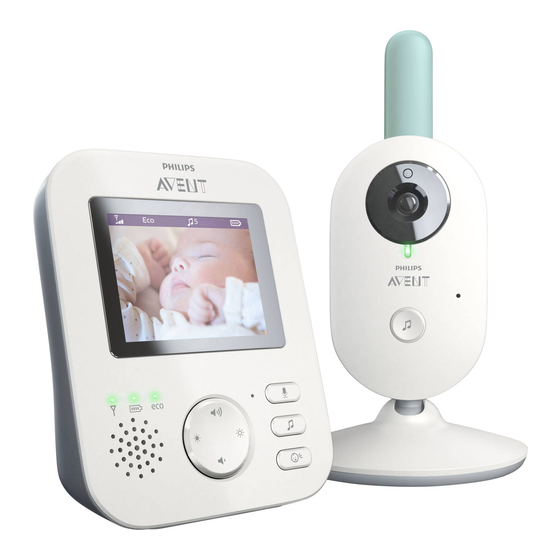
Summary of Contents for Philips AVENT SCD620
- Page 1 SCD620...
- Page 3 9 10...
- Page 5 English 6...
- Page 6 English Introduction Congratulations on your purchase and welcome to Philips Avent! To fully benefit from the support that Philips Avent offers, register your product at www.philips.com/welcome. The Philips Avent video baby monitor provides you with round-the-clock support and it allows you to see your baby day and night from anywhere in the house.
- Page 7 English operation of this baby monitor or your use of it and therefore do not accept any liability in connection with your use of this baby monitor. Danger - Never immerse any part of the baby monitor in water or any other liquid. Do not place the appliance where water or any other liquid can drip or splash onto it.
-
Page 8: Preparing For Use
English - All required markings on the baby unit, parent unit and power adapter are located on the bottom of the baby unit, parent unit and power adapter. Compliance with standards - This product complies with the radio interference requirements of the European Community. -
Page 9: Using The Baby Monitor
English 20°C - When you charge the parent unit for 3 hours, it can be used cordlessly for approx. 10 hours. - If the parent unit is switched on during charging, charging takes approximately twice as long. 3 hrs 10 hrs - When the rechargeable battery of the parent unit is almost empty, the battery status light turns red and the parent unit beeps. - Page 10 English 2 When the baby unit is on, the power-on light on the baby unit lights up green. Note: The power-on light on the baby unit always lights up green, even when there is no connection with the parent unit. 3 Make sure that the parent unit and the baby unit are at least 2.5 meters/ 8.2 feet away from each other to avoid acoustic feedback.
- Page 11 English Note: It takes less than 10 seconds to establish the link between the parent unit and the baby unit. 20°C When the baby unit is turned off, the parent unit will show the out of range image. Make sure that the baby unit is switched on. If no connection has been established, the link light turns red, the parent unit beeps three short beeps every 20 seconds and the out-of- range image appears on the display.
-
Page 12: Operating Range
English 4 Adjust the baby unit in a way that ensures the best visibility of your baby. The baby unit can be rotated to position it in the desired way. Operating range The operating range is up to 50 meters / 165 feet indoors and 300 meters / 985 feet outdoors. - Page 13 English 1 Press the top or bottom part of the control button to adjust the volume. Tip: Make sure that the volume is adapted to the current conditions. Under noisy conditions, the vibration alert can be turned on as well. 20°C The volume bar appears on the display to show the selected volume.
- Page 14 English With the baby monitor on, you can switch between these 4 different modes by pressing the mode button on the side of the parent unit. The display shows the selected mode. The selected mode is also indicated in the status bar. When turning on the device, the mode that was last used will be active.
-
Page 15: Eco Mode
English When the AUDIO mode is activated, the display of the parent unit switches off. After 3 seconds the display will completely turn off and the status bar AUDIO 20°C will disappear. Note: The status bar is not visible when the display is off. Note: The link light shows that the parent unit is still on and connected to the baby unit. - Page 16 English 1 Press the mode button on the side of the parent unit to switch to ECO mode. Note: When the display is on, the selected mode will be visible in the status bar. The status bar is not visible when the display is off. When the ECO mode is activated the display and sound of the parent unit switch off when no sound is detected for 20 seconds.
- Page 17 English 2 Press the right part of the control button to enter the list of lullabies. 3 Press the top or bottom part of the control button to scroll through the list of lullabies. Lullaby Songs 1 Rock-a-Bye Baby 2 Twinkle, Twinkle 3 Hush, Little Baby 4 Brahm’s Lullaby 5 Golden Slumbers...
- Page 18 English 8 Press the left part of the control button and then press the bottom of the control button to select the volume options of the lullaby menu. Press the right part of the control button to access the lullaby volume levels. 9 Press the top or bottom part of the control button to adjust the volume.
- Page 19 English The latest lullaby selected on the parent unit starts to play on the baby unit and is repeated continuously for approximately 15 minutes. To stop the lullaby on the baby unit, press the lullaby on/off button on the baby unit. 15 min Talk-back You can use the talk-back button on the parent unit to talk to your baby.
-
Page 20: Belt Clip
English 2 Press the top or bottom part of the control button to select the desired sensitivity level. 20°C If your baby only makes soft sounds, the sensitivity of the baby unit needs 20°C to be set to a high sensitivity level on the parent unit. The louder your baby sounds, the lower the sensitivity can be set on the 20°C parent unit. - Page 21 English Warning: Do not use cleaning sprays or liquid cleaners. 1 Switch off the baby unit, remove the power adapter from the baby unit and remove the power adapter from the wall socket. 2 Clean the baby unit with a dry cloth. Note: Fingerprints or dirt on the lens of the baby unit may affect the camera’s performance.
-
Page 22: Ordering Accessories
English 4 Clean the parent unit with a dry cloth. 5 Clean the adapters with a dry cloth. Storage When you are not going to use the baby monitor for a long time, store the parent unit, the baby unit and the adapters in a cool and dry place. Ordering accessories To buy accessories or spare parts, visit www.shop.philips.com/service or go to your Philips dealer. -
Page 23: Frequently Asked Questions
English Removing the rechargeable battery Note: We strongly advise you to have a professional remove the rechargeable battery. Only remove the rechargeable battery when you discard the appliance. Make sure the battery is completely empty when you remove it. Only the parent unit includes a battery. - Page 24 English HOW TO USE / CONNECTING THE UNITS Why can’t I establish a The baby unit and the parent unit are probably close to the outer limits of connection? the operating range or there is interference from other 2.4 GHz wireless Why is the connection devices.
- Page 25 English HOW TO USE / CONNECTING THE UNITS * ECO mode: The display and sound of the parent unit switch off when no sound is detected for 20 seconds. Eco Mode reduces power consumption during quiet times while keeping you connected to your baby. In ECO mode the ECO LED light is green and the device will operate on a different connection modus.
- Page 26 English NOISE/SOUND Question Answer Why does the parent The parent unit and baby unit may be too close to each other. Make sure unit and/or baby unit the parent unit and the baby unit are at least 2.5 meters / 8.2 feet away produce a high-pitched from each other.
- Page 27 English OPERATING TIME / RANGE Question Answer Why does my baby The specified operating range of 300 meters /985 feet is only valid monitor manage a much outdoors in open air and in the line of sight. Depending on the surroundings smaller distance than and other disturbing factors, the operating range may be smaller (see also specified in this user...
- Page 28 English Wall mount Printing instructions: Print this page in scale 100% and use the template to accurately mark the position of the holes for the screws on the the wall.
- Page 32 www.philips.com/Avent Philips Consumer Lifestyle BV Tussendiepen 4, 9206 AD Drachten, the Netherlands Trademarks owned by the Philips Group. ©2015 Koninklijke Philips N.V. All rights reserved Specifications are subject to change without notice. © 2016 Koninklijke Philips N.V. All rights reserved 4213.600.0002.1 (3/2016) >75% recycled paper >75% papier recyclé...