Table of Contents
Advertisement
3.
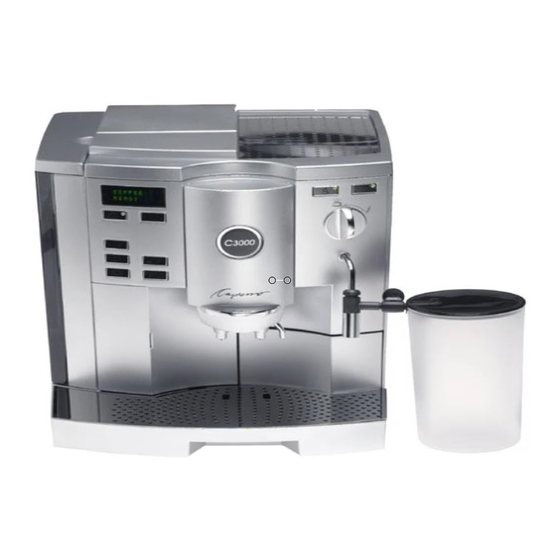
FIG. 1
1.
Height-Adjustable Coffee Spout
2.
Operating Display (See Fig.2)
3.
Removable Water Tank
4.
Low Water Flotation Device(Inside)
5.
Claris Water Care Cartridge
(Not Installed)
6.
Lid for Water Tank
7.
Holder for Claris Water Cartridge
8.
Aroma Protection Lid
9.
Cover for Bean Container
9a. 800 Number and Serial Number
10. Lid for Ground Coffee Funnel
11. Opening for Ground Coffee
12. Warming Plate
13. Steam System (See Fig.3)
14. Hot Water Release
15. Milk Container
15a. FrothXpress (See Fig.4)
16. Used Coffee Container
17. Removable Grid
18. Removable Drawer/Used Water Tray
19. Cover for Programming Buttons
(See Figure 3A)
Advertisement
Table of Contents

Related Manuals for Capresso C3000


Summary of Contents for Capresso C3000
-
Page 1: Drawings
FIG. 1 Height-Adjustable Coffee Spout Operating Display (See Fig.2) Removable Water Tank Low Water Flotation Device(Inside) Claris Water Care Cartridge (Not Installed) Lid for Water Tank Holder for Claris Water Cartridge Aroma Protection Lid Cover for Bean Container 9a. 800 Number and Serial Number 10. - Page 2 FIG. 3 FIG. 3A FIG. 4 FIG. 2 Display Dialog System Steam Portion Button FrothXpress Ground Coffee Button Parts of On/Off Button Selector Switch for Program Button Steam Nozzle Special Coffee Button Coffee or Hot Water Q-/Q+. Minus/Plus Buttons Connector 1-Cup Small Button Permanent Steam Button Claris Button (for...
- Page 3 FIG. 8a FIG. 8b FIG. 5 FIG. 7 FIG. 6 FIG. 9 FIG. 12 FIG. 10 FIG. 11...
- Page 4 FIG. 13 FIG. 14 FIG. 15 FIG. 16 • Maximum Milk • Reduced Milk • No Milk Flow Flow and Milk Froth Flow and Milk Froth • Milk Warm • Milk Hot FIG. 19 FIG. 20 FIG. 18 FIG. 17 Straw...
- Page 5 FIG. 23 FIG. 21 FIG. 22 FIG. 24 FIG. 25 FIG. 26...
-
Page 6: Table Of Contents
15.6 Programming Claris Filter Cartridge ...... 20 The C3000 ............9 15.7 Programming Water Hardness ....... 20 Welcome to the Capresso C3000......9 15.8 Programming Economy Mode ........ 20 A Word About “Crema Coffee” ......9 15.9 Programming Timer Clock ........21 Please Don’t/Please Do ........ -
Page 7: Product Registration
4. A WORD ABOUT “CREMA COFFEE” (PRESSURE to 9 hours after last use, and you can also program the C3000 to BREWED COFFEE) automatically turn on at a certain time every day. Additionally,... -
Page 8: Please Don't/Please Do
In the U.S., espresso roasting results mostly in a dark- er roast than espresso roasting in Europe. 6. FACTORY SETTINGS The C3000 leaves the factory with the settings described below. 5. PLEASE, DON’T... (or you will void your warranty To change any of these settings, see the sub-chapters under protection): “Programming.”... -
Page 9: Preparing The Machine For The First Time
• Coffee temperature: high • Remove water tank and rinse well with clear tap water. Other setting: normal • Fill water tank and replace. Make sure that tank engages well. • Steam portion: 14 seconds DISPLAY • FILL SYSTEM / PRESS STEAM. Other settings: 3 to 250 seconds in 1 second intervals DISPLAY •... -
Page 10: Adjusting The Grinder
9. RINSING THE MACHINE off (see chapter 11) HARDNESS LEVEL 1: grains 2-9 The C3000 will automatically complete a rinse cycle when the machine is turned off (or when the machine turns off HARDNESS LEVEL 2: grains 10-19 automatically). When the machine is cold and you turn the... -
Page 11: Claris Water Cartridge
11. CLARIS WATER CARTRIDGE • Close the holder for the cartridge so that it engages in the The C3000 comes with two free Claris water cartridges. The Claris water tank (Fig.12). water cartridge is specially made for use with the Capresso C3000. -
Page 12: 11B. Replacing The Claris Filter
Most people prefer pressure brewed coffee to drip coffee. 11b. Replacing the Claris Filter From small to large, here is the coffee terminology: The C3000 will now automatically monitor the filter. After approx. • oz. to 1 oz. of coffee is called a “Ristretto” (a short espresso). -
Page 13: 12A. Using Ground Coffee
14. FROTHING MILK • Open cover (Fig.1, 19). The Pump-Auto-Cappuccino System (FrothXpress) allows you to heat and froth milk directly into your cup. Your C3000 comes • Press the button (Fig. 3A; N); scoop button. with the following utensils to froth milk:... -
Page 14: Assembly Of The Frothxpress System
Steam will be dispensed for the programmed time 14.3 Frothing Into a Cup STEAM PORTION) and then it will stop automatically. DISPLAY The C3000 is ready to froth as long as both green lights in the steam buttons (Fig.3,K and M) are illuminated. If the lights are... -
Page 15: Hot Chocolate
(it will take less than a minute): • Disconnect the milk container from the joint (Fig. 4; Z from Y). Before leaving our factory, many of the functions of the C3000 are set to enable you to obtain coffee without any additional •... -
Page 16: Programming Powder Quantity
(ex. 1 small cup; • You can go the next setting by pressing the button. Fig.2,D). 15.2 Programming Coffee Temperature • The C3000 will start grinding and the will show the DISPLAY • COFFEE READY. -
Page 17: Programming Steam Portion
• Coffee button you selected (ex. “1 small cup”). environment. The advantage is that the frothing will stop automatically after the programming frothing time has elapsed. • Then it will DISPLAY Please Wait. At the time of programming, the machine will not froth. It will •... -
Page 18: Programming Claris Filter Cartridge
15.7 Programming Water Hardness DISPLAY will show ENOUGH TEA? / CLOSE TAP. (This program will come up only if the program for the Claris • When you have enough hot water in your cup turn the selector Filter Cartridge is set to FILTER NO.) To change the setting switch back to the cup symbol (Fig. -
Page 19: Programming Timer Clock
15.9 Programming Timer Clock • The machine will turn itself on at the programmed time. Programming the timer clock is necessary if an automatic turn- • To switch off the automatic timer proceed as follows: on time is required. • Press the button. -
Page 20: Programming Language Selection
• If this message shows on the display no more coffee can be made until you fill the water container. The C3000 can display its messages in seven languages. • The water container will never be completely empty. The low •... -
Page 21: Emptying The Used Water Tray
• Replace the used coffee container and drawer. • Before emptying the bean bag completely, check to see whether there are any particles that look like stones and • DISPLAY COFFEE READY. remove them. 16.3 Emptying the Used Water Tray 16.6 Removing Stones or Other Foreign Objects •... -
Page 22: Cleaning Metal Contacts
16.8 Cleaning the Frother System 17.1 Cleaning with Special Tablet See chapters 14.7 and 14.8 for details. The C3000 monitors how many coffees are brewed and how often the rinsing program is activated. After approx. 220 16.9 General Cleaning Instructions coffees or after approx.180 rinse cycles the... -
Page 23: Decalcifying
Capresso (use the enclosed mail order form that came with your • The C3000 will start the automatic cleaning program by C3000 or call us at 1-800-220-5701 or order it via the Internet at dispensing water in intervals into the container underneath www.capresso.com). - Page 24 • Turn off your machine by pressing the ON/OFF button selector switch (fig. 3,L) back to the cup symbol. and let it cool down for approx. 5 hours. • The C3000 will now pump the rest of the water/Durgol • Open cover for programming buttons (Fig.1,19). • Press the button (Fig.
-
Page 25: Disposal
(Fig.3, L) back to the cup symbol. or cream from the refrigerator considerably lowers the temperature of the coffee. • The C3000 will now pump fresh water in intervals into the used water tray on the inside. During this process the DISPLAY shows UNIT DECALC./PLEASE WAIT.