Table of Contents
Advertisement
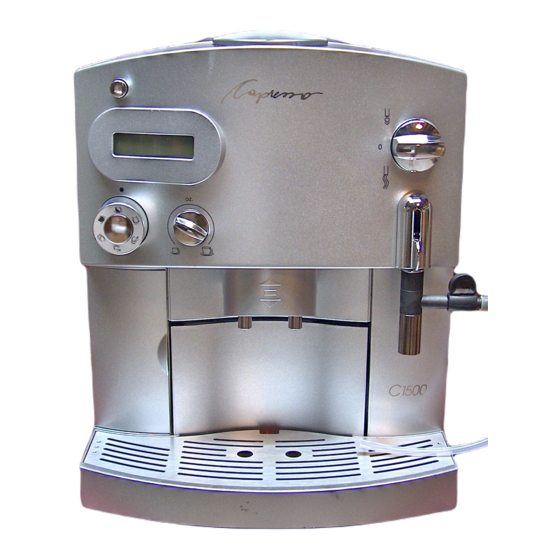
Fig. 1
7
6
5
4
3
2
1c
1b
1a
1
1. Height-Adjustable Coffee Spout
1a. Sticker with Serial Number
1b. Door
1c. Program Dial with "P BUTTON"
2. Two Line Display (see fig. 3)
3. Removable Water Tank
4. Low Water Flotation Device (see fig. 4, call-out #4)
5. CLARIS Water Care Cartridge (installed)
6. Hinged Water Tank Lid
7. Ground Coffee Funnel
8. Lid for Ground Coffee Funnel
9. Lid for Bean Container
10. On/Off Button
10a. Coffee Dial with Coffee Button "BUTTON"
10b. Cup Size Dial
11. Steam/Water Dial
12. frothXpress System
13. Removable Grid (see fig. 1a)
14. Removable Tray (see fig. 1a)
15. Water Hardness Indicator Strip
16. CLARIS Water Care Cartridge (unpacked)
17. Two Cleaning Tablets
18. Measuring Scoop
19. Supporting Tray for Used Coffee Container
(see fig. 1a)
20. Used Coffee Container (see fig. 1a)
8
9
0
10
10a
10b
11
12
13
14
15
16
17
18
Fig. 1a
Traces of Coffee Grounds
in New Machine?
This is normal!
Grinder was tested during
assembly. Despite cleaning
traces of ground coffee
may be found.
20
19
13
14
Advertisement
Table of Contents

Related Manuals for Capresso Capresso C1500


Summary of Contents for Capresso Capresso C1500
- Page 1 Fig. 1 1. Height-Adjustable Coffee Spout 1a. Sticker with Serial Number 1b. Door 1c. Program Dial with "P BUTTON" 2. Two Line Display (see fig. 3) 3. Removable Water Tank 4. Low Water Flotation Device (see fig. 4, call-out #4) 5.
-
Page 2: Assembly View
Steam/Water Dial (SW Dial) Fig. 2 Coffee Position (fig. 2a) Steam Position (fig. 2b) Hot Water Position (fig. 2c) Fig. 3a Fig. 3b Fig. 3c • maximum milk flow frothXpress Assembly • no milk flow and milk froth U. Steam Nozzle •... - Page 3 Nozzle Fig. 7 Fig. 8 Fig. 9 2 scoops max! Ground coffee only 1 CUP X STRONG PRESS BUTTON 5.0 coarse BUTTON Cup Size Coffee Dial fine Dial Fig. 10 Fig.11 Fig. 12 "P BUTTON" seal needs to be in place and clean Fig.
-
Page 4: Table Of Contents
CONTENTS Important Safeguards Illustrations Product Registration ............7 Welcome To The Capresso C1500........7 Equipment ................7 A Word About "Crema Coffee" .......... 8 Pressure Brewing ............... 8 Different Coffee Drinks ............8 Coffee Facts ............... 8 Please Do Not..............9 Please Do... -
Page 5: Product Registration
Please note: Registering your product is part of your warranty. 2. Welcome To The Capresso C1500 Thank you for choosing the Capresso C1500. The C1500 can prepare 1 or 2 cups of excellent, professional-quality espresso or 1 or 2 cups of crema coffee at a time. -
Page 6: A Word About "Crema Coffee
3. A Word About "Crema Coffee" (Pressure Brewed Coffee) According to the majority of coffee experts, grinding, tamping and brewing under high pressure is the ideal process for extracting maximum flavor and aroma. Your C1500 will always produce espresso and coffee with a thick, foamy layer called "crema."... -
Page 7: Please Do Not
4. Please Do Not... To keep your warranty active please follow these instructions: • Never fill instant coffee into the grinder or ground coffee funnel; it can damage the functioning of the brewing chamber. • Never fill sugar coated beans into the bean container (see chapter 7.2 and 8.1). •... -
Page 8: Using Oily Beans
Please note: If you use frozen beans, let them thaw for 3 to 4 hours before adding to the bean container. This will prevent moisture from seeping into the grinder. Never use sugar-coated beans. The sugars will stick to the burrs and clog the flow of ground coffee. -
Page 9: Grinding And Brewing Coffee
8. Grinding and Brewing Coffee a. Make sure the water tank and bean container are filled. b. Select from one of the following options by turning the Coffee Dial (fig. 12) (text in first line only): 1 CUP REGULAR - 1 CUP STRONG - 1 CUP X STRONG - 2 CUPS REGULAR - 1 PREGROUND - 2 PREGROUND Please note: The grinder automatically adjusts the amount of coffee. -
Page 10: Using Hot Water
8.2 Using Hot Water With the hot water function you can produce a cup of tea, a quick soup or add hot water to your coffee, making it less strong. a. Make sure only the steam nozzle is attached (fig.7). b. -
Page 11: Regulating The Frother And Milk Temperature
by a "knocking noise". Caution: Always make sure that you have a container underneath the frothXpress when using the steam function. Otherwise hot steam or hot milk might splatter, which can cause severe injuries. Please note: Skim and 1% milk will produce more froth than 2% and whole milk. 8.4 Regulating Froth and Milk Temperature Maximum milk flow with maximum froth is achieved when the knob sits parallel to the joint (fig. -
Page 12: Automatic Monitoring Controls
9. Automatic Monitoring Controls The C1500 has automatic monitoring controls. The display will show when cleaning, refilling and any other maintenance is necessary. Here are the messages: PLEASE WAIT / HEATING UP The C1500 is heating up. Wait until a different message appears. RINSE MACHINE / PRESS BUTTON You must push the BUTTON. -
Page 13: Changing Parameters
10. Changing Parameters Besides the six different coffee options and the cup sizes you can change a variety of parameters as explained in chapters 10.1 through 10.6. 10.1 Changing the Grinder Fineness Important: You can only adjust the fineness during the actual grinding process. For darker beans, we recommend grinding somewhat coarser (turn the selector to the thicker bars, clockwise);... -
Page 14: Changing The Water Hardness
11. Claris Water Cartridge The C1500 comes with one free Claris water cartridge. The Claris water cartridge is specially made for use with the Capresso C1500, and it: • Reduces the water hardness up to 75%. • Removes (if present) up to 85% chlorine, up to 90% lead, up to 95% copper and up to 67% aluminum. -
Page 15: Installing The Claris Cartridge
the brewing cycle starts, ensuring freshly filtered water every time you make coffee. • Eliminates decalcifying the C1500. When using your Claris water cartridge, you never need to decalcify your machine. • Costs less than 3¢ per cup (based on a 5 oz. cup). •... -
Page 16: Extra Rinse Cycle
• Rinse out water tank daily. • Clean the tray and its components (fig. 1a) with a warm water and mild liquid soap solution. • The water tank, the tray and its components ARE NOT dishwasher safe. • Clean the ground coffee funnel with a dry bottle brush. DO NOT use any liquids for cleaning this funnel. -
Page 17: Decalcifying (Durgol Required)
into the tray. It will repeat this process several times. After approx. 8 minutes the cleaning cycle will stop and the display will show: EMPTY TRAY. e. Carefully remove the tray. There will be water in the tray and in the used coffee container. -
Page 18: Clearing For Transport
d. Fill water tank with approx. 12 oz. (350 ml) of water. Then add about 5 oz. (150 ml) of Durgol and stir. Please note: The total solution should be at or slightly above the "0.5 liter" marking on the water tank. Also: always fill water first, then Durgol. -
Page 19: User Statistics
e. At the same time the machine will push a little bit of water and some steam into the cup underneath the nozzle. The whole procedure will take less than 20 seconds. f. Turn the SW dial to 0-position. The machine will turn off (display off). The next time you turn the machine on the display will show FILL / WATER TANK. -
Page 20: Capresso C1500 Customer Service
Mon. - Fri. 9AM - 9PM; Sat. 9AM - 5PM Eastern Standard Time. If you have any questions, need supplies or if you are not satisfied with your CAPRESSO C1500 please call the above number. When you call after hours, please leave your name and number and we will call you back. -
Page 21: Supplies
14.1 Suppiies Your Capresso C1500 comes with 1 Claris cartridge and 2 cleaning tablets. For prolonged use, we recommend that you have extra cleaning tablets, the Claris filter or the Durgol decalcifying liquid on hand. • Special Cleaning Tablets, Order #1151.10 for 2-pack; 1151.11 for 10-pack. •...