
Related Manuals for Dual XDMA6855


Summary of Contents for Dual XDMA6855
- Page 1 ® ®...
- Page 2 Please read entire manual before installation. • Disconnect negative battery terminal. Consult a qualified technician for instructions. • Avoid installing the unit where it would be subject to high temperatures, such as from direct sunlight, or where it would be subject to dust, dirt or excessive vibration. •...
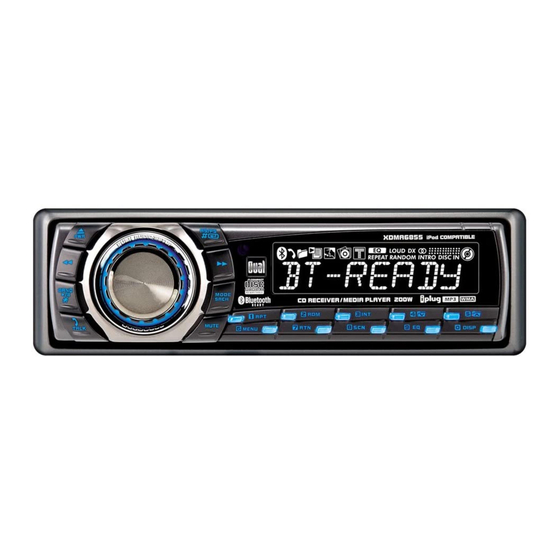
- Page 3 Antenna Connector BLACK Front Preamp Outpu When replacing the fuse, make sure new fuse is the correct type and amperage. Using an incorrect fuse could damage the radio. The XDMA6855 uses one 10 amp ATM fuse located beside the wiring connector.
- Page 4 Preset 4/Folder Down/Key 4 Band/Play/Pause/Key * The XDMA6855 allows playback of your favorite MP3 and WMA files recorded on CD-R and CD-RW discs. Its powerful on-board DSP processor decodes the compressed audio while maintaining near-CD sound quality. An internal SRAM buffer provides ESP (Electronic...
- Page 5 Power Open Volume Up Mute/End Call AS/PS/Enter/Key # Talk/Redial Audio/Setup Preset 5/Folder Up/Key 5 Tune/Track Up Preset 4/Folder Down/Key 4 Display Preset 1/Repeat /Key 1 Volume Down Mode/Search Preset 3/Intro/Key 3 Tune/Track Down Preset 2/Random/Key 2 Band/Play/Pause/Key * Preset 6/Menu/Key 6...
- Page 6 With the unit off, press to allow the front panel to slide down. Gently squeeze the release tab located on the bottom center underside and pull front panel down and away from unit to remove. To install, insert left side first, then push right side to secure.
- Page 7 The clock will display 12-hour AM/PM time in USA frequency spacing mode (PM 10 : 00). In European frequency spacing mode, the clock will display 24-hour time (22:00). Press and hold the for more than 3 seconds to access the setup menu. Press the momentarily to select between the menu functions and rotate the left/right to adjust or activate the...
- Page 8 Press momentarily to select between Volume (default), Bass, Treble, Balance, & Fader. VOLUME BASS TREBLE BALANCE FADER Press until appears then rotate encoder left/right to adjust ( -6 minimum / +6 maximum). Press until appears then rotate encoder left/right to adjust ( -6 minimum / +6 maximum). Press until appears then rotate encoder...
- Page 9 Press momentarily to seek the next strong station. Press for more than 2 seconds, then release. "MANUAL" will momentarily appear in the display. Press momentarily to move radio frequency up or down one step at a time. Press and hold to advance quickly. If tuning is not adjusted for 5 seconds, the unit will return to seek tuning mode (default).
- Page 10 With the label facing up, insert a standard size CD into the CD slot. The CD will automatically begin playback. Press to eject the CD. The unit will change to previous mode of operation (AM, FM, auxiliary input, iPod, or Bluetooth). If the disc is not removed within 10 seconds, the unit will reload the disc.
- Page 11 When an MP3/WMA encoded disc is first inserted, “READING” will appear in the display. Depending on the number of files and folders, this may take several seconds. Press to select between track number/elapsed time (default), clock, track name, directory name, title, artist and album.
- Page 12 Refer to the following button function table when selecting, searching or navigating MP3/WMA files and folders: SRCH Direct Select, Search and Navigate Modes Enter/Confirm Preset #1 A, B, C, 1 Preset #2 D, E, F, 2 Preset #3 G, H, I, 3 Preset #4 J, K, L, 4 Preset #5...
- Page 13 Press for more than 3 seconds, then release. Press again, an " " will flash in the display. Use the buttons in the table on page 12 (32 character maximum input) or the rotary encoder to enter the desired alphanumeric search characters. Press the to advance one character to the right.
- Page 14 After navigating by direct select, alphanumeric search or file/folder navigate modes, the track number and elapsed time will be displayed by default. Press momentarily to select clock, track name, directory name, title, artist and album. Press to select the previous folder. Press to select the next folder.
- Page 15 The following types of discs/files are compatible: • CD-ROM (ISO), CD-R, CD-RW • CD-DA • MP3 data • WMA data The following types of discs/files are not compatible: • WMA files that are protected by DRM (Digital Rights Management). • WMA lossless format •...
- Page 16 An internal buffer provides ESP (Electronic Skip Protection) to virtually eliminate skipping. When playing a disc recorded with regular audio files (CD-DA or .WAV) and MP3/WMA files, the unit will play the MP3/WMA files only. Only MP3 files with filename extension (.mp3) can be played. Only WMA files with filename extension (.wma) can be played.
- Page 17 ® Connecting an iPod requires the cable (sold separately). Once connected, press until "IPOD" appears in the display. The iPod will automatically begin playback. If a song is playing on the iPod before it is connected, it will continue to play. Press to select between elapsed time (default), track number, clock, title, artist and album.
- Page 18 ® Press and hold to fast forward or reverse a song. Press / II to temporarily stop playback. / II again to resume playback. Press Press to play the first 10 seconds of each song. Press again to cancel. Press to continuously repeat selected song.
- Page 19 ® Connecting a Bluetooth device requires first connecting the module (sold separately). When connected to a Dual Bluetooth Ready head unit, the BTM60 supports the HFP (hands-free profile), A2DP (advanced audio distribution profile) and AVRCP (audio video remote control profile).
- Page 20 ® Description Function Press once. An "_" will appear on the display. Input the desired phone number using the 0-9, *, # buttons on the head unit front panel. Press to begin dialing. A phone call may also be placed from your mobile device using the keypad, phone book or speed dial.
- Page 21 ® Options Action Menu Function BT ON Enables the BTM60 Bluetooth Interface Module (sold separately). The Bluetooth icon will flash every 10 seconds. BT OFF Disables Bluetooth support. ACNT ON Allows the BTM60 to automatically (re)connect to the most recently connected mobile device. : Some mobile devices do not support this feature.
- Page 22 A slight adjustment of any custom Dual Electronics Corp. warrants this product to controls may save you a service call. the original purchaser to be free from defects in material and workmanship for a period of one 2.
- Page 23 Problem Cause Action Yellow wire not connected or incorrect Check connections for proper voltage Red wire not connected or voltage (11~16VDC) incorrect voltage Black wire not connected Check connection to ground Fuse blown Replace fuse Speaker wires not connected Check connections at speakers One or more speaker wires touching Insulate all bare speaker wires each other or touching chassis ground...
- Page 24 Toll Free: 1-866-382-5476 www.dualav.com ©2007 Dual Electronics Corp. All rights reserved. Windows Media and the Windows logo are trademarks, or registered trademarks of Microsoft Corporation in the United States and or other countries. iPod is a trademark of Apple Computer, Inc., registered in the U.S. and other countries.