
Related Manuals for Alesis DM7X


Summary of Contents for Alesis DM7X
- Page 1 USER GUIDE ENGLISH ( 3 – 9 ) GUÍA DEL USUARIO ESPAÑOL ( 10 – 16 ) GUIDE D’UTILISATION FRANÇAIS ( 17 – 23 ) GUIDA PER L'USO ITALIANO ( 24 – 30 ) BENUTZERHANDBUCH DEUTSCH ( 31 – 37 )
-
Page 3: English
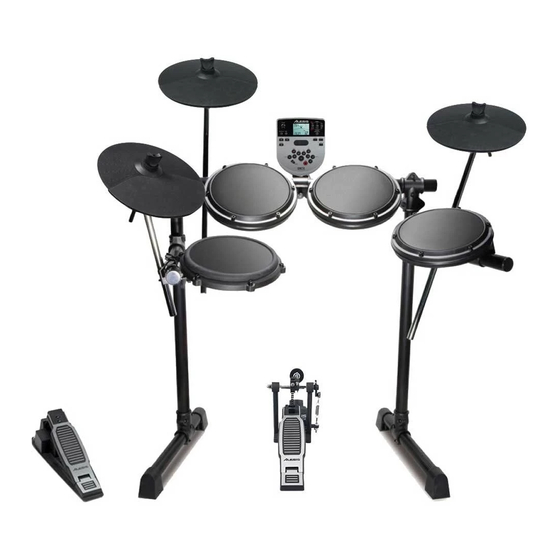
USER GUIDE (ENGLISH) BOX CONTENTS DM7X Module User Guide Cable snake Safety & Warranty Manual Power adapter CONNECTION DIAGRAM * sold separately CRASH 2 TOM 4 CYMBAL PAD* DRUM PAD* COMPUTER* POWER HEADPHONES* MP3 PLAYER* EXTERNAL SOUND MODULE* octave SPEAKERS*... -
Page 4: Front Panel
FEATURES FRONT PANEL DISPLAY – Shows the module's current settings and functions. SONG/PATTERN – In Normal Mode, press this button to enter the Song Menu, where you can select a song or adjust song-related settings. In Learning Mode, press this button to enter the Pattern Menu, where you can select a pattern (full kit plus accompaniment) to play along to or adjust pattern-related... -
Page 5: Top Panel
TOP PANEL OUTPUTS – Use standard 1/4" TRS cables to connect these outputs to a speaker or amplifier system. The level of these outputs is controlled by the VOLUME knob. AUX IN – Use a standard 1/8" stereo cable 1 1 2 to connect this input to an optional audio player (e.g,. -
Page 6: Playing Along With Songs
BASIC FUNCTIONS EDITING & SAVING DRUM KITS IMPORTANT: • To edit and save your kits, you must be in Normal Mode. If the LED above the SONG/PATTERN button is not lit, press and hold PAGE/SELECT until it is. • Remember to save your kits after you have entered the settings you want! First, press KIT until NUM appears in the display. - Page 7 PLAYING ALONG WITH BEATS, RHYTHMS & PATTERNS IMPORTANT: To play along with patterns, you must be in Learning Mode. If the LED under the SONG/PATTERN button is not lit, press and hold PAGE/SELECT until it is. Press one of the Learning Mode buttons to select how you want to play: •...
- Page 8 ADVANCED FUNCTIONS ADJUSTING UTILITY SETTINGS The Utility settings let you further customize your pad settings and adjust the module's MIDI settings. To adjust the Utility settings: Hit the pad whose settings you want to adjust, or press its corresponding PAD SELECT button. Press UTILITY, then press PAGE/SELECT until the desired setting appears in the display: •...
-
Page 9: Midi Settings
Stop recording on your sequencer. Your performance has been recorded. Notes: • Pressing START/STOP to start/stop Song playback generates the MIDI message FA (start) or FC (stop). • When syncing the module with another MIDI device, the DM7X module can only be the master, not the slave. -
Page 10: Español
GUÍA DEL USUARIO (ESPAÑOL) CONTENIDO DE LA CAJA Módulo DM7X; multicable; adaptador de alimentación; guía del usuario; manual sobre la seguridad y garantía DIAGRAMA DE CONEXIÓN * se vende por separado CRASH 2 TOM 4 PAD DE PLATILLOS* PAD DE TAMBOR*... -
Page 11: Panel Frontal
CARACTERÍSTICAS PANEL FRONTAL PANTALLA – Muestra los parámetros y funciones actuales del módulo. TEMA/PATRÓN – En modo normal, pulse este botón para abrir el menú Song (Tema), en el que puede seleccionar un tema o ajustar parámetros relacionados con el tema. En modo de aprendizaje, pulse este botón para abrir el menú... - Page 12 PANEL SUPERIOR SALIDAS – Use cables estándar TRS de 1/4 pulg. para conectar estas salidas a un altavoz o sistema de amplificador. El nivel de estas salidas se controla con la perilla VOLUME. 1 1 2 ENTRADA AUXILIAR – Use un cable estéreo estándar de 1/8 pulg.
- Page 13 FUNCIONES BÁSICAS CÓMO EDITAR Y GUARDAR LOS KITS DE BATERÍA IMPORTANTE: • Para editar y guardar sus kits, debe estar en modo normal. Si el LED que está arriba del botón SONG/PATTERN no está encendido, mantenga pulsado PAGE/SELECT hasta que se encienda. •...
- Page 14 CÓMO TOCAR CON BEATS, RITMOS Y PATRONES IMPORTANTE: Para tocar con patrones de acompañamiento, debe estar en modo de aprendizaje. Si el LED que está debajo del botón SONG/PATTERN no está encendido, mantenga pulsado PAGE/SELECT hasta que se encienda. Pulse uno de los botones de modo de aprendizaje para seleccionar cómo desea tocar. •...
- Page 15 FUNCIONES AVANZADAS CÓMO AJUSTAR LOS PARÁMETROS DE LA UTILIDAD Los parámetros Utility (Utilidad) le permiten personalizar más aún los parámetros de sus pads y ajustar los parámetros MIDI. Para ajustar los parámetros de la utilidad: Toque el pad cuyos parámetros desea ajustar o pulse su botón PAD SELECT (Selección de pad) correspondiente.
- Page 16 • Al pulsar START/STOP para iniciar/parar la reproducción del tema, se genera el mensaje MIDI FA (inicio) o FC (parada). • Cuando sincroniza el módulo con otro dispositivo MIDI, el módulo DM7X sólo puede ser el maestro y no el esclavo.
-
Page 17: Français
GUIDE D'UTILISATION (FRANÇAIS) CONTENU DE LA BOÎTE Module DM7X; câble multipaire; câble d'alimentation CA; guide d’utilisation; consignes de sécurité et informations concernant la garantie SCHÉMA DE CONNEXION * vendu séparément CRASH 2 TOM 4 PAD DE CYMBALE * PAD DE BATTERIE*... - Page 18 CARACTÉRISTIQUES PANNEAU AVANT ÉCRAN – Cet écran affiche tous les paramètres et les fonctions en cours du module. TOUCHE SONG/PATTERN – En mode Normal, appuyez sur cette touche afin d’accéder au menu Song, d’où vous pouvez sélectionner une chanson, ou encore, modifier les paramètres de la chanson.
- Page 19 PANNEAU SUPÉRIEUR SORTIES – Utilisez des câbles TRS 1/4 po (6,35 mm) standards afin de brancher ces sorties à un haut-parleur ou à un système de sonorisation. Le niveau de ces sorties est commandé par le bouton VOLUME. 1 1 2 ENTRÉE AUX –...
- Page 20 FONCTIONS DE BASE MODIFICATION ET ENREGISTREMENT DES ENSEMBLES DE SONS DE BATTERIE IMPORTANT : • Pour modifier et enregistrer vos ensembles, le module doit être en mode Normal. Si la DEL au-dessus de la touche SONG/PATTERN n’est pas allumée, enfoncez la touche PAGE/SELECT jusqu’à ce qu’elle s’allume.
- Page 21 UTILISATION DE CHANSONS D’ACCOMPAGNEMENT IMPORTANT : Pour faire jouer des chansons, le module doit Remarque : Pendant la lecture, les être en mode Normal. Si la DEL au-dessus de la touche touches de sélection s'allumeront à SONG/PATTERN n’est pas allumée, enfoncez la touche indiquer lesquelles batteries sonnent.
- Page 22 FONCTIONS ÉVOLUÉES RÉGLAGE DES PARAMÈTRES UTILITY Les paramètres Utility vous permettent de personnaliser encore plus les paramètres des pads et MIDI. Pour modifier les paramètres Utility : Frappez maintenant le pad pour lequel vous désirez modifier les paramètres ou appuyez sur la touche de sélection correspondante.
- Page 23 • Appuyez sur la touche START /STOP afin de lancer/arrêter la lecture d’une chanson génère des messages MIDI FA (lancer) ou FC (arrêter). • Lors de la synchronisation du module à un autre appareil MIDI, le module DM7X est toujours le maître, il ne peut être l’esclave.
-
Page 24: Italiano
GUIDA PER L'USO (ITALIANO) CONTENUTI DELLA CONFEZIONE Modulo DM7X; cavo flessibile; adattatore di alimentazione; guida per l'uso; istruzioni di sicurezza e garanzia SCHEMA DEI COLLEGAMENTI * Venduti separatamente TOM 4 CRASH 2 PAD PERCUSSIONI* PIATTI* COMPUTER* ALIMENTAZIONE CUFFIE* LETTORE MP3*... - Page 25 CARATTERISTICHE PANNELLO ANTERIORE DISPLAY – Mostra le attuali impostazioni e formazioni del modulo. SONG/PATTERN – In modalità normale, premere questo tasto per entrare nel menù canzoni (Song), dove sarà possibile scegliere canzone regolare configurazioni relative alle canzoni. modalità apprendimento, premere questo tasto per entrare nel menù...
-
Page 26: Pannello Superiore
PANNELLO SUPERIORE USCITE – Servirsi di cavi TRS standard da 1/4" per collegare queste uscite ad un altoparlante o a un impianto di amplificatori. Il livello di queste uscite è controllato dalla manopola VOLUME. 1 1 2 INGRESSO AUX – Servirsi di un cavo stereo standard da 1/8"... - Page 27 FUNZIONI BASE MODIFICA E SALVATAGGIO DEI SET BATTERIA IMPORTANTE: • Per modificare e salvare i set, bisogna essere in modalità normale. Se il LED al di sopra del tasto SONG/PATTERN non è acceso, tenere premuto PAGE/SELECT finché non si accende. •...
- Page 28 SUONARE AL TEMPO DI BEAT, RITMI E PATTERN IMPORTANTE: per suonare con i pattern, occorre essere in modalità di apprendimento. Se il LED al di sotto del tasto SONG/PATTERN non è acceso, tenere premuto PAGE/SELECT finché non si accende. Premere uno dei tasti di modalità di apprendimento per scegliere come si desidera suonare: •...
- Page 29 FUNZIONI AVANZATE REGOLAZIONE DELLE IMPOSTAZIONI UTILITÀ Le impostazioni delle Utilità consentono di personalizzare ulteriormente le configurazioni dei pad e di regolare le impostazioni MIDI del modulo. Per regolare le configurazioni delle Utilità: 1. Battere il pad le cui configurazioni si desidera regolare, oppure premere il tasto PAD SELECT corrispondente.
- Page 30 • La pressione di START/STOP per avviare/interrompere la riproduzione della canzone genera il messaggio MIDI FA (avvio) o FC (stop). • Al momento di sincronizzare il modulo con un altro dispositivo MIDI, il modulo DM7X può solo essere il master, non lo slave.
-
Page 31: Deutsch
BENUTZERHANDBUCH (DEUTSCH) LIEFERUMFANG DM7X Modul; Kabelstrang; Netzteil; Benutzerhandbuch; Sicherheitshinweise und Garantieinformationen ANSCHLUSSÜBERSICHT * Separat erhältlich TOM 4 CRASH 2 DRUM PAD* BECKEN-PAD* COMPUTER* STROM KOPFHÖRER* MP3-PLAYER* EXTERNES SOUNDMODUL* octave push accomp store volume pitch phrase latch a n a l o g... - Page 32 FUNKTIONEN VORDERSEITE DISPLAY – Zeigt die aktuellen Einstellungen und Funktionen des Moduls an. SONG/VORLAGE – Drücken Sie diese Taste im Normal-Modus, um das Song-Menü aufzurufen, einen Song auswählen oder Song-Einstellungen anpassen können. Drücken Sie diese Taste im Lernmodus, um ins Vorlage-Menü zu gelangen, wo Sie eine Vorlage (gesamtes Kit 13 14 plus Begleitung) zum Mitspielen auswählen...
- Page 33 OBERSEITE AUSGÄNGE – Verwenden Sie handelsübliche 1/4" TRS-Kabel, um diese Ausgänge an einen Lautsprecher oder Verstärkersystem anzuschließen. Lautstärke dieser Ausgänge steuern über 1 1 2 LAUTSTÄRKE-Regler. AUX IN – Verwenden Sie ein handelsübliches Miniklinke 1/8"-Stereokabel, diesen Eingang mit einem optionalen Audio-Player zu verbinden (z.B.
- Page 34 GRUNDFUNKTIONEN DRUM KITS BEARBEITEN & SPEICHERN WICHTIG: • Um Ihre Kits zu bearbeiten und zu speichern müssen Sie sich im Normal-Modus befinden. Wenn die LED oberhalb der SONG/VORLAGE-Taste nicht leuchtet, halten Sie SEITE/AUSWÄHLEN bis sie leuchtet. • Denken Sie daran Ihre Kits zu speichern, nachdem Sie die gewünschten Einstellungen eingegeben haben! Drücken Sie zuerst KIT bis NUM am Display erscheint.
- Page 35 Passen Sie das Tempo an, indem Sie TEMPO drücken und die Tasten < und > verwenden, um die neue BPM-Zahl (Beats pro Minute) einzustellen. Drücken Sie die Tasten < und > gleichzeitig, um das Tempo auf den Standardwert zurückzusetzen. Stellen Sie die Lautstärke der Musik (nicht der Drum-Spur) ein, indem Sie zuerst SONG und dann die Taste SEITE/AUSWÄHLEN drücken bis ACC am Display erscheint.
- Page 36 ERWEITERTE FUNKTIONEN ANPASSEN DER OPTIONEN Mit den Optionen können Sie Ihre Pad-Einstellungen und die MIDI-Einstellungen des Moduls weiter anpassen. So passen Sie die Optionen an: Betätigen Sie das Pad, dessen Einstellungen Sie anpassen möchten oder drücken Sie die entsprechende PAD-AUSWAHLTASTE. Drücken Sie OPTIONEN und anschließend SEITE/AUSWÄHLEN bis die gewünschte Einstellung am Display erscheint: •...
- Page 37 • Wenn Sie START/STOPP drücken, um die Song-Wiedergabe zu starten/stoppen, wird eine MIDI-Nachricht FA (Start) oder FC (Stopp) erzeugt. • Bei der Synchronisierung des Moduls mit einem anderen MIDI-Gerät kann das DM7X Modul nur als Master und nicht als Slave verwendet werden.
- Page 38 APPENDIX VELOCITY CURVES CURVE 1 CURVE 2 CURVE 3 Volume Volume Volume Velocity (striking force) Velocity (striking force) Velocity (striking force) CURVE 4 CURVE 5 CURVE 6 Volume Volume Volume Velocity (striking force) Velocity (striking force) Velocity (striking force) PAD MIDI NOTE NUMBERS TRIGGER MIDI NOTE NUMBER TRIGGER MIDI NOTE NUMBER Kick 36...
-
Page 39: Specifications
SPECIFICATIONS Maximum Polyphony Drum Kits 40 kits (24 preset kits + 16 user kits) 11 General MIDI kits Instruments 385 (drums, percussion, SFX) 7 hi-hat combinations (open/closed) Effects Reverb, 3-band equalizer Sequencer Normal Mode: 80 songs Learning Mode: 20 beats, 12 rhythms, 10 patterns Resolution: 120 ticks per quarter note Maximum Note Storage: approximately 1600 notes Tempo... - Page 40 7-51-0386-A...