Table of Contents
Advertisement
Advertisement
Table of Contents

Related Manuals for Keurig Rivo


Summary of Contents for Keurig Rivo
- Page 1 Let’s Begin! Use and Care Guide...
-
Page 2: Important Safeguards
Pack Holder during the brew process. ™ 2. Do not touch hot surfaces. Use handles appliance malfunctions or is damaged To avoid risk of injury, do not lift the Brew Handle or open the Rivo Pack Assembly Housing ™ and knobs when available. -
Page 3: Table Of Contents
WELCOME thank you for purchasing the Keurig Rivo Cappuccino and Latte System. Before operating ® ™ the Rivo ™ System, we recommend carefully reading these instructions to learn how to use, clean and care for the System. We hope you enjoy crafting the perfect espresso, cappuccino, latte and more! tABLE OF CONtENtS WELCOME SyStEM OVERVIEW PREPARING yOUR SyStEM CRAFtING yOUR FIRSt BEVERAGE thE RIVO ™ CONtROL PANEL USING yOUR SyStEM hELPFUL hINtS CLEANING AND MAINtENANCE tROUBLEShOOtING WARRANty Record Your Rivo System Serial Number Above ™ the serial number can be found on the bottom of the Rivo System gift box ™ and on the side of housing behind the Water Reservoir. Removing the serial number label from the Rivo System will void warranty. ™... -
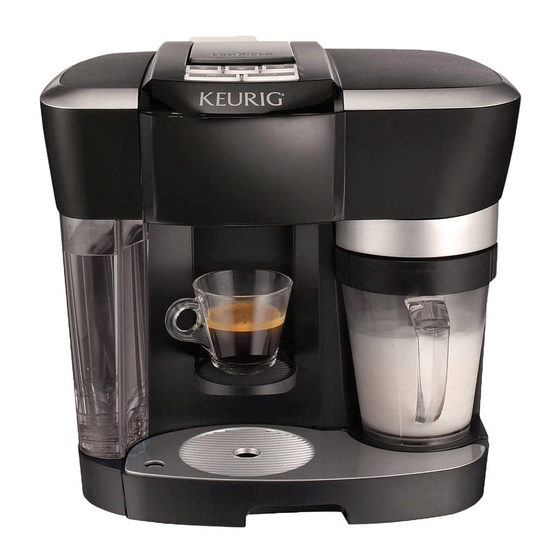
Page 4: Product Diagram And Parts
SyStEM OVERVIEW CONTROL PANEL RIVO SyStEM ™ Water Reservoir Lid Drip Tray Lid Water Reservoir Drip Tray Overflow Indicator Power Cord Drip Tray Rivo Pack Bin Power Button ™ Beverage Platform Brew Handle FROthING PItChER CONtROL PANEL Frothing Lid Short Espresso Button Frothing Whisk... -
Page 5: Preparing Your System
Hot water or any other liquid may damage the Water Reservoir. Always ensure the Water Reservoir is filled to *The first cleansing brew and cleansing froth cycles prepare the the REFILL line before turning on the Rivo System. ™ System for your first beverage. It is normal for the System to be slightly louder during these initial cycles. -
Page 6: Crafting Your First Beverage
CRAFtING yOUR FIRSt BEVERAGE thE RIVO CONtROL PANEL ™ Brew Espresso STEP 1 FROthING MODES CAPPUCCINO FROTH COLD FROTH LATTE FROTH Creates more foam Creates less foam and Keeps your milk cold, A Place a mug on the B Lift the Brew handle C Lower Brew handle and and less steamed milk. more steamed milk. creates less foam and Beverage Platform. and place a Rivo select your ESPRESSO ™ Perfect for a cappuccino Perfect for a latte. more milk. Perfect pack into the System. SIZE on the bottom row or macchiato. for an iced latte. of the Control Panel. After about 1 minute, you will hear a beep. this indicates your espresso is complete. Froth Milk STEP 2 SHORT ESPRESSO (1.4 Oz.) ESPRESSO LUNGO (2.8 Oz.) -
Page 7: Using Your System
USING yOUR SyStEM Crafting a Cappuccino Crafting a Latte Place a 12 oz. mug on the Drip tray and Place a 12 oz. mug on the Drip tray and STEP 1: STEP 1: prepare a Short Espresso (1.4 oz.) by selecting prepare a Short Espresso (1.4 oz.) by selecting the Short Espresso Button on the Control Panel. the Short Espresso Button on the Control Panel. Pour cold milk to MIN FILL of the Pour cold milk to MAX FILL of the STEP 2: STEP 2: Frothing Pitcher (4.5 oz.) and place the Frothing Frothing Pitcher (6 oz.) and place the Frothing Lid on the Frothing Pitcher. Lid on the Frothing Pitcher. Important: Add enough milk to fill to MIN FILL, but do not fill Important: Add enough milk to fill to MIN FILL, but do not fill beyond MAX FILL. -
Page 8: Helpful Hints
EMPTy wATER RESERvOIR NOTIFICATION – If the Water Reservoir becomes separate 3 oz. mug on the Beverage Platform empty during brewing or frothing, the System will stop. the Control Panel will light up in and prepare an Espresso Lungo (2.8 oz.) by a circular pattern, flashing on the last mode used, and you will hear a series of beeps. If the selecting the Espresso Lungo Button on the Water Reservoir is filled within 2 minutes, simply press the last used mode and continue Control Panel. Pour the espresso over the ice. crafting your beverage. If more than 2 minutes have passed, the System will automatically shut off. Press the Power Button and begin a new brew. you will need a new Rivo pack. ™ Important: Do not brew espresso directly into a glass cup filled FROTHING PITCHER NOTIFICATION – If the Frothing Pitcher has not been positioned with ice. Doing so may cause the glass to crack or break. securely, you will hear 3 beeps when selecting a frothing mode. Remove the Frothing Pitcher and re-insert, ensuring the Pitcher is securely in place. Pour cold milk to MAX FILL of the STEP 2: THE RIGHT wATER – For the best tasting espresso, cappuccino or latte we recommend... -
Page 9: Cleaning And Maintenance
WARRANty CLEANING AND MAINtENANCE tROUBLEShOOtING Before cleaning the Keurig ® Rivo ™ System, unplug the Power Cord and wait for the System SITUATION SOLUTION to cool down. Unless otherwise noted, clean components with warm soapy water. Do not System does not have power • Plug System into an independent outlet. • Make sure the Power Button is pressed. use solvents, alcohol or other harsh substances. Do not place any components in an oven. • During normal operation, the System will shut off when it is idle for longer than 2 minutes. Just press the Power Button wATER RESERvOIR – the Water Reservoir should be cleaned regularly. the Water to restart. Reservoir is not dishwasher safe. Wash by hand with warm water and mild soap. • Check to be sure that the System is plugged in securely. • Plug into a different outlet. FROTHING PITCHER – After each use, thoroughly clean all components of the Frothing • Reset your home circuit breaker, if necessary. Pitcher. Place them on the top rack of the dishwasher or wash by hand with warm water System will not brew • Make sure the System has power (see above). • Check that the Water Reservoir is filled. and mild soap. • System may be cold or frozen. Let System rest at room System will not brew when used for the first time temperature for at least 2 hours before powering on. • Make sure the System has power (see above). Clean the interior components after every 10 to 12 beverages: • Under normal operation, the System will shut off when it is idle... -
Page 10: Warranty
WARRANty Limited One Year Warranty Keurig warrants that your Brewer will be free of defects in materials or workmanship under normal home use for one year from the date of purchase. It is recommended that you fill out and return the warranty card enclosed with your Brewer so that your purchase information will be stored in our system. Keurig will, at its option, repair or replace a defective Brewer without charge upon its receipt of proof of the date of purchase. If a replacement Brewer is necessary to service this warranty, the replacement Brewer may be new or reconditioned. If replacement Brewer is sent, it will carry the remaining warranty of the original Brewer. this warranty only applies to Brewers operated in the United States and Canada. this warranty gives you specific legal rights, and you may also have other rights that vary from state to state and, in the case of Canada, from province to province. Only the use of Keurig Brewed ® Rivo ™ brand packs and accessories will guarantee the proper functioning and lifetime of your Keurig Brewer. Any damage to or malfunction of your Brewer resulting from the use of non Keurig Brewed ® Rivo ™ brand packs and accessories may not be covered by this warranty or may result in a service fee if the defect is determined to be caused by such use. What is not covered by the Limited Warranty? thIS WARRANty DOES NOt COVER CONSEQUENtIAL OR INCIDENtAL DAMAGES SUCh AS PROPERty DAMAGE AND DOES NOt COVER INCIDENtAL COStS AND EXPENSES RESULtING FROM ANy BREACh OF thIS WARRANty, EVEN IF FORESEEABLE. Some states or provinces do not allow the exclusion or limitations of incidental or consequential damages, so the above limitation or exclusion may not apply to you depending on the state or province of purchase. Nor does this warranty cover damages caused by use of non Keurig ® Rivo ™ brand packs or accessories, services performed by anyone other than Keurig or its authorized service providers, use of parts other than genuine Keurig parts, or external causes such as abuse, misuse, inappropriate power supply or acts of God. Other Limitations thIS WARRANty IS EXCLUSIVE AND IS IN LIEU OF ANy OthER EXPRESS WARRANty, WhEthER WRIttEN OR ORAL. IN ADDItION, KEURIG hEREBy SPECIFICALLy DISCLAIMS ALL OthER WARRANtIES WIth RESPECt tO yOUR R500 SyStEM, INCLUDING ANy IMPLIED WARRANty OF MERChANtABILIty OR FItNESS FOR ANy PARtICULAR PURPOSE. Some states or provinces do not... - Page 11 Keurig, Incorporated 55 Walkers Brook Drive Reading, MA 01867 Keurig, Incorporated is a wholly-owned subsidiary of Green Mountain Coffee Roasters, Inc. For household Use Only Made in China. Printed in China. © 2012 Keurig, Incorporated All rights reserved www.keurig.com | 1.866.901.BREW P/N 60-202246-000 Rev A 06/12...