SIIG UltraATA 133 PCI RAID Quick Installation Manual
Hide thumbs
Also See for UltraATA 133 PCI RAID:
- Quick installation manual (36 pages) ,
- User manual (26 pages) ,
- Quick installation manual (12 pages)
Table of Contents
Advertisement
Quick Links
Introducing the UltraATA 133 PCI RAID
The UltraATA 133 PCI RAID is a ultra high-speed dual
channel Ultra ATA/133 controller for use in Pentium
class computers. It achieves burst data transfer rates up
to 133MB/sec ans supports drive capacities greater than
137GB. It's enhanced BIOS auto-detects device types and
fine tunes to the best performance for each connected
hard drive.
Features and Benefits
•
Compliant with UltraDMA6 ATA/133 specifications
•
Compliant with PCI v2.2 Plug-n-Play
•
Provides two independent Ultra ATA channels
(built-in 256-byte FIFOs per channel) for faster
data transfer
•
Supports Ultra DMA 0-6 and Multi-word DMA 0-2
•
Breaks the 137GB barrier! Supports hard drives
larger than 137GB
•
Co-exists with on-board IDE controller
•
Supports RAID 0 (striping), RAID 1 (mirroring) and
RAID 0+1 (mirror+striping)
•
CRC (Cyclical Redundancy Check) error-checking
provides data verification and achieves flawless
data transfer
•
Full ACPI power management support
•
Flash BIOS for easy upgrade
•
Works with various brands of Ultra ATA 133/100/
66/33 hard disk drives
04-0369A
UltraATA 133 PCI RAID
Quick Installation Guide
1
Advertisement
Table of Contents

Related Manuals for SIIG UltraATA 133 PCI RAID


Summary of Contents for SIIG UltraATA 133 PCI RAID
- Page 1 UltraATA 133 PCI RAID Quick Installation Guide Introducing the UltraATA 133 PCI RAID The UltraATA 133 PCI RAID is a ultra high-speed dual channel Ultra ATA/133 controller for use in Pentium class computers. It achieves burst data transfer rates up to 133MB/sec ans supports drive capacities greater than 137GB.
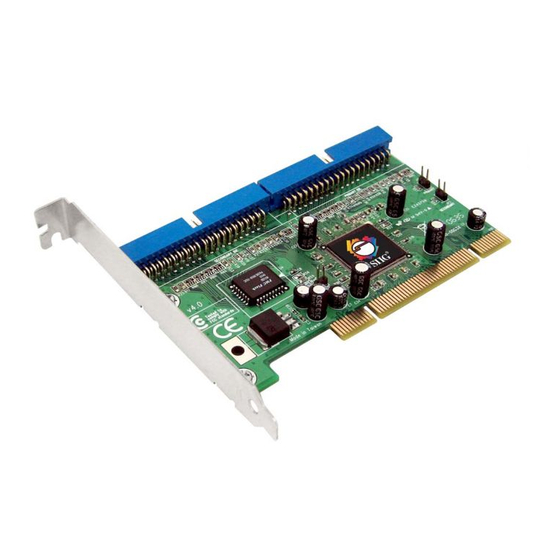
- Page 2 (1) Installation CD • This quick installation guide Layout Pin1 IDE1 IDE2 Pin1 Activity Jumper On (do not remove) Figure 1. UltraATA 133 PCI RAID layout Note: For proper operation of the UltraATA 133 PCI RAID, the jumper must remain on.
-
Page 3: Hardware Installation
Replace the slot bracket's holding screw to secure the card. Device Connection The UltraATA 133 PCI RAID is a dual channel Ultra ATA 133 controller that supports up to four IDE hard disk drives. To achieve maximum performance and compatibility we suggest using identical hard drives in... - Page 4 In any given RAID set, it's best to install the hard drives on separate channels, either Master to Master or Slave to Slave. For example, if you are setting up a RAID set with two hard drives, install the first drive on IDE1 as Master and the second on IDE2 as Master.
-
Page 5: Raid Arrays
Reconnect the system power and other peripherals to your computer. RAID Arrays RAID Arrays are setup in the UltraATA 133 PCI RAID's BIOS. Find your RAID set and follow the steps in the order in which they appear. RAID 0 (striping) ..........page 6 RAID 1 (mirroring) ........ - Page 6 RAID 0 (Striping) This RAID array to be used on New/Blank hard drives. Striping will destroy existing data on the hard drive. For Manual Setup As the BIOS boots press F3 when prompted to enter the RAID BIOS. At the next screen press F2 to form a RAID set. Press F1 to create RAID 0.
- Page 7 RAID 1 (Mirror) For Manual Setup For New/Blank Hard Drives As the BIOS boots press F3 when prompted to enter the RAID BIOS. At the next screen press F2 to form a RAID set. Press F2 to create RAID 1. In a Mirror set the source drive needs to be equal to or smaller than the destination drive.
- Page 8 Answer Y to Enable Auto-Rebuild. When asked Are You Sure?, press Y to accept. 10. Press ESC to exit the RAID BIOS. Ignore the BIOS error message and continue booting. The mirror rebuilds automatically. For Auto Setup Use this setup on New/Blank hard drives only. As the BIOS boots press F3 when prompted to enter the RAID BIOS.
- Page 9 Rebuilding a Failed Mirror Set If a SPARE drive was not configured, the steps below will guide you in rebuilding a failed mirror set. As the BIOS boots press F3 when prompted to enter the RAID BIOS. Press F1 to dissolve an Array. Press the number of the Mirrored array to be dissolved.
- Page 10 RAID 0+1 (Mirror+Striping) This RAID array to be used on New/Blank hard drives only, striping destroys existing data on the hard drive. RAID 0+1 requires four hard drives. For Manual Setup As the BIOS boots press F3 when prompted to enter the RAID BIOS.
- Page 11 Press A to Auto configure. Press Y to accept the configuration. Press ESC to reboot. Continue with Fdisk and Format steps as if you were installing a conventional hard drive. Rebuilding a Failed RAID 0+1 Set The steps below will guide you in rebuilding a failed Mirrored-Stripe set.
-
Page 12: Table Of Contents
Software Installation This section provides information on how to install the UltraATA 133 PCI RAID drivers. Table of Contents Windows 98SE ..........page 13-14 Windows ME ..........page 14-15 Verify Windows 98SE.ME Installation ..page 15 Windows NT 4.0 ......... -
Page 13: Windows 98Se
Windows 98SE For A New Installation Setup the RAID array prior to Windows installation. Follow Microsoft procedures to install Windows 98SE accordingly. Once Windows has installed and booted, right click My Computer and click Properties. Select Device Manager tab. Double click PCI RAID controller listed under Other Devices. -
Page 14: Windows Me
Remove the driver diskette and restart Windows to complete the installation. When Windows resumes, go to Medley GUI on page 20 and install the RAID monitoring utility. Windows ME For A New Installation Setup the RAID array prior to Windows installation. Follow Microsoft procedures to install Windows ME accordingly. -
Page 15: Verify Windows 98Se.me Installation
Remove the driver diskette and restart Windows to complete the installation. When Windows resumes, go to Medley GUI on page 20 and install the RAID monitoring utility. To Verify Installation In Windows 98SE/ME: Right click My Computer, click Properties, then click Device Manager. -
Page 16: Verify Windows Nt Installation
Screen 5, Windows NT Setup, make sure driver diskette is in floppy drive and press Enter. 10. Screen 6, Windows NT Setup, highlight Silicon Image Ultra-133 Medley ATA RAID Controller and hit Enter to load driver. 11. Screen 7, Windows NT Setup, the UltraATA 133 driver, Silicon Image Ultra-133 Medley ATA RAID Controller should be listed. -
Page 17: Windows 2000
Highlight Silicon Image Sil 0680 Ultra-133 Medley ATA RAID Controller from SCSI Adapters listing and select Properties. A message This device is working properly is displayed in the dialog box, the driver has been correctly installed. Windows 2000 For A New Installation Setup the RAID array prior to Windows installation. -
Page 18: Windows Xp/Server 2003
Insert the driver diskette, check Floppy disk drives, uncheck the other boxes, click Next, and click Next again. If the Digital Signature Not Found message appears, click Yes. Our driver has been thoroughly tested in Windows for stability. Note: If prompted for Windows 2000 CD-ROM, insert the CD into your CD-ROM drive and click OK. - Page 19 Press Enter to finish driver installation, then follow the on-screen instructions to complete Windows installation. Note: If the Software Installation warning pops up, click Yes. And if the Hardware Installation warning pops up, click Yes again. Our driver has been thoroughly tested for stability and compatibility.
- Page 20 Medley GUI The Medley GUI provides significant functionality including the ability to create and dissolve RAID sets; Remove a member of a Mirrored or Mirrored-Striped RAID set; Rebuild a Mirrored RAID set; save, copy, or send, via e-mail, the current configuration. Installing Medley GUI Place the driver installation CD into the CD-ROM drive.
- Page 21 Selecting each different component in the configuration tree provides specific information for that component, such as the chip. By selecting a specific channel, either Primary or Secondary, the following information is reported.
- Page 22 Selecting a specific drive reports all pertinent information to that drive, including Configuration and Disk Identification information.
- Page 23 Selecting Sets reports how many RAID sets have been created. By selecting a specific RAID set, such as Set 0 which is the Striped set, the type of RAID set, the number of members and stripe size is reported.
- Page 24 The Members tab reports the device identification (corresponding with the information in the BIOS) and the State of each device. Besides reporting information, the Members tab of a mirror set allows the user to remove a specific drive from that set, as well as add a designated Spare drive to a Mirrored set that has experienced a disk failure.
- Page 25 The device identification, along with the State of each device is also reported in the Members tab window. Note that when a Mirrored Set is first created, the State of the “destination” drive may report as Rebuild for as much as 30-90 minutes depending on the size of the disk.
- Page 26 Medley Configuration Menu With Medley running, the small Medley icon should appear in the bottom right of the computer screen, next to the clock. By right-clicking on the icon, the user may configure Medley including customizing the settings for SMTP, E-mail, Notification, Event Level, Log File, Audio, and Popup.
- Page 27 E-Mail The current Medley configuration may be sent via e-mail. Using the e-mail tab in the Medley Configuration Menu, the user may set the default e-mail address and subject line to where the configuration would be sent. This, however, can be overridden at the time of sending the email.
- Page 28 Event Level There are different types of e-mail notifications that may be sent which are set with the Event Level tab. The different levels are: Disabled - No event logs will be sent Informational - The following events will be sent: - Informational - Warnings - Errors...
- Page 29 Log File The log file is used to store event information received from all the RAID drivers. The log file is a text file and can be viewed with Notepad or the Medley GUI. Use the Log File tab to set where the log file should be stored and the name of the file as well.
- Page 30 Popup The popup window is a visual notification that an event occurred. The popup window can be disabled or set to popup for only certain event levels. The different levels are: Disabled - No popup will occur Informational - The popup window will be displayed for the following events: - Informational - Warnings...
-
Page 31: Technical Support And Warranty
A lifetime manufacturer warranty supplied with this product is offered by SIIG, Inc. Please see SIIG website for more warranty details. If you should happen to encounter any problems with this product, please follow the procedures below. - Page 32 Fremont, CA 94538-3152 UltraATA 133 PCI RAID is a trademark of SIIG, Inc. SIIG and SIIG logo are registered trademarks of SIIG, Inc. Microsoft and Windows are registered trademarks of Microsoft Corporation. Pentium is a registered trademark of Intel Corporation.