Accu-Chek Aviva Combo Training Handbook
Hide thumbs
Also See for Aviva Combo:
- Quick start manual ,
- Owner's booklet (316 pages) ,
- Standard owner’s booklet (306 pages)
Table of Contents
Advertisement
Quick Links
Advertisement
Table of Contents

Related Manuals for Accu-Chek Aviva Combo


Summary of Contents for Accu-Chek Aviva Combo
- Page 1 Training Handbook mmol/L Accu-Chek Aviva Combo blood glucose monitoring system ®...
- Page 2 Owner’s Booklets (Instructions for use) provided with your new meter. Before starting therapy with your Accu-Chek Aviva Combo meter, please con- sult your Accu-Chek Aviva Combo meter Owner’s booklets for detailed informa- tion regarding warnings and precautions related to their use.
-
Page 4: Table Of Contents
Table of Contents 1 Your Accu-Chek Aviva Combo meter ..............5 1.1 Summary of functions and features ..............5 1.2 Button functions ..................... 6 2 Getting Bolus Advice from your meter ..............9 2.1 About Bolus Advice ....................9 2.2 Setting up Bolus Advice ..................10 3 Measuring your blood glucose (bG) level ............26... -
Page 5: Your Accu-Chek Aviva Combo Meter
Your Accu-Chek Aviva Combo meter 1 Your Accu-Chek Aviva Combo meter 1.1 Summary of functions and features Features Convenient blood glucose (bG) testing. Test results in five seconds. Provide Bolus Advice. Small sample size that allows testing from the fingertip. -
Page 6: Button Functions
1.2 Button functions Infrared (IR) Window Left / Right Soft Button Enter * Backlight Button Down > Right < Left Teststrip Slot + Power On / Off Button... - Page 7 Your Accu-Chek Aviva Combo meter Key Name Function Power · turn the meter on and off On / Off · Backlight adjust the backlight level (low, medium high) · move through screens < Left arrow · scroll left in an information screen ·...
- Page 8 Key Name Function · select a menu or option Enter · save changes · exit Left soft · select a menu on the display above the button button Right soft · select a menu on the display above the button button Press and hold...
-
Page 9: Getting Bolus Advice From Your Meter
Getting bolus advice from your meter 2 Getting Bolus Advice from your meter The Bolus Advice function on your meter will provide you with recommendations on the amount of insulin for food intake and for correcting bG levels that are not within your Target Range. -
Page 10: Setting Up Bolus Advice
2.2 Setting up Bolus Advice Before you can start setting up the Bolus Advice function, you need to discuss the required setting parameters with your healthcare professional. The following settings are necessary: Time Block settings Time Blocks … split the day into periods, to facilitate the pro- gramming of those settings that change throughout the day, such as Insulin Sensitivity and Carb Ratio. - Page 11 Getting bolus advice from your meter Carb Ratio … is the amount of insulin you need for one unit of carbohydrates. You must program the Carb Ratio for each Time Block you wish to set up. Insulin Sensitivity … is the amount of insulin you need to lower your bG level by a given amount.
- Page 12 Advice Option settings Meal Rise … is an increase in your bG level that is acceptable after a meal. After a meal, the Meal Rise is added to your bG target. After a meal, the bG target value plus the Meal rise value is accepted without a correction bolus, as long as Acting time and Offset time are effective (see the explanations below).
- Page 13 Getting bolus advice from your meter...
- Page 14 Press + until the meter powers up. The Accu-Chek screen appears for a few seconds. The Language screen appears. If you wish to keep the default language, press to select Next and continue with step 6. Language Language English Deutsch...
- Page 15 Getting bolus advice from your meter Press to save the setting. Press to select Save. Time/Date Time Format 24 hr The Time / Date screen appears. If you wish to Time keep the default time, press to select Next Date 1 Jan DD MMM and continue with step 12.
- Page 16 Time/Date Time Format 12 hr Time Press to change the hour. Date 1 Jan DD MMM Cancel Time/Date Time Format 12 hr Time Press to select the hour and to save. Date 1 Jan DD MMM Cancel Continue using to set ·...
- Page 17 Getting bolus advice from your meter The Units screen appears. to set · the units for carbohydrates · the Insulin Increment · the Max Bolus Press to select Next Warning Limits Hyper 16.5 mmol/L 4.0 mmol/L Hypo The Warning Limits screen appears. Select the upper (Hyper) and lower (Hypo) limits of your bG...
- Page 18 Warning Limits Hyper 12.5 mmol/L mmol/L to set the Hypo- (Low bG) 60 mg/dL Hypo Warning Limit. Select the upper (Hyper) and lower (Hypo) Press to select Next. limits of your bG Cancel Setup The Setup screen “Would you like to receive Would you like to receive bolus advice bolus advice from your meter?”...
- Page 19 Getting bolus advice from your meter Time Blocks The first Time Blocks screen appears. 6:00 0:00 am 5:30 am Press to enter the end time box. Target Range 4.0 mmol/L 8.0 mmol/L Press to select the end time. Carb Ratio Press to save the setting and move to the Insulin Sensitivity...
- Page 20 Press to enter. Press to select the amount of carbs Time Blocks Target Range covered by the amount of insulin. 4.5 mmol/L 6.5 mmol/L Press to save and move to the insulin for bG Carb Ratio 1.2 BE box. Insulin Sensitivity Press to enter.
- Page 21 Getting bolus advice from your meter Health Events Exercise 1 Exercise 2 The Health Events screen appears. Stress Illness Press to enter the Exercise 1 box. Premenstrual Next Back Health Events Exercise 1 Exercise 2 Press to select the percentage as needed. Stress Illness Press...
- Page 22 Advice Options Meal Rise 5.5 mmol/L Snack Size Acting Time 4:00 The Advice Options screen appears. Offset Time 1:00 HH MM Back Advice Options Meal Rise 100 mg/dL Press to enter the Meal Rise box. mmol/L Snack Size Press to select the meal rise level. Acting Time 4:00 Offset Time...
- Page 23 Getting bolus advice from your meter Advice Options Meal Rise 3.0 mmol/L Press to enter. Snack Size 4:30 Press to select the Acting Time. Acting Time 4:00 Offset Time 1:00 Press to save and move to the Offset Time HH MM box.
- Page 24 Setup The Setup Wizard is complete. Setup Completed Press to select Next and enter the main Successfully menu. Next Switch of the meter. Now you can continue with coding your meter. Before you can test your bG level with your meter you must code it with the code chip accompanying the test strip container.
- Page 25 Notes...
-
Page 26: Measuring Your Blood Glucose (Bg) Level
3 Measuring your blood glucose (bG) level 3.1 Running a control test You need: · a new test strip · a control solution level 1 or 2. The control level is printed on the bottle label. Place your meter on a flat surface (for example, a table) and insert the test strip into the Test Strip Slot in the direction of the arrow. - Page 27 Measuring your blood glucose (bG) level Remove the cap from the control solution bottle and wipe the tip with a tissue. Squeeze the bottle until a tiny drop forms at the tip. Apply the drop to the front edge of the yellow window of the test strip.
- Page 28 Compare the result to the acceptable range shown on the label of the test strip container. Press to display the Control Level screen. Control Result 10:02 2 Feb 08 Press to select the control solution level. No Entry Press to confirm. Level 1 Level 2 Cancel...
-
Page 29: Performing A Blood Glucose (Bg) Test
Measuring your blood glucose (bG) level 3.2 Performing a blood glucose (bG) test You need: · your lancing device · a new test strip Prepare the lancing device according to the instructions provided. Wash and dry your hands. Place your meter on a flat surface (for example, a table) and insert the test strip into the Test Strip Slot in the direction of the arrow. - Page 30 bG Test Apply Sample The “Apply Sample” screen appears and a beep indicates that the strip is ready for testing. Prick your finger with your lancing device. Gently squeeze your finger to get a blood drop. Apply the blood drop to the front edge of the yellow window of the test strip.
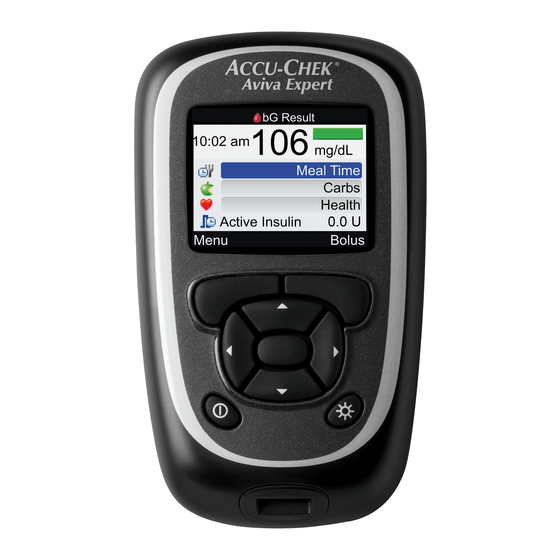
- Page 31 Measuring your blood glucose (bG) level Your bG Result appears on the display. About three seconds later the detailed “bG Result” screen appears. Here you can enter information about meal time, the carbs you are planning to eat and you current health or activity state.
- Page 32 Understanding your bG result The coloured bar on the bG Result screen indicates the meaning of your bG result: If the bar is Your bG level is above Hyper Warning Limit. It is highly recommended that Blue Hyper you check for ketones and measure your bG level frequently. Blue above your Target Range but below Hyper Warning Limit.
-
Page 33: Using Bolus Advice
Measuring your blood glucose (bG) level 3.3 Using Bolus Advice Bolus Advice can only provide a reliable bolus recommendation, when a current bG test result is available. Therefore it is highly recommended that you always use Bolus Advice by starting with a bG test. When you use Bolus Advice with- out a current bG test result, you will be prompted with a warning if the last bG Test result dates back for more than five minutes. - Page 34 Prepare the lancing device according to the instructions provided. Wash and dry your hands. Place your meter on a flat surface (for example, a table) and insert the test strip into the Test Strip slot in the direction of the arrow. The meter turns bG Test Match Code to Vial The “Match Code to Vial”...
- Page 35 Measuring your blood glucose (bG) level Prick your finger with your lancing device. Gently squeeze your finger to get a blood drop. Touch the blood drop against the front edge of the yellow window of the test strip. bG Test Analyzing The “Analyzing”...
- Page 36 About three seconds later, a detailed “bG Result” screen appears. Here you can add information about the Meal Time, planned food intake or your state of health, for statistical reasons, where appropriate. If you use the bG result for Bolus Advice, you cannot change entries later on.
- Page 37 Measuring your blood glucose (bG) level Press to enter the carbs Box. ➊ Press to select the amount of carbo- hydrates you are planning to eat. Press to save and move to the Health box, ➋ and press to enter. Press to select your current state of health, as appropriate.
-
Page 39: Managing Your Data
Managing your data 4 Managing your data Careful analysis of your bG data is an effective way for you and your healthcare professional to control and manage your diabetes. Your meter automatically stores up to 1000 diary records with their time and date. - Page 40 The following table depicts the icons used to display your data: View Data bG Value Date of Record(s) 1 Feb 08 mmol 20:06 Time of bG Test Bolus Icon 17:33 16:06 bG Icon 13:52 Health Event Icon 10:02 Back Select View Meal Time Icon Carbs Icon Icon...
- Page 41 Managing your data Viewing your data From main menu press to select My Data. Press to enter. 10:02 2 Feb 08 View Data The Data screen is displayed and View Data is Add Data Reports highlighted. Data Transfer Press to enter. Menu View Data 1 Feb 08...
- Page 42 The screen shows the bG test results in the right View Data 1 Feb 08 column by default, but you can also view bolus or 20:06 bG Value carb data. 17:33 Bolus 16:06 Press to select Select View. Carbs 13:52 Press to select carbs or bolus.
- Page 43 Managing your data Editing your data You can also use this function to add information on your Basal insulin. You are in the View Detail screen in step 6 of the previous procedure. View Detail 16:06 1 Feb 08 bG Value 8.6 mmol/L Meal Time Pre Meal...
- Page 44 Adding data You can add data to a diary record for Carbs, Health, Basal, and Bolus, but not for bG Test results. From the main menu, press to select My Data. Press to enter. 10:00 2 Feb 08 View Data Add Data Press to move to Add Data.
- Page 45 Managing your data Add Data to edit other entries accordingly. DD MMM Carbs Health Bolus Cancel Add Data Press to save and return to the My Data DD MMM 45 g screen. Health Bolus Bolus Cancel Save...
- Page 46 Reporting data In this menu you can view many different statistics for your bG test results, such as bG averages and standard deviations. Standard deviation is a statistical expression that indicates how far the individual test results are scattered around the average. From main menu, press to select My Data.
- Page 47 Managing your data bG Averages … shows you averages and standard devia- tions for your bG test results for the catego- ries Overall, Pre Meal, Post Meal, Bedtime and Others. Test results without Meal time entry only occur in the Overall category. You can choose whether the averages and standard deviations include the results of the last 7, 14, 30, 60 or 90 days.
- Page 48 Trend … combines your bG test results for the categories Overall, Pre Meal, Post Meal, Bedtime and Oth- ers with the entries for Carbs and insulin. You can view them either as a table or as a graphic. You can choose whether the results of the last 8, 24 or 48 hours or 7 days are included.
- Page 49 Managing your data Last 48 hours Overall When the time field is highlighted (8, 24 or mmol < > 48 hours or 7 days), press to select the included period of time. 08:00 20:00 08:00 Back Table Last 8 hours Pre Meal <...
- Page 50 Standard Day … shows you averages and standard deviations for your bG test results for the categories Overall, Pre Meal, Post Meal, Bedtime and Other calcu- lated for each Time Block of your Bolus Ad- vice / Time Block setting. You can view them either as table or as graphic.
- Page 51 Managing your data Last 30 days Overall When the time field is highlighted (7, 14, 30, 60 or mmol < > 90 days), press to select the included period of time. 6:00 12:00 18:00 Back Table Last 30 days Pre Meal <...
- Page 52 Standard Week … shows you averages and standard deviations for your bG test results for the categories Overall, Pre Meal, Post Meal, Bedtime and Other, calcu- lated for each day of the week. You can view them either as a table or as a graphic. You can choose whether the averages and standard deviations include the results of the last 7, 14, 30, 60 or 90 days.
- Page 53 Managing your data Last 14 days Overall When the time field is highlighted (7, 14, 30, 60 or mmol < > 90 days), press to select the included period of time. Back Table Last 14 days Last 7 days Pre Meal Overall <...
- Page 54 Target … shows you percentages for your bG test results for the categories Overall, Pre Meal, Post Meal, Bedtime and Other, that are • above your Target Range (between upper and lower bG target limit) • within your Target Range (between upper and lower bG target limit) •...
- Page 55 Managing your data Last 14 days Overall When time field is highlighted (7, 14, 30, 60 or Above < > 90 days), press to select the included Within Below period of time. Hypo Back Table Last 7 days Last 14 days Pre Meal Overall When the Meal Time field is highlighted, press...
-
Page 56: Transferring Data To A Computer
4.1 Transferring data to a Computer Position the infra-red window of your meter opposite the infra-red cable of the computer, and prepare the computer for data transfer (for detailed instructions, see the instructions provided with the according software on your computer.) From main menu on the meter press select My Data. - Page 57 Managing your data...
-
Page 59: Using Reminders
Using Reminders 5 Using Reminders Managing your job, managing your family or managing school often require your full attention. The meter can assist you managing your diabetes. With reminders it helps you remembering a variety of diabetes related tasks. Three different types of reminders are available to accommodate for different requirements: bG Test Reminders …... - Page 60 To set Reminders From main menu, press to select Settings. Press to enter. 10:02 2 Feb 08 Reminders Bolus Advice The Settings screen appears. Meter Sound/Vibrate Press to enter Reminders. Time/Date Menu Reminders bG Test Reminders Alarm Clock Date Reminders The Reminders screen appears.
- Page 61 Using Reminders bG Test Reminders – After High bG This reminder will turn on the meter. You can dismiss it by pressing You can reschedule (snooze) it to occur in 15 minutes by pressing Reminders bG Test Reminders From the Reminders screen press Alarm Clock Date Reminders select bG Test Reminders.
- Page 62 After High bG Reminder To change the bG threshold press 16.5 bG Threshold mmol/L 300 mg/dL Press to select the bG value as needed. Remind After 0:15 HH MM Press to confirm and move to the Remind After box. Cancel Press to enter.
- Page 63 Using Reminders bG Test Reminders – After Low bG This reminder turns on the meter. You can dismiss it by pressing You can re-schedule (snooze) it to occur in five minutes by pressing Reminders bG Test Reminders From the Reminders screen press Alarm Clock Date Reminders select bG Test Reminders.
- Page 64 After Low bG Reminder To change the bG Threshold press mmol/L 300 mg/dL bG Threshold Press to select the bG value as needed. Remind After 0:15 HH MM Press to confirm and move to the Remind After box. Cancel Press to enter.
- Page 65 Using Reminders bG Test Reminders – After Meal This reminder will turn on the meter. You can dismiss it by pressing You can reschedule (snooze) it to occur in five minutes by pressing Reminders bG Test Reminders Alarm Clock From the Reminders screen press Date Reminders select bG Test Reminders.
- Page 66 After Meal Press to enter. Reminder Press to select appropriate Snack Size as Snack Size 20 g 2:00 Remind After needed. HH MM Press to confirm and move to the Remind After box. Cancel Press to enter. After Meal Reminder Press to select an appropriate period of Snack Size...
- Page 67 Using Reminders Alarm Clock This reminder turns on the meter. You can dismiss it by pressing You can re-schedule (snooze) it to occur in 15 minutes by pressing Reminders bG Test Reminders From the Reminders screen, press Alarm Clock Alarm Clock Date Reminders select Alarm Clock.
- Page 68 Alarm Clock Press to enter. HH MM 9:00 bG Test Press to select Off, bG Test, Injection or 0:00 bG Test 0:00 Other as needed. Other 0:00 Press to confirm. 0:00 Cancel Alarm Clock Where appropriate, repeat steps 2 to 4 to set HH MM bG Test 9:00...
- Page 69 Using Reminders Date Reminders – Dr. Visit This reminder does not turn on the meter, but sounds as soon as you turn on the meter on the selected day. You can dismiss it by pressing Reminders bG Test Reminders Alarm Clock From the Reminders screen, press Date Reminders select Date Reminders.
- Page 70 Press to enter the day box. Dr. Visit Reminder Press to select the day. Appointment Date/Time Press to confirm and enter the month box. Date 12 Mar 2 Feb DD MMM Press to select the month. Time --:-- HH MM (Optional) Press to confirm and enter the year box.
- Page 71 Using Reminders Date Reminders – Lab Test This reminder does not turn on the meter, but sounds as soon as you turn on the meter on the selected day. You can dismiss it by pressing Reminders bG Test Reminders From the Reminders screen press Alarm Clock Date Reminders select Date Reminders.
- Page 72 Press to enter the day box. Lab Test Reminder Press to select the day. Appointment Date/Time Press to confirm and enter the month box. Date 12 Mar 2 Feb DD MMM Press to select the month. Time --:-- HH MM (Optional) Press to confirm and enter the year box.
-
Page 73: Changing Your Meter Settings
Changing your system Settings 6 Changing your meter Settings As your life or health situation may change, you may need to change some of the values in your meter settings. Discuss with your healthcare professional before you change settings. From main menu press to move to Settings. -
Page 74: Bolus Advice
You will find the particular settings as follows: Reminders Reminders › bG Test Reminders › After High bG bG Test Reminders Alarm Clock › After Low bG Date Reminders › After Meal › Alarm Clock › Alarm Clock 1– 8 Back ›... -
Page 75: Time Format
Changing your system Settings Meter › Warning Limits › Hyper (high) › Hypo (low) › Key Lock › ON / OFF › Language › Units › Grams, BE, KE, CC › Insulin Increment › Max Bolus Sound / Vibrate Sound/Vibrate ›... -
Page 77: Appendix
Appendix Appendix A Calculating a correct bolus is a tricky business. If you had to work it out yourself, here’s what you would have to do. - Page 79 Appendix...
- Page 81 Appendix...
- Page 83 Appendix Where to find the Bolus Advice settings on the meter Manual calculation On your meter Time dependence of Time Blocks: parameters In Settings › Bolus Advice › Time Blocks (circadian rhythm) Carb Ratio: Insulin-to-carbohydrate ratio Within each Time Block (in Settings › Bolus Advice ›...
- Page 84 Manual calculation On your meter Meal Rise: Prevention of double dosage In connection with Acting Time after meal and Offset Time (in Settings › Bolus Advice › Advice Options). Offset Time Acting Time Prevention of double dosage after a high bG test result after a correction bolus.
- Page 85 Appendix Appendix B: Bolus Advice Calculations In this section you will learn how Bolus Advice recommendations are calculated. To make sure that the recommendations meet your needs, you must give the Bolus Advice feature on your meter some extra information, as well as the basic blood glucose (bG) and carbohydrate values.
- Page 86 Time Blocks Time Blocks Your insulin needs may vary depending on the time of day, Start 0:00 5:30 so using the same values and factors throughout the 5:30 11:00 day would probably not suit your metabolism or lifestyle. 11:00 17:00 21:30 17:00 This could also lead to incorrect doses of insulin.
- Page 87 Appendix Within Time Blocks you will find the following settings: Time Blocks Target Range 4.0 mmol/L 8.0 mmol/L Carb Ratio 10 g Insulin Sensitivity 2.2 mmol/L Cancel Save Target Range Your bG results should be between the lower and upper values of the Target Range as long as you are fasting (in the morning or before a meal).
- Page 88 Without a meal – that means, when you do not enter Carbs – these are the Calculations If your bG level is … … the Bolus calculation is (bG – Target bG) × Insulin Sensitivity above Hyper Warning Additional recommendation to measure BG more frequently and check for ketones.
- Page 89 Appendix Before a meal – that means, when you enter Carbs – these are the Calculations The Meal bolus will always be calculated as: carbs × insulin-to-carb-ratio If your bG level is … … the Bolus calculation is (bG – Target bG) × Insulin Sensitivity + Meal bolus.
- Page 90 Health Events Health Events If your routine was always the same from one day to the Exercise 1 -10% Exercise 2 -20% next, then Time Blocks would provide enough information Stress to calculate the correct boluses. However, sometimes your Illness +20% Premenstrual daily routine may be different and your insulin needs will...
- Page 91 Appendix When one of the programmed Health Events occurs in your daily life, you can choose the Health Event on your meter so that Bolus Advice can calculate the correct insulin dose. You can program five different Health Events: · Exercise 1 ·...
- Page 92 Meal Rise After a meal, bG levels usually increase by a noticeable amount, even in people without diabetes. Depending on the type of meal, your bG can reach a maximum about an hour after your meal and return to its original level after another one to two hours.
- Page 93 Appendix Snack Size The Snack Size defines a certain amount of carbohydrates for which a meal bolus is calculated, but no Meal Rise is triggered. No bG level above the Target Range or currently allowed bG is tolerated for this amount of carbohydrates, so Bolus Advice will calculate a correction bolus for any increase in bG after a snack.
- Page 94 Offset Time The Offset Time is the time taken for the bolus to take effect. After the Offset Time, your bG level should decrease because of the insulin, and at the end of the Acting Time it should return to the target level. The Offset Time must be at least 45 minutes, and the maximum value will be limited by the Acting Time that you choose.
- Page 95 Appendix Example The following example explains the effect of the Offset Time and Acting Time: bG level hyper Target Value Target Range hypo Current Bolus bG values Fig. 2: Example blood-sugar curve (bG-level) You calculate and administer a correction bolus at 12 o’clock. The insulin needs time to become effective, so your bG value (dotted line) may not be significantly reduced, even by 2 o’clock.
- Page 96 hyper Target Value Target Range hypo Current Potential Bolus bG values bG level Fig. 3: Example blood-sugar curve – double dosage However, at 2 o’clock, if Bolus Advice took only your current bG value into consideration, it would ignore the ongoing effect of your correction bolus. It would then recommend an additional bolus to compensate for the raised bG value.
- Page 97 Appendix The currently allowed bG value considers the following factors: · The upper limit of the Target Range for your current Time Block · Excursions beyond the Target Value that have had a correction bolus that is still active (Acting Time) ·...
- Page 98 Acting Time bG level Offset Time hyper Target Value Target Range hypo Time Current Bolus Currently allowed Bolus bG values bG value: corrected bG not required Fig. 4: Corrected high bG The above diagram shows an example of the effect of this rule. The first correc- tion bolus at 12 o’clock remains active during the Acting Time (the width of the blue area).
- Page 99 Appendix bG level hyper Target Value Target Range hypo Current Bolus bG values Fig. 5: Subsequent boluses Where the measured value is greater than the currently allowed bG value, the newly calculated bolus (light-blue) only considers the difference between the current bG value (dotted line) and the currently allowed bG value (the height of the blue area).
- Page 100 Acting Time bG level hyper Offset Time Target Value Target Range hypo Time Current Currently allowed Bolus Meal Bolus bG values not required bG value: Meal Rise Fig. 6: Subsequent meal boluses Subsequent meals If you eat several meals in a row, the Meal Rise will not add up, but start afresh for each new meal bolus.
-
Page 101: Meal Bolus
Appendix Appendix C The Mathematical Basis for Bolus Calculations Below is a list of the most important formulas and principles that Bolus Advice uses to calculate your bolus. It is difficult to accurately calculate a bolus your- self using these formulas (remembering to include the Acting Time and Offset Time of your most recent boluses). -
Page 102: Correction Bolus
Currently Allowed bG Value The currently allowed bG Value considers all blood sugar excursions, that have already been treated by a meal- and/or correction- bolus. For all bG test results below the currently allowed bG value no correction will be recommended. - Page 103 Appendix Correction Bolus with Carbohydrate Intake Whenever you tell Bolus Advice that you have consumed carbohydrates, the related meal bolus is always offset against any correction bolus (even negative). When you eat a meal, Bolus Advice also calculates the correction bolus for bG results that are within the Target Range;...
- Page 104 Changing your Meter Settings 1. From main menu press to move to Settings. 2. Press to enter. The Settings screen appears. 10:02 2 Feb 08 Reminders Bolus Advice Meter Sound/Vibrate Time/Date Time Blocks Menu 3. Use x, to edit the particular setting as needed. 4.
- Page 105 Experience what’s possible. ACCU-CHEK and ACCU-CHEK AVIVA Combo are trademarks of Roche. © 2014 Roche Diagnostics. All rights reserved. www.accu-chek.ca...