Table of Contents
Advertisement
Available languages
Available languages
Quick Links
Advertisement
Chapters
Table of Contents

Related Manuals for Oregon Scientific WTGR800


Summary of Contents for Oregon Scientific WTGR800
- Page 1 Integrated Thermo-Hygro Wind Sensor Model: WTGR800 USER MANUAL...
-
Page 2: Table Of Contents
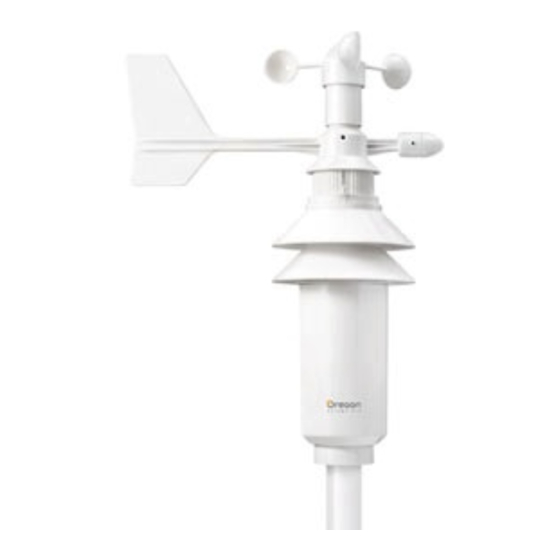
Integrated Thermo-Hygro Wind Sensor INTRODUCTION Model: WTGR800 Thank you for selecting the Oregon Scientific Integrated Thermo-Hygro Wind Sensor (WTGR800). USER MANUAL Sensors with this logo are compatible with this unit. NOTE Please keep this manual handy as you use your new product. It contains practical step-by-step CONTENTS instructions, as well as technical specifications and... -
Page 3: Getting Started
2. Use the screw (Type B) to fix. 3. Assemble the wind vanes on the top of the wind pointer. 4. Use the screw (Type B) to fix. 2 x Rectangular 2 x Round Base Legs U-Shaped Bolts 5. Hold the wind sensor upright and rotate the protective sleeve to the left to unlock. - Page 4 pole into a hard rocky type of ground as it may bend or break the pole. It should be inserted into soft soil. 7. Place a wooden block on the top of the pole. With a hammer, hit the wooden block to insert the pole at a perpendicular angle to the ground until reaching the base.
-
Page 5: Reset
EU-DECLARATION OF CONFORMITY Hereby, Oregon Scientific, declares that this Integrated Thermo-Hygro Wind Sensor (model: WTGR800) is in compliance with the essential requirements and other PRECAUTIONS relevant provisions of Directive 1999/5/EC. A copy of the Do not subject the unit to excessive force, shock, •... -
Page 6: Declaration Of Conformity
Address: 19861 SW 95 Ave.,Tualatin, Oregon 97062 USA Telephone No.: 1-800-853-8883 declare that the product Product No.: WTGR800 Product Name: Integrated Thermo-Hygro Wind Sensor Manufacturer: IDT Technology Limited Address: Block C, 9/F, Kaiser Estate, Phase 1, 41 Man Yue St.,... - Page 7 Integrierter Thermo-Hygro- EINLEITUNG Windmesser Wir danken Ihnen, dass Sie sich für das Integrierter Thermo-Hygro-Windmesser von Oregon Scientific™ Modell: WTGR800 (WTGR800) entschieden haben. BEDIENUNGSANLEITUNG Sensoren mit diesem Logo sind mit diesem Gerät kompatibel. INHALT HINWEIS Halten Sie bitte diese Anleitung bereit, Einleitung ..............
-
Page 8: Erste Schritte
auf der Stahlstange auf: 1. Montieren Sie den Windrichtungszeiger auf der Spitze des Windmessers. 2. Befestigen Sie diesen mit der Schraube (Typ B). 2 x U- 3. Montieren Sie die Windfahne auf der Spitze des rechteckige förmige Windzeigers. Sockelfüße Rundbügel 4. - Page 9 der Schraubenmutter. 17. Stecken Sie die 2 rechteckigen Sockelfüße in den Boden, um die Stange fest zu verankern. 6. Stecken Sie die Stahlstange mit dem Führungsende voran im senkrechten Winkel in den Boden. 18. Um die Standsicherheit der Stange zu gewährleisten, verankern Sie die Zugschnüre mit den 3 Stiften fest im Boden.
-
Page 10: Reset
Sammelstellen, die Sie bei Ihrer Gemeinde erfragen können. • Wenn dieses Produkt auf bestimmte Holzflächen gestellt wird, kann die Oberfläche beschädigt werden. Oregon Scientific ist nicht haftbar für solche Beschädigungen. Entsprechende Hinweise entnehmen Sie bitte der Pflegeanleitung Ihres Möbelherstellers. •... -
Page 11: Über Oregon Scientific
Anzahl d. Kanäle Luftfeuchtigkeit Stromversorgung 4 batteries UM-3 (AA) 1,5 V ÜBER OREGON SCIENTIFIC Besuchen Sie unsere Website www.oregonscientific.de und erfahren Sie mehr über unsere Oregon Scientific- Produkte. Auf der Website finden Sie auch Informationen, wie Sie im Bedarfsfall unseren Kundendienst erreichen und Daten herunterladen können. - Page 12 Sensor termohigráfico de viento integrado INTRODUCCIÓN Modelo: WTGR800 Gracias por elegir Sensor termohigráfi co de viento integrado de Oregon Scientifi c (WTGR800). MANUAL DE USUARIO Los sensores con este logotipo son compatibles con esta unidad. CONTENIDO Introducción............... 1 NOTA Tenga este manual a mano cuando use el nuevo producto.
- Page 13 1. Confi gure el indicador de la dirección del viento en la parte superior del sensor de viento. 2. Use el tornillo (Tipo B) para fi jarlo. 3. Instale las veletas en la parte superior del anemómetro. 4. Use el tornillo (Tipo B) para fi jarlo. 2 x Cierre 2 x Patas redondo en...
- Page 14 Golpee el bloque de madera perpendicularmente con Para instalar la unidad principal del anemómetro en un martillo hacia el suelo hasta alcanzar la base. un palo: 1. Retire el tornillo que fi ja el conector de plástico al mástil superior. 2.
- Page 15 Por medio de la presente Oregon Scientifi c declara que el sin electricidad estática. Sensor termohigráfi co de viento integrado ( Modelo: WTGR800) • No limpie la unidad con materiales abrasivos o cumple con los requisitos esenciales y cualesquiera otras corrosivos.
- Page 16 Capteur de vent thermo-hygrométrique INTRODUCTION intégré Merci d’avoir choisi cette Capteur de vent thermo-hygro- métrique intégré (modèle WTGR800) Oregon Scientific Modèle:WTGR800 Les capteurs au logo suivant sont compatibles avec MANUEL DE L’UTILISATEUR cet appareil. REMARQUE Veuillez conserver ce manuel pour toutes TABLE DES MATIERES références ultérieures.
- Page 17 2. Utilisez la vis (type B) pour le fixer. 3. Fixez la girouette au sommet du pointeur de vent. 4. Utilisez la vis (type B) pour la fixer. 2 x boulons en 2 x pieds de base rectangulaires 5. Tenez l’anémomètre droit et tournez le manchon de protection vers la gauche pour le déverrouiller.
- Page 18 enfoncer la perche perpendiculairement dans le sol jusqu’à avoir atteint la base. Installation du corps principal de l’anémomètre sur une perche existante: 1. Retirez la vis qui fixe le connecteur plastique au bout de la perche supérieure. 2. Enlevez le connecteur plastique. 3.
- Page 19 N’utilisez que des piles neuves. Ne pas mélanger des Par la présente, Oregon Scientific déclare que Capteur piles neuves et usagées. de vent thermo-hygrométrique intégré (Modèle: WTGR800) est conforme à la directive européenne 89/336/CE. Une • Les images de ce manuel peuvent dif férer de l’aspect copie signée et datée de la déclaration de conformité...
- Page 20 Sensore integrato termoigrometrico di INTRODUZIONE direzione del vento Grazie per aver scelto la Sensore integrato termoigrometrico di direzione del vento ( WTGR800 ) di Oregon Scientific Modello: WTGR800 I sensori con questo logo sono compatibili con MANUEL DE L’UTILISATEUR questa unità.
- Page 21 direzione del vento sull’asta in acciaio: 1. Montare l’indicatore della direzione del vento sulla parte superiore del sensore. 2. Fissarlo con la vite di tipo B. 3. Montare la ruota a coppette sulla parte superiore 2 staffe per la base 2 bulloni dell’indicatore.
- Page 22 l’asta in un terreno di tipo roccioso, poiché potrebbe piegarsi o spezzarsi. Deve essere collocata in un terreno morbido. 7. Collocare un blocchetto di legno sulla parte superiore dell’asta. Con l’aiuto di un martello, battere sul blocchetto di legno per conficcare perpendicolarmente nel terreno l’asta, fino alla base.
- Page 23 Con la presente Oregon Scientific dichiara che questo • Non immergere l’unità in acqua. Se si versa del prodotto (modello WTGR800) è conforme ai requisiti liquido sul prodotto, asciugarlo immediatamente con essenziali ed alle altre disposizioni pertinenti stabilite dalla direttiva 1999/5/CE. Una copia firmata e datata della un panno morbido e liscio.
- Page 24 Geïntegreerde Thermo-Hygro Windsensor INTRODUCTIE Model: WTGR800 Dank u dat u gekozen hebt voor het Oregon Scientific Geïntegreerde Thermo-Hygro Windsensor (WTGR800). HANDLEIDING Sensoren met dit logo worden door het apparaat ondersteund. INHOUD NB Houd deze handleiding bij de hand terwijl u uw nieuwe product gebruikt.
- Page 25 2. Gebruik de schroeven (Type B) om hem vast te draaien. 3. Zet de windmeter boven op de windvaan. 4. Gebruik de schroeven (Type B) om hem vast te draaien. 2 x Rechthoekige Grondhaak Uvormige Bouten 5. Houd windsensor rechtop draai beschermhoes linksom om hem te openen.
- Page 26 Om de windsensor op een bestaande paal te bevestigen: 1. Verwijder de schroef van de plastic steun op de bovenpaal. 2. Schuif de steun omlaag. 3. Verwijder de plastic basis van de bijgeleverde stalen paal als u deze reeds bevestigd had. 4.
- Page 27 Reinig het apparaat niet met krassende of bijtende Bij deze verklaart Oregon Scientific dat deze Geïntegreerde materialen. Thermo-Hygro Windsensor (Model: WTGR800) voldoet • Laat de interne componenten met rust. Anders kan aan de essentiële eisen en aan de overige relevante dit de garantie beïnvloeden.
- Page 28 Agradecemos por selecionar a Sensor de vento termo- Modelo: WTGR800 higrômetro integrado da Oregon Scientifi c Scientifi c Scientifi c (WTGR800). MANUAL DO USUÁRIO Os sensores que trazem este logo são compatíveis com este aparelho. NOTA Mantenha este manual à mão ao utilizar seu CONTEÚDO...
- Page 29 3. Monte as pás de vento na parte superior do indicador de vento. 4. Utilize o parafuso (Tipo B) para prender. 2 Parafusos 2 Pernas-Base Redondos em Retangulares “Formato U” 5 Segure o sensor de vento perpendicularmente e gire a capa protetora para a esquerda para abrir. 6.
- Page 30 7. Coloque um bloco de madeira no topo do pólo. Utilize um martelo para bater no bloco de madeira e inserir o polo, em ângulo perpendicular, no solo até atingir a base. Montagem da parte principal do sensor de vento em um pólo já...
- Page 31 Não altere os componentes internos da unidade. Isso Oregon Scientifi c declara que este Sensor de vento invalidará sua garantia. termohigrômetro integrado (WTGR800) está conforme • Utilize apenas pilhas novas. Não misture pilhas novas com os requisitos essenciais e outras provisões da e usadas.
- Page 32 Integrerad Thermo-Hygro Vind-sensor INTRODUKTION Tack för ditt val av en Oregon Scientific Integrerad Modell: WTGR800 Thermo-Hygro Vind-sensor (WTGR800). BRUKSANVISNING Sensorer med denna logo är kompatibla med denna enhet. IINNEHÅLL NOTERA Ha denna manual tillhands när du använder Introduktion ..............1 din nya produkt. Den innehåller en praktisk steg- för-steg instruktion, samt teknisk specifikation och...
- Page 33 3. Montera vindkopparna ovanpå vindriktningsfanan. 4. Använd skruv (Typ B) för att fästa. 2 x Rektangulära 2 x Runda basben U-formade bultar 5. Håll vindgivaren uppåt och vrid skyddshylsan åt vänster för att lossa. 6. Skjut hylsan neråt för att öppna batterifacket. 7.
- Page 34 Att sätta upp vindgivaren på en befintlig stolpe: 1. Ta bort skruven som håller plastskarven i botten av toppstolpen. 2. Skjut ner plastskarven. 3. Ta bort plastfästet från metallstolpen om den redan är monterad. 4. Montera fästet i botten på toppstolpen med den redan monterade skruven.
- Page 35 EU-FÖRSÄKRAN OM ÖVERENSSTÄMMELSE • Rengör inte produkten med rengöringsmedel som Härmed intygar Oregon Scientific att denna Integrerad innehåller repande eller korroderande material. Thermo-Hygro Vind-sensor (Modell:WTGR800) står I • Mixtra inte med interna komponenter. Detta förverkar överensstämmelse med de väsentliga egenskapskrav och garantin.
- Page 36 © 2007 Oregon Scientifi c. All rights reserved. 086L005069-012...