Table of Contents
Advertisement
Available languages
Available languages
Quick Links
Advertisement
Chapters
Table of Contents

Related Manuals for Oregon Scientific GP123


Summary of Contents for Oregon Scientific GP123
- Page 1 GPS Scout Backtrack Altimeter Model: GP123 USER MANUAL...
-
Page 2: Table Of Contents
GPS Scout GPS mode ..............8 Backtrack Altimeter LED light ..............10 Backlight / keypad lock ..........10 Model: GP123 Water resistance ............10 USER MANUAL Specifications ..............10 Precautions ..............10 About Oregon Scientific ..........11 INDEX EU declaration of conformity ........11 Introduction ..............2 Overview ................2 Front view ..............2... -
Page 3: Overview
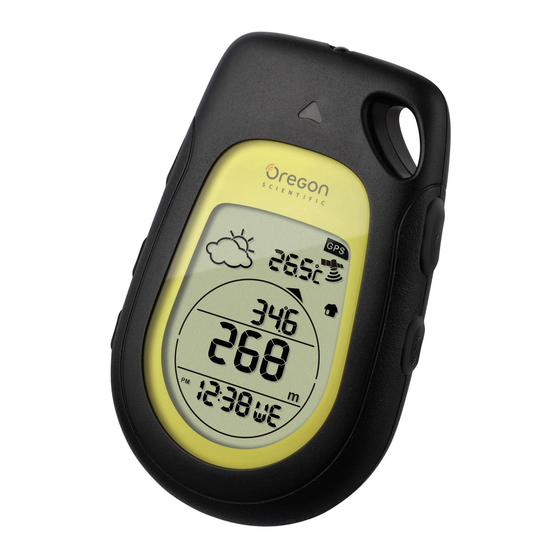
GP123 comes equipped with GPS, altimeter, barometer, compass and alarm. With easy-to-view display and sturdy yet comfortable palm- grip design, the GP123 is useful when venturing outdoors. View at a glance temperature, time and weather forecast information as well as data relating to altitude, barometer, compass and GPS depending on your selection. -
Page 4: Lcd Screen
14. Measurement units (hPa, m, km / ft, inHg, mi) : low battery indicator : direction indicator BATTERY REPLACEMENT The GP123 uses 2 x AAA batteries which have already been installed. If the battery power of the unit is low, and ‘need new batt’... -
Page 5: Displays
To replace battery: DISPLAYS 1. Lift up the ring lever part of the screw and rotate counter OPERATION MODES clockwise to open battery compartment. 2. Remove battery compartment cover. Press DISP/- to toggle between modes: 3. Insert the batteries, matching the polarities. 4. -
Page 6: To Set Clock And Alarm
To disable alarm: Press any key. ALTIMETER AND BAROMETER MODES ABOUT THE ALTIMETER - BAROMETER The altimeter measures altitude in either meters or feet. The device is equipped with an intelligent barometer that determines altitude by the built-in sensor and advanced Baro-compensation technology. -
Page 7: To Set Sea Level Pressure
maximum altitude record (yes / no), then SET to COMPASS MODE confirm. IMPORTANT Although the compass has been calibrated during the manufacturing process, it is highly recommended to calibrate the compass before first use to take into account TO SET SEA LEVEL PRESSURE location factors which may affect the compass. -
Page 8: Compass Sensor Calibration
To calibrate the compass sensor: 1. Press DISP/- repeatedly to navigate to compass mode. 2. Press and hold SET. Display will show CALI and smart prompt 3. Press SET to start calibration. 4. Rotate the unit clockwise at a constant speed. The moving segments around the circumference of the display act as a guide. -
Page 9: True North Calibration
For places elsewhere in the world, visit the website: 2. Press and hold SET. Display will show CALI. http://www.magnetic-declination.com 3. Press DISP/- to toggle to True North option. Display will show NORTH. When you set the declination angle on the compass you compensate for the difference between true and magnetic 4. - Page 10 The signal quality is as follows: To search for stored location (backtrack function): 1. Press DISP/- repeatedly to navigate to GPS mode. Excellent 2. Once GPS signal has been successfully found, press repeatedly to select the symbol which represents the location you wish to return to. Good 3.
-
Page 11: Precautions
WATER RESISTANCE damage. Use luke warm water and mild soap to clean the unit thoroughly after each training session. Never The GP123 is splash proof only. use the products in hot water or store them when wet. • Do not subject the product to excessive force, shock, dust, temperature changes, or humidity. - Page 12 Do not touch the exposed electronic circuitry, as there is a danger of electric shock. Hereby, Oregon Scientific, declares that this GPS Scout Backtrack Altimeter (model: GP123) is in compliance with • Check all major functions if the device has not been the essential requirements and other relevant provisions used for a long time.
- Page 13 GPS-Pfadfinder und Nordpol-Kalibrierung ..........8 GPS-Modus ..............9 Backtrack-Höhenmesser LED-Beleuchtung ............10 Modell: GP123 Hintergrundbeleuchtung / Tastensperre ....10 Wasserfestigkeit ............10 BEDIENUNGSANLEITUNG Technische daten ............11 Vorsichtsmaßnahmen ..........11 Über Oregon Scientific ..........12 INHALT EU-Konformitätserklärung .........12 Einleitung ...............2 Übersicht ................2 Vorderansicht ............2 LCD-Bildschirm ............3 Batteriewechsel .............3 Anzeigearten ..............4...
-
Page 14: Einleitung
Wir danken Ihnen, dass Sie sich für den GPS-Pfadfinder VORDERANSICHT und Backtrack-Höhenmesser von Oregon Scientific (GP123) entschieden haben. Der GP123 ist nützlich bei allen Outdoor-Aktivitäten und verfügt über GPS, einen Höhenmesser, Barometer, Kompass sowie Alarmfunktion. Durch das leicht ablesbare Display, der stabilen und dennoch bequemen Kreuzgriff-Ausführung, ist der GP123 besonders... -
Page 15: Lcd-Bildschirm
14. Maßeinheiten (hPa, m, km / Fuß, inHg, mi) : Batterieladeanzeige : Richtungsanzeiger BATTERIEWECHSEL Der GP123 benötigt 2 Batterien des Typs AAA, die bereits im Gerät eingelegt sind. Wenn die Batterieladung des Geräts zur Neige geht, wird das 1. Gibt an, welcher Modus (ALTI / BARO / COMPASS Symbol und ‘need new batt’... -
Page 16: Anzeigearten
So wechseln Sie die Batterie aus: 1. Heben Sie den ringförmigen Hebel der Schraube an und drehen Sie ihn gegen den Uhrzeigersinn, um das Batteriefach zu öffnen. DISP/- DISP/- 2. Lösen Sie die Abdeckung des Batteriefachs. 3. Legen Sie die Batterien ein und achten Sie auf die Übereinstimmung der Polaritäten. -
Page 17: So Stellen Sie Uhrzeit Und Alarm Ein
der modernen Druck-Kompensations-Technologie ermittelt. SO STELLEN SIE UHRZEIT UND ALARM EIN Er erkennt auch die Abweichungen des Luftdrucks, die 1. Halten DISP/- gedrückt, durch Wetterbedingungen verursachte Schwankungen der Uhreinstellungsmodus aufzurufen. physikalischen Höhen- und Druckwerte entstehen. Dadurch werden Diskrepanzen beseitigt, und der Höhenmesser 2. -
Page 18: So Stellen Sie Den Luftdruck Auf Meereshöhe Ein
SO STELLEN SIE DEN LUFTDRUCK AUF KOMPASS-MODUS MEERESHÖHE EIN WICHTIG Obwohl der Kompass beim Herstellungsverfahren kalibriert wurde, wird unbedingt empfohlen, ihn vor 1. Drücken Sie wiederholt auf DISP/-, um zum Barometer- erstmaligen Inbetriebnahme kalibrieren, Modus zu gelangen. Standortfaktoren zu berücksichtigen, die sich auf den 2. -
Page 19: Kalibrierung Des Kompass-Sensors
ebenen und waagerechten Fläche durchgeführt werden. Falls keine ebene und stabile Fläche verfügbar ist, stellen Sie das Gerät so auf Ihre Handfläche, dass es senkrecht zu Ihrem Körper steht. Drehen Sie das Gerät mit der anderen Hand, um es zu kalibrieren. So kalibrieren Sie den Kompass-Sensor: 1. -
Page 20: Nordpol-Kalibrierung
Deklinationen in den Vereinigten Staaten: • , um den Wert zu erhöhen oder zwischen http://www.ngdc.noaa.gov/geomagmodels/Declination.jsp Optionen zu wechseln • DISP/-, um den Wert zu verringern oder zwischen 1. Geben Sie Ihre Postleitzahl in das Textfeld ein. Optionen zu wechseln 2. Klicken Sie auf “Get Location”. •... -
Page 21: Gps-Modus
Wenn ‘EIN’ gewählt wurde, drehen Sie das Gerät, um Die Signalgüte wird wie folgt angezeigt: den Richtungsanzeiger bei Aufforderung auf Norden auszurichten; drücken Sie anschließend zur Bestätigung Ausgezeichnet auf SET. HINWEIS Wenn die Funktion des Deklinationswinkels eingeschaltet ist, wird die Nordpol-Funktion automatisch Mangelhaft abgeschaltet, und umgekehrt. -
Page 22: Led-Beleuchtung
HINWEIS REACH erscheint, wenn Sie sich in unmittelbarer gibt an, dass die Tasten gesperrt sind. Nähe des gespeicherten Standorts befinden. WASSERFESTIGKEIT HINWEIS Wenn innerhalb von 15 Minuten keine Taste Der GP123 ist nur spritzwassergeschützt. gedrückt wird, erscheint “SLEEP“ auf dem Display, d.h. -
Page 23: Technische Daten
Reinigungsmittel, da diese das Gerät beschädigen TECHNISCHE DATEN können. Reinigen Sie das Produkt nach jeder Trainingseinheit sorgfältig mit lauwarmen Wasser und Echtzeituhr 12-/24-Stunden mit Stunde, Minute einer milden Seife. Verwenden Sie das Produkt niemals -5 °C bis 50 °C in heißem Wasser und lagern Sie es nicht in feuchtem Temperatur-bereich (23 °F bis 122 °F) Zustand. -
Page 24: Über Oregon Scientific
Zeit nicht benutzt wurde. Sorgen Sie für Hiermit erklärt Oregon Scientific, dass die GPS-Pfadfinder eine regelmäßige Kontrolle und Reinigung Ihres Geräts. und Backtrack-Höhenmesser (Modell: GP123) mit den Lassen Sie Ihre Uhr jährlich bei einer zugelassenen grundlegenden Anforderungen und anderen relevanten Service-Zentrale warten. - Page 25 GPS Explorador Calibración del norte geográfico ......8 Modo GPS ..............9 Altímetro con retroceso Piloto LED ..............10 Modelo: GP123 Retroiluminación / bloqueo del teclado ....10 Resistencia al agua .............10 MANUAL DE USUARIO Especificaciones ............10 Precauciónes ...............11 Sobre Oregon Scientific ..........12 CONTENIDOS EU –...
-
Page 26: Introducción
GPS, altímetro, barómetro, brújula y alarma. Pantalla de fácil consulta y diseño resistente pero cómodo para cogerlo con la palma de la mano, el GP123 es muy útil cuando se sale al aire libre. Consulte de un vistazo información sobre temperatura, hora y predicción meteorológica, así... -
Page 27: Pantalla Lcd
: indicador de pila gastada : indicador de la dirección CÓMO CAMBIAR LAS PILAS El GP123 funciona con 2 pilas AAA que ya lleva instaladas. Si las pilas se gastan, y aparecen el símbolo y "need new batt", cambie las pilas rápidamente para garantizar que el GPS y las demás utilidades funcionen correctamente. -
Page 28: Pantallas
Cómo cambiar las pilas: 1. Levante la anilla que hay en la parte superior del tornillo y hágala girar en la dirección contraria a las agujas del reloj para abrir el compartimento para pilas. 2. Retire la cubierta del compartimento para pilas. DISP/- DISP/- 3. -
Page 29: Cómo Configurar Reloj Y Alarma
CÓMO CONFIGURAR RELOJ Y ALARMA MODOS DE ALTÍMETRO Y BARÓMETRO 1. Pulse DISP/- y manténgalo pulsado para entrar en ACERCA DEL ALTÍMETRO-BARÓMETRO modo de configuración de la hora. El altímetro mide la altitud en metros o pies. El dispositivo 2. Configure la hora y la alarma pulsando los siguientes va equipado con un barómetro inteligente que determina la botones: altitud mediante el sensor incorporado con la tecnología de... -
Page 30: Para Configurar La Presión A Nivel Del Mar
PARA CONFIGURAR LA PRESIÓN A NIVEL DEL MAR MODO BRÚJULA 1. Pulse DISP/- repetidamente para acceder al modo de IMPORTANTE Aunque la brújula ha sido calibrada durante barómetro. el proceso de fabricación, recomendamos encarecidamente calibrarla antes de usarla por primera vez para incorporar 2. -
Page 31: Calibración Del Sensor De La Brújula
Para calibrar el sensor de la brújula: 1. Pulse DISP/- repetidamente para acceder al modo de brújula. 2. Pulse SET y manténgalo pulsado. La pantalla mostrará CALI y el icono que indica que debe empezar la calibración. 3. Pulse SET para iniciar la calibración. 4. -
Page 32: Calibración Del Norte Geográfico
2. Haga clic en “Obtener localización”. • DISP/- para reducir el valor o alternar entre opciones 3. Desplácese hacia abajo y haga clic en “Calcular”. • SET para confirmar. Para declinaciones en Canadá: http://geomag.nrcan.gc.ca/apps/mdcal-eng.php CALIBRACIÓN DEL NORTE GEOGRÁFICO Si no sabe el ángulo de declinación, puede utilizar la función de norte geográfico para compensar la diferencia entre el Para obtener la declinación en su ciudad/país visite la polo norte magnético y el geográfico. -
Page 33: Modo Gps
Una vez localizada una señal GPS, el dispositivo puede MODO GPS almacenar hasta 3 localizaciones al mismo tiempo. Cada CONSEJO Salga al aire libre y colóquese en un lugar localización está representada por un icono: despejado para obtener la mejor calidad de señal GPS. No se mueva mientras el dispositivo busca señal GPS. -
Page 34: Piloto Led
RESISTENCIA AL AGUA NOTA Si no ha pulsado ningún botón en un plazo de 15 El GP123 solamente es resistente a salpicaduras. minutos, SLEEP aparecerá en la pantalla, lo cual significa que el GPS ha entrado en modo de espera. Pulse cualquier botón para volver al modo de GPS. -
Page 35: Precauciónes
La unidad principal contiene componentes que el Gama de presión a 900 a 1.100 hPa usuario no debe manipular. nivel del mar (26,58 a 32,48 inHg) • No raye la pantalla LCD con objetos duros, porque Predicción Soleado, parcialmente podría causar daños. meteorológica soleado, nublado y lluvia •... -
Page 36: Sobre Oregon Scientific
Por medio de la presente Oregon Scientific declara que el aviso. GPS Explorador Altímetro con retroceso (modelo: GP123) cumple con los requisitos esenciales y cualesquiera otras NOTA No todas las funciones y accesorios estarán disposiciones aplicables o exigibles de la Directiva 1999/5/ disponibles en todos los países. - Page 37 GPS Scout Calibration du nord vrai ..........8 Mode GPS ..............9 Backtrack Altimètre Lumière LED ...............10 Modèle: GP123 Rétroéclairage / verrouillage clavier ......10 Résistance à l’eau ............10 MANUEL DE L’UTILISATEUR Caractéristiques ............10 Précautions ..............11 À propos d’Oregon Scientific ........12 TABLE DES MATIERES Europe –...
-
Page 38: Introduction
VUE AVANT (GP123) d’Oregon Scientific Utile pour toutes les activités de plein air, le GP123 est équipé d’un GPS, altimètre, baromètre, boussole et d’une alarme. Avec un affichage facile à voir et conçu pour tenir dans la main fermement mais confortablement, le GP123 est pratique pour s’aventurer dans la nature. -
Page 39: Ecran Lcd
: indicateur pile faible : indicateur de direction REMPLACEMENT DES PILES Le GP123 utilise 2 piles AAA qui ont déjà été installées. Si la charge des pile de l’appareil est basse, et ‘need new batt’ s’affiche, remplacer rapidement les piles pour 1. -
Page 40: Affichages
Pour remplacer les piles : 1. Lever le papillon de la vis et tourner dans le sens contraire des aiguilles d’une montre pour ouvrir le compartiment à piles. 2. Enlever le couvercle du compartiment à piles. DISP/- DISP/- 3. Insérer les piles en alignant les polarités. 4. -
Page 41: Pour Régler L'heure Et L'alarme
d’un capteur intégré et de la technologie de compensation POUR RÉGLER L’HEURE ET L’ALARME barométrique avancée. Il permet également de différencier 1. Appuyer et tenir DISP/- pour entrer dans le mode de la pression causée par les changements d'altitude et par réglage. -
Page 42: Mode Boussole
2. Appuyer et tenir SET pour entrer les réglages. en compte les facteurs locaux qui pourraient affecter la boussole. 3. Régler les options suivantes (pression au niveau de la mer, icones de prévision météo) en appuyant sur les boutons suivants : Pour des lectures plus précises, il est fortement recommandé... -
Page 43: Calibration Du Détecteur Boussole
IMPORTANT La calibration de la boussole doit se faire sur une surface plate et horizontale. Si une telle surface stable n’est pas disponible, le placer sur la paume de la main de façon à être perpendiculaire au corps. Utiliser l’autre main, tourner l’appareil pour calibrer. -
Page 44: Calibration Du Nord Vrai
• DISP/- pour diminuer les valeurs ou alterner les Pour les déclinaisons aux États-Unis : options http://www.ngdc.noaa.gov/geomagmodels/Declination.jsp • SET pour confirmer 1. Entrer votre code postal dans la boite à texte. CALIBRATION DU NORD VRAI 2. Appuyer sur “Get Location”. Lorsque vous ne connaissez pas l’angle de déclinaison, la 3. -
Page 45: Mode Gps
REMARQUE Si l’angle de déclinaison est activé, la Pour que la fonction GPS soit opérationnelle, la qualité du fonction nord géographique s’éteindra automatiquement et signal doit être bonne ou excellente. vice-versa. Une fois que le signal GPS a été trouvé, l’appareil peut stocker jusqu’à... -
Page 46: Lumière Led
NOTE REACH apparaitra quand vous êtes près de la position enregistrée. RESISTANCE A L’EAU Le GP123 est seulement résistant aux éclaboussures. NOTE Si aucun bouton n’a été utilisé dans une période de 15 minutes, SLEEP s’affichera pour indiquer que le GPS a passé... -
Page 47: Précautions
• Soyez prudent lors de la manipulation des piles. Ensoleillé, variable, nuageux, Prévision météo • Retirez les piles à chaque fois que vous rangez le pluvieux produit pour une période indéterminée. Boussole numérique 16 points cardinaux / ordinaux • Lors du changement de piles, veuillez utiliser des piles Alimentation 2 piles UM-4 (AAA) 1.5V neuves comme indiqué... -
Page 48: À Propos D'oregon Scientific
EUROPE – DÉCLARATION DE CONFORMITÉ Par la présente Oregon Scientific déclare que l’appareil GPS Scout Backtrack Altimètre (modèle: GP123) est conforme aux exigences essentielles et aux autres dispositions pertinentes de la directive 1999/5/CE. Une copie signée et datée de la déclaration de conformité est disponible sur demande auprès de notre Service Client. - Page 49 Altimetro multifunzione e GPS con Calibrazione del nord reale ........8 funzione Backtrack Modalità GPS ..............8 Torcia con luce LED ...........10 Modello: GP123 Retroilluminazione / blocco dei tasti ......10 Resistenza all’acqua ...........10 MANUALE PER L’UTENTE Specifiche tecniche .............10 Precauzioni ..............10 Informazioni su Oregon Scientific ......11 INDICE Dichiarazione di conformitá...
-
Page 50: Introduzione
VISTA ANTERIORE con funzione Backtrack (GP123) di Oregon Scientific . Il GP123, utile per tutte le attività all’aperto, è dotato di GPS, altimetro, barometro, bussola e sveglia. Grazie al display di facile lettura e al design resistente ma dalla comoda impugnatura, il GP123 è utile quando ci si avventura all’aperto. -
Page 51: Display Lcd
: indicatore di batteria in esaurimento : indicatore della direzione SOSTITUZIONE DELLE BATTERIE L’unità GP123 funziona con 2 batterie di tipo AAA, già inserite. Se le batterie dell'unità sono in esaurimento, appare l’icona . Sostituire le batterie per garantire il funzionamento... -
Page 52: Visualizzazioni
Sostituzione delle batterie: 1. Per aprire il vano batterie, sollevare l’anello della vite e ruotare in senso antiorario. 2. Togliere la copertura del vano batterie. DISP/- DISP/- 3. Inserire le batterie, rispettando la polarità indicata. 4. Chiudere il vano batterie e ruotare in senso orario per fissare. -
Page 53: Impostazione Di Ora E Sveglia
all’avanzata tecnologia di baro-compensazione. Distingue IMPOSTAZIONE DI ORA E SVEGLIA inoltre le differenze di pressione causate dai cambiamenti 1. Tenere premuto DISP/- accedere alla dell’altitudine fisica da quelle causate dalle condizioni modalità impostazione dell’ora. meteorologiche. In questo modo, vengono eliminate le discrepanze e l'altimetro risulta più... -
Page 54: Impostazione Della Pressione Sul Livello Del Mare
MODALITÀ BUSSOLA IMPOSTAZIONE DELLA PRESSIONE SUL LIVELLO DEL MARE IMPORTANTE Anche se la bussola è stata calibrata durante il processo di produzione, si consiglia caldamente di 1. Premere ripetutamente DISP/- per accedere alla ricalibrarla prima del primo utilizzo, così che vengano presi modalità... -
Page 55: Calibrazione Del Sensore Della Bussola
la bussola sul palmo della mano, in modo che sia perpendicolare al proprio corpo. Ruotare l’unità con l’altra mano per calibrarla. Calibrazione del sensore della bussola: 1. Premere ripetutamente DISP/- per accedere alla modalità bussola. 2. Tenere premuto SET. Sul display apparirà la scritta CALI e l’indicatore smart 3. -
Page 56: Calibrazione Del Nord Reale
Quando si imposta l’angolo di declinazione nella bussola, si Impostazione della calibrazione del nord reale: compensa la differenza tra il nord vero e quello magnetico. In 1. Premere ripetutamente DISP/- per accedere alla questo modo, le rilevazioni della bussola sono più precise. modalità... - Page 57 NOTA Quando si esce dalla modalità GPS, il segnale del Segnalazione della posizione: GPS rimane bloccato per 60 secondi, per permettere di 1. Premere ripetutamente per selezionare l’icona accedere alle altre modalità. desiderata. 2. Tenere premuto per salvare la posizione in Durante la modalità...
-
Page 58: Torcia Con Luce Led
NOTA Quando si è in prossimità della posizione salvata, RESISTENZA ALL’ACQUA appare la scritta REACH. Il GP123 è impermeabile agli spruzzi. NOTA Se non viene premuto nessun tasto per 15 minuti, sul display appare la scritta SLEEP, ad indicare che la SPECIFICHE TECNICHE sessione GPS è... -
Page 59: Informazioni Su Oregon Scientific
Non manomettere i componenti interni. In questo modo si invalida la garanzia del prodotto e si possono provocare danni. L’unità principale non contiene INFORMAZIONI SU OREGON SCIENTIFIC componenti che possono essere riparati dall’utente. • Non graffiare il display LCD con oggetti duri in quanto si Per avere maggiori informazioni sui nuovi prodotti Oregon potrebbero causare danni. - Page 60 GPS Scout Ware noorden kalibreren .........8 GPS-modus ..............9 Terugvind hoogtemeter LED-licht ..............10 Model: GP123 Schermverlichting / toetsblokkering ......10 Waterdicht ..............10 HANDLEIDING Specificaties ..............10 Waarschuwingen ............11 Over Oregon Scientific ..........12 INHOUD EU – conformiteits verklaring ........12 Introductie ..............2 Overzicht ................2 Voorkant ..............2 LCD-scherm .............3...
-
Page 61: Gps Scout
Het scherm is eenvoudig af te lezen en het ontwerp is stevig maar ligt lekker in de hand, dus de GP123 is ideaal voor als u de deur uit gaat. In één oogopslag weet u de temperatuur, de tijd en de weersverwachting, en afhankelijk van uw instellingen ook de hoogte, luchtdruk en GPS-gegevens. -
Page 62: Lcd-Scherm
14. Meeteenheden (hPa, m, km / ft, inHg, mi) : batterijindicator : richtingsindicator BATTERIJ VERVANGEN De GP123 gebruikt 2 x AAA batterijen. Deze zijn al geplaatst. Als de batterijen van het apparaat leeg raken, worden 1. Geeft aan welke modus (ALTI / BARO / COMPASS / 'need new batt' weergegeven. -
Page 63: Weergave
De batterij vervangen: 1. Til het ringetje van de schroef op en draai het tegen de klok in om het batterijvak te openen. 2. Verwijder het klepje van het batterijvak. DISP/- DISP/- 3. Plaats batterijen volgens de polariteit. 4. Sluit het batterijvak, en draai de schroef met de klok mee dicht. -
Page 64: De Klok En De Wekker Instellen
met de geavanceerde baro-compensatie technologie. De DE KLOK EN DE WEKKER INSTELLEN sensor kan ook onderscheid maken tussen drukverschillen 1. Houd DISP/- ingedrukt om de tijdinstellingsmodus te veroorzaakt door fysieke hoogte en weersomstandigheden. openen. Dit voorkomt discrepanties en maakt de hoogtemeter nauwkeuriger dan de meeste apparaten die op de markt 2. -
Page 65: Kompasmodus
3. Stel de volgende opties in (luchtdruk op zeeniveau, Om de nauwkeurigheid te vergroten raden wij aan het weersverwachtingspictogrammen) door op de volgende kompas bij elk buitengebruik te ijken. toetsen te drukken: Het kompas dient geijkt te worden: • om een waarde te verhogen of een optie te kiezen •... -
Page 66: Kompassensor Ijken
voorhanden hebt, plaatst u het apparaat op de palm van de hand, en houdt die haaks op uw lichaam. Met de andere hand draait u het apparaat om te kalibreren. De kompassensor ijken: 1. Druk herhaaldelijk op DISP/- om naar de kompasmodus te gaan. -
Page 67: Ware Noorden Kalibreren
1. Voer uw postcode in in het tekstvak. • DISP/- om een waarde te verlagen of een optie te kiezen 2. Klik op “Get Location”. • SET om te bevestigen 3. Schuif omlaag en klik op “Compute”. Voor declinaties in Canada: WARE NOORDEN KALIBREREN http://geomag.nrcan.gc.ca/apps/mdcal-eng.php Wanneer u niet weet hoe groot de declinatiehoek is, kan... -
Page 68: Gps-Modus
Zodra er een GPS-signaal is gevonden, kan het apparaat GPS-MODUS tot 3 locaties tegelijk opslaan. Voor uw gemak wordt elke TIP Ga naar buiten en zoek een open plek om de beste locatie weergegeven als een pictogram: GPS-ontvangst te krijgen. Sta stil wanneer het apparaat naar een GPS-signaal zoekt. -
Page 69: Led-Licht
NB REACH verschijn op het scherm wanneer u in de buurt van een opgeslagen locatie bent. De GP123 is alleen spatwaterdicht. Als u gedurende 15 minuten geen toets indrukt, verschijnt SLEEP op het scherm om aan te geven dat de SPECIFICATIES GPS is uitgeschakeld. -
Page 70: Waarschuwingen
• Let op bij het behandelen van alle typen batterijen. Zonnig, half bewolkt, bewolkt, Weersverwachting • Verwijder de batterijen als u het product voor langere regenachtig tijd op gaat bergen. Digitaal kompas 16 kardinale / ordinale punten • Wanneer u de batterijen vervangt, gebruik dan Voeding 2 x UM-4 (AAA) 1,5V batterijen alleen nieuwe batterijen zoals aangegeven in deze... -
Page 71: Over Oregon Scientific
EU – CONFORMITEITS VERKLARING Bij deze verklaart Oregon Scientific dat deze GPS Scout Terugvind hoogtemeter (model: GP123) voldoet aan de essentiële eisen en aan de overige relevante bepalingen van Richtlijn 1999/5/EC. Een kopie van de getekende en gedateerde Conformiteits verklaring is op verzoek beschikbaar via onze Oregon Scientific klanten service. - Page 72 GPS Explorador Modo GPS ..............9 Luz LED ...............10 Altímetro Recuo Luz de fundo / bloqueio do teclado ......10 Modelo: GP123 Resistência a água ............10 MANUAL DO USUÁRIO Especificações ............10 Precauções ..............11 Sobre a Oregon Scientific ..........12 CONTEÚDO CE – Declaração de conformidade ......12 Introdução ..............2...
-
Page 73: Introdução
Com uma tela de fácil leitura e um design portátil, confortável e resistente, o GP123 é útil em aventuras ao ar livre. Verifique rapidamente a temperatura, hora e a previsão do tempo, bem como dados referentes à altitude, barômetro, bússola e GPS dependendo de sua seleção. -
Page 74: Tela Lcd
14. Unidades de medida (hPa, m, km / pés, inHg, milhas) : indicador de pilha fraca : indicador de direção TROCA DE PILHA O GP123 usa 2 pilhas AAA, já instaladas. Quando as pilhas estiverem fracas, o ícone e ‘need new batt’ aparecerão na tela. Substitua as pilhas imediatamente a fim de assegurar o funcionamento contínuo do GPS e... -
Page 75: Displays
Para substituir as pilhas: DISPLAYS 1. Levante a argola do parafuso e gire-a no sentido anti- MODOS DE FUNCIONAMENTO horário para abrir o compartimento de pilha. 2. Remova a tampa do compartimento de pilha. Pressione DISP/- para alternar os modos: 3. -
Page 76: Hora / Data / Alarme
NOTA Para sua conveniência, as unidades de medida HORA / DATA / ALARME foram programadas para seguir automaticamente o mesmo Pressione SET para alternar a hora / data / alarme em formato (imperial/métrico). qualquer modo. O ícone aparecerá na tela quando o alarme for ativado. Para desligar o alarme: Pressione qualquer tecla. -
Page 77: Ajustando A Pressão A Nível Do Mar
Para ajustar e reinicializar o altímetro: Este aparelho efetua a previsão do tempo para as próximas 12 a 24 horas. 1. Pressione DISP/- repetidamente para navegar ao modo altímetro. 2. Pressione e mantenha pressionado SET para inserir os ajustes. 3. Pressione ou DISP/- para alterar a altitude atual Parcialmente Ensolarado... -
Page 78: Sobre A Bússola
materiais magnéticos. Evite objetos magnéticos grandes, SOBRE A BÚSSOLA linhas de força, alto-falantes, motores elétricos etc. A bússola mostra a indicação em graus ao Norte junto com 16 direções cardeais/colaterais. A circunferência externa do IMPORTANTE A calibragem da bússola deve ser feita em display consiste em 36 segmentos que mostram a posição uma superfície plana e horizontal. -
Page 79: Calibragem Do Norte Absoluto
Para declinações nos Estados Unidos: CALIBRAGEM DO NORTE ABSOLUTO http://www.ngdc.noaa.gov/geomagmodels/Declination.jsp Quando você não souber o ângulo de declinação, a função de calibragem para o norte absoluto poderá ser utilizada 1. Insira seu código postal na caixa de texto. para compensar a diferença entre o norte absoluto e o 2. -
Page 80: Modo Gps
Quando o sinal do GPS for encontrado, o aparelho é capaz MODO GPS de armazenar até 3 localizações de uma vez. Para sua DICA Dirija-se ao ar livre e coloque-se em uma área aberta conveniência, cada localização é representada por um para uma melhor qualidade de sinal do GPS. -
Page 81: Luz Led
NOTA A palavra REACH aparecerá ao aproximar-se da localização armazenada. RESISTÊNCIA A ÁGUA O GP123 é apenas resistente a respingos. NOTA Se nenhuma tecla for pressionada durante um período de 15 minutos, a palavra SLEEP aparecerá na tela, indicando que o aparelho abandonou o modo GPS. -
Page 82: Precauções
• Tome as devidas precauções ao manusear qualquer Ensolarado, parcialmente Previsão do tempo tipo de pilha. nublado, nublado, chuvoso • Retire as pilhas do aparelho caso tenha a intenção de Bússola digital 16 cardinais / pontos ordinais guardá-lo por um longo tempo. Alimentação 2 pilhas UM-4 (AAA) de 1,5V •... -
Page 83: Sobre A Oregon Scientific
CE – DECLARAÇÃO DE CONFORMIDADE Oregon Scientific declara que este GPS Explorador Altímetro Recuo (modelo: GP123) está conforme com os requisitos essenciais e outras provisões da Diretriz 1999/5/CE. Uma cópia assinada e datada da Declaração de Conformidade está disponível para requisições através do nosso SAC. - Page 84 GPS Scout Kalibrering av verklig Nordriktning ......8 GPS-läge ...............8 Vägfinnande Höjdmätare LED-belysning ...............9 Modell: GP123 Bakgrundsbelysning/ Tangentlås ......10 Vattentålighet ...............10 BRUKSANVISNING Specifikationer ............10 Försiktighetsåtgärder ..........10 Om Oregon Scientific ..........11 INNEHÅLL EU-Försäkran om överensstämmelse .......11 Introduktion ..............2 Produktöversikt .............2 Framifrån ..............2 LCD Display ............3...
-
Page 85: Introduktion
Lagra upp till 3 olika platser och använd den väg-finnande funktionen för att enkelt ta dej tillbaka. VIKTIGT • Mätfunktionerna som är inbyggda i GP123 skall inte ersätta proffesionella mätinstrument eller industriella precisionsanordningar. Värden som visas av denna produkt bör endast ses som rimliga uppskattningar. -
Page 86: Lcd Display
14. Mätenhet (hPa, m, km / ft, inHg, mi) : indikator för låg batterinivå : riktningsindikator BATTERIBYTE GP123 använder 2 x AAA-batterier, som redan är installerade. Om batteriet är svagt i enheten,visas och ‘need new 1. Indikerar vilket läge (ALTI / BARO / COMPASS / GPS) batt’. -
Page 87: Displayer
För att byta batteri: 1. Lyft upp ringen på skruven och vrid moturs för att öppna batteriluckan. 2. Ta bort batteriluckan. DISP/- DISP/- 3. Se till att batterierna sätts in med rätt polaritet. 4. Sätt tillbaka batteriluckan och vrid skruven medurs för att låsa. -
Page 88: Att Ställa Klocka Och Alarm
lufttrycksförändringar som orsakats av väder och förändringar ATT STÄLLA KLOCKA OCH ALARM som orsakats av fysisk höjdskillnad. Denna smarta funktion 1. Tryck håll inne DISP/- för gå eliminerar avvikelser och gör höjdmätaren mer noggrann tidsinställningsläget. än de genomsnittliga höjdmätarna på marknaden. Man kan också... -
Page 89: Kompassläge
Kompassen skall kalibreras: • för att öka värde eller växla funktioner • Före första användning. • DISP/- för att minska värde eller växla funktioner • När du bytt batteri. • SET för att bekräfta. • Innan du åker iväg på en längre utomhusaktivitet. •... -
Page 90: Kalibrering Av Kompassensorn
NOTERA Om ingen knapp tryckts under en 5- DEKLINATIONSVINKEL minutersperiod, kommer kompassen att återvända till Deklinationationen är vinkeln mellan kompassnålens riktning höjdmätarläget (fabriksinställt). och (magnetisk Nordpol) och den verkliga Nordpolen. Deklinationsvinkeln kan variera från 0-30 grader Öst (E) eller Väst (W) och kan hittas på de flesta kartor eller på KALIBRERING AV KOMPASSENSORN internet. -
Page 91: Kalibrering Av Verklig Nordriktning
KALIBRERING AV VERKLIG NORDRIKTNING GPS-LÄGE Om du inte vet deklinationsvinkeln kan funktionen verklig TIPS Förflytta dig utomhus till en öppen plats för att få nordriktningskompensation användas för att kompensera bäst GPS signalkvalitet. Stå stilla när enheten söker efter skillnaden mella magnetisk och verklig nordpunkt. Allt du GPS-signal. -
Page 92: Led-Belysning
Så snart GPS-signalen hittats, kan enheten lagra upp till 3 platser. För enkelhetens skull är varje plats representerat av en ikon: Ikon Föreslagen användning Parkeringsplats Hemma Favoritplats Displayen visar också återstående sträcka. När REACH Att markera en plats: visas, har du kommit till önskad plats. 1. -
Page 93: Bakgrundsbelysning/ Tangentlås
VATTENTÅLIGHET • Använd en mjuk, lätt fuktad trasa. Använd inte GP123 är endast stänkskyddad. repande eller frätande rengöringsmedel då dessa kan orsaka skada. Rengör produkten noggrant efter varje träningstillfälle. Använd aldrig produkterna i hett vatten SPECIFIKATIONER och förvara dem inte fuktiga. -
Page 94: Om Oregon Scientific
Oregon Scientific denna på avsedd miljöstation och får inte slängas som vanligt Scout Vägfinnande Höjdmätare (modell: GP123) står I restavfall. överensstämmelse med de väsentliga egenskapskrav och övriga relevanta bestämmelser som framgår av direktiv • Av trycktekniska skäl, kan displaybilderna i denna 1999/5/EG. - Page 95 © 2010 Oregon Scientific. All rights reserved. P/N:300102793-00003-10...