
Related Manuals for Uniden GnVr 85XX series


Summary of Contents for Uniden GnVr 85XX series
-
Page 1: Security System
GnVr 85XX series security system For more exciting new products please visit our website: australia: www.uniden.com.au OWNER’S MANUAL... -
Page 2: Important Safeguards
iMPortant saFeGuarDs WarninG risK oF electrical sHocK Do not oPen WARNING: TO REDUCE THE RISK OF ELECTRIC SHOCK, DO NOT REMOVE COVER. NO USER SERVICEABLE PARTS INSIDE. REFER SERVICING TO QUALIFIED SERVICE PERSONNEL. The exclamation point within an equilateral triangle is intended to alert the user to the presence of important operating and maintenance (servicing) instructions in the literature accompanying the appliance. -
Page 3: General Precautions
General Precautions All warnings and instructions in this manual should be followed. Remove the plug from the outlet before cleaning. Do not use liquid aerosol detergents. Use a water-dampened cloth for cleaning. Do not use this product in humid or wet places. Keep enough space around the product for ventilation. - Page 4 instructions read and Follow instructions - All the safety and operating instructions should be read before the product is set up and used. Follow all operating instructions. retain instructions - These safety and operating instructions should be retained for future reference. Heed Warnings - Comply with all warnings on the product and in the operating instructions.
- Page 5 built-in installation such as a bookcase or rack unless proper ventilation is provided and the product manufacturer’s instructions have been followed. 10. Water and Moisture - Do not use this product near water - for example, near a bath tub, wash bowl, kitchen sink or laundry tub, in a wet basement, near a swimming pool, etc.
- Page 6 • If the product does not operate normally by following the operating instructions. Adjust only those controls that are covered by the operating instructions. Improper adjustment of other controls may result in damage and will often require extensive work by a qualified technician to restore the product to its nor mal operation.
-
Page 7: Table Of Contents
contents INTRODUCTION ...................9 What’s in the Box? ................10 Getting to know your GNVR ..............11 Getting to know your Cameras ............12 Hardware Connections ................13 Installing the Cameras ................ 14 Adjusting the Camera View Angle ............15 Mouse Operation .................15 BASIC OPERATION ................17 Start up the GNVR system .............. - Page 8 Power Off ..................59 Reboot .....................59 Logout ..................... 59 Device Time ..................59 Volume .................... 60 USING THE APP .................61 WARRANTY ..................66...
-
Page 9: Introduction
• Instant USB backup of live video from selected camera. • Upgradeable firmware. • 3-Step remote view. • Free Uniden GuardianLive iOS and Android compatible apps with live viewing, playback, video recording, and snapshot capability. • Instant email alerts with attached snapshots. -
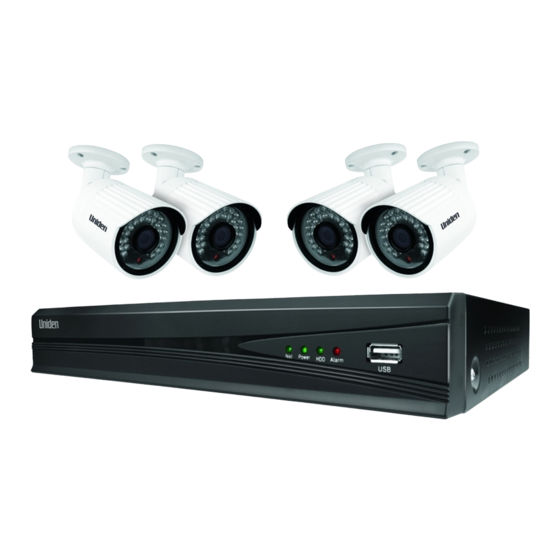
Page 10: What's In The Box
What’s in the Box Model 8-ch nVr outdoor camera GNVR 8540 GNVR 8580 Each NVR comes with: 1. Power Cable 2. HDMI Cable 3. Mouse 4. Ethernet Cable Each Camera comes with: 5. 30m Cat5E Cable 6. Mounting Hardware (not shown here) -
Page 11: Getting To Know Your Gnvr
Getting to Know Your GnVr Front alarm Power Port Network connected Power connected Hard Disk Drive indicator Alarm indicator USB port Back Dc in alarM in/out HDMi (power cable) Port ViDeo in rJ45 (mouse/ (cameras) external HD) (ethernet cable) RS485 and Alarm In/Out Connections: Connect external alarm devices. -
Page 12: Getting To Know Your Cameras
USB port: Connect the included USB mouse. Camera Input: Connect the Uniden 1080P Wired HD cameras. DC IN: Connect the included AC power adapter. installinG tHe GnVr Before installing the GNVR, take into consideration the following points. Ideally, choose a location that is central and has easy access to the mains •... -
Page 13: Hardware Connections
HarDWare connections Follow the steps below to connect the GNVR and the camera(s). 1. Connect the camera to the 30m Ethernet cable and plug the cable into the VIDEO IN port on the GNVR. 2. Connect the HDMI cable (supplied) to the HDMI port on the GNVR and to the external display device (TV/PC) or the VGA cable (not supplied) to the VGA port. -
Page 14: Installing The Cameras
installinG tHe caMeras Installation Tips • Test the cameras before permanent installation. Make a plan for camera wire routing and for camera angle. • Mount the camera so the lens is away from direct and intense sunlight. • Plan to route the wiring so it does not interfere with power lines or telephone lines. -
Page 15: Adjusting The Camera View Angle
Adjusting the Camera View Angle The camera has several adjustment points to provide maximum flexibility when setting the view angle. To make the adjustments, use the hex key included with the Camera Mounting Kit. camera View angle adjustments Mouse Features Right Button Left Button Scroll Wheel... - Page 16 leFt Button • In live view, click to open the Navigation Bar. Right-click to close it. • In live view while in a split-screen display mode, double-click an individual channel to view it in full-screen. Double-click again to return to the split- screen display mode.
-
Page 17: Basic Operation
Basic oPeration start uP tHe GnVr sYsteM Plug in the power supply. The power indicator lights up, the system emits a single beep, and the preview screen displays. The GNVR’s normal start-up mode is multi-screen. GnVr Multi-screen • The GNVR system displays live views of any cameras connected. • The main camera is highlighted. -
Page 18: On-Screen Display
on-screen Display The GNVR system shows the following for all live views. Channel No. Date/Time Instantly record video Zoom Click to . . . Take a snapshot Main Menu The Main Menu allows access to the GNVR’s key functions. Using the mouse, right click the screen during a live view to display the Main Menu. - Page 19 The following features are available without having to log in. • 4:3 - Changes the live view screen aspect ratio from 16 X 9 to 4 X 3. • The 4 screen, 6 screen, 8 screen and 9 screen menu items allow for displaying 4, 6, 8, or 9 live view screens at the same time.
-
Page 20: Full Screen
During a live view with multiple screens displayed, double click any channel to view it in full screen. Full screen Log into the System You must log into the system to access all features of the GNVR. Hover the cursor over start. A sub menu displays: access login screen Click login. -
Page 21: Change Password
Enter the default user name (admin), leave the password field blank, and click login. Change Password Note: It is strongly recommended that you add a password to your system. Right click the screen to display the Main Menu, then left click setting. Click Account. - Page 22 Click setting. setting Menu displays: setting screen Scroll to near the bottom of the screen to Device Time and click Setting. The Device time screen displays.
- Page 23 accessing Device time To set the date and time for your location, click the desired field and then click the up or down arrows.Click OK when complete.
-
Page 24: Advanced Operation
aDVanceD oPeration loG into tHe sYsteM To access the Advanced Settings in the Main Menu, log into the system. Hover the cursor over start. A sub menu displays: access login screen Click login. The login screen displays: login screen... -
Page 25: Advanced Settings In Main Menu
Enter “admin” as the default user name and click login. Change the user name and password to something easily remembered, and be sure to keep a record of the user name and password. aDVanceD settinGs in Main Menu Right-click to access Main Playback - Play video files stored on the Menu hard disk... -
Page 26: Playback
Playback The Playback screen replays recorded video from each individual channel. First select cameras and date and click Search. Recording will then be listed at the bottom. Click the desired time to playback recording at that time frame. Playback Menu • Backward: Play video backwards. -
Page 27: Backup
Backup Store the backup video files from the hard disk to an external storage device such as a USB drive. Access the Backup Menu. Backup Menu Insert a USB drive in the USB port on the GNVR’s front panel. usB Port Click refresh. -
Page 28: Ptz
PtZ (Pan-tilt-Zoom) This function requires a camera with PTZ capability (not included). Set the controls for a camera equipped with Pan-Tilt-Zoom capability. Refer to the PTZ camera manufacturer’s instructions for details on setting the camera’s parameters. PtZ camera Parameters Menu Presets The GNVR system can move a PTZ camera to a specific angle/point of view and then save that setting as a “preset”... -
Page 29: Capture
Cruise “Cruise” refers to the camera’s rotation speed. On the “Cruise” interface, set preset, residence time (amount of time camera pauses at preset points), and cruise speed; click add to confirm the settings. Click Delete to clear the preset. To recall a cruise setting, select the desired cruise number in the drop- down list, then click Track This feature allows a PTZ camera to automatically detect, follow, and record... -
Page 30: Alarm
alarm The GNVR system keeps a record of any alarms received. Use the alarm parameters to tailor the alarms for different situations: • Motion detection • Video loss • Tampering To see a list of alarms received, right click the screen to display the Main Menu, then click alarm. -
Page 31: Setting
In the File Manager screen, click refresh to ensure the latest files display. Double click the file name in the left portion of the screen to display the captured image or file. setting The setting screen specifies parameters for several major functions in the GNVR system. - Page 32 Device setting screen Set the correct date and time to ensure correct time stamping of recorded video. Device info Set parameters or get information for the following: • Device Name - Specify a name for the GNVR. • Device Number - Assign a number to the device. • Record Replace - Enable record overwrite.
-
Page 33: System Version
• Channel Number - Device channel capacity (8 or 16). • HDD Number - The number assigned to the hard disk drive. • Alarm Input Number - Number slot where the input from an alarm device connects to the GNVR rear panel. • Alarm Output Number - Number lot where the output for an alarm device connects to the GNVR rear panel. -
Page 34: Ptz Setting
PtZ setting Set parameters for a Pan-Tilt-Zoom (PTZ) camera. PtZ setting screen • CH - The channel number where a PTZ camera connects Obtain the following information from the PTZ camera: • Protocol • Data Bits • PTZ Address • Bits per Second • Flow Control • Stop Bits • Parity... - Page 35 Dst setting This screen sets Daylight Savings Time for the GNVR system. Click the Enable box to activate the DST settings. Set Daylight saving time to begin on the first Sunday in October and to end on the first Sunday in April. Daylight savings time (Dst) screen Qr code This screen shows a Quick Response (QR) code that contains the Device ID...
- Page 36 channel channel screen The term “Channel” refers to each monitoring camera attached to the GNVR system. The channel screen allows for setting parameters to control several features for each channel. Display setting Sets parameters for each camera’s screen display. Display setting screen • CH - Choose the channel where the camera is connected.
-
Page 37: Video Parameters
• Show Name (2) - Choose to show or hide the Local Camera Name as stamped on the recording. • Local Camera Name - Assign a name to specifi ed camera. • Show Date - Show or hide the current time and date for the selected camera. • Time Format - Choose 24-hour or 12-hour time display. • OSD Position - Sets the place on the screen where the camera name and date are stamped. -
Page 38: Schedule Record
• Bit rate Type - CBR/VBR optional. • Bit rate - Select the appropriate bit rate. • Frame Rate - Choose frame rates from the drop-down list (Default = Full). Higher resolution, bit rate, and frame rate increase the size of recorded video files. - Page 39 Motion Set parameters on each channel for detecting motion.Use the Copy To feature to transfer the settings to other channels. Motion Detection setting screen Channel - select relevant channel to change its motion parameter. • Enable Motion Detection - Choose to enable motion detection. •...
- Page 40 Video lost Set up an alarm notification in case a camera loses video. Use the Copy To feature to transfer the settings to other channels. Video lost screen tampering alarm This screen sets parameters for triggering an alarm caused by tampering with a camera.
-
Page 41: Video Mask
Video Mask Use Video Mask to block off a portion of the camera’s video. Blocked portions will be shown as black boxes. Video Mask screen... -
Page 42: Network Settings
These settings do not require changes. The GNVR series support a P2P connection directly to the Uniden P2P Cloud Server for remote access to your system via an iPhone, iPad, and Android device using the Uniden GuardianLive app. -
Page 43: Ntp Settings
DDns server settings The DDNS server allows for a connection to the Internet a PC with a fixed IP address. DDns settings screen ntP settings Set up Network Time Protocol. ntP settings screen... - Page 44 This feature allows for time synchronization between DVR and network. Internet connection is required. Choose from the list of time zone provided. You can turn off this feature by unticking ‘Enable NTP’.
-
Page 45: Email Setting
email setting Set up parameters so the GNVR can send status messages for motion detection or other events through email. - Enter sender’s email address and password. Gmail is recommended. - Enter receiver’s email address. You can also put user name if preferred. -
Page 46: Alarm Input
Alarm The alarm screen allows configuring alarms for the GNVR system. The GNVR alerts you by popping up live video and playing sound alerts for events such as motion detection, video loss, or hard disk drive problems. alarm screen alarm input Enables alarm processing, sets the alarm schedule, and selects the trigger mode. -
Page 47: Alarm Output
alarm output Sets the alarm output delay and alarm schedule. alarm output screen exception Sets parameters for alarm event types and alarm displays on the monitor. Allows you to choose an audio alarm type. alarm exception screen... -
Page 48: Account
account Enter details of the user account in this screen. account screen account setting Enter user name, password, and specify user type. account setting screen... -
Page 49: Device Log
user online Check the status of an online user’s connection. user online screen System The system screen allows for setting up system parameters as needed. Device log Check the device logs according to the video type and date time. system screen - Device log... -
Page 50: Stream Info
stream info. View the band width of data streaming for each channel. system screen - stream info. HDD setting Check the capacity and free space of the HDD (hard Disk Drive), and format the HDD if needed. system screen - HDD setting... -
Page 51: Auto Reboot
update Update the GNVR system hardware. system screen - update system auto reboot Enable or disable the GNVR system for rebooting once, daily, or weekly. system screen - auto reboot... -
Page 52: Record
Recovery Confi guration Export or import a recovery configuration file. System Screen - Recovery Confi rmation record Main Menu - record The record screen allows for setting the system to record based on a schedule or you can manually turn recording on or off for all channels or individual channels. -
Page 53: Display Setting
record screen Display setting Main Menu - Display setting... - Page 54 Display setting screen Set up the following parameters in the Display screen: • Language - Different kinds of languages for selection (English, French, Spanish, etc.). • Auto Logout - It will logout automatically with no operation during the selected minutes. • Display - Adjust the brightness/ contrast/ saturation/hue of the video screen display • Resolution - Select a different resolution to match the resolution of the...
-
Page 55: Image Setting
image setting Main Menu - image setting image setting screen Adjust the following items in the image setting screen: • Brightness • Contrast • Saturation • Hue... -
Page 56: Ip Channel Setting
iP channel setting Main Menu - iP channel setting iP channel setting - Manual The IP Channel Settings do not require changing. The system automatically identifies when cameras are attached and assigns the IP addresses. iP channel setting - Manual... - Page 57 iP channel setting screen This iP channel setting screen allows setting up parameters for connecting the GNVR system to the Internet. Choose Manual or Automatic to set up all channels or individual channels.
-
Page 58: Other Main Menu Options
otHer Main Menu oPtions Hover the mouse over start in the Main Menu and these options display: • Quick Setup • Power Off • Reboot • Logout • Device Time • Volume Main Menu Features under start QuicK setuP Click Quick setup to return to the initial system setup screens. -
Page 59: Power Off
PoWer oFF Click Power off to shut down the GNVR system. Unplug the Power Adapter to fully remove power from the GNVR. Main Menu - Power off reBoot Click reboot to reboot the GNVR system automatically. Main Menu - reboot loGout Click logout to exit the advanced feature items in the Main Menu. -
Page 60: Volume
VoluMe Click Volume to change the volume of the SELECTED live screen. Main Menu - Volume The camera on the channel showing the live view screen must be equipped with a microphone to pick up sounds around the camera. -
Page 61: Using The App
View live and recorded video remotely using an iOS or Android device and Uniden’s GuardianLive App. From the Apple App Store or Google Play, download the Uniden GuardianLive app. Open the app. Tap Create Account. The Create Account screen displays. -
Page 62: Live Screen
liVe screen Live Screen is the main screen in the GuardianLive app. Back Camera Name Quad View Date &Time display Pause Microphone HD/SD Refresh Remote Playback Alarm Snapshot Record Audio... - Page 63 Pause Tap on a camera view and tap the Pause icon to stop live view. Play Tap on a camera view and tap the Play icon to start the streaming of live view. audio Tap to turn on audio (not available on all models). alert Tap to open the Alarm setting screen and save configuration, so that you can be alerted when...
- Page 64 reMote PlaYBacK screen On the app, in the live view, tap the Playback icon to get the Remote Playback screen displayed. Tap the date displayed on the top right corner of the screen to get the Select Date pop-up box. Tap to scroll through the dates and select the dates that you want to play the recorded video.
- Page 65 snaPsHot screen On the Device List screen, tap on the Menu icon (top left corner) to reveal menu options, About, Recordings, Snapshots and Logout. Tap the option, Snapshots, to view the images that have been taken using the app. Please note, these images are NOT stored on the hard disk. loGout Tap to logout of the app.
-
Page 66: Warranty
GnVr 85XX series important: Satisfactory evidence of the original purchase is required for warranty service. Please refer to our Uniden website for any details or warranty durations offered in addition to those contained below. Warrantor: The warrantor is Uniden Australia Pty Limited ABN 58 001 865 498 (“Uniden Aust”). - Page 67 Product, together with satisfactory evidence of your original purchase (such as a legible copy of the sales docket) to Uniden. Please refer to the Uniden website for address details. You should contact Uniden regarding any compensation that may be payable for your expenses incurred in making a warranty claim.
- Page 68 © 2015 Uniden Australia Pty Limited. Version 1.0...