Table of Contents
Advertisement
Quick Links
Advertisement
Table of Contents
Troubleshooting

Related Manuals for Miller Electric and DS-74DX16


Summary of Contents for Miller Electric and DS-74DX16
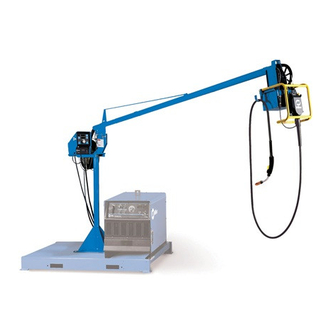
- Page 1 DS-74DX Swingarc Visit our website at www.MillerWelds.com OM-1500-14 207 499H 2007−07 Processes MIG (GMAW) Welding Flux Cored (FCAW) Welding (Gas-and Self-Shielding) Submerged (SAW) Welding Description Wire Feeder (Use with CV Power Sources) DS-74DX12, and DS-74DX16 File: MIG (GMAW)
- Page 2 ISO 9001:2000 Quality System Standard. particular model are also provided. Miller Electric manufactures a full line of welders and welding related equipment. For information on other quality Miller products, contact your local Miller distributor to receive the latest full line catalog or individual specification sheets.
-
Page 3: Table Of Contents
TABLE OF CONTENTS SECTION 1 − SAFETY PRECAUTIONS - READ BEFORE USING 1-1. Symbol Usage ............... . 1-2. - Page 4 TABLE OF CONTENTS SECTION 9 − ELECTRICAL DIAGRAM SECTION 10 − PARTS LIST ..............OPTIONS AND ACCESSORIES WARRANTY .
-
Page 5: Section 1 − Safety Precautions - Read Before Using
DC constant voltage (wire) welder, 2) a DC manual (stick) welder, or 3) an AC welder with reduced open-circuit volt- age. In most situations, use of a DC, constant voltage wire welder is recommended. And, do not work alone! D Disconnect input power or stop engine before installing or servicing this equipment. - Page 6 OM-1500-14 Page 2 D Do not use welder to thaw frozen pipes. D Remove stick electrode from holder or cut off welding wire at contact tip when not in use.
-
Page 7: Additional Symbols For Installation, Operation, And Maintenance
1-3. Additional Symbols For Installation, Operation, And Maintenance FIRE OR EXPLOSION hazard. D Do not install or place unit on, over, or near combustible surfaces. D Do not install unit near flammables. D Do not overload building wiring − be sure power supply system is properly sized, rated, and protected to handle this unit. -
Page 8: California Proposition 65 Warnings
1-4. California Proposition 65 Warnings Welding or cutting equipment produces fumes or gases which contain chemicals known to the State of California to cause birth defects and, in some cases, cancer. (California Health & Safety Code Section 25249.5 et seq.) Battery posts, terminals and related accessories contain lead and lead compounds, chemicals known to the State of California to cause cancer and birth defects or other... -
Page 9: Section 2 − Consignes De Sécurité − Lire Avant Utilisation
SECTION 2 − CONSIGNES DE SÉCURITÉ − LIRE AVANT UTILISATION Se protéger et protéger les autres contre le risque de blessure — lire et respecter ces consignes. 2-1. Symboles utilisés DANGER! − Indique une situation dangereuse qui si on l’évite pas peut donner la mort ou des blessures graves. Les dangers possibles sont montrés par les symboles joints ou sont expliqués dans le texte. - Page 10 Il reste une TENSION DC NON NÉGLIGEABLE dans les sources de soudage onduleur quand on a coupé l’alimentation. D Arrêter les convertisseurs, débrancher le courant électrique et décharger les condensateurs d’alimentation selon les instructions indiquées dans la partie Entretien avant de toucher les pièces. DES PIÈCES CHAUDES peuvent provoquer des brûlures graves.
-
Page 11: Dangers Supplémentaires En Relation Avec L'installation, Le Fonctionnement Et La Maintenance
ACCUMULATIONS risquent de provoquer des blessures ou même la mort. D Fermer l’alimentation du gaz protecteur en cas de non-utilisation. D Veiller toujours à bien aérer les espaces confi- nés ou se servir d’un respirateur d’adduction d’air homologué. LES CHAMPS MAGNETIQUES peuv- ent affecter des implants médicaux. -
Page 12: Proposition Californienne 65 Avertissements
LES FILS DE SOUDAGE peuvent provoquer des blessures. D Ne pas appuyer sur la gâchette avant d’en avoir reçu l’instruction. D Ne pas diriger le pistolet vers soi, d’autres per- sonnes ou toute pièce mécanique en enga- geant le fil de soudage. DES ORGANES MOBILES peuvent provoquer des blessures. -
Page 13: Principales Normes De Sécurité
2-5. Principales normes de sécurité Safety in Welding, Cutting, and Allied Processes, ANSI Standard Z49.1, de Global Engineering Documents (téléphone : 1-877-413-5184, site Internet : www.global.ihs.com). Recommended Safe Practices for the Preparation for Welding and Cut- ting of Containers and Piping, American Welding Society Standard AWS F4.1 de Global Engineering Documents (téléphone : 1-877-413-5184, site Internet : www.global.ihs.com). - Page 14 OM-1500-14 Page 10...
-
Page 15: Section 3 − Introduction
SECTION 3 − INTRODUCTION 3-1. Specifications Type of Input Welding Power Power Source Type 24 Volts AC Constant Voltage (CV) Single-Phase DC With 14-Pin And 10 Amperes Contactor Control 50/60 Hertz Maximum Height With 4 ft (1.2 m) Post Vertical Lift Of Boom SECTION 4 −... -
Page 16: Installing Control Box And Adjusting Tilt
4-2. Installing Control Box And Adjusting Tilt Tools Needed: 3/8 in 4-3. Installing Boom And Reel Support Tools Needed: 3/8, 3/4 in OM-1500-14 Page 12 Weld Control Bracket Screw Bracket and screws are installed onto bottom of control at factory. Swivel Loosen screws. -
Page 17: Installing Wire Guide Extension
4-4. Installing Wire Guide Extension Tools Needed: 3/8 in Wire Guide Fitting Bolt Monocoil Liner Wire Guide Extension Tighten bolt to secure liner in wire guide fitting. Do not overtighten bolt and crush liner. Repeat procedure for opposite side. ST-152 383 OM-1500-14 Page 13... -
Page 18: Equipment Connection Diagram
4-5. Equipment Connection Diagram OM-1500-14 Page 14 Welding Power Source Remote 14 Connection Negative (−) Weld Output Cable Positive (+) Weld Output Cable Workpiece Weld Control Boom Swivel 10 Pipe Post And Base 11 Gas Hose 12 Gas Supply and Regulator (Customer Supplied) Shielding gas pressure not to exceed 100 PSI (689 kPa). -
Page 19: Control Box Connections
4-6. Control Box Connections 4-7. 14-Pin Plug Information Pin* *The remaining pins are not used. Pin Information 24 volts ac with respect to socket G. Contact closure to A completes 24 volts ac contactor control circuit. Circuit common for 24 volts AC circuit. +10 volts dc input from power source to wire feeder with respect to socket D. -
Page 20: Removing Safety Collar And Adjusting Boom
4-8. Removing Safety Collar And Adjusting Boom Tools Needed: 1-1/8 in 4-9. Gun Recommendation Table Process GMAW − Hard or Cored Wires FCAW − Self-Shielding Wires 4-10. Wire Type, Size, And Feed Speed Capability Table Motor Speed Wire Type Standard Standard Standard Optional High... -
Page 21: Installing And Threading Welding Wire
4-11. Installing And Threading Welding Wire Install wire spool. Ad- just tension nut so wire is taut when wire feed stops. Pressure Adjust Install drive rolls. NONCONDUCTIVE SURFACE No Wire Slip Be sure that outlet cable has proper size liner for the welding wire size. When installing gun, position liner extending from outlet wire guide as close as possible to drive rolls with-... -
Page 22: Setting Internal Dip Switches
4-12. Setting Internal DIP Switches When DIP switch positions are changed, the unit must be turned Off and then On again in order for the new settings to be active. DIP switches are only read on power up. OM-1500-14 Page 18 In the DIP switch S1 illustrations, the elevated slider on each switch is shown in white. -
Page 23: Power Source Selection Menu
4-13. Power Source Selection Menu Non-CE Model Shown Program Volts Wire Speed Start Crater Pre/Postflow Sequence * * Power Source Upper Display Deltaweld 452 dELT Deltaweld 302 dELT Deltaweld 652 dELT Dimension 302 Dimension 452 Dimension 652 Dimension 1000 XMT 304 XMT 456 Invision 354MP I354... -
Page 24: Section 5 − Operation
SECTION 5 − OPERATION 5-1. Operational Terms The following is a list of terms and their definitions as they apply to this wire feeder: General Terms: Cold Wire Jog Feeding wire without contactor or gas valve being energized. A portion of the weld program, such as preflow, run-in, start, weld, crater, burnback, and postflow. Sequence Weld Program A group of sequences that make up a weld cycle. -
Page 25: Jog/Purge Switch
5-4. Jog/Purge Switch Pressing the Jog/Purge switch allows the op- erator to jog wire without energizing the weld power or gas valve circuit. The unit provides the ability to jog the wire feeder by means of the gun trigger or the Jog/Purge switch. -
Page 26: Program Push Button
5-6. Program Push Button 5-7. Upper Display To set the correct voltage range for a particular power source, see Section 4-13 for power source selection menu, or Section 5-12 for V-Min And V-Max adjustments. Upper Display The upper display shows voltage or time. The unit displays both preset and actual arc voltage. -
Page 27: Lower Display
5-8. Lower Display Lower Display The lower display shows wire speed or amperage. The unit displays and adjusts only preset wire speed at idle. When the unit is in a welding state, actual wire speed is displayed for the active welding sequence. Lower Display Push Button Press button to choose between wire speed or amperage functions. -
Page 28: Adjust Control
5-10. Adjust Control 5-11. Sequence Push Button Start Crater Pre/Postflow Sequence For more information on Setting Sequence Parameters see Section 6-1. The Sequence push button allows the selection of welding sequences. Five weld- ing sequences are available. The default sequence is the Weld sequence. The Weld sequence is active on power up. -
Page 29: Auxiliary Menus
5-12. Auxiliary Menus Program Start Crater Pre/Postflow Sequence 5-12 Auxiliary Menus (Continued) Reset To Factory Settings A reset menu is displayed if the following four push buttons are pressed simultaneously: Program, Sequence, upper display, and Set- up. The upper display indicates “WIPE” . The lower display indicates “OFF”. - Page 30 5-12 Auxiliary Menus (Continued) Burnback If the Setup push button is pressed, the unit allows burnback time to be set. Burnback time and voltage can be specified when the lower display indicates “BURN” and the upper display indicates the burnback time or voltage.
-
Page 31: Section 6 − Setting Sequence Parameters
SECTION 6 − SETTING SEQUENCE PARAMETERS 6-1. Sequence Parameters In A Program Sequence 1. Preflow 2. Run-In 3. Start 4. Weld 5. Crater 6. Burnback 7. Postflow X = Setting available. Start Time Preflow Time Run-In Start Preflow Trigger Pressed Parameters Volts Seconds... -
Page 32: Section 7 − Setting Dual Schedule Parameters
SECTION 7 − SETTING DUAL SCHEDULE PARAMETERS 7-1. Optional Dual Schedule Switch Diagrams DSS-9 Notes OM-1500-14 Page 28 DSS-8 Maint 2P (Maintained-Contact 2-Pole Switch) Maint 1P (Maintained-Contact 1-Pole Switch) Will not function with trigger hold and dual schedule. A DSS-9 is recommended for this application. -
Page 33: Diagnostics
7-2. Diagnostics Note: The error messages are shown on the upper and lower displays to indi- cate specific errors. Ex- planations are in the text below: Error Indications Error conditions are indicated by LED3 on PC1, PC101, and LED4 on PC70. To view LEDs, turn Off unit, remove wrapper, and turn unit On. -
Page 34: Diagnostics For User Defined Options
7-3. Diagnostics For User Defined Options OPT1 OPT2 Indicates a User Defined Option Error SECTION 8 − MAINTENANCE & TROUBLESHOOTING 8-1. Routine Maintenance 3 Months Replace unreadable labels. Replace Check cracked 14-pin cord. parts. 6 Months Blow out or vacuum inside. -
Page 35: Troubleshooting
8-2. Troubleshooting Trouble Wire feeds, shielding gas flows, but elec- Check interconnecting cord connections. If secure, check cord for continuity and repair or replace (see trode wire is not energized. Sections 4-5 and 4-6). Wire feeder is on, meter(s) do not light Check and reset circuit breaker at welding power source. - Page 36 SECTION 9 − ELECTRICAL DIAGRAM Figure 9-1. Circuit Diagram OM-1500-14 Page 32...
- Page 37 204 144-C OM-1500-14 Page 33...
- Page 38 SECTION 10 − PARTS LIST Hardware is common and not available unless listed. 803 189-C Figure 10-1. Main Assembly OM-1500-14 Page 34...
- Page 39 Item Dia. Part Mkgs....See Note ..... 201 319 .
- Page 40 Item Dia. Part Mkgs....204 722 ..... 134 464 .
- Page 41 Item Dia. Part Mkgs....134 201 ....204 721 .
- Page 42 Hardware is common and not available unless listed. ST-142 306-H Figure 10-3. Boom Assembly OM-1500-14 Page 38...
- Page 43 Item Part Figure 10-3. Boom Assembly (Figure 10-1 Item 13) ... . 010 313 Pin, Cotter Hair .072 X 1.437 ... . 010 910 Washer, Flat Stl Sae .375 .
- Page 44 Hardware is common and not available unless listed. See Table 10-1 For Drive Roll & Wire Guide Kits Item Dia. Part Mkgs. Figure 10-4. Drive Assembly, Wire (Figure 10-1 Items 26 and 30) ....010 668 .
- Page 45 Item Dia. Part Mkgs. Figure 10-4. Drive Assembly, Wire (continued) ..... 184 136 ....155 098 .
- Page 46 Item Part Figure 10-5. Support, Hub and Reel (Figure 10-1 Item 10) ..058 427 Ring, Retaining Spool ..136 684 Nut, Stl Slflkg Hex Reg .625-11 W/Nyl Insert .
- Page 47 Table 10-1. Drive Roll and Wire Guide Kits Wire Size Metric Fraction .023-.025 in. 0.6 mm 150 993 149 518 .030 in. 0.8 mm 150 993 149 518 .035 in. 0.9 mm 150 993 149 518 .040 in. 1.0 mm 150 993 149 518 .045 in.
- Page 49 Notes Start Your Professional Over 80,000 trained 400 Trade Square East, Troy, Ohio 45373 Welding Career Now! since 1930! 1-800-332-9448 www.welding.org...
- Page 51 Warranty Questions? LIMITED WARRANTY − Subject to the terms and conditions Call below, Miller Electric Mfg. Co., Appleton, Wisconsin, warrants to 1-800-4-A-MILLER its original retail purchaser that new Miller equipment sold after the effective date of this limited warranty is free of defects in for your local material and workmanship at the time it is shipped by Miller.
- Page 52 File a claim for loss or damage during shipment. For assistance in filing or settling claims, contact your distributor and/or equipment manufacturer’s Transportation Department. 2007 Miller Electric Mfg. Co. 2007−01 Miller Electric Mfg. Co. An Illinois Tool Works Company 1635 West Spencer Street Appleton, WI 54914 USA International Headquarters−USA...